A novel method for solving shortest tool length based on compressing 3D check surfaces relative to tool postures
Xiangyu LI, Junxue REN, Ximing LV, Yuke ZHOU, Congle LIU
Key Laboratory of High Performance Manufacturing for Aero Engine (Northwestern Polytechnical University), Ministry of Industry and Information Technology, Xi’an 710072, China
KEYWORDS CNC;Compressed check surface;Multi-axis machining;Shortest tool length;Silhouette curve;Tool holding system
Abstract Solving the shortest tool length quickly under a known tool trajectory in multi-axis machining of complex channel parts is an urgent problem in industrial production.To solve this problem, a novel and efficient method is proposed which is featured by extracting only a few necessary curves from the check surface instead of sampling the entire surface. By rotating and compressing the 3D check surface relative to all tool postures,the boundaries of the area occupied by the 2D compressed surfaces are the essential elements for determining the shortest tool length.A tracking-based numerical algorithm is introduced to efficiently solve the silhouette curves which are formed in compressing.To define the multi-taper shaped tool holding system(THS)which is commonly used in production,a characterization model for THS profile is established.A model for solving the shortest tool length is finally constructed based on the critical interference relationship between the THS profile and all compressed boundary curves.For acceleration,the boundary splines are segmented according to their knot vectors.Then a new concept called the axis-aligned tool length box(AATB)is introduced,which can provide a conservative range of tool length for a spline segment.By scanning the AATBs of all spline segments,the very few effective spline segments that may ultimately determine the shortest tool length are filtered out.This acceleration method makes the solution for the shortest tool length more focused and efficient.The results of experimental examples are also reported to validate the efficiency and accuracy of the proposed algorithm.
1. Introduction
With the advanced design concepts, more and more complex channel parts enclosed by free-form surfaces are adopted in modern turbomachinery, such as the blisk in aero-engine and the closed impeller in gas-turbine. Multi-axis CNC machining has been the exclusive means for manufacturing this kind of part owing to its unique capability of continuously changing the tool orientation. However, the interference-free cutter which can reach the deepest part of the channel has to be thin and long,1as illustrated in Fig.1(left).As a result,the cutter is too weak in stiffness and thus extremely susceptible to deflection,2,3vibration4,5and wear,6,7which is particularly worrisome as it often severely reduces the cutting efficiency8–10and undermines the geometric accuracy of the final machined part.11,12To strengthen the cutter stiffness in multi-axis machining,especially for hard-to-cut materials,in general,current research adopts two natural strategies:shortening the tool length of the entire tool path or optimizing the tool shank shape.13–15Compared with the latter, the former strategy is more economical and easier to implement in practice. Hence,the shortest tool length is preferred and widely adopted in practice. Besides, the shortest tool length is also considered as an important factor in scheduling the tool sequence,as well as optimizing tool axes.16
Quickly solving the shortest tool length with a reference tool trajectory has always been an urgent problem in industrial production. Generally, an ordinary multi-axis machining program contains hundreds or even thousands of tool postures,if we try to calculate the exact shortest tool length of each posture one by one, it will require a large number of interference checking operations. Such a heavy calculation load often makes the task of solving shortest tool length very timeconsuming (even up to hundreds of minutes), which far exceeds the expectation of programmer (preferably in a few minutes). An easier way in practice is, based on the programmer’s experience about the structure of the channel, choosing those tool postures located in deepest part of the channel to participate in calculation, as they are considered most likely to ultimately determine the shortest tool length. Then the initially obtained shortest tool length will be updated until all postures are just interference-free.This approach is less robust because of its heavy reliance on human experience. Even so,the computing efficiency is still unacceptable, especially for the complicated tool holding system.To further reduce the calculation load,one conservative approach is designing a simple safe geometry(e.g.,the safe cylinder in Fig.1(left)),or bounding box) to replace the complex check surfaces in interference detection. However, the conservative tool length is often too long which may severely reduce the tool stiffness,just as shown in Fig.1(left).Conceivably,if a smaller and more complicated tool handle(e.g.,the conical tool handle which is gaining popularity in manufacturing) is adopted and allowed to enter the channel,the tool length may be significantly reduced,as shown in Fig. 1(right). In fact, besides tool handle, the spindle or other related geometries of machine tool may also restrict the shortest tool length in some special cases. Therefore, to ensure the calculated shortest tool length more reliable, the actual shape of the tool handle, spindle, and other related geometries have to be fully considered. Certainly, it will require much more computing resources.
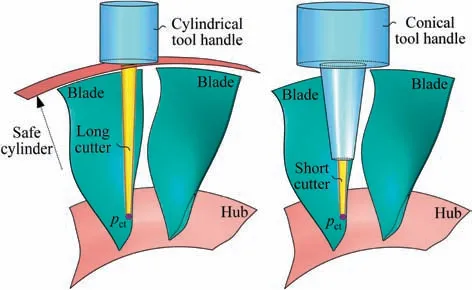
Fig. 1 A long cutter with cylindrical tool handle (left) and a short cutter with conical tool handle (right).
Regarding efficiently calculating the shortest tool length itself, some key works, though not too much, focusing on this problem is perhaps worthwhile to review. Inui et al.17–19proposed a method to calculate the shortest tool length in 3-axis and 5-axis machining. The length was derived by computing the distance between the cutter location points and an offset shape of the workpiece by the inverted zero-length cutter(i.e., the Minkowski sum shape). As the operations of offsetting workpiece and measuring minimum distance need a large number of calculations, the method is inefficient. Besides, the method is limited in dealing with the simplest cylindrical tool handle.Also,Kaneko and Horio20implemented a similar algorithm. Lee et al.21used a hybrid model which is composed of the Z-map model and the Triangulation model to inspect the collision caused by tool holder,then they applied an increment method to find the optimal tool length. Different from these studies, Ahmed and Chen22used the technology of Kd-tree to gradually remove most of the irrelevant geometric elements,i.e., the discretized triangular patches. As a result, the efficiency of calculating the shortest tool length was improved.Actually, in essence, solving the shortest tool length is still the problem of interference detection. Detection of the minimum distance23is the most commonly used method.To generalize the method to different complex geometries, both the obstacle surface and the tool handle have to be discretized into simple geometric elements, such as points, line segments, and triangular patches. By judging the minimum distance between the tool handle and the obstacle surface against the safe value,the shortest tool length can be obtained. Because the topological relationship between two sets of discrete geometries no longer needs to be concerned, hence,the simplicity and strong robustness are the significant benefits of this method. On the negative side, the calculation amount is typically huge (e.g.,millions of points),as a result,the calculation speed and accuracy are heavily dependent on discrete methods. This type of operation is most suitable for running on a graphics processing unit (GPU) with many simple processors. For example, Bi et al.24,25and Wang et al.26,27adopted GPU to accelerate the solution of the shortest tool length. However, testing all discretized points on the check surface in the above methods is not the best choice. Conceivably, most of the sampling points are radially away from the tool axial line and are impossible to determine the shortest tool length.
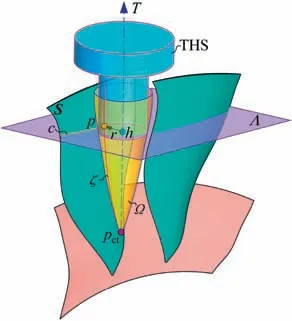
Fig.2 Revolving space formed by rotating check surface around tool axial line.
A complete tool holding system (THS) contains tool handle, spindle, and other related geometry bodies. Generally,THS is a revolving body with respect to the tool axial line. It is noticed that the tool length is minimum when THS is just contacting with check surfaces at a critical point p, as shown in Fig.2.Let h be the axial height of p from the cutter tip point pct. The plane crossing p and perpendicular to tool axis T is denoted as Λ. The intersection curve of plane Λ and channel surfaces S is denoted as c. Actually, the critical point p is the closest point on curve c to the tool axial line and the minimum distance is exactly the radius r of THS at p. Actually, r and h are more important than the specific position of p on the curve c for solving the shortest tool length. On the other hand, all points on c except p are far away from the tool axial line.Theoretically, these points are useless for solving the shortest tool length and should be abandoned to reduce the computational burden. Hence, searching the critical point is a breakthrough for efficiently determining the shortest tool length, which is also the innovation of this paper.
Imagine that if we rotate the check surface S around the tool axial line,then the formed revolving space Ω is the design space of tool and THS.Obviously,the meridian ζ of Ω is made up of all critical points. Therefore, our idea about solving the shortest tool length is: adjusting the tool length to make the THS profile is just contacting with the meridian of the revolving space of check surface, the resultant tool length is the shortest. Some research works also mentioned the revolving space. Kim28introduced a concept of safe space between the tool axis and the check surface under a known tool path.Chaves-Jacob et al.29proposed the concept of Adapted Tool Shape and used it to optimize the cutter shape in flank milling to reduce the machining error. However, their description of solving the revolving space is simplified. To achieve the best conical cutter with maximum stiffness, a similar concept of Cutter Profile Design Space (CPDS) was also proposed in our previous research.13Unfortunately, none of the above three works concern about the problem of solving the shortest tool length.
In a different note, considering the shortest tool length is the global minimum for all tool postures in a tool path. The bottleneck tool postures that restrict the global shortest tool length are rarely, especially for those huge NC programs.Chiou et al.16also noticed this phenomenon. They shortened the global shortest tool length by adjusting the tool axes of those bottleneck tool postures. Hence, calculating the exact shortest tool lengths of every tool posture one by one is inefficient and meaningless.Because most of them will eventually be replaced by the minimum one. Inspired by this idea, filtering out the few effective meridians of all revolving spaces will accelerate the process of solving the global shortest tool length(see Section 3 for the details).Motivated by the lack of an efficient algorithm for calculating the shortest tool length in a complex channel enclosed by freeform surfaces, to fulfill the need, we present a novel solution with fully considering the actual shape of THS.The main components,as well as the contributions of our solution,are as follows:
●Given a tool posture, by rotating and compressing a check surface with respect to the tool axial line, the boundary curves of the 2D compressed surface are the necessary elements to determine the shortest tool length.Then,a numerical tracking algorithm is presented to efficiently trace out the silhouette curves, which are newly formed boundaries in compressing.
●To define the multi-taper shaped THS which is most commonly used in industry,a generic model of tool holding system is proposed. Based on the critical interference relationship between the THS profile and all compressed boundary curves, the model for solving the shortest tool length is established.
●To accelerate the solution, these compressed boundary splines are divided into spline segments according to their knots.Then,we propose a new concept of axis-aligned tool length box (AATB) for a single spline segment, which can be quickly obtained by taking advantage of the convex hull property of NURBS spline. Based on all AATBs, the very few effective spline segments which might ultimately determine the shortest tool length can be quickly filtered out.
The remainder of this paper is organized as follows. In Section 2, we present the model for solving the shortest tool length based on the THS profile and all boundary curves of the compressed check surface. Also, an efficient algorithm for tracking the silhouette curves is introduced herein. Next,in Section 3, by filtering out the very few effective boundary spline segments, a novel acceleration method for solving the shortest tool length is proposed. Section 4 reports the detailed results and discussions of examples. Finally, we conclude the paper in Section 5.
2. Model for solving the shortest tool length
As already alluded,when the THS is just contacting the check surfaces for all postures, the tool length is minimum. According to this strategy, we will build the model of solving the shortest tool length in this section.Specifically,a generic model of tool holding system and the method for extracting the boundaries of compressed check surfaces are needed and will be described as follows.
2.1. Characterization model of generic tool holding system
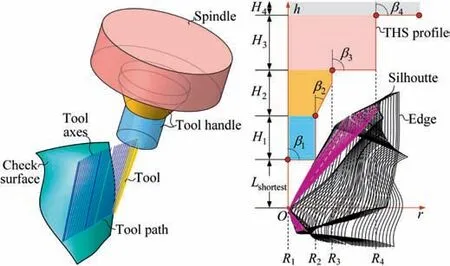
Although there are many types of THS in industrial production, most of them are multi-taper shaped and their profiles are composed of line segments (Note: those very special profiles are not considered in this article, e.g., spline and conic curve), as shown in Fig. 3 (left). Taking the cutter tip point pctas the origin of a two-dimensional cutter coordinate system,the tool axial line as the h-axis and the radius of THS as the raxis,then the THS profile can be characterized by multiple line segments which make the THS radius is monotonically increasing along the tool axis, as illustrated in Fig. 3(right).Obviously,the height of the THS profile is the function of tool length L and can be abstractly expressed as Γ(L). Let us describe the characterization of Γ(L) as follows.
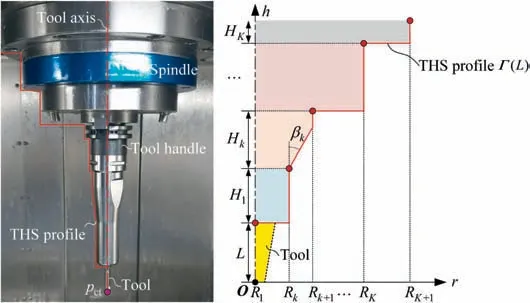
Fig. 3 An actual THS (left) and characterization of THS profile in cutter coordinate system (right).
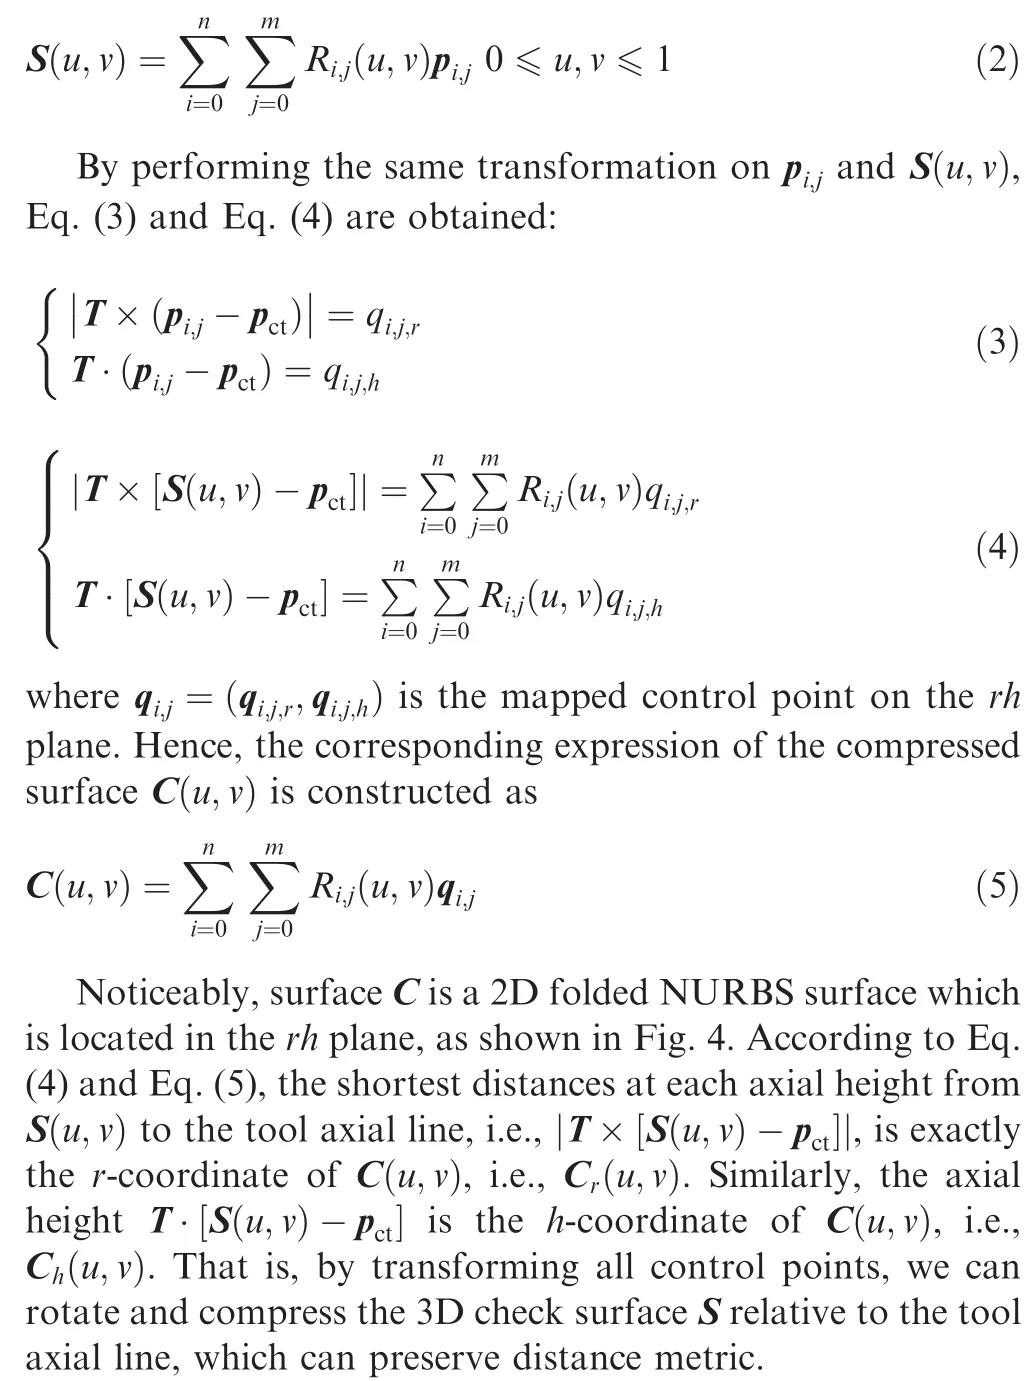
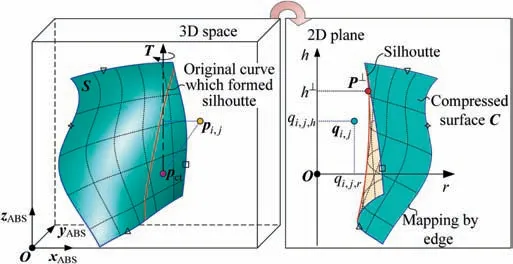
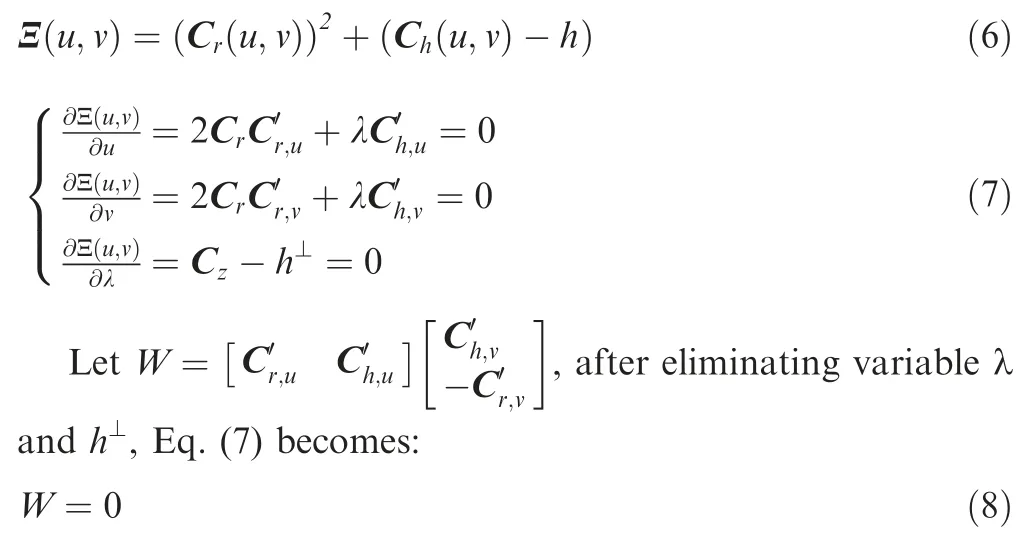
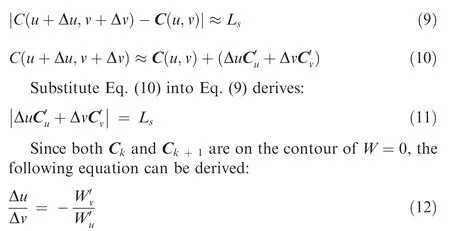
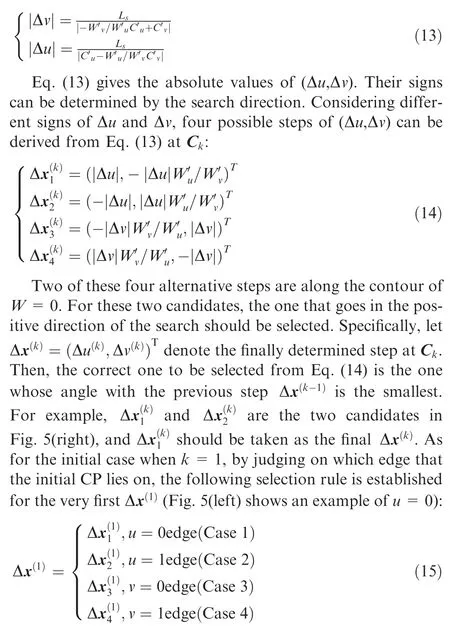
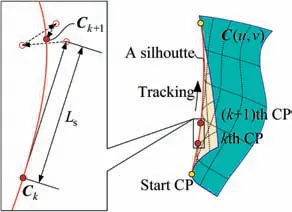
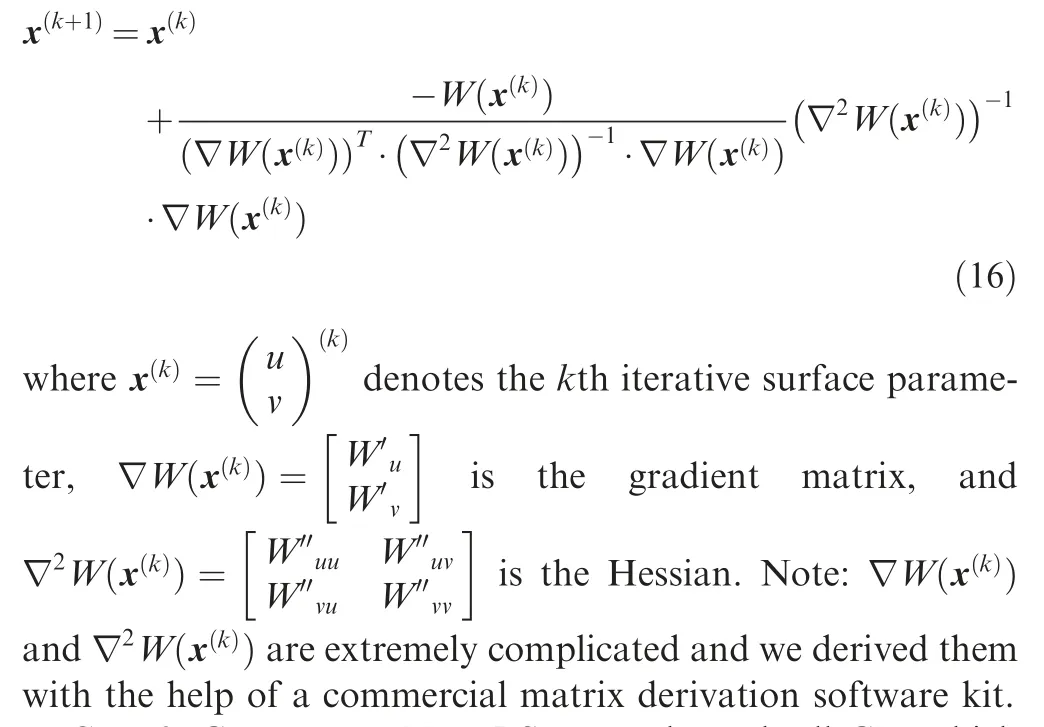
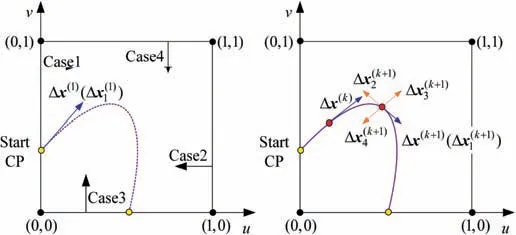
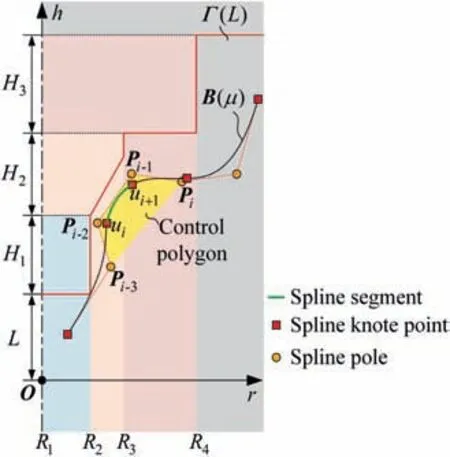
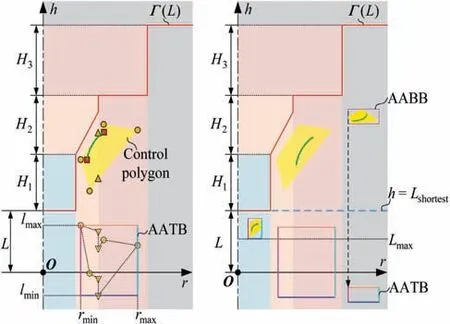
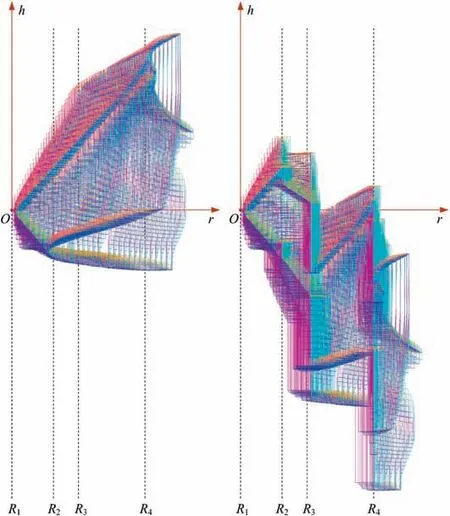
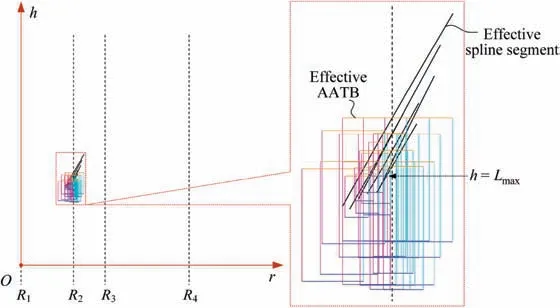
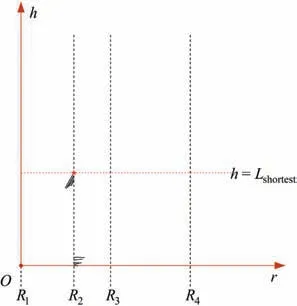
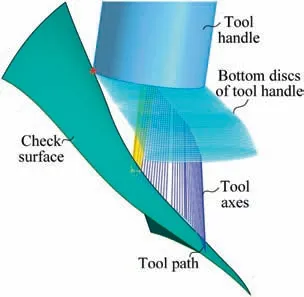
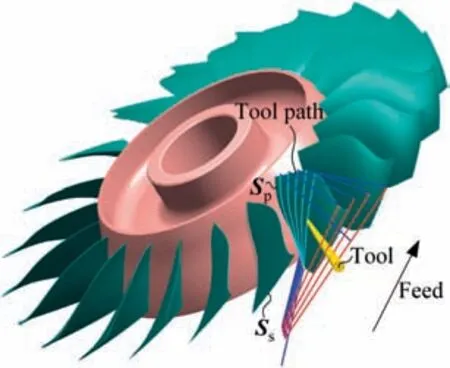
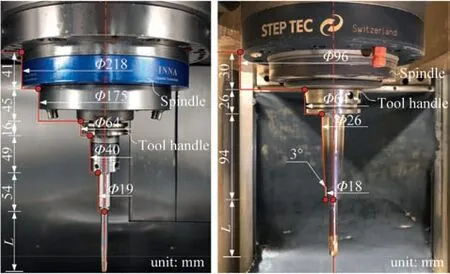
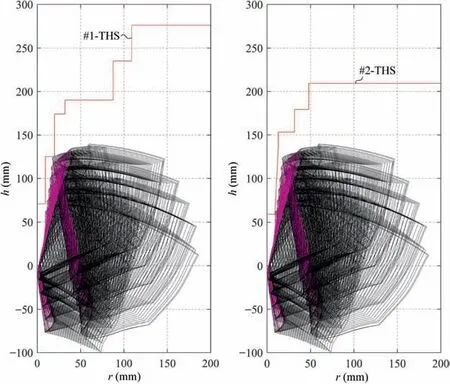
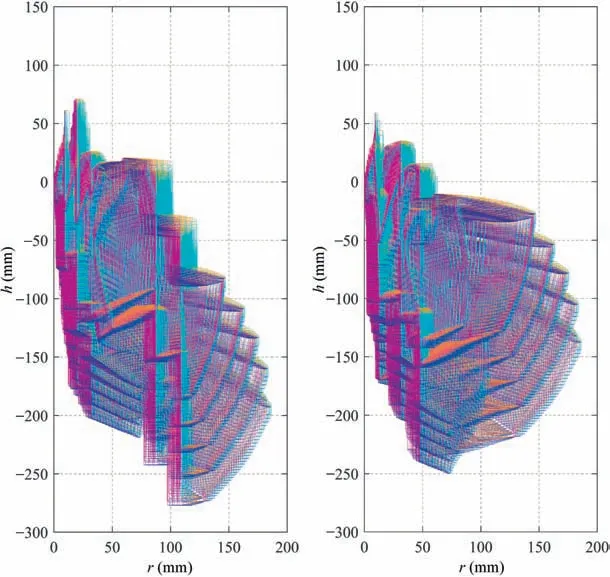
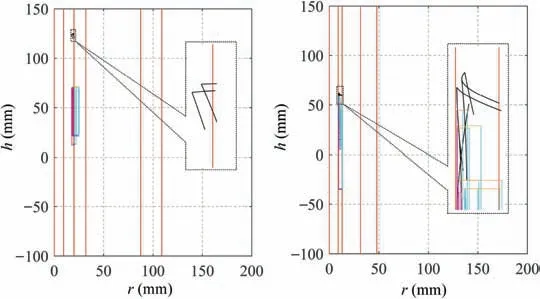
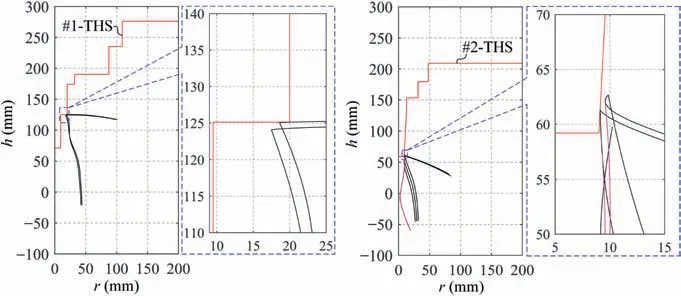
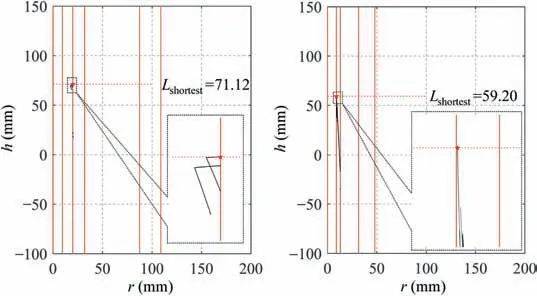
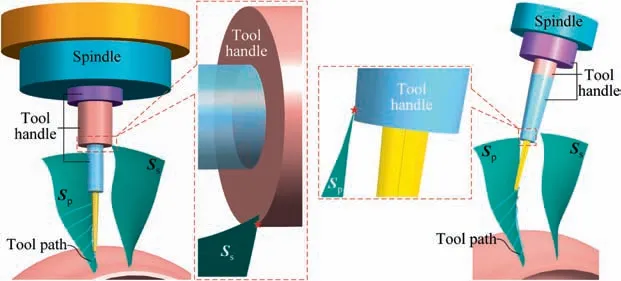
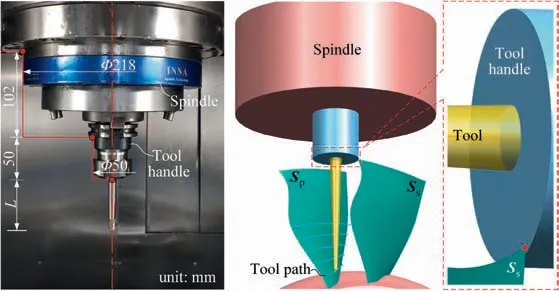
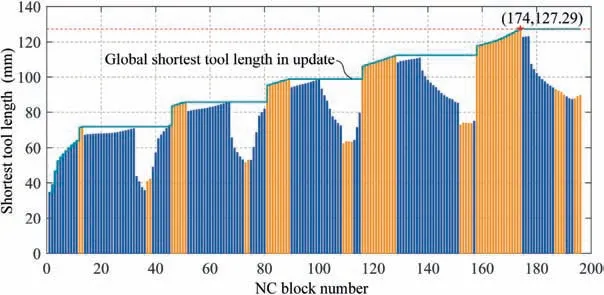
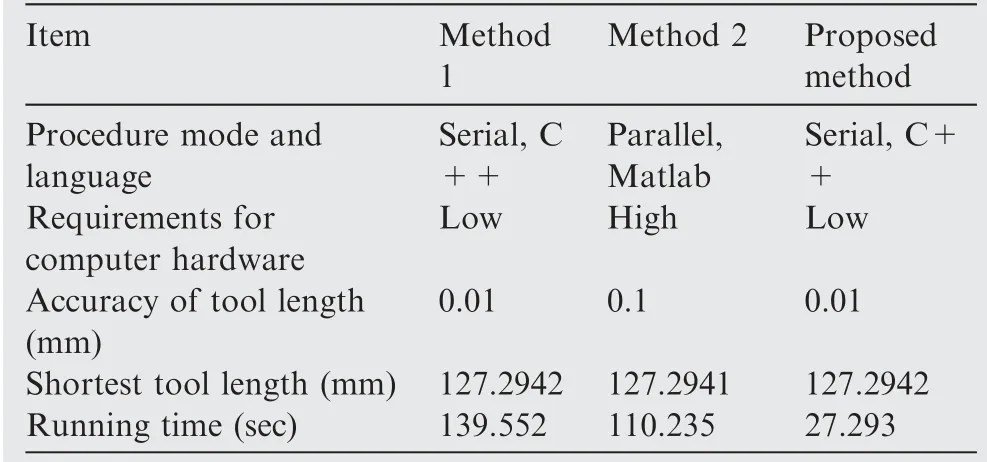
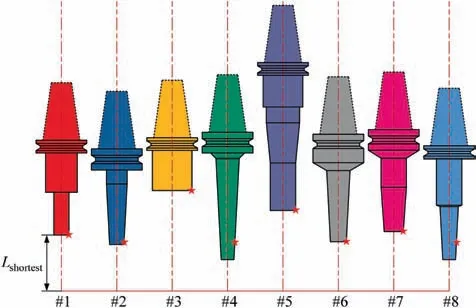
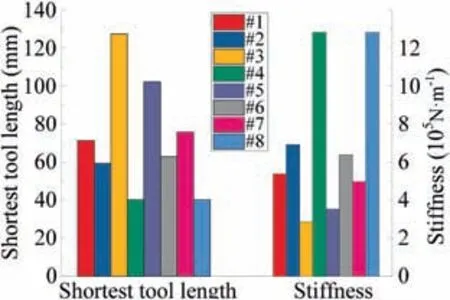
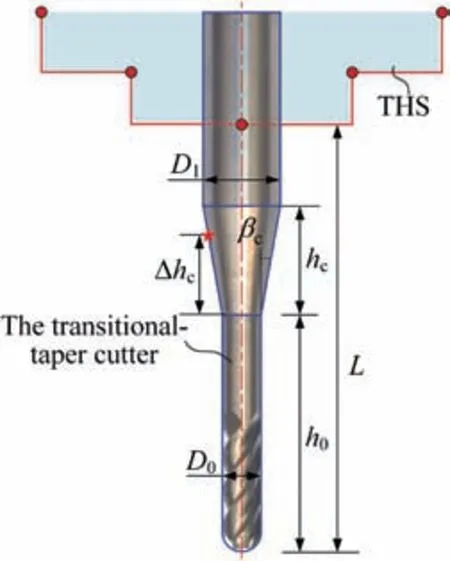
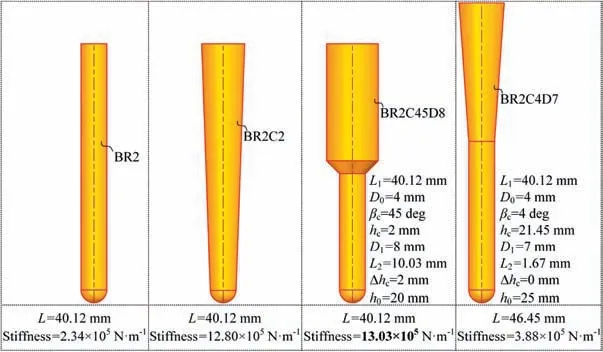
The distribution of r-coordinate for all endpoints of Γ(L)segments is {R1,R2,...,Rk,...,RK,RK+1}, where 1 ≤k ≤K, Rk Since Γ(L)can only move along the h-axis,to facilitate the description of the filtering method in Section 3, the line r=Rk(i=1,2,...,K) is called a transboundary line of THS profile, and the area of Rk As already explained in the introduction, the meridian of the revolving space formed by rotating the check surface relative to the tool axial line is the key element for solving the shortest tool length.It is noticed that the meridian is formed from a few special curves on the check surface.This property can be guaranteed for the channel parts in aero-engines because their enclosed surfaces are always free-from and typically very smooth. Let us describe the compressing method and a tracking-based algorithm for efficiently solving the meridian. 2.2.1. Rotating and compressing check surface relative to tool posture Referring Fig. 4, the smooth surface S is one of the original check surfaces. Normally, S can be represented as a NURBS surface and can be written as Eq. (2) (see the Eq. (4.13) in30),{ pi,j} are its control points. A known cutter posture (pct,T)is defined by the cutter tip point pctand the unit tool axis vector T. In fact,we are most concerned about the boundaries of the area occupied by the compressed surface. Because only these boundaries participate in determining the shortest tool length,while the interior points of the area are not. That is the main reason why the method of sampling the entire check surface is inefficient. A compressed surface usually has two types of boundaries, i.e., the four edges and some silhouettes which are newly formed in the compressing process. The edge curves can be easily extracted based on the surface equation and omitted here.As for the silhouettes,any point on it is called a characteristic point (CP). On the compressed surface C, CP is the closest perpendicular point to the h-axis with current axial height. Then, the silhouette curves (i.e., all CPs) need to be searched out and will be presented in the next section. Fig. 4 A check surface is rotated about tool axial line and compressed into a 2D folded surface. 2.2.2. Tracking silhouette curves Generally,a silhouette curve starts from and ends at the edge of the compressed surface,which is denoted as a type I silhouette.However,it could happen(though extremely rare)that a silhouette curve entirely lies in the interior of the compressed surface,and this kind of silhouette is denoted as a type II silhouette.The details of efficiently tracking for silhouettes on parametric surface C(u,v),i.e.,C(u,v)=[Cr(u,v)Ch(u,v)]T,will be presented as follows. To ensure the calculated CPs are uniformly distributed (within the given tolerance) on the silhouette curve,let Ls(e.g., 0.01 mm) be the minimum Euclidean distance between any two neighboring CPs on the silhouette. (1) Geometric property of the silhouette curve For any CP P⊥(Cr(u,v),Ch(u,v)) on silhouette with tool axial height h⊥, it should satisfy the condition of ‘‘the closest perpendicular point”. To describe it, we construct a Lagrange-form function, as in Eq. (6), where variable λ is the Lagrange multiplier. With this combined form, the CP should satisfy the extreme condition of Eq. (6), as given in Eq. (7). Obviously, for any potential CP on surface C, if it lies on the silhouette curve,its parameter(u,v)must satisfy the condition W(u,v) = 0. (2) Tracking for type I silhouette Since any type I silhouette begins and ends at some boundary edges of C(u,v), we will numerically construct the type I silhouette curve by the following procedure: Step 1: Find the starting CPs on the edges of the compressed surface. All starting CPs can be found by the following strategy.Divide each edge of surface C(u,v) into enough intervals.The interval size is no more than Ls. If the signs of W(u,v)are different at the two ends of one specific interval, then this interval is considered containing a starting CP(here we made a reasonable assumption:there will be at most one starting CP in an interval owing to the smallness of Ls). The accurate target CP will be found out by the binary searching method. In contrast,the remaining intervals need to be further tested.The test method is:randomly sample Ls/ε points in the test interval(ε is the required displacement accuracy of the linear axes of any typical multi-axis CNC machine tool, e.g., 10-3mm); if the signs of W(u,v)at two neighboring sample points are different,then their midpoint is a starting CP within the tolerance. Step 2: Track an entire type I silhouette. Randomly pick a starting CP as an initial point for iteration, the tracking procedure towards the interior of C(u,v) is then executed to trace out the entire type I silhouette. In general, the tracking will stop at another starting CP which also lies on one edge of C(u,v). The two starting CPs then are marked as ‘‘searched”. The iterative tracking process from an obtained CP Ck(u,v) to the next CP Ck+1(u+Δu,v+Δv) is performed in two steps: Step 2.1: Initial search along the contour of W=0 by step Ls. To restrict the search length, the Euclidean distance between the current CP Ckand the next one Ck+1is set to be Ls, thus we have Eq. (9). Expanding it into Taylor series and omitting the second-order term and after, yields Eq.(10): Substituting Eq. (12) into Eq. (11), then Eq. (13) is obtained. After Step 2.1,in general,due to the omission of the second and all the higher-order terms in Eq. (10), the actual W(u+Δu(k),v+Δv(k)) does not equal to zero in general, as shown in Fig.6.To ensure the correctness and quality of tracking, we need to further search from (u+Δu(k),v+Δv(k)) to a more accurate Ck+1, which is Step 2.2. Step 2.2: Accurate search along the gradient of W by an iterative method. Taking (u+Δu(k),v+Δv(k))(which is obtained in Step 2.1)as the initial point, we employ the well-known twodimensional damped Newton method to accurately track a neighboring CP that meets the condition W=0, as shown in Fig.6.This Newton method is well known for its quadratic convergence.The iterative formula for the propagation of surface parameter (u, v) is given in Eq. (16). Using this formula,the exact parameters of the next CP can be obtained after a few iterations under a given threshold of accuracy: Fig. 6 Tracking type I silhouette on compressed surface. Step 3: Construct a NURBS curve through all CPs which are searched in Step 2.The simple chord length method which is described in30is adopted here (the details are omitted here).As a result, this curve is an identified type I silhouette curve. Step 4: Repeat Step 1 to Step 3 until all starting CPs are marked as ‘‘searched”. It indicates that all type I silhouette curves have been found. (3) Tracking for type II silhouette Normally,type II silhouettes rarely appear in smooth channel surfaces, such as the aero-engine parts. We numerically search and construct type II silhouettes by the following simple procedure: Fig. 5 Determination of searching step: initial tracking (left) and intermediate tracking (right). a. Sample the compressed surface into a dense set of points based on some controlling tolerance.Then surface C and its uv domain are divided into many patches based on these sample points. We reasonably assume that there is at most one CP in each patch. b. Identify the patches containing a type II CP. If the W signs of the four corner points of a patch are not the same with each other,which illustrates that the existence of a type I CP or a type II CP in this patch, then the patch is marked. Remove those patches crossed by the type I silhouettes from all the marked patches. As a result,the remaining patches are identified as containing type II CP. c. Taking the midpoint of any identified patch as the initial point, we still employ the damped Newton method to accurately search for an interior type II CP that meets the condition W=0. Starting from this initial CP, the tracking process of Step 2 in Section 2.2.2 will be executed and eventually stop once a loop (i.e., a type II silhouette) is formed. Similarly, execute Step 3 in Section 2.2.2 and construct a type II silhouette curve.Next, remove the patches crossed by the obtained silhouette. d. Repeat (c) until there is no marked patch containing type II CP,which means all type II silhouettes have been found. So far, all the boundary curves of the compressed surface are obtained, including the edges and the newly formed type I and type II silhouettes. As explained previously,a combination of a tool posture and a check surface corresponds to a 2D compressed surface.Referring Fig. 7(left), given a channel enclosed by M freeform surfaces (i.e., the check surfaces) and a toolpath containing N non-interference tool postures, by the means in Section 2.2, a total of M×N compressed surfaces are obtained and accompanied by s boundary curves Bi(μ), i = 1,2,...,s,s ≥4×M×N, μ is the curve parameter. In the example shown in Fig. 7, M=1, N=34, s=170, there are 34×4=136 compressed edges and 34 compressed silhouettes(all are type Ⅰ). If the THS profile is just contacting with Bi(μ) (see Fig. 7(right)),it means the THS is also just contacting with the check surfaces. As a result, the current tool length is exactly the shortest tool length Lshortest, as given in Eq. (17): Eq. (17) is an abstract expression, let us present a clearer form which is easier to implement in below. Sampling Bi(μ)into a dense set of points based on some controlling tolerance,let bi,p(Bi,p,r,Bi,p,h) be the pth sample point on the boundary curve Bi(μ), p = 1,2,...,ni, niis the number of samples. If Rk Eq. (18) is the mapping from any boundary point to the tool length restricted by itself. Obviously, it is an important basis for determining the shortest tool length. Substitute Eq.(18) into Eq. (17), Lshortestcan be intuitively expressed as: Eq. (19) is exactly the model for solving the shortest tool length with a given tool trajectory in a complex channel,which is based on the THS profile is just contacting with all boundaries of compressed surfaces. Although we have found out all necessary boundaries of compressed surfaces in advance,the operation of sampling boundaries in Eq. (19) still needs a lot of calculation resources.Actually, referring Fig. 7(right), we can draw an interesting observation:only part of the outermost envelope of all boundaries are possible to ultimately determine the shortest tool length while most of the internal boundaries are not. Trying to obtain the complete envelope curve is not wise, because many time-consuming calculations still need to be processed,such as solving the exact intersection points between splines.To accelerate,we turn to filter out the very few effective spline segments from all boundaries. Fortunately, the strong convex hull property of NURBS spline can be used for just that. Let us describe the details. Fig. 7 Solving shortest tool length of a known tool path (left) based on all compressed boundaries (right). (Compressed edges are colored by black and compressed silhouettes are colored by pink). 3.1.1. Boundary spline segment For a compressed boundary B(μ), it can be defined by a 3thdegree NURBS curve and expressed as: where μ is the curve parameter, {Pi} are the n + 1 control points, {wi} are the weights, {Ni,3(μ)} are the 3th-degree B-spline basis functions defined on the nonperiodic (and nonuniform) knot vector U = {0,0,0,0,u4,u5,...,un,1,1,1,1}. Then B(u) will be split into n + 1 spline segments according to its knot vector. As a result, the spline segment is the basic unit for filtering. According to the strong convex hull property of NURBS curve,30that is, if u ∈[ui,ui+1), then B(μ)lies within the convex hull of the four control points Pi-3,Pi-2,...,Pi(i.e., the control polygon), as shown in Fig. 8. For a spline segment, let rminand rmaxbe the left and right limits of its control polygon, respectively. Given a specific THS, if both Rk Fig. 8 A spline segment and its control polygon. 3.1.2. AATb If we directly use the irregular control polygons to filter the effective spline segments,it will require a large number of polygon intersection operations,which is too complicated and inefficient.The Axis-aligned Bounding Box(AABB)of the control polygon is a useful and efficient filtering tool although it only works for the multi-cylindrical THS(such as the one in Fig.15(left)).To apply to the more generic THS which contains conical tool handles, inspired by the idea of AABB, here we propose a new concept which can give a conservative range of tool length for a spline segment: the axis-aligned tool length box(AATB) of control polygon. For an AATB,rminand rmaxare also its left and right limits,respectively. Here, let lmaxand lminbe the maximum and minimum values of the shortest tool length determined by the control polygon of spline segment, respectively. Referring Fig. 9(left), lmaxand lminare also the upper and lower limits of the AATB, respectively. To avoid visual confusion, an AATB is displayed by a four-color box (the left, right, upper and lower lines are colored by pink,cyan,orange,and blue,respectively.)Obviously, AATB is determined by the positions of control polygon relative to Γ(L). Noticeably, without a specific THS, AATB cannot exist independently. For a known spline segment, rminand rmaxare easy to obtain while lminand lmaxneed to be calculated by the following steps: Step 1: According to Eq. (18), calculate the shortest tool lengths respectively determined by the four control points of the control polygon. Step 2: If the spline segment is type II, then perform this step; otherwise, go to Step 3. Since the convex hull of type II spline segment crosses the multiple influenced ranges of the THS profile segment, it is necessary to additionally solve all the intersection points between the control polygon and the transboundary lines of THS profile (i.e., r=Rk,k=1,2,...,K).Referring Fig.9(left),the two upward-pointing triangles on the control polygon are the intersection points.Next,calculate the shortest tool lengths determined by the left and right limit points of intersection points respectively. The hcoordinates of four downward-pointing triangles in Fig.9(left)reflect the mapped tool lengths. Fig.9 AATB of control polygon(left)and filtering the effective AATBs (right). Step 3: The minimum and maximum values of all shortest tool lengths solved in Step 1 and Step 2 are lminand lmax,respectively. The h-coordinate of AATB can be used to directly and consistently reflect the shortest tool lengths determined by different spline segments. In other words, relative to all AATBs, it can be considered that the complicated THS profile(no matter the multi-cylinders,the multi-tapers,or the mixture of the first two) has been transformed to be a horizontal line h=Lshortest,as shown in Fig.9(right).As a result,AATB can be utilized to quickly filter out the effective spline segments. By carefully observing Fig.9(left),we can get such a conclusion: the height range of AATB of a type II spline segment is conservative. Specially, if the spline segment is located within the (k+1)th to the qth influenced ranges, then the lmaxof the current AATB is ‘‘false high” because the ‘‘real” upper limit of the spline segment should be lower than lmax.However,to further carefully distinguish this special case is unnecessary and skipped here,as it does not miss the correct effective spline segments. For the example shown in Fig. 7, the AABBs and AATBs of all boundary spline segments are illustrated in Fig. 10(left)and Fig.10(right),respectively.Although both of them are displayed by the four-color boxes, their shapes may be different.Specifically, only for the type I spline segment in the special case, i.e., the spline segment is completely located in a single influenced range of cylindrical THS profile segment, dose its AATB and its AABB have the same shape, for example, the rightmost spline segment in Fig. 9(right). Certainly, this conclusion can also be inferred from Eq. (18). Compared with AABB, AATB is more applicable because it is applicable for multi-taper shaped THS (including multi-cylinder, multitaper, and cylinder-taper mixed). The filtering criterion for effective boundary spline segments is:let Lmaxbe the maximum lminof all AATBs,if an AATB satisfies lmax>Lmax,then the corresponding spline segment is effective, that is, it is possible to ultimately determine the shortest tool length. According to the above criteria, all effective AATBs and spline segments for both type I and type II will be quickly filtered out. Note: it may conservatively filter out the extremely few ‘‘false” effective type II spline segments. By applying the above criterion,the effective AATBs of the example shown in Fig. 7 are illustrated in Fig. 11. From the zoomed figure, it can be observed that all horizontal orange lines (i.e., lmaxof effective AATBs) are higher than the highest horizontal blue line h=Lmax(i.e., the maximum of lminfor all effective AATBs). Remarkably, the number of effective AATBs is very small (i.e., 28) compared to that one (i.e.,5560)in Fig.10.By tracing the forming process of these effective spline segments,we can find they come from six boundary curves(i.e.,three edges and three silhouettes),and the number only accounts for 3.53% of the total number of all boundary curves. Further tracing, these six curves come from only three tool postures. Evidently, only very few tool postures and very small areas on the check surface are effective to ultimately determine the shortest tool length. Besides that, it is conceivable that the number of effective AATBs and spline segments will stay at a small level even though the number of tool postures may increase dramatically(the results of several tests can confirm it). In other words, this acceleration method is welltargeted and robust. Fig. 10 AABBs (left) and AATBs (right) of all control polygons. Fig. 11 All effective spline segments and AATBs. Fortunately, the required accuracy of the shortest tool length in industrial production is relatively low, e.g., 0.1 mm. As the identified effective spline segments are very few and short,hence, we adopted the simple sampling strategy already mentioned in Section 2.3 to solve the exact shortest tool length according to Eq. (18). Certainly, the distance between two neighboring sample points should not exceed the required accuracy. The mapped tool lengths of all sample points are shown by the black solid curves in Fig. 12. As a result, the h-coordinate of the highest mapped point (e.g., the red star in Fig. 12) is the shortest tool length Lshortest. We can draw several interesting observations from Fig.12.One is the tool length has a jump near the line r=R2. The main reason is,for the given THS profile in Fig.7(right),there is a height difference H1between the end-point of the non-vertical part of 1th segment and the start-point of the non-vertical part of the 2th segment. Another interesting phenomenon is that the shape of mapped tool lengths who satisfies R2 Fig. 12 All mapped tool lengths of sample points on effective spline segments. 3.4.Tracing critical interference information in machining scene Noticeably, the highest mapped point in the 2D rh plane can reflect the critical interference information in the 3D machining scene with the shortest tool length. By carefully tracing the formation process of the highest point,the following items are clear:the riskiest tool posture,the critical interference position, which check surface and which area (edge or the interior silhouette)participate in forming the critical interference point,which part of the THS restricts the shortest tool length, etc.Tracing and analyzing the example in Fig. 7, it is clear that the 1th tool posture is the most dangerous.Besides,the bottom disc of tool handle is just touching the unique check surface at one edge, which restricts the shortest tool length. These judgments are consistent with the actual state in the 3D machining scene, as illustrated in Fig. 13. Of course, the traced interference information can be applied to adjust those bottleneck tool axes (just like the approach in16) or modify the shape of the tool handle to shorten the global shortest tool length. Fig. 13 Tracing riskiest tool posture and critical interference position (red star). To verify and evaluate the accuracy and applicability of the proposed numerical algorithm for efficiently solving the shortest tool length,based on the software platforms of Unigraphics V18.0 and MATLAB 2017b and the integrated development environment of Microsoft Visual Studio 2015, we developed a prototype software system written by C++ language and applied it to a typical open blisk, which is a complex channel part used in aero-engine. Referring Fig. 14, the length of the blade is about 160 mm, a conical ball-end cutter BR2C2 (the ball radius is 2 mm and the taper is 2°) is adopted for finish machining of the pressure surface of the blade in a five-axis machine tool. To improve machining efficiency and quality,it is desirable to use the shortest tool length to enhance the tool stiffness as much as possible. The required accuracy of the shortest tool length is 0.01 mm.The tool axis is changed along the tool path under the rule of the constant lead and title angles, i.e., 18° and 0°, respectively. There are five tool paths colored by cyan near the root of the blade (For the convenience of display, the width of cutting line is set to be larger than normal value). Without counting the non-cutting motions, a total of 196 interference-free tool postures participate in the calculation of the shortest tool length.In this example,two check surfaces are considered,i.e.,the pressure surface Spand the suction surface Ss. Both of them have 27×34=918 control points. When searching the silhouette curves, the step Lsis set to 0.01 mm. Fig. 15 shows two typical THSs. The left one adopted a multi-cylinder hydraulic tool handle, denoted as #1-THS.According to the characterization model of THS in Section 2.1,the geometric parameters of its profile are {(9.5 mm, 54 mm,90 deg); (20 mm, 49 mm, 90 deg); (32 mm, 16 mm, 90 deg);(87.5 mm, 45 mm, 90 deg); (109 mm, 41 mm, 90 deg);(1000 mm, 1000 mm, 90 deg)}. Similarly, the right one used a multi-taper heat-shrinkable too handle (there is a conical segment in THS profile), denoted as #2-THS. Its parameters are{(9 mm, 0 mm, 90 deg); (13 mm, 94 mm, 3 deg); (32 mm,26 mm, 90 deg); (48 mm, 30 mm, 90 deg); (1000 mm,1000 mm, 90 deg)}. Note: the height of the 1st segment of#2-THS is 0 mm. It can be seen that both THS profiles are complicated and can reflect the actual THS tightly.Our prototype software is implemented on an average computer with an Intel(R) Core (TM) i5-2300 M CPU with a 2.80 GHz processor. 4.1.1. Boundaries of all compressed surfaces Fig. 14 A five-axis tool trajectory for machining open blisk. Fig. 15 Two THSs. #1-THS (left); #2-THS (right). The compressed surfaces formed by Spand Ssrelative to all tool postures are shown in Fig. 16(left) (or Fig. 16(right)).For all boundaries, there are 2×196×4=1568 edges and 313 silhouettes (all are type I). By adjusting the tool length,the two THS profiles are just contacting with these boundaries,as shown in Fig.16.Intuitively,only very few boundary curves are close to the THS profiles. 4.1.2. Effective boundary spline segments and AATBs According to the geometric parameters of two THSs, the AATBs of all boundary spline segments are illustrated in Fig. 17. The identified effective AATBs and spline segments are shown in Fig. 18. For #1-THS, only 9/62627=0.014%of AATBs are effective; likewise, the percentage of #2-THS is 20/62627=0.032%. The proportion of effective AATBs is also the proportion of effective spline segments. Such a small proportion validates the motivation and advantages of the AATB proposed by us. In other words, by segmenting the THS profile and the compressed boundaries and overall scanning all AATBs, the proposed method can accurately and quickly discover all effective boundary spline segments, which make the next sampling approach for solving the shortest tool length more focused.This acceleration method avoids wasting precious computing resources on sampling the majority boundaries which are impossible to contribute to the shortest tool length. Therefore, the complete solution presented can be easily applied in industrial production. By tracing all effective spline segments of #1-THS, they come from only 4 compressed boundaries,which only account for 4/1568=0.026% of all boundaries. Similarly, all effective spline segments of #2-THS are from 7 original compressed boundaries and the proportion is 7/1568=0.045%. When the tool length is minimum, the relationships between THS profile and the effective compressed boundaries are illustrated in Fig. 19. The results in this figure are consistent with that in Fig. 16 but with fewer compressed boundaries. 4.1.3. Shortest tool length and running time The mapped tool lengths at the sample points on the effective boundary spline segments are shown by the black solid curves in Fig. 20. The solved shortest tool length of #1-THS is 71.1194 mm. By tracing the most risk point which ultimately determines the global shortest tool length,it can be found that the 171th tool posture which is located on the deepest tool path is most dangerous. When #1-THS move to that posture with the shortest tool length, the tool handle has partially entered the blisk channel, meanwhile, the bottom edge of the second cylinder in tool handle is just interfering with the blade tip(edge) of Ss,as shown in Fig. 21 (left). Similarly, the obtained shortest tool length of #2-THS is 59.1993 mm. Different from#1-THS, the 9th tool posture which is located on the shallowest tool path is the most dangerous.At this time,the side of the first cone in tool handle is just contacting with a corner point of Ss, as illustrated in Fig. 21 (right). For the two different THSs in this example, the most dangerous tool posture and the critical interference position are greatly different, which is mainly related to the tool axes and the specific geometric parameters of tool holding system. Fig.16 THS profiles are just contacting with all compressed boundaries.#1-THS(left);#2-THS(right).(Compressed edges are colored by black and compressed silhouettes are colored by pink). Fig. 17 All AATBs. #1-THS (left); #2-THS (right). Fig. 18 Effective AATBs (four-color boxes) and spline segments (black solid curves). #1-THS (left); #2-THS (right). (Dark red solid lines are transboundary lines of THS profile). Fig. 19 All effective compressed boundaries. #1-THS (left); #2-THS (right). (Compressed edges are colored by black and compressed silhouettes are colored by pink). Fig.20 Tool lengths(black solid curves)mapped by all effective boundary spline segments and global shortest tool length(red star).#1-THS (left); #2-THS (right). The components of running time for two THSs are listed in Table 1. It can be observed that the procedure of solving the compressed boundaries takes the most calculation time for both THSs, about 25.991/28.354=91.67%. Reducing this part of time is definitely our focus for improving the algorithm in the future,e.g.,using the parallel algorithms to track the silhouette curves. Fig. 21 Critical interference position (red star) under the riskiest tool posture with the shortest tool length: #1-THS (left); #2-THS(right). Table 1 The components of running time for two THSs. To further verify the calculation quality and efficiency of the proposed algorithm, we also compared it with two commonly used methods for calculating the shortest tool length, which are the method of calculating the minimum distance (Method 1) and the method of fully-discretization of the check surfaces(Method 2). The procedure of Method 1 is: determining whether THS body interferes with the channel by calculating the minimum distance between the two entities; using the dichotomy method to get the precise minimum tool length of each tool posture (the range of tool length is (0 mm,300 mm), and the iteration accuracy is 0.01 mm); as a result,the global minimum tool length is the goal. The program is implemented in C ++ language and serial mode. The procedure of Method 2 is: sampling the entire check surfaces and determining the minimum tool length of each tool posture based on these sample points, and then the global minimum tool length of all postures is the target. To evaluate the algorithm more objectively, this method is implemented in MATLAB language and parallel mode. As the size of both check surfaces is about 159.76 mm×89.38 mm and the discrete density is 0.1 mm×0.1 mm, then the total number of sample points is 2×1598×894=2.86×10⁶(Note: if the density becomes 0.01 mm×0.01 mm, the number of samples is as high as 2.86×10⁸, an ordinary computer can not handle them well). Considering that the parallel Method 2 performed not well for a THS with multiple tapers (because it has to frequently judge which taper of THS is affected by the sample point,which seriously affects the efficiency of parallel computing), hence a simple and conservative THS (recorded as #3-THS) which is composed of two cylinders was adopted in this test, as shown in Fig. 22(left). Its parameters are {(25 mm,50 mm, 90 deg); (109 mm, 102 mm, 90 deg); (1000 mm,1000 mm, 90 deg)}. The critical interference state under the riskiest tool posture with the shortest tool length is illustrated in Fig. 22(right). For Method 1 and Method 2, both of them need to calculate the exact shortest tool length of each tool posture one by one. In Fig. 23, we only present the results calculated by Method 2. The calculation results and running time of three methods are compared in Table 2. From Fig.23 and Table 2,it can be seen that the results of the proposed algorithm and the two comparison methods are consistent, such as the shortest tool length and the critical interference position.However,under the same hardware conditions, it is gratifying that the running time of the proposed method is only 27.293/139.552=19.56% of Method 1(though their accuracies are the same), which is 27.293/110.235=24.76% of the Method 2 (though the accuracy of the former is higher than the latter). Method 1 costs most of the time to calculate the shortest tool length of each tool posture, as a result, solving the global shortest tool length is inefficient. Although the proposed method also needs to obtain the compressed boundaries of each tool posture one by one, overall filtering the effective AATBs can quickly pick out the few effective spline segments.Compared with Method 1, our method can not only improve the calculation efficiency but also guarantee the accuracy. As can be seen that the calculation results of three methods in this example are very close, theoretically, the accuracy in Method 2 should be lower than that of the other two methods.We thought this is just a coincidence for this test. Because the critical interference position is located at the corner of the check surface (see Fig. 22(right)). Even though Method 2 has a low discrete accuracy (i.e., 0.01 mm×0.01 mm), the corners of the check surface are always sampled in general. If the critical interference position was not sampled,the low accuracy of Method 2 will be leaked. Due to using the strategy of fullydiscretization, Method 2 requires the high-performance computer hardware.When the required precision is extremely high,the computational cost of Method 2 will increase by the order of square. However, for the proposed algorithm, the number of CP points on a silhouette curve will increase linearly,which will result in a linear increase in calculation load. Compared with Method 2, our method has lower requirements for computer hardware and is easier to apply in industrial production. In short,it can be concluded that the proposed method for calculating the shortest tool length can not only improve computing efficiency but also can ensure accuracy. Fig. 22 #3-THS (left) and critical interference position (red star) under riskiest tool posture (right). Fig.23 Required tool lengths for each tool posture(blue and orange bars represent critical interference with Sp and Ss,respectively)and global shortest tool length in update (green stepped curve). Table 2 Calculation results and running time of three methods. 4.3.1. Optimizing tool handle for shortest tool length For the tool paths in Fig. 14, here the conical ball-end cutter BR2C2 was respectively clamped by eight different tool handles (#1-THS, #2-THS, and #3-THS are the same with those in Section 4.1 and 4.2; the physical entity of #5 tool handle is given in Fig. 3(left)) with their shortest tool length Lshortest,as illustrated in Fig. 24, the other geometries (such as spindle)in THS are the same as #1-THS; then we compared their tool stiffnesses. The tool material is the common K44 cemented carbide, whose Young’s modulus is 490 GPa. The calculation formula for the stiffness of a generic cutter in13(which has been physically verified) was used herein and the results are shown in Fig. 25. Fig. 24 Eight different tool handles with shortest tool length.(Red stars are critical interference positions). Fig. 25 Comparison of shortest tool lengths and tool stiffnesses of eight different THSs. It can be seen that different tool handles may have different shortest tool lengths and may result in huge differences in tool stiffness. For example, the ratio of the shortest tool length of#4-THS to that one of #3-THS is 40.12 mm/127.29 mm=31.52%, while the ratio of stiffness is(12.7986×10⁵N·m-1)/(2.8489×105N·m-1)=4.49. #4-THS is the optimal one that can significantly improve the tool stiffness and will be beneficial for the CNC machining efficiency and quality in practical (This idea has been applied to industrial manufacturing by authors). Besides, another interesting phenomenon is that the shortest tool lengths of #4 and #8 are the same while their tool handle shapes are different. Certainly, obtaining the maximum combined stiffness of cutter and tool handle may be a better option, it will be explored in the future. Fig. 26 Transitional-taper cutter with double cylinders. 4.3.2. Selecting appropriate transitional-taper cutter In the multi-axis machining of complex channel parts, as described previously, using a full-conical cutter (the tapered shank is assumed to be long enough)to replace a cylinder cutter can enhance the stiffness.However,compared with the latter, the applicability of the former is poor for other channels due to its fixed taper,which may easily cause the tapered shank near the ball head to interfere with the machined surface.Besides, the conical cutter is not easy to be resharpened once its cutting edges are worn, because the entire tapered shank has to be ground. A compromise choice that may slightly reduce the stiffness is the transitional-taper cutter with double cylinders,as shown in Fig.26.The cylinder with diameter D1is the only clamping part of the tool,and the other cylinder with diameter D0is allowed to be ground while the transitional cone(the taper is βcand the cone height is hc) is not. In industrial production, using this type of cutter is more economic thanks to its better applicability and improvement of stiffness. Only constrained by the current THS, the shortest tool length L1can be calculated by the proposed algorithm. However,it still cannot guarantee that all resharpened transitionaltaper cutters in the tool storehouse are available due to their non-standard h0.For a specific transitional-taper tool,whether it interferes with the check geometries still needs further judgment.Specifically,the judgment method is as follows:only taking the clamping cylinder (with the diameter D0) and the transition cone as a new THS, a new shortest tool length L2can be calculated by our algorithm. Let Δhcbe the height difference between the critical interference point (such as the red star in Fig. 26) and the bottom disc of the transition cone.Then h0≥L2-Δhccan guarantee this transitional-taper cutter is interference-free with the check geometries. Therefore,the shortest clamping length of this cutter, i.e., the L in Fig. 26, is equal to max{L1,h0+hc|h0≥L2-Δhc}, which can guarantee neither the THS nor the transitional-taper cutter interferes with the check geometries. This method of selecting and clamping the transitionaltaper cutter has been successfully applied in practice to choose the strongest cutter.For example,here we take#4-THS(whose shortest tool length for the full conical cutter is minimum in Section 4.3.1) for the tool paths in Fig. 14, then L1is 40.12 mm. Two different transitional-taper cutters (i.e.,BR2C45D8 and BR2C4D7), the cylindrical cutter (BR2) and the full-conical cutter(BR2C2) in the tool storehouse are four alternative cutters.Fig.27 shows the geometric parameters and the shortest clamping lengths of the candidate cutters. Fig. 27 Four different candidate cutters with their shortest clamping lengths. Clearly,among the four candidate cutters,the transitionaltaper cutter BR2C45D8 is the most suitable for the current tool path because its stiffness is the maximum, i.e.,13.03×105N·m-1. Comparing the stiffness of the cylindrical cutter BR2 and the transitional-taper cutter BR24C45D8,the latter is 5.57 times higher than the former. Hence, using a transitional-taper cutter is indeed an available solution to improve the cutter stiffness in practice although a careful calculation is required. This paper proposed a novel method to quickly solve the shortest tool length of a known tool trajectory in multiaxis machining. The main idea is not to sample the entire check surfaces but to find out the few necessary curves which may determine the shortest tool length. By rotating and compressing the 3D check surface relative to all tool postures,the boundary curves (i.e., the edges and the newly formed silhouette curves in compressing) of the 2D compressed surfaces are the necessary elements. To efficiently solve silhouette curves, a tracking-based numerical algorithm is given. Based on the proposed characterization model for the multi-taper shaped THS, a model for solving the shortest tool length is constructed according to the critical interference relationship between the THS profile and all compressed boundaries. To speed up, a new concept of AATB is proposed, which can give a conservative range of tool length for a boundary spline segment. By scanning all AATBs,the very few effective boundary spline segments that may ultimately determine the shortest tool length were then filtered out. This method makes the solution for solving the shortest tool length more focused and efficient. The verification examples confirmed it. About the future research on the subject, we plan to identify the few bottleneck tool postures for the shortest tool length(e.g., the tool postures near the 174th one in Fig. 23) in advance based on the relationship between the channel features and tool postures. We believe it will further improve the efficiency of solving the shortest tool length. Moreover,extracting the local effective regions on check surface may be another acceleration method worth trying, especially for large parts,such as the leading edge protection cap of the composite blade. Besides, another interesting work is to improve the acceleration method to apply to the spline-shaped THS profile.Certainly, upgrading the prototype with advanced programming techniques (e.g., multithreading and GPU acceleration)will make the proposed algorithm more practical in industrial production, which is also another task for authors in future. Declaration of Competing Interest The authors declare that they have no known competing financial interests or personal relationships that could have appeared to influence the work reported in this paper. Acknowledgment The authors gratefully acknowledge the support of National Science and Technology Major Project of China (No. JPPTKF2016).We also greatly appreciate Dr.Luo Ming for the linguistic assistance.
2.2. Compressing 3D check surface relative to tool posture
2.3. Model of shortest tool length


3. Acceleration for shortest tool length
3.1. AATB of boundary spline segment

3.2. Filtering effective spline segments based on AATBs
3.3. Calculating shortest tool length based on effective spline segments
4. Results of experimental examples and discussion
4.1. Calculation results
4.2. Comparison with other methods

4.3. Application
5. Conclusion and future work
 CHINESE JOURNAL OF AERONAUTICS2021年2期
