Investigations on femtosecond laser-induced surface modification and periodic micropatterning with anti-friction properties on Ti6Al4V titanium alloy
Xinlei PAN, Weifeng HE,b, Zhenbing CAI, Xuede WANG, Ping LIU,Sihi LUO, Liuheng ZHOU,*
a Science and Technology on Plasma Dynamics Laboratory, Air Force Engineering University, Xi’an 710038, China
b Institute of Aeronautics Engine, School of Mechanical Engineering, Xi’an Jiaotong University, Xi’an 710049, China
c Tribology Research Institute, Key Lab of Advanced Technologies of Materials, Southwest Jiao-tong University, Chengdu 610031, China
KEYWORDS Femtosecond laser-induced surface modification;Laser-induced periodic surface structures;Microstructure;Titanium alloys;Tribological performance
Abstract Titanium alloys have a wide application in aerospace industries as it has greater strength and low density, but it has poor tribological properties. To improve its friction and wear performance,in present work,a femtosecond laser is used to directly irradiate the Ti6Al4V titanium alloy surface in air conditioning, which results in localized ablation and the formation of periodic microstructures but also a strong pressure wave,propagating the material inside.Through the optimization of processing parameters,surface modification and periodic micropatterning with effective anti-friction properties were successfully induced on the surface. After a treatment of femtosecond laser-induced surface modification (FsLSM), the surface microhardness was improved by 16.6%and compressive residual stress reached -746 MPa. Besides, laser-induced periodic surface structures (LIPSS) with a titanium oxide outer coating were fabricated uniformly on the titanium alloy surface. Rotary ball-on-disk wear experiments revealed that the average coefficient of friction(COF) and wear mass loss of the specimen with FsLSM treatment were largely reduced by 68.9% and 90% as compared to that of untreated specimens, respectively. It was analyzed that the reason for the remarkable wear resistance was attributed to the comprehensive action of the generation of LIPSS, the titanium oxide outer coating, high amplitude compressive residual stress and gradient grain size distribution on the subsurface during the laser surface treatment. Since the findings here are broadly applicable to a wide spectrum of engineering metals and alloys,the present results offer unique pathways to enhancing the tribological performance of materials.
1. Introduction
Titanium alloy has been widely used as critical components in the aerospace, marine and medical industries due to its excellent mechanical properties such as high strength,superior fatigue resistance and great biocompatibility. However, one main challenge hampering the widespread use of titanium alloy was its poor wear characteristics. For example, the blade dovetail fabricated from titanium alloy has inevitably experienced fretting wear during its operation, which caused it to fracture easily and to fail after certain periods of service life. Besides,there were also other titanium alloy components that served in a similar wear condition in aircraft, and some of those were very critical and whose unexpected failure might cost severe destruction and lives. Thus, it was necessary to further improve the friction and wear performance of titanium alloy.
Surface strengthening technologies have attracted more attention due to their effectiveness in promoting the mechanical performance of processed material without changing its original ingredients.Among these,the laser-induced surface modification technique has proved to be a competitive process for enhancing the friction and wear performance of various metals and alloys due to its special advantages involving the great improvement in the mechanical properties, flexibility and possibility of treating small areas. So far, it is possible to divide the application of laser technologies primarily into several areas according to the strengthening mechanism upon lasers with different pulse durations. On a nanosecond pulse duration scale, one competitive process of laser surface treatment used to improve wear resistance of materials is Laser Shock Peening (LSP) technology.It utilized a nanosecond laser pulse to induce an ultra-high pressure shock wave (~1-10 GPa) on the surface of the materials under waterconfinement, which leads to severe plastic deformation(~10/s) in the peening area to modify the microstructural and mechanical properties.Zhou et al.investigated the effects of LSP on friction and the wear behavior of the medicinal Ti6Al4V alloy and found that the average Coefficient of Friction (COF) of the specimens processed with the laser intensity of 11.3 GW/cmwere significantly reduced to 50% as compared to the untreated specimens. And the average amount of wear moss was decreased to 29.2%as a result of the increasing laser energy and impact times.It was analyzed that this was attributed to the compressive residual stress and greater hardness of the material after LSP treatment. Shen et al.have studied the tribological properties of titanium alloy Ti6Al7Nb subjected to multiple LSP with different laser power densities.They reported that the microhardness of the sample after LSP was effectively improved from 290 HVto 369 HVin maximum,increasing by 27.2%.The average grain size on the surface showed a reduction of 67%. And corresponding wear resistance was improved by 44% after multiple LSP. Kumar et al.have reported that the wear volume of Ti6Al4V samples decreased from 1.211×10mmto 0.106×10mmafter LSP treatment. And the dissipation energy loss for Ti6Al4V substrate from 11.412×10J was decreased to 3.284×10J for the LSP sample at 20 N load.In addition to titanium alloy,the remarkable wear and friction performance improvement via LSP was also reported in magnesium alloy,steeland aluminum alloy.Thus,from the references mentioned above,it is possible to see that the nanosecond pulsed laser was successfully applied in the field of surface strengthening to improve the wear resistance and that a respective process has been developed based on its characteristics.
In recent years,some researchers have attempted to use the femtosecond laser pulse to induce surface change of materials,and significant improvement in fatigue and corrosion performance was also achieved by femtosecond laser-induced surface modification technology(FsLSM).It should be pointed out that the pressure of an Mbar-level shock wave induced by a femtosecond laser could reach ~10-10GPa without any confining layer, much higher than that of water-confined nanosecond LSP.In this way,the simple process of FsLSM made it possible to apply this technology to a wide spectrum of engineering components with complicated shapes,thereby becoming more competitive as compared to nanosecond LSP which necessarily needs the help of water confinement.Under the effects of a shock wave that was so much stronger, the mechanical properties of the peening area were modified noticeably.For example,Sano et al.improved the surface microhardness in the heataffected zone of the laser-welded 2024-T3 aluminum alloy using the FsLSM treatment with a direct ablation mode by 36.9%,while Lu et al.reported that the surface hardness of the Mg-3Gd alloy has been enhanced by 70% effectively under a relatively low pulse energy of 430 μJ.Kawashima et al.succeeded in prolonging the fatigue life of the friction stir welded 7075-T73 aluminum alloy under cyclic loading at a stress amplitude of 200 MPa by approximately 3.7 times compared with that of the base metal.Wang et al.reported that the corrosion current density of the NiTi alloy decreased from 0.50 μA cmto 0.17 μA cmafter FsLSM treatment, and the corresponding corrosion resistance of the NiTi alloy was improved by about 66%.Additionally,femtosecond laser treatment might produce a richer variety of periodic surface structures on the surface of materials than long-pulse laser treatments. These laserinduced periodic surface structures(LIPSS)might show surface functionalization features such as superhydrophobicity,icephobicity and anti-bacterium properties.Thus, the potential application of a laser process using a femtosecond pulsed laser has been further extended as a result of its simple process and high degree of efficiency. Besides, due to its ultrashort pulse duration, the femtosecond laser showed no thermal action as compared to the nanosecond laser pulse.And the ultimate precision features of the femtosecond laser made it possible to process micro-parts and micro-devices. Therefore, FsLSM technology exhibited a more promising application compared with the conventional process using nanosecond pulsed lasers.
However, by far the greatest number of investigations regarding FsLSM were focused on its effects on fatigue and the corrosion performance of materials.There were few studies devoted to determining the effectiveness of FsLSM on friction and wear performance of the materials. Thus, in the present work we systematically studied the friction and wear performance of Ti6Al4V, an alloy commonly used for aerospace components and medical implants, processed by means of direct laser ablation with femtosecond pulse duration in air conditioning. The surface morphology and roughness, microhardness, residual stress, microstructure evolution and tribological properties of the Ti6Al4V titanium alloy with and without FsLSM treatments were identified. To confirm the advantage of FsLSM treatment, the comparative experiments by nanosecond LSP were also carried out in this study. From these results, a clear relationship between the processing parameters used in FsLSM experiments and the mechanical properties modification of the Ti6Al4V titanium alloy was determined.
2. Materials and experiments
2.1. Materials and specimens
The specimens with a size of 60 mm×20 mm×2.8 mm used in the present work were made from a commercially produced Ti6Al4V titanium alloy plate (Baoti, China) via the wirecutting method. The chemical position of the Ti6Al4V titanium alloy plate (in wt%) was 6.16 Al, 3.95 V, 0.03 Fe, 0.04 C, 0.06 O, 0.014 N, and balance Ti. The ultimate tensile strength σwas 925 MPa, and the yield strength σwas 870 MPa. The average grain size of the specimen investigated in the present work was ~1.02 μm.
2.2. FsLSM and nanosecond LSP experiments
As shown in Fig.1(a),the femtosecond laser with a pulse duration of 290 fs was generated from a PH1-20 high power and energy femtosecond laser (Light conversion, Lithuania). The output laser pulse was finally focused on the surface of the materials to form a ∅20 μm spot after going through a beam expander,a spatial light modulator,a reflector,a galvanometer and a telecentric flat field mirror successively.The laser energy parameters used in experiments varied from 10 μJ to a maximum value of the femtosecond laser instrument 240 μJ. The distance to the adjacent spot was 5 μm. According to the definition of coverage C=πD/4L(where D and L were spot diameter and pulse interval, respectively), the corresponding coverage Cwas 1256%. The specimens were fixed on the XY-Z automatic motion stage,which was controlled by the central computer to achieve the designated scanning pattern. The detailed parameters used in the FsLSM experiment were listed in Table 1.
To compare the effectiveness of FsLSM and nanosecond LSP on the wear and friction performance of the materials,the nanosecond LSP experiment was also conducted as shown in Fig. 1(b). During the nanosecond LSP, a black tape with a thickness of ~100 μm was attached to the surface of the titanium alloy to serve as a protective layer and flowing water(~2 mm thickness) was selected as the confinement layer to improve the pressure of the plasma. The detailed processing parameters used in the nanosecond LSP experiment was given in Table 2. The laser scanning pattern used in the nanosecond LSP was consistent with that used in FsLSM.
2.3. Characterization of the surface integrity
The microhardness on the surface and in depth (40-300 μm depth)was measured using a Vicker’s indentation test machine(Taiming, China). The indentation load was 200 g and the dwell time was 15 s. To characterize the distribution of the hardness on the top surface (15-60 μm depth), a NanoTest Vantage nano-indentation(MML,England)was used to measure the nano-hardness along the depth direction of the top surface.The indentation load was 100 mN and the dwell time was 5 s. The loading rate and unloading rate were both 2.5 mN/s.
The roughness of the surface was measured by a KT28-021 portable roughness instrument (Havoger, Germany). The sensor probe driven by an internal precision actuator moved uniformly on the target surface, providing displacement information of the probe to the processor. The residual stress was tested using an LXRD X-ray diffractometer (Proto,Canada) via the sin2ψ method. The diffracted tube was Cukα, by means of which the X-ray information from a Ti 213 plane was collected. The diameter of the X-ray beam was 2 mm and 2θ was 142°. The residual stress in depth was measured with the help of an electropolishing machine (Proto,Canada) via the layer-by-layer removement method. The polishing solution was 90% CHOH solution+10% HCIOsolution.
An optical microscope (Hirox, Japan) and a scanning electron microscope (Zeiss, Germany) were used to characterize the microstructure evolution and wear scar of the specimens before and after FsLSM treatment. And an energy dispersion spectrum (EDS) was carried out to analyze the chemical composition of the peening surface and the debris manufactured by friction. The sectioned microstructure was characterized by electron backscatter diffraction(EBSD)technology.The scanning step was set as 0.1 μm and the collected data were analyzed by HKL Channel 5 software. The EBSD sample was prepared by mechanical polishing and ion beam milling methods. The surface observed was polished to #2000 by abrasive paper first, and then it experienced ion beam milling in EM RES102 ion beam thinner (Leica, Germany) operated at 1 kV for 2 h.The TEM observation was conducted by a Tecnai F20 field emission TEM (FEI, USA) operated at 200 kV. The TEM sample was prepared by means of the focused ion beam(FIB) method in the Helios NanoLab G3 UC system (FEI,USA).
2.4. Friction and wear test
Rotary ball-on-disk wear experiments were conducted by MST-3001 friction and wear tester (Huahui, China) at room temperature. A GCr15 ball (750 HV, R<0.1 μm) of 3 mm in diameter was used as the counter ball. The testing load was 500 g and the wear time was 30 min. The radius of rotation was set as 6 mm and the speed of the workbench was 120 r/min. After the wear test, the wear mass loss of the specimens was measured by electronic balance (Mettler toledo,Switzerland). An average of five measurements were used.
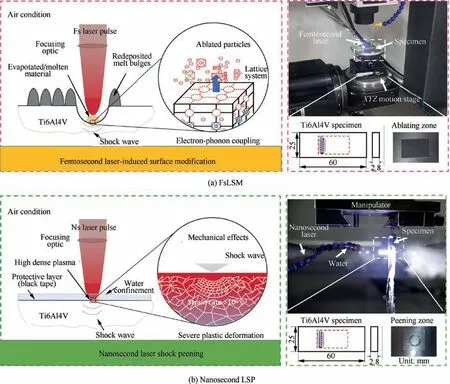
Fig. 1 Schematic diagram of FsLSM and nanosecond LSP process.

Table 1 Detailed processing parameters used in FsLSM experiment.

Table 2 Detailed processing parameters used in nanosecond LSP experiment.
3. Results and discussions
3.1. Surface morphology and roughness
Fig. 2(a)-(c) shows the surface morphologies of the Ti6Al4V titanium alloy subjected to LSP and FsLSM with different laser energies by OM and SEM. It could be observed that LSP treatment shows limited effects on the surface morphologies of titanium alloy except for the increasing surface undulation since it only exerts mechanical influence to the specimens.As for FsLSM treatment, the processing laser parameters had a strong influence on the topography of the surface as evident in Fig.2(a).As for the samples processed at the low amount of energy of 10 μJ, it was clearly observed that there were presences of micro-droplets and traces of laser ablation. And the peening area exhibited a slight metallic luster. Then, with an increasing amount of laser energy,the surface of the specimens was completely ablated and presented a consequence of melting and deposition of the recast material.Micro-droplets were not observed and only several obscure scanning traces were identified. The corresponding 3D images (Fig. 2(b)) show that the laser-induced periodic surface structures (LIPSS)were made on the processed surface by a femtosecond laser, which was more significant when the materials were subjected to a higher amount of laser energy.And the undulation of the surface was more obvious with an increase in the laser energy accordingly. Specifically, the difference in height increased from 5.6 μm at 10 μJ to 8.2 μm at 240 μJ. From the SEM images (Fig. 2(c)), it can be seen that ripple patterns were formed in the ablated area at a lower amount of laser energy(10 μJ) and its magnificent image shows irregular laserdeposition products and some micron-sized fused particles.Then, as the laser energy (50 μJ) increased, the FsLSMed surface presented a hierarchical micro/nanostructure consisting of micrometric pillars covered uniformly. When the laser energy reached a higher level (100 μJ, 150 μJ and 240 μJ), it was observed that the more intensive ablation made the material molt and resolidify more tightly and smoothly. As seen from enlarged views, numerous dense and continuous oxide particles and islands without cracks were generated on the surface.It was analyzed that this was contributed to the changing ablation mechanism under the effects of different laser energy.Cheng et al.have suggested that the ablation at lower laser energy occurred predominantly by spallation, which resulted in ejection of the top most surface layer. With a greater amount of energy, the molted layer was in a metastable state as the result of superheating.The rapid phase explosion caused by the upward movement of vapor bubbles of the irradiated surface produced a mixture of vapor and metal droplets.
Fig. 3 shows the surface roughness Rof untreated, LSPed and FsLSMed specimens. For specimens treated with an FsLSM treatment,it was noted that the average surface roughness increased almost linearly with the increasing laser energy from 10 μJ to 240 μJ. The maximum value appeared on the specimen processed at 150 μJ, reaching ~1.3 μm. Compared with that of untreated specimens (~0.2 μm), there was a large improvement in roughness. When the laser energy exceeded 150 μJ, the surface roughness was slightly reduced to 1.2 μm.This was attributed to ablation, and the plastic deformation of the Ti6Al4V titanium alloy caused by FsLSM was saturated under such greater amounts of laser energy. As for specimens treated with LSP, the average surface roughness with one and three impacts were 2.2 and 3.3 μm,respectively,indicating that LSP has a more adverse effect on the surface roughness as compared to FsLSM.
3.2. Microhardness analysis
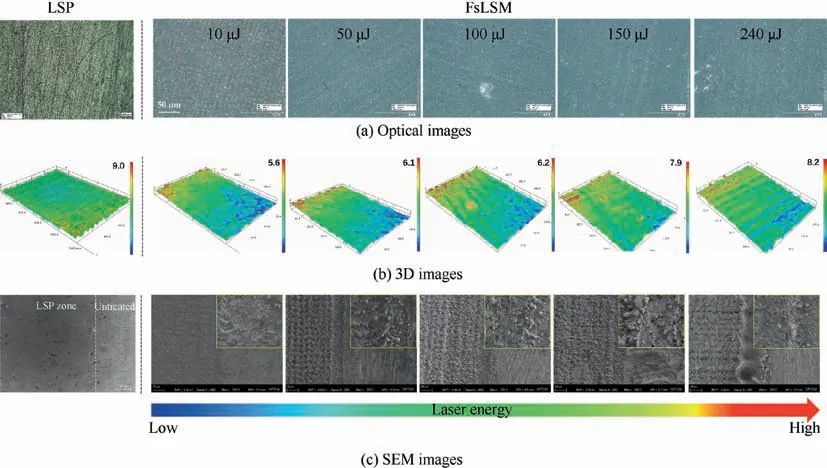
Fig. 2 Surface morphologies of LSPed and FsLSMed specimens at different laser energy.
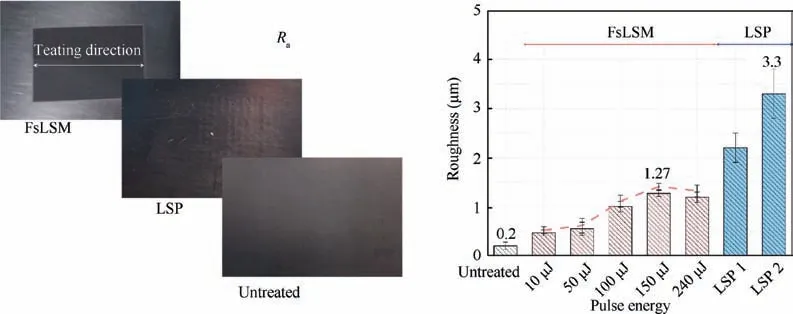
Fig. 3 Surface roughness of untreated, LSPed and FsLSMed specimens.
The surface microhardness of Ti6Al4V titanium alloy subjected to FsLSM with different degrees of laser energy is shown in Fig.4(a).As for the untreated specimens,the average original surface microhardness was ~350 HV. When the specimens were processed with a laser energy of 10 μJ, the surface microhardness exhibited a significant increase, reaching~385 HV. Compared with the untreated specimens, there was a 10%improvement.Then,as the laser energy improved from 50 μJ to 150 μJ, the surface microhardness was further enhanced. The maximum microhardness was attained at 150 μJ (~408 HV), which was improved to about 16.6% as compared to that of the original specimens.This can be understood easily because more laser energy means higher pressure.However, it was also noted that the increment gradually became less and less with an increase in laser energy. In other words, the further improvement of the laser energy was not able to effectively improve surface microhardness. This might be attributed to the limit of plastic deformation of the titanium alloy by FsLSM. When the laser energy increased to 240 μJ,the surface microhardness dropped from ~408 HV to~381 HV. As is described above, the corresponding laser intensity for the laser energy of 240 μJ has reached 264 TW/cm. Under a density of power that is so much stronger, the air was broken down by the femtosecond laser and part of the laser energy was absorbed and scattered into the air and the plasma. Thus, the remaining laser energy could be well focused on the surface of the materials. Besides, the microhardness of specimens treated with the LSP 1 and LSP 2 parameters were 392 HV and 384 HV, respectively, which was below that of specimens subjected to FsLSM treatment.
The distribution of the hardness along the direction of the depth of two representative specimens processed at 150 μJ and 240 μJ is shown in Fig. 4(b) and (c). As seen from the Fig. 4(b), within the layer at the depth of 40-100 μm, the microhardness exhibited a gradient distribution along the direction of the depth. The thickness of the work hardening layer induced by FsLSM was around 100 μm for both specimens processed at 150 μJ and 240 μJ. At the same depth, the microhardness value of specimens processed at 150 μJ was higher than that of specimens processed at 240 μJ. Due to the limitation of Vicker’s microhardness tester,the distribution of the hardness on the top surface was not available.Thus,the technique of nanoindentation measurement was used to characterize this layer (15-60 μm) of the specimens processed at 150 μJ and the results are plotted in Fig. 4(c). It can be seen that the gradient tendency of the distribution of the hardness was maintained on the top surface. The maximum value was~8 GPa at a depth of 15 μm, while the minimum value was~2.5 GPa observed at a depth of 60 μm.Combining the hardness results at a depth of 40-300 μm as shown in Fig. 4(b), it could be concluded that the FsLSM might introduce a work hardening layer with a thickness of 100 μm into the surface of titanium alloy and in this layer the hardness distribution along the direction of the depth presented a gradient tendency.In addition, the displacement-loading profiles showed that the elasticity modulus E at a depth of 15 μm was 170 GPa, which was higher than that at a depth of 60 μm(113 GPa),as evident in Fig. 4(c). This result was attributed to the ultra-refined grains on the top surface, which possessed a higher degree of hardness and an elasticity modulus.
3.3. Residual stress analysis
During the LSP process,residual stress was often used to evaluate its effectiveness on the improvement of the mechanical property of the materials. In Fig. 5, the surface residual stress as a function of laser energy under FsLSM and the distribution of residual stress in depth was plotted.It was observed that the surface residual stress of untreated specimens was -28 MPa.As for the specimens with FsLSM treatment,it was found that FsLSM at all laser energy levels led to an improvement in compressive residual stress compared with that of untreated specimens as indicated in Fig. 5(a). Specifically, the compressive residual stress magnitudes increased continuously with an increase in the amount of laser energy from 10 μJ to 150 μJ.And the maximum value of compressive residual stress appeared at 150 μJ, reaching -746 MPa. Compared with that of untreated specimens, there was a great increase in surface compressive residual stress.For all FsLSM experiments below 150 μJ the compressive residual stress levels were high and very close to each other. However, when the laser energy reached 240 μJ, there was a clear drop (-424 MPa) in compressive residual stress, which might be caused by the thermal relaxation due to dynamic recovery.The value of surface compressive residual stress of specimens subjected to LSP treatment with LSP 1 and LSP 2 parameters was -595 MPa and -506 MPa, respectively. Based on the microhardness results mentioned in Section 3.2, it was deduced that only by increasing impact numbers in the LSP experiment might be a deterioration of the surface integrity,which might cause disadvantages for the improvement of the mechanical properties of materials.
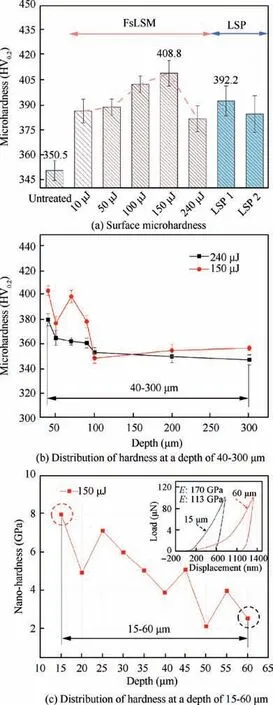
Fig. 4 Microhardness distribution of untreated, LSPed and FsLSMed specimens.
Fig. 5(b) shows the in-depth residual stress of specimens treated with 150 μJ, which exhibited the maximum value of surface residual stress.It is possible to see that the distribution of the compressive residual stress along the direction of the depth displayed a gradient tendency and the thickness of layer affected by compressive residual stress was around 83 μm. It has been proved that the deeper compressive residual stress might have benefits for the improved deformation resistance of materials.Combining the microhardness results at different amounts of laser energy as shown in Fig. 3, it becomes evident that the specimens processed at 150 μJ obtained the greatest strengthening effects and avoided dynamic recovery at the same time. As is known, the mechanical performance of a material is closely related to the morphology of its microstructure.Thus,in the following part,the specimens processed at 150 μJ were used to investigate the effects of FsLSM on the microstructure evolution of the Ti6Al4V titanium alloy.
Much faster fs-laser energy deposition on material surfaces results in significant mechanical influence, becoming unprecedently strong under ablation conditions via Mbar-level shock waves(SW).Fs-laser generated SWs provide much higher pressures P ~10-10GPaversus ~1-10 GPa for nslaser.Thus, higher compressive residual stress would be introduced into the surface of FsLSMed metals due to its severer plastic deformation induced by fs-laser, as compared to LSP. In addition, owing to its ultrashort pulse width, the heat effects of femtosecond laser could be negligible. For example,Le Harzic et al.reported that the wide of heat affected zone induced by nanosecond laser was 40 μm,whereas that induced by femtosecond laser was less than 2 μm. Thus, the residual tensile stress induced by femtosecond laser could be negligible.As is known, the thermal effect of nanosecond laser normally will result in residual tensile stress. However, if one covers the target with an absorptive overlay(black tape in present work),thermal effects only involve this overlay, thus creating a pure mechanical effect inside the target.As a consequence,a biaxial compressive residual stress field is created in a plane parallel to the surface.Thus,the residual stress induced by LSP follows a two-step sequence: (i) During the interaction, the plasma expansion creates a uniaxial depression of the irradiated area and a dilation of the surface layers. (ii) After the laser pulse duration, the surrounding matter reacts to the deformed area by generating the compressive stress field.
3.4. Characterization of the composition by SEM and EDS
Fig.6 shows the EDS analysis of the surface chemical composition of the Ti6Al4V titanium alloy subjected to LSP treatment. From SEM image, it could be observed that the LSPed zone exhibited rougher as compared with the untreated zone.EDS mapping shows the main elements such as Ti,Al,V,C,O distributed uniformly both in LSPed and untreated zone,which indicates that LSP treatment has no effects on the composition of the surface chemistry of the Ti6Al4V titanium alloy.
As mentioned above,the specimens with FsLSM treatment at 150 μJ exhibited an optimum value for hardness and compressive residual stress.Thus,in the following part,the studied elements focused on this specimen to unveil its corresponding microstructure modification under the effects of FsLSM treatment.
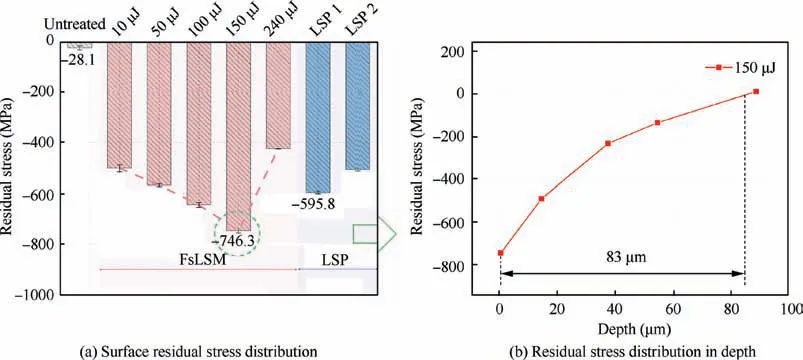
Fig. 5 Residual stress distribution of untreated, LSPed and FsLSMed specimens.
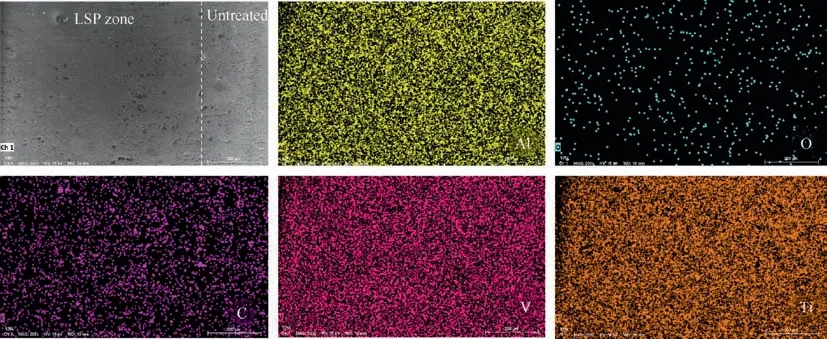
Fig. 6 EDS analysis of surface chemical composition of Ti6Al4V titanium alloy subjected to LSP treatment.
To investigate the effects of FsLSM on the composition of the surface chemistry of the Ti6Al4V titanium alloy, energy dispersion spectrum (EDS) mapping was used to characterize the distribution of the Ti,Al,V,O and C elements on the border of untreated and FsLSMed regions processed at 150 μJ.As show in Fig. 7(a), the SEM image presented massive microdroplets and nano-ripples in the region of laser treatment.Additionally,it was also observed that deposition of the recast materials was more significant alongside the border of untreated and FsLSMed regions,which had obviously formed a molten cladding.This was caused by the repeated laser ablation here. Thus, more vapor bubbles would exit via the metal interface and then be deposited, thereby resulting in the final structure.From the EDS mapping,it can be clearly noted that the Al, V and Ti elements had been distributed uniformly throughout the whole scanning area. There was no obvious difference in concentration between the untreated area and the FsLSMed area. However, for the O and C elements, an O-rich layer overlapping with a tiny C-rich layer can be clearly observed. And it should specifically be pointed out that the effected width of oxide coating exceeded that of the areas of ablation as seen from the SEM image.It could be deduced that the residual thermal energy was transmitted into its adjacent layer due to laser induced surface modification, exothermic chemical processes and effects of the pressure of gas.Thus,the severe oxide and slight carbide phenomenon also occurred here. It is known that the Ti and Al elements have a higher affinity with oxygen, and at a certain temperature the faster absorption of oxygen by Ti and Al elements could be achieved easily.In general,the Ti and Al elements would be oxidized to form TiOand AlOrespectively according to the equations:Ti+O→Ti+O, 4/3Al+O→2/3AlO. Thus,the oxide coating in the peening area might have existed in the form of TiOand AlO, which would produce a higher value for hardness than that for the matrix.In addition,the molten cladding as mentioned above exhibited a rich state in the Ti and V elements but was poor in the Al, O and C elements. This was attributed to the stronger ablation regime induced by duplicated laser scanning.The multiple laser peening resulted in a higher heating rate,which quickly brought the temperature of materials above their equilibrium boiling temperature. The superheating caused these light elements (Al, O and C)to enter a rapid phase explosion into the air away from the interface, thereby leading to the absence of Al, O and C.However, it was not easy to expel heavy metal elements such as Ti and V due to their relatively high density, melting point and boiling point(Melting point:Ti-1678°C,V-1890°C;Boiling point:Ti-3287°C,V-3000°C).These vapor elements gathered above the interface, which was not far away from the surface, and then experienced rapid cooling and solidification to be then deposited on the surface again, thereby forming the unique crater structures at the edge of the ablation region as shown in EDS mapping.
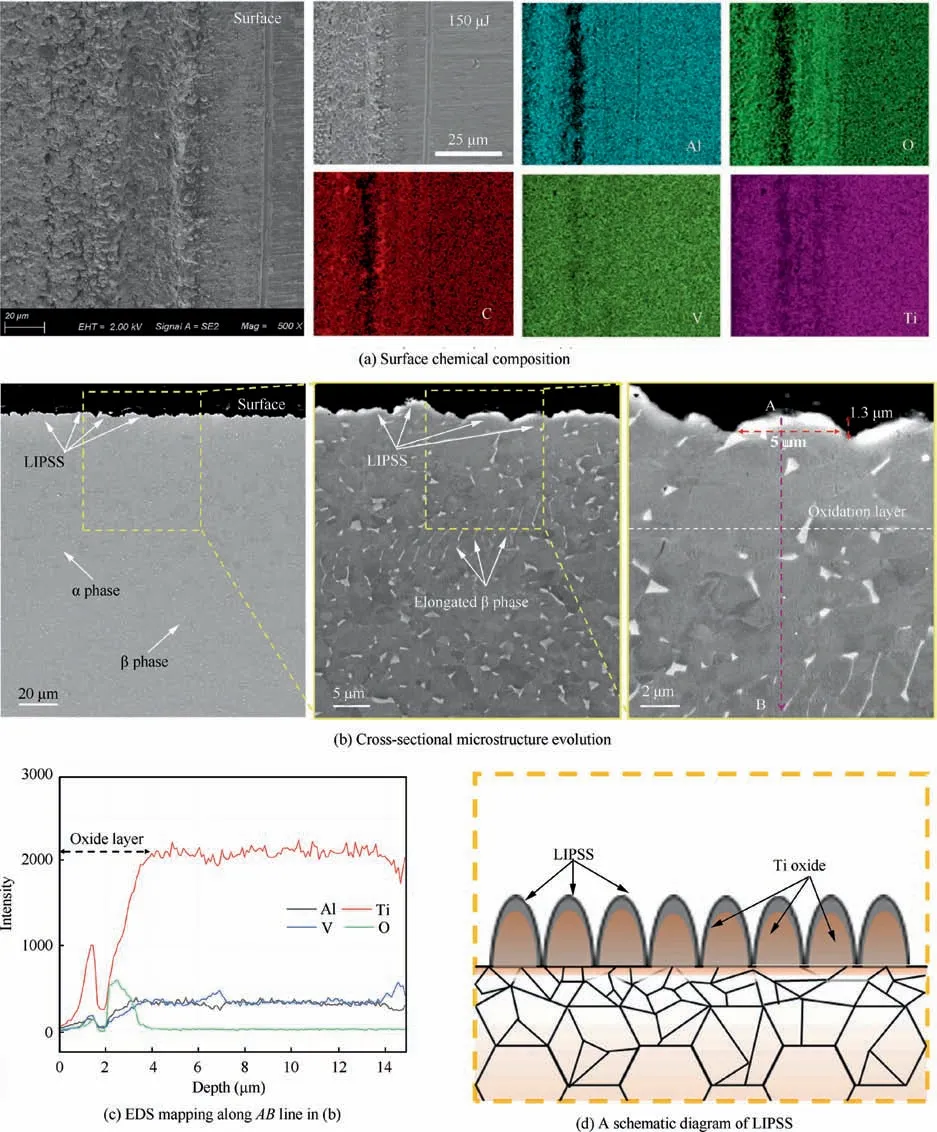
Fig. 7 Analysis of the microstructure of Ti6Al4V titanium alloy subjected to FsLSM with 150 μJ.
Fig. 7(b) presents a typical SEM cross-sectional image of the Ti6Al4V titanium alloy with FsLSM treatment at 150 μJ.As shown in Fig. 5(b), it can be clearly determined the α and β phase according to their morphology,which presents a dark and a bright appearance,respectively.Additionally,it was confirmed that LIPSS was formed homogeneously on the surface of the processed materials. Obviously, there is an outer remelting coating with a thickness of ~5 μm which seems to adhere to the titanium alloy matrix as evident in the highly magnified SEM image.Below this layer,the β phase(indicated by the white color) is severely compressed and shows an elongated outline,indicating that the subsurface areas experienced much deformation induced by a strong shock wave.The higher magnificent image of the interested region on the top surface is illustrated.It is evident that the outer coating displays a dense and homogeneous microstructure without any visible defects.It can also be easily measured the width of the valley on the top surface as ~5 μm and the height as ~1.3 μm. The improved wear resistance of Ti6Al4V titanium alloy has benefited from this promising compact and uniformly distributed structure.
To investigate the distribution density of the Ti, Al, V and O elements in the cross section,the EDS linear scanning along the path, AB was conducted and the data plotted in Fig. 7(c).Seen from the curve of the intensity of each element as a function of depth,it was precisely determined that the thickness of that re-melting layer was ~4 μm. Within the re-melting layer,the Al and V elements basically exhibited a gradient distribution, while the Ti element showed a relatively small peak first at 1.5 μm depth and then it continuously increased to the concentration value of the matrix at a depth of 4 μm.As for the O element, it shows two peaks in the coating. The smaller one is located at the same depth (1.5 μm) as the Ti element, and the other significant peak appears at a depth of 2.5 μm. Based on the distributed trend of each element,it could be deduced that an oxide coating which was mainly composed of titanium oxidation had been generated on the surface. Meanwhile, it was noted that in the first of 1.5 μm depth the Ti concentration was relatively high. This phenomenon is attributed to the fact that the Ti elements possess the capacity of faster absorption of oxygen due to the higher affinity between them.As shown in Fig. 7(c), the severe oxide reaction occurred at the depth of 2.5 μm. In this layer, massive harder Ti-, Al- and V-oxidation might be formed,which would contribute to the improvement of the hardness. Based on the observation, the morphology and chemical composition of LIPSS in Fig. 7(d), which consisted of a ‘‘wave”-shaped structure with an outer oxide coating. These inorganic hard oxidations increased the resistance of LIPSS to deformation, thereby helping the ripple ridges retain their original morphology and structure during the dry friction process. Thus, the beneficial effects of LIPSS on the wear and friction performance of the materials could be continued for a long time.
3.5. Characterization of microstructure by means of EBSD and TEM
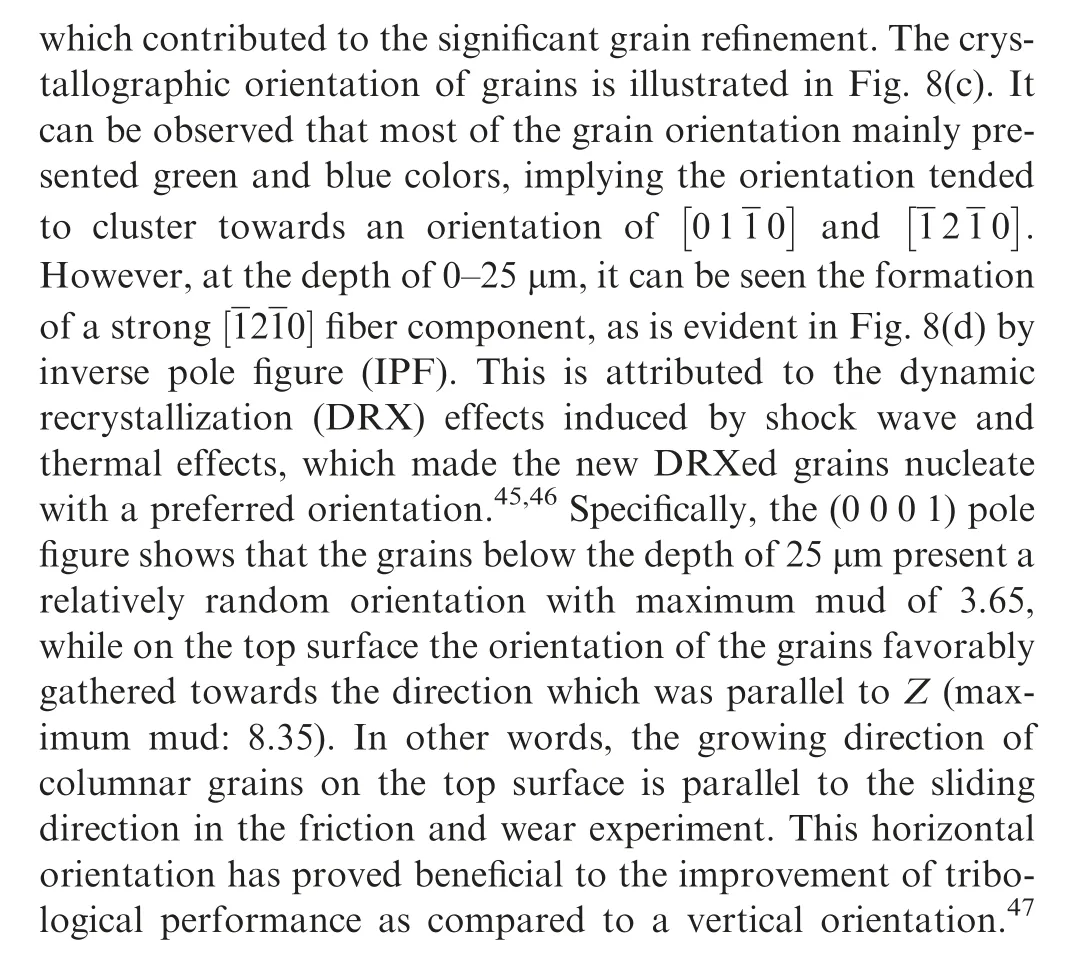
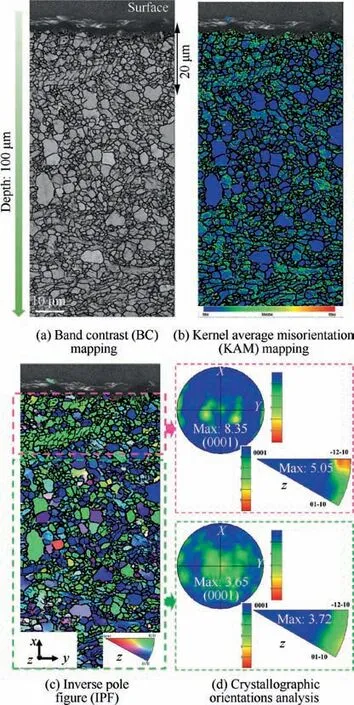
Fig. 8 Cross-sectional microstructure evolution of Ti6Al4V titanium alloy with FsLSM treatment at 150 μJ.

The study of cross-sectional morphology by SEM and EDS suggests that a unique LIPSS formed on the surface.Next,the finer characteristics of the microstructure below a single‘‘bulge” was examined via FIB+TEM techniques to seek the deformation mechanism of titanium alloy during FsLSM.As evident in Fig.9(a),a single wave-shaped TEM sample with a depth of ~6.5 μm was extracted from the surface.It is clearly noted that an ablation layer was generated on the top surface,in which some voids and cracks can also be observed. The cross-sectional TEM image shows that a gradient microstructure along the depth was formed by the thermo-mechanical actions induced by the laser, as indicated in Fig. 9(b). From the surface to the inside, the whole observed area is obviously divided into three regions according to different characteristics of plastic deformation: an ablation layer (surface-0.7 μm), a severe plastic deformed layer (0.7-2.5 μm) and a moderately deformed layer (below 2.5 μm). As for the ablation layer(Region I), the magnified image reveals that this layer shows no significant crystal lattice features as compared to the region below this layer (Fig. 9(c)). The high resolution TEM image(Fig. 9(d)) of the interface between the ablation layer and the severely deformed layer show the formation of a fully amorphous microstructure. This was also confirmed by the SAED pattern, which consists of faint halo rings with no diffraction spots. Deeper in the sample, the severely deformed layer(Region II) exhibits massive structures of deformed twins and nanograins, as shown in Fig. 9(e). The SAED patterns show exiguous crystalline diffraction spots and homogeneous rings, typifying the generation of nanograins. This phenomenon suggests the plastic severe deformation occurred here and the deformation was mainly accommodated by deformed twins. The microstructural features in deeper layers (Region III, moderately deformed layer) show an absolutely different tendency.In this layer,high dense dislocations are the primary deformed mode and deformed twins show a relatively low density,as indicated in Fig.9(f).The results where the SAED patterns show clear crystalline diffraction spots implies that there few nanograins exist. Thus, according to the TEM and EBSD observation, it can be concluded that the titanium alloy severely deformed under the effects of ultra-high pressure was induced by the femtosecond laser. On the top surface,the deformation mode was dominant by deformed twins, and then the gradually slipping dislocation played a critical role in the increase in depth.
3.6. Friction and wear performance
Fig. 8 shows the coefficient of friction (COF) and wear mass loss of untreated, nanosecond LSPed and FsLSMed specimens, respectively. The profile of COF versus time is illustrated in Fig. 10(a). It was found that the average value of COF for the untreated sample was 0.440.When the specimens were treated with nanosecond LSP for one time, the COF decreased slightly to 0.380.Compared with the untreated specimens, it was reduced by 13.6%. However, as the impact time increased to three times,the COF rose rather than dropped as compared to that of the untreated sample,reaching 0.485.This phenomenon was because the COF depended on the comprehensive action of surface roughness and microhardness. The increasing impact times resulted in the improvement of hardness,but the surface quality got worse.From the experiments,it is obvious that the deteriorating effects originated from the increasing surface roughness are dominant in determining the COF of the materials. Meyershas also proposed that the COF was very sensitive to roughness rather than hardness.As for the specimens subjected to FsLSM with the laser energy of 150 μJ,it was noted that the COF declined to 0.137 and the curve was smoother. The 68.9% large decrease in COF suggested that the modified sample by FsLSM has a specific wear resistance. In addition, the wear mass loss of untreated,nanosecond LSPed and FsLSMed specimens was 10, 7, 11,1 mg, respectively, as evident in Fig. 10(b). Compared with that of untreated specimens, the wear mass loss of specimens with FsLSM decreased by 90%.Both the COF and wear mass loss results prove that the wear and friction performance of Ti6Al4V titanium alloy can be effectively improved by FsLSM.
The optical image, three-dimensional morphology and sectioned profile of the wear scar of untreated,nanosecond LSPed and FsLSMed specimens are shown in Fig. 11. It can be observed notably from Fig. 11(a) that the width of the wear scar of untreated and nanosecond LSPed specimens is wider than that of the FsLSMed specimen.And this can also be confirmed in the 3D image.Moreover,it can be seen that the wear depth was maximum in the center and gradually decreased with the increasing distance away from the center.On the worn surface, many grooves caused by micro-plowing can be observed. And this micro-plowing phenomenon is more obvious in untreated and nanosecond LSPed specimens than in FsLSMed specimens. To characterize the wear scar quantitatively,the data of the sectioned profiles of the wear scar along the arrowhead direction in Fig.11(a)was extracted and plotted in Fig. 11(b). Based on the comparison among the three curves,it was found that the width and depth of the wear scar of FsLSMed specimens were narrower and shallower. For example, the width value of FsLSMed specimens is around 648 μm, while for the untreated and nanosecond LSPed specimens it reaches 1531 μm and 1354 μm,respectively. As for the wear depth, the value for the FsLSMed specimens is ~80 μm,which is smaller than the depth(~110 μm)of the wear scar of untreated and nanosecond LSPed specimens. Thus, the narrower and shallower wear scar in FsLSMed specimens results in a smaller wear mass loss due to the plastic removal under a repeated rotating action.
Fig. 12 shows the typical morphology of the wear scar of untreated and FsLSMed specimens sliding against GCr15 balls. At the same time, the EDS mappings of some representative regions on the worn surface are also presented to better understand the wear behavior.As show in Fig.12(a),there are many craters and lots of wear debris seen on the wear track surface,which is caused by the micro-cutting of hard asperities on the GCr15.And this indicates that adhesive wear has occurred.Additionally,this wear debris on the sliding interface would take part in the friction process,resulting in severe plastic deformation and wear damage by three-body wear. Meanwhile, it is known to all that during the sliding process the frictional heat would definitely lead to thermally soften the titanium alloy. In this case, the counter abrasive materials would be attached to the surface of the softened material,which could be confirmed by the observation of a rough worn surface induced by metal plastic flow.Besides,the rough worn surface with parallel grooves can be clearly identified,implying that abrasive wear also occurred here.Furthermore,the corresponding EDS mapping of selected particles on the surface shows the occurrence of oxidation.This is because the titanium alloy reacted chemically with the oxygen in the air. In conclusion, the wear mechanism of the untreated Ti6Al4V titanium alloy was mainly composed of adhesion wear, abrasive wear and slight oxidative wear.
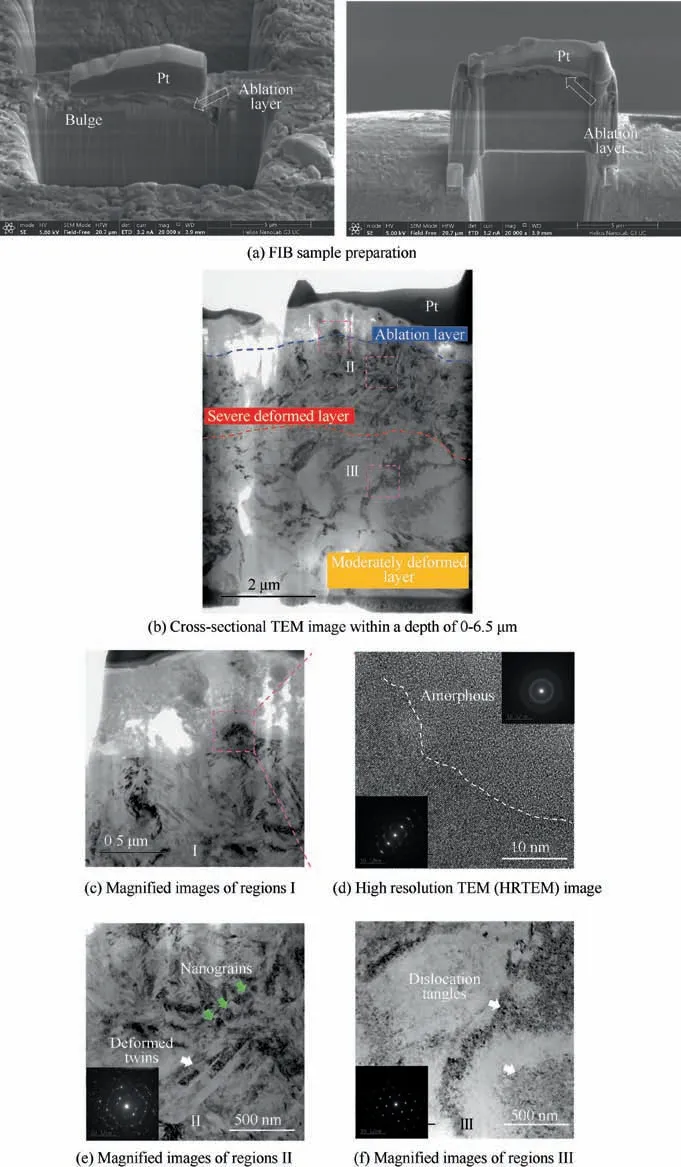
Fig. 9 TEM images showing microstructure evolution on top surface of Ti6Al4V titanium alloy with FsLSM treatment at 150 μJ.
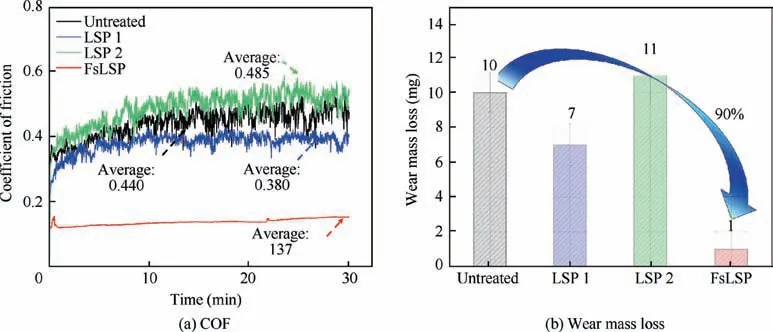
Fig. 10 Coefficient of friction (COF) and wear mass loss of untreated, nanosecond LSPed and FsLSMed specimens.

Fig. 11 Morphology and sectioned profiles of wear scar of untreated, nanosecond LSPed and FsLSMed specimens.
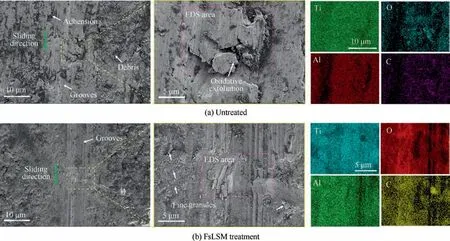
Fig. 12 Typical morphology of wear scar of untreated and FsLSMed specimens.
As for the titanium alloy with FsLSM treatment, it can be noted that the large particles originally existed in the worn surface of untreated specimen were replaced by fine granules by the grinding action of the two hard surfaces and the wear track exhibits a relatively smooth and flatter appearance(Fig.12(b)).As is mentioned in Section 3.3, the increasing hardness was achieved on and near the surface layer of the titanium alloy by FsLSM.Therefore,the debris generated during the friction process would retain its inherent characterization of a higher degree of hardness, which could effectively prevent adhesion wear.In addition, it was also found that the width of grooves was narrower than that of untreated specimens and the ablated structures remain visible, implying a greater wear resistance induced by FsLSM. All these observed results form good support of the measurements of COF and wear loss.The EDS mapping of the wear track shows that the oxide coating was partly damaged. From Fig. 9(b), it can be found that the maximum depth of the wear scar has reached ~80 μm.Thus,it is reasonable and inevitable to observe that the oxide coating was worn through.
3.7. Discussion on the strengthening mechanism
As is mentioned above,the significant decrease in COF and the wear mass loss of the Ti6Al4V titanium alloy was achieved by FsLSM, indicating the greater effectiveness of FsLSM on the improvement of friction and wear performance. As shown in Fig. 13, the strengthening mechanism could be concluded as following:
(I) The fact that the titanium alloy specimens with FsLSM treatment exhibited a lower COF and wear mass loss as compared with that of ns-LSPed samples indicates some new mechanism acting here.During the friction process,Xu et al.have suggested that the COF value is closely related to the contact state, the lubrication of the interface and the actual contact area.As shown in Section 3.1,the OM and SEM images have confirmed that LIPSS homogeneously covered the titanium alloy surface,which was not observed in the samples subjected to ns-LSP as seen from related publications.These laser-generated surface structures could significantly reduce the adhesion between metal and friction pairs during the repeated sliding motion by forming a gliding intermediate layer.In this case,the contact area between the surface of micro-textures and the ball decreased,thereby resulting in the reduction of COF.In addition,the valleys between ripple ridges could allow the control of the motion and the flow of finer debris formed in the friction process in a tribologically way, which protected the interior soft materials from a direct intermetallic contact. The large debris peeling could be effectively avoided,thereby resulting in the improvement of friction and wear performance. This result is consistent with the report.In conclusion, the decreased contact areas and the trapped effect played a key role in the COF.
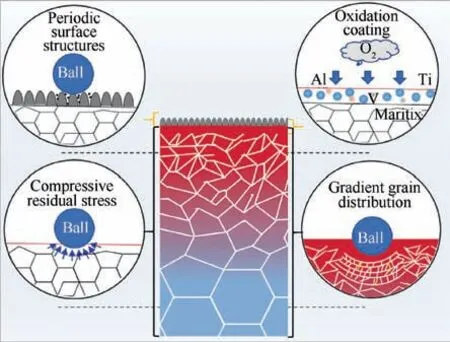
Fig. 13 Schematic illustrations of strengthening mechanism of FsLSM.
(II) Chemical analysis by EDS revealed that a superficial oxidation which was not observed in ns-LSPed specimens was generated in the processing area of samples with FsLSM treatment.It has been reported that the initial oxide layer could act as a solid lubricant and decrease the COF.Moreover, the oxidized layer that was formed as well as the nanograins layer on the top surface produced a higher hardness and elasticity modulus,which promoted the resistance capacity of LIPSS to plasticity and elastic deformation.Thus, the cutting action of the grounding ball was effectively restrained by the oxide coating and the ripple structures could remain intact due to the unique conformality of the outer oxide coating. Thus, the beneficial tribological effects induced by LIPSS could be retained for a long time as a result of inorganic hard coating. The results that the laser-induced oxide layer supports the reduction of friction and wear were also reported in the research by Kirner et al.Based on the results of the experiment, it can be seen that the combination of LIPSS and outer oxide coating produce an effective method to promote friction and wear performance.
(III) From the residual stress measurements,it was noted that the FsLSM introduced beneficial compressive residual stress at and near the surface layer of the titanium alloy.The maximum value has reached-746 MPa with a laser energy of 150 μJ, and the compressive residual stress affected depth was 83 μm. As we found out, the high amplitude compressive residual stress induced by FsLSM could improve the resistance of the materials to surface-dependent failures such as fretting fatigue by delaying the crack initiation time and its propagation.And this mechanism is also suitable for the improvement of wear performance. The pre-existing high amplitude compressive residual stress induced by FsLSM could critically combine with the applied stress by the ball, which results in the gradual decrease in the actual stress the material experienced.In addition,compressive residual stress enhanced the threshold of crack growth by decreasing the stress intensity factor.Thus,it was difficult for the debris peeling to occur during the friction process.This could be confirmed by the fact that there were fewer traces of the deformation features on the wear scar surface of FsLSMed specimens compared with that of untreated specimens. A passive film caused by compressive residual stress was generated below the oxidation layer, which benefited the improvement of wear and friction performance.
(IV) As described in Section 3.3, the surface hardness of the Ti6Al4V titanium alloy with FsLSM treatment at 150 μJ was improved by 16.6% in maximum as compared to that of untreated specimens, which produced a smaller contact area.At the same time, the distribution of gradient hardness along the direction of the depth as a result of the distribution of the size of the grain also presented a smoother transition of mechanical properties, thereby resulting in the improvement of the load-carrying capacity.During the friction experiment,the finer grain layer in the FsLSM sample could accommodate the large plastic strain induced by the sliding contact, and the stress concentration in the crack tip was suppressed. Thus, crack propagation in the subsurface was prevented due to the decreased driven force.While for the untreated specimen, the elongated grains below the contact interface could not accommodate large plastic strain imposed by the high contacting load as well as frictional force, vortical structure filled with cracks was formed inevitably, leading to high COF and low wear resistance.
4. Conclusions
(1) Laser-induced periodic surface structures (LIPSS) wear fabricated in the ablated areas of the Ti6Al4V titanium alloy subjected to FsLSM treatment, which inhibited adhesive tendency by reducing the contact area and decreased the abrasive wear by capturing wear debris.
(2) The surface microhardness of the specimens with FsLSM treatment was improved from 350 HV to 408 HV in maximum,about a 16.6%increase.The distribution of the hardness along the direction of the depth presented a gradient tendency and the affected thickness was around 100 μm.
(3) High amplitude compressive residual stress was introduced on the subsurface of the specimens with FsLSM treatment and the maximum value reached -746 MPa.
(4) A superficial titanium oxidation with a thickness of approximately 4 μm was formed during the laser surface treatment, which produced a higher value of the hardness to prevent the LIPSS from being damaged.
(5) The average coefficient of friction (COF) of the specimen with FsLSM treatment decreased from 0.440 to 0.137, decreasing by 68.9%. And the wear mass loss of specimens with FsLSM dropped by 90%.
(6) The reason for the improvement in the tribological performance is attributed to the comprehensive action of the generation of laser-induced periodic surface structures (LIPSS), titanium oxide, high amplitude compressive residual stress and gradient grain size distribution during the laser surface treatment.
The authors declare that they have no known competing financial interests or personal relationships that could have appeared to influence the work reported in this paper.
s
This study was co-supported by the Key-Area Research and Development Program of Guangdong Province (No.2018B090906002), the National Natural Science Foundation of China (No. 51875574) and the National Science and Technology Major Project of China (No. 2017-VII-0003-0096-1).
 Chinese Journal of Aeronautics2022年4期
- Chinese Journal of Aeronautics的其它文章
- Reduced-dimensional MPC controller for direct thrust control
- A multiscale transform denoising method of the bionic polarized light compass for improving the unmanned aerial vehicle navigation accuracy
- Periodic acoustic source tracking using propagation delayed measurements
- Optimal predictive sliding-mode guidance law for intercepting near-space hypersonic maneuvering target
- Sea fog detection based on unsupervised domain adaptation
- Unsteady characteristic research on aerodynamic interaction of slotted wingtip in flapping kinematics
