Profile error compensation in precision grinding of ellipsoid optical surface
Shimeng YU, Jiahao ZHU, Peng YAO, Chuanzhen HUANG
Center for Advanced Jet Engineering Technologies (CaJET), School of Mechanical Engineering, Shandong University, Jinan 250061, China
Key Laboratory of High Efficiency and Clean Mechanical Manufacture, Shandong University, Ministry of Education, Jinan 250061, China
KEYWORDS Aspheric lens;Ellipsoid surface;Error compensation;Grinding wheel truing;Precision grinding
Abstract Optical glass elements with the ellipsoidal surface are used in many critical aerospace instruments, such as satellites, telescope and cameras.Their optical performance is mainly affected by profile accuracy and surface quality. In this paper, a rectangular ellipsoid surface is precisely ground on a BK7 optical glass blank by grating scanning grinding path with a three-axis CNC precision surface grinder. A profile error compensation procedure for ellipsoidal grinding is proposed based on the error analysis about the primary error sources in the XY and YZ projection planes during the grinding process. The mathematical prediction models of the wheel arc profile error,the measurement and wear error of the grinding wheel radiuses are established.By applying the proposed error compensation procedure, the profile accuracy of the ellipsoidal surface was improved from 4 μm to 2 μm in the XY plane, and improved from 15 μm to 5 μm in the YZ plane.
1. Introduction
There is a substantially increased demand for aspheric lenses with high form accuracy and surface quality in the advanced optical systems due to their advantages such as aberration correction and good imaging quality.Among them, the ellipsoidal lenses play a role of expanding or reducing a beam in an optical system, and its performance requires higher form accuracy of the lens.Optical glasses,which have a high refractive index,high hardness,low coefficient of thermal expansion,good chemical stability and corrosion resistance, can well adapt to the unique environment in the aerospace field, and are ideal materials for aspheric lens.The machining of aspherical optical components requires high-efficiency milling, precision grinding,and precision polishing.The high form accuracy in the precision grinding stage will significantly reduce the time required for polishing.
Generally, it is easier to obtain aspheric optical elements with high form accuracy by using arc-shaped diamond grinding wheels.However,the diamond grinding wheel is gradually worn during the grinding process, which reduces the accuracy of the arc profile of the grinding wheel,resulting in a reduction in aspheric grinding accuracy.Therefore,the dressing of the grinding wheel is very important to improve the form accuracy and surface quality of the aspheric surface.
At present, the dressing methods of super-hard diamond wheels mainly include mechanical dressing, laser-mechanical combination dressing, electrical discharge dressing and abrasive waterjet dressing.Mechanical dressing has been extensively used for nearly all types of diamond grinding wheels.An efficient dressing method was developed by Chen et al,namely, on-machine rotary green silicon carbide rod(ORGCR)dressing method.The arc-shaped diamond grinding wheels with any designed radius could be obtained by the ORGCR dressing method. The form error of the diamond wheel arc profile reached 2.5 μm to 6 μm per 3 mm.Zhu et al.proposed a high-efficiency method, similar in principle to Chen et al.but using a different helical interpolation trajectory to dress the diamond grinding wheel with arc profile.This method could keep uniform wear of the dressing wheel. The arc profile accuracy of the diamond grinding wheel was improved to 5 μm (PV).Laser dressing is a non-contact dressing method, which can selectively remove bond material without damaging super-hard abrasive. Chen et al. presented that,the diamond grains and the bronze bond could be simultaneously removed by controlling the laser power up to 40 W.The circular runout error and the axial gradient error of the wheel surface was improved to 9.5 and 0.8 μm respectively,i.e.The electrical discharge truing(EDT)is a kind of dressing method which combines electrochemical and mechanical action. Guo and Zhaogave a novel on-machine dry electric discharge truing (EDT) method to precision arc-shaped and V-shaped diamond grinding wheels. The profile error of the arc-shaped could be significantly decreased to 4 μm, and the V-shaped diamond wheel with 22.5 μm V-tip radius could be generated. Abrasive waterjet (AWJ) introduces an impressive new technology for high efficiency diamond wheel dressing,which has no mechanical damage of grains and truer wear.The experiment results indicated that both high dressing efficiency and good truing quality can be obtained.In this paper, the helical interpolation truing method was used for generating the profile of the arc-shaped diamond grinding wheel.
In the process of aspheric grinding, there are many errors that affect the profile accuracy, such as workpiece and wheel setting error,tool path error,machine positioning error,wheel wear error,wheel size and section profile errors.Among them,the effect of the tool path and machine positioning errors can be partly masked out when machining with an ultra-precision machine tool. The wheel setting error can be reduced to an appropriate level by using the on-machine precision truing and measurement. The errors that have a greater impact on the accuracy of the workpiece form accuracy after grinding include the wheel dimensional error, the wheel profile error and the geometric error caused by the wheel wear.In order to improve the profile accuracy, the influence of various errors must be reduced or even eliminated. The arc profile error of the grinding wheel can be removed by the precision dressing of the grinding wheel, but other errors need to be reduced or removed through error compensation during the grinding process.Recently, the research on various error principles and error compensation methods in the process of aspheric grinding are mostly for the rotational machining of axisymmetric workpieces, while less research has been done on the grating scanning grinding of rectangular aspheric workpieces.Chen et al.reported a compensation method concerning with the on-machine measurement. They analyzed the effect of the probe size on the ground profile and used the measured profile date to obtain the actual ground profile and the residual profile error for compensation. Compared to the grinding without compensation, the PV value and the surface roughness was further decreased after three compensation grinding cycles. Huang et al.proposed a profile error compensation approach, which significantly reduced the effect of the initial wheel geometry error and residual form error by modifying NC tool path based on measured profile error. By making contrast with the conventional compensation technique, Chen et al.focuses on a novel technique aims to first minimizes the initial form error and then compensates the resulting form error.With this technique,the speed of convergence of the residual form error has improved markedly. Guo et al.established the profile error prediction model by analyzing the effect of the wheel setting error on the profile accuracy. They proposed a compensation scheme based on the prediction model.Xi et al.designed an on-machine noncontact measuring system to compensate the profile error of the large-diameter aspherical mirror arising from tool offset and machine position errors. Lin et al.studied the wheel wear and form error compensation for arc envelope grinding on a T3-configuration machine tool. They developed a new algorithm for wear simulation based on 3D wheel-workpiece contact area to better understand the wear process in grinding aspherical surface. In order to eliminate both noise and highfrequency waves in the measured data,they used the Gaussian process(GP)regression method to fit the form error.The proposed error compensation methods were verified on a threeaxis grinder, and RMS value was successfully reduced by 37%.Jiang et al.considered the wheel runout in the grinding process.They proposed an algorithm for the grinding envelope surface in the multi-axis grinding based on envelope theory.The accuracy of this method is verified through two experiments carried out on a 5-axis machining center.Previous researches focused on the improve of error compensation methods for aspheric grinding based on the on-machine measurement. They calculated the profile error by measuring the profile of the workpiece after grinding, and then compensated the grinding trajectory of the next grinding cycle. These error compensation methods do not analyze the source of the error.While the error sources from different projection directions are different, especially for the rectangular ellipsoidal workpiece.To carry out the error compensation pertinently and improve the machining efficiency by reducing the compensation cycles,it is essential to separate the main errors existing in the grinding process.
In this paper, a new grinding error compensation scheme for the grinding of the rectangular ellipsoidal workpiece is proposed,which separates the main errors existing in the grinding process and analyzes the error sources from different projection directions.The error in the YZ projection plane is mainly derived from the arc profile error of the arc-shaped grinding wheel, while the error in the XY projection plane is mainly derived from the grinding wheel radius measurement error and the grinding wheel radius wear error. In this paper, these two errors are theoretically analyzed, and mathematical models of the errors are established. Finally, an ellipsoidal surface was precision ground.
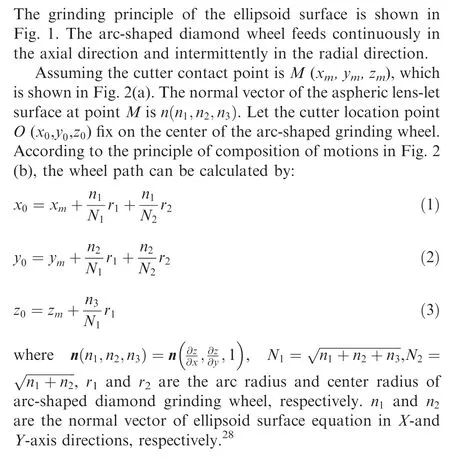
2. Grinding principle of ellipsoid surface
3. Error analysis for grinding ellipsoid
Fig. 2 shows the schematic diagram of relative movement of grinding wheel and workpiece in two projection planes of YZ and XY. As shown in Fig. 2(a), the grinding method in the YZ plane is parallel grinding. The arc profile of the diamond wheel and the elliptical section of the BK7 glass keep tangent at all times.With the axial feed of the diamond grinding wheel, every point on the arc profile of the grinding wheel is involved in the grinding process, and each point is only involved in the grinding once. The grinding process in the YZ plane is actually copying the arc shape of the grinding wheel to the glass surface, so the profile accuracy of the BK7 glass in the YZ plane after grinding is mainly determined by the profile accuracy of the arc-shaped diamond wheel.
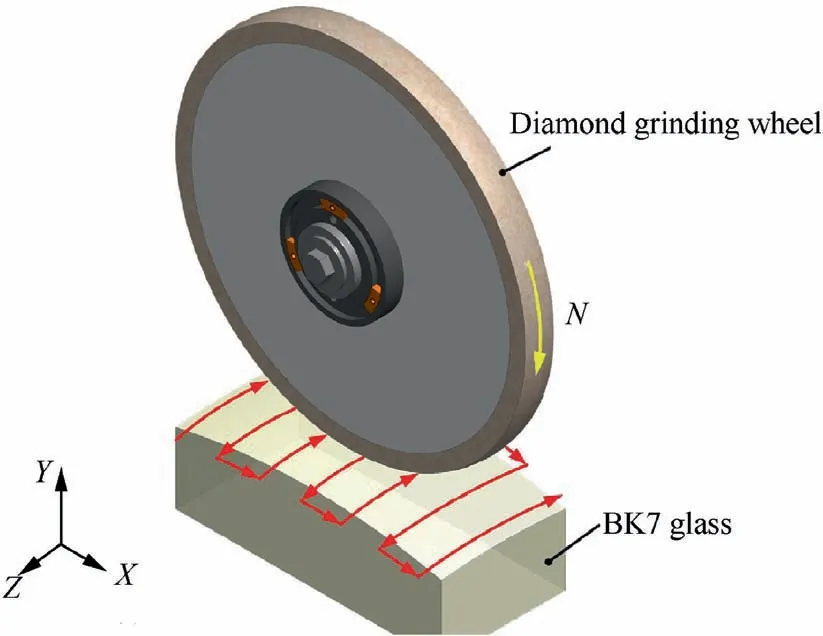
Fig. 1 Grinding principle of ellipsoid surface.
As shown in Fig.2(b),the grinding method in the XY plane is vertical grinding. The grinding wheel and the BK7 glass are kept tangent at all times.The grinding wheel trajectory can be regarded as the offset ellipse of the ellipsoidal surface in the cross-section elliptical contour of the XY plane. The points on the grinding wheel have participated in the grinding many times. The form accuracy of the elliptical contour in this projection plane is mainly determined by the measurement error of the grinding wheel radius and the grinding wheel radius wear error.
3.1. Measurement error of grinding wheel radius
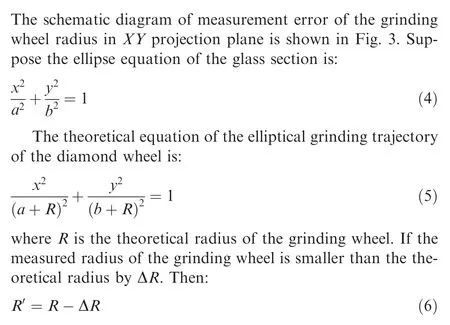
where Ris the measured radius of the grinding wheel.According to Eq.(1),the equation of the elliptical grinding trajectory of the diamond wheel during actual grinding is:
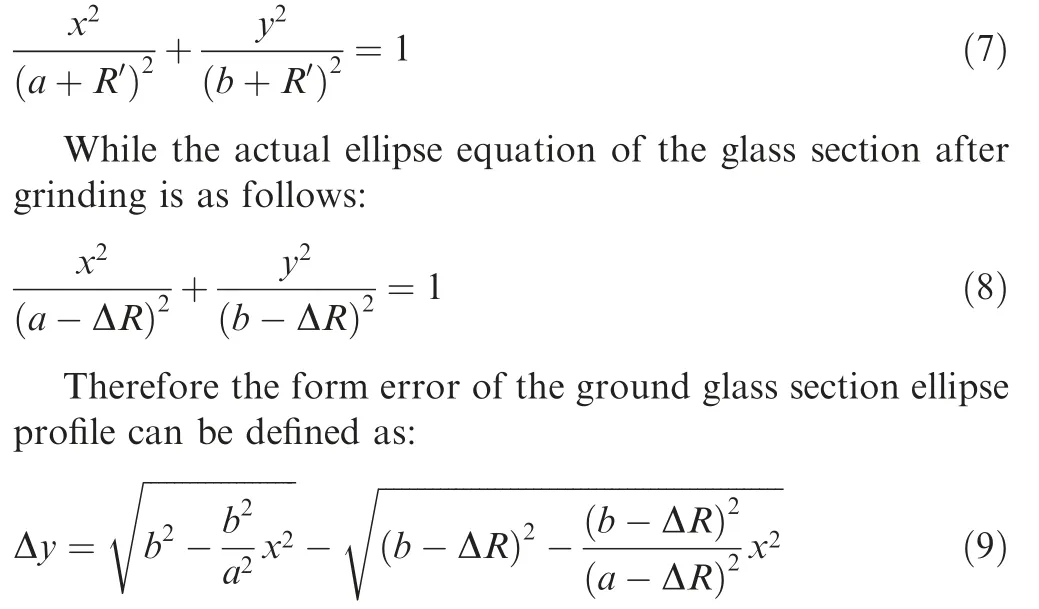
To verify the accuracy of the theoretical error model, ellipsoid surface grinding experiments were generated on a BK7 glass block with a 3-axis CNC ultra-precision grinder NAS520X-CNC,which is shown in Fig.4.The detailed grinding parameters are shown in Table 1. In the experiments, certain measurement errors of grinding wheel radius were artificially added. After each grinding cycle, a laser displacement sensor(LK-G10)was used to scan the BK7 glass surface along the X-axis direction.
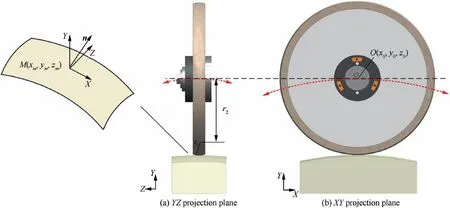
Fig. 2 A schematic diagram of relative movement between grinding wheel and workpiece in two projection planes of YZ and XY.
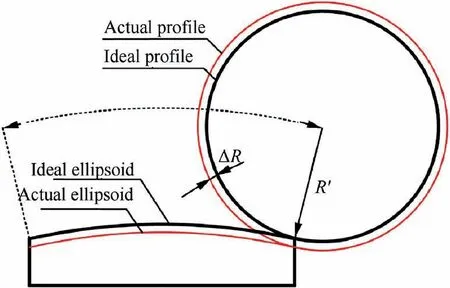
Fig. 3 Schematic diagram of measurement error of grinding wheel radius in XY projection plane.
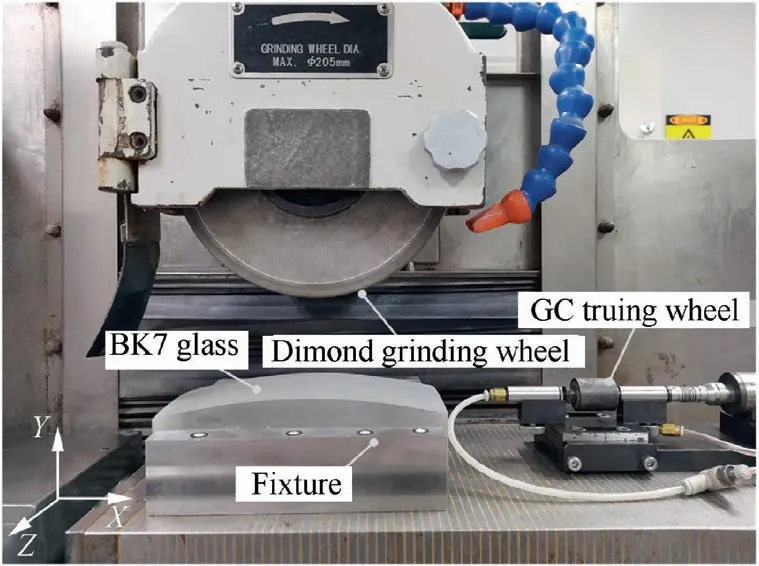
Fig. 4 Setup of grinding experiments.
The effects of measurement error of grinding wheel radius on the section shape deviation of ground ellipsoid BK7 glass are shown in Fig. 5. Fig. 5(a), (b), (c) and (d) are the form errors when the introduced measurement error of grinding wheel radius is 300, 500, 1000 and 3000 μm respectively. The solid line in the figure is the profile deviation of the glass section after actual grinding,and the dotted line is the theoretical profile deviation predicted by Eq. (9). It can be seen that the actual profile deviation curves after grinding are in good agreement with the predicted results. As can be seen from the devi-ation curve, the absolute value of the profile deviation gradually increases from the middle to both ends of the glass section.As the measurement error of the grinding wheel radius increases,the more obvious the bending degree of profile deviation curve is, and the higher the coincidence degree between experimental results and predicted results is. It is obvious that there are some other errors that affect the experimental results,such as machine tool system errors,etc.Due to the large X-axis feed step used in grinding,the grinding marks on the BK7 glass surface are obvious after grinding. There are obvious periodic noise signals in the profile deviation curve of glass section caused by grinding marks.
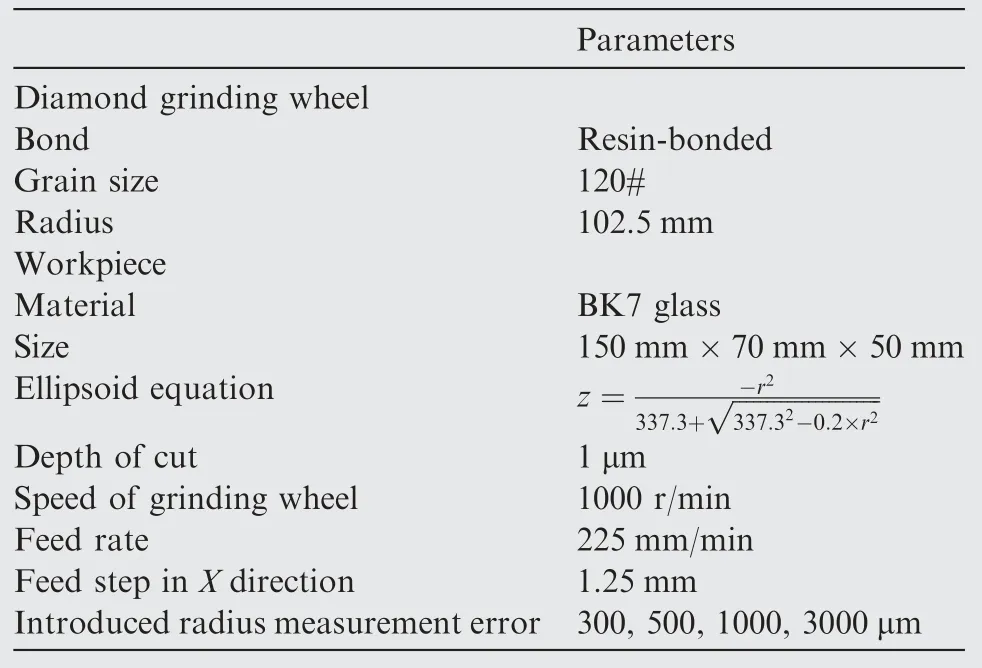
Table 1 Grinding experimental parameters of BK7 glass.
3.2. Wear error of grinding wheel radius
During the grinding process,as the diamond wheel feeds from left to right, the wheel will inevitably wear, and the radius of the wheel will gradually decrease.As shown in Fig.6,the wear of the grinding wheel radius causes deviations in the profile of the BK7 glass after grinding.
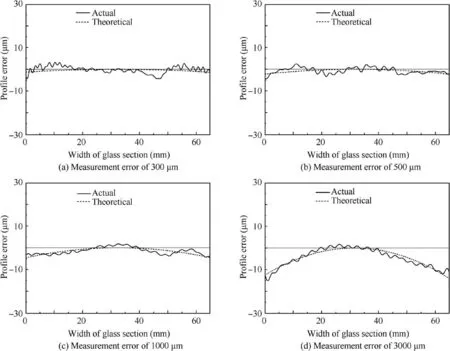
Fig. 5 Effect of measurement error of grinding wheel radius on section shape deviation of grinded ellipsoid BK7 glass.
During the grinding process, as the volume of the material to be ground increases, the wear of the grinding wheel gradually increases. Generally, the grinding wheel wear rate can be expressed by the grinding ratio G. The grinding ratio G refers to the ratio of volume of the workpiece material removed and the volume of the grinding wheel wear under the same grinding conditions, as follows:

where Vis the workpiece removal volume per unit time, and Vis the grinding wheel removal volume per unit time. The grinding ratio G is related to the grinding wheel parameters,workpiece materials,grinding parameters,etc.For a particular workpiece material, the grinding ratio G has a constant value under certain grinding conditions. For the grinding of ellipsoidal BK7 glass, in order to study the influence of grinding wheel radius wear on grinding accuracy, the grinding ratio G can be simplified as the relationship between grinding wheel radius wear and cumulative grinding depth, as follows:

where ΔR is the wear value of the wheel radius,Cis the cumulative grinding depth.Similarly,the grinding wheel radius wear has a fixed relationship with the cumulative grinding depth for BK7 glass under a specific grinding condition.
To obtain the relationship between the wear of the grinding wheel radius and the cumulative grinding depth, a grinding experiment of ellipsoidal BK7 glass was carried out. The resin bonded diamond wheel with an average grain size of 124 μm was used to grind the ellipsoidal BK7 glass. The linear speed of the wheel was 8.59 m/s, the feed speed was 225 mm/min,and the X-axis feed step was 1.25 mm. A laser displacement sensor (LK-G10) was adopted to measure the arc profile of the diamond wheel.
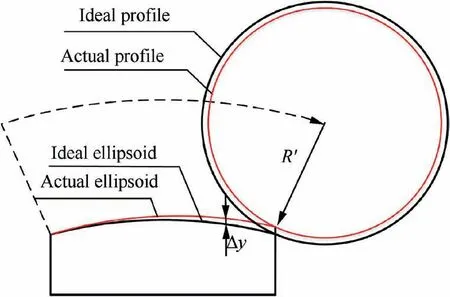
Fig.6 Schematic diagram of wear error of grinding wheel radius in XY projection plane.
The experimental results are shown in Fig.7.the black scatter points in the figure are the grinding wheel radius wear amount at different accumulated grinding depths. It can be seen that as the cumulative grinding depth increases, the wear of the grinding wheel radius also gradually increases, which approximates a linear change. The black curve in Fig. 7 is obtained by linear fitting of the scatter points.The curve equation is:

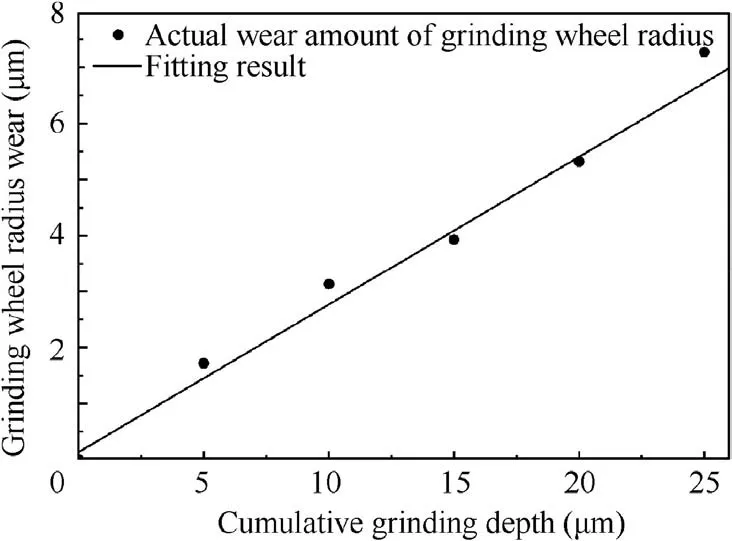
Fig. 7 Variation of wheel radius wear with cumulative grinding depth.
The standard deviation of the fitting is 0.008,so Eq.(12)is the variation rule of the grinding wheel radius wear amount with the cumulative grinding depth in theory. The variation rule of the grinding wheel radius wear amount with the number of steps of the grinding wheel during one grinding process is approximate:

where a is the total number of steps of the grinding wheel during one grinding process, and ΔRis the wear amount of the grinding wheel radius in each step.
3.3. Arc profile error of grinding wheel
In the YZ projection plane, the profile error of the arc-shaped grinding wheel will be directly copied to the glass surface,which will affect the profile accuracy of the ground ellipsoidal surface.This error can be removed by the precision dressing of grinding wheel. The principle of dressing arc-shaped diamond grinding wheel by green silicon carbon(GC)wheel is shown in Fig. 8. During the dressing process, the rotary axis of the diamond grinding wheel and GC wheel remain vertical.With precision three-axis linkage controlling,the diamond wheel makes circular interpolation movement along the circumferential surface of the GC wheel in the YZ plane.Meanwhile,the dressing wheel makes linear reciprocating motion along the X axis. In the dressing process,the diamond wheel and the dressing wheel keep continuous contact, which will keep a uniform wear of the dressing wheel and improve the profile accuracy of diamond wheel.
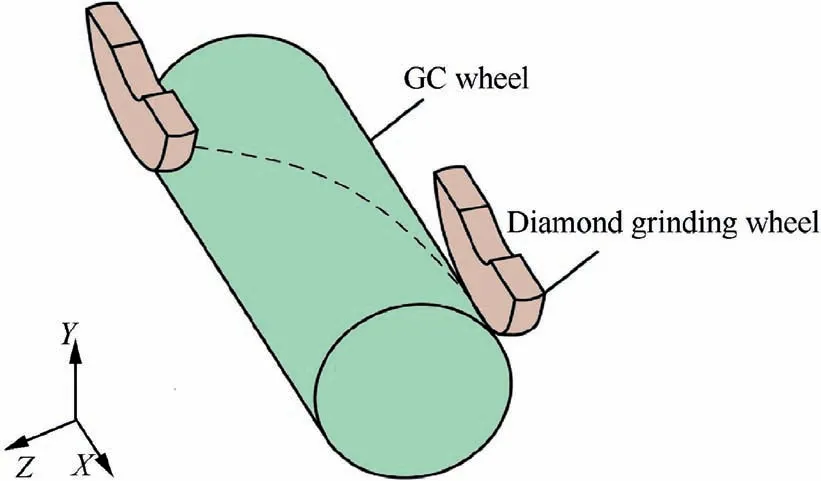
Fig. 8 Schematic diagram of dressing principle.
4. Error compensation
4.1. Error compensation scheme
Based on the above error analysis,there may be grinding wheel radius measurement error, grinding wheel radius wear error and the arc profile error of the grinding wheel in the grinding process. The arc profile error of the grinding wheel can be reduced to an appropriate level by using the precision truing method. The influence of grinding wheel radius wear error on profile accuracy are insignificant when the grinding wheel radius wear error is small.However,the grinding wheel radius measurement error significantly affects the profile accuracy.This error must be compensated during the grinding process.It should be compensated first. The error compensation scheme for ellipsoid grinding is proposed, as shown in Fig. 9.Firstly, the arc diamond grinding wheel is precisely dressed by the helical interpolation truing method with a rotary GC wheel, and the ellipsoid surface is ground by the dressed diamond grinding wheel. In the grinding process, the deviation curve of glass section shape is obtained by measuring the profile of the glass section after the first grinding cycle.If the profile accuracy is not met the requirement, a profile error compensation grinding would be needed. The error value of grinding wheel radius measurement can be obtained by fitting the curve with deviation equation, and this error is compensated in the next grinding cycle by adjusting the wheel radius in the NC program.
4.2. Set up and parameters of experiments
A high efficiency precision truing experiment for arc-shaped diamond grinding wheel is carried out on ultra-precision grinder NAS520X-CNC, the experimental setup is shown in Fig.10.The parameters of the dressing experiments are shown in Table 2. In order to improve the truing efficiency, a 180#GC wheel was chosen to dress the120# diamond grinding wheel during the dressing experiment. In the experiment, the linear speed of the diamond wheel was 6.44 m/s, the linear speed of the dressing wheel was 4.19 m/s, the feed speed of the wheel was 240 mm/min, and the grinding depth was 2 μm.
The wheel arc profile was measured by the Keyence LKG10 laser displacement sensor.
The ellipsoid surface was ground on the BK7 glass block with the trued arc-shaped diamond grinding wheel, and the measurement error of and the wear error of the grinding wheel radius are compensated in the grinding process. The linear speed of the wheel was 8.59 m/s, the feed speed was 225 mm/min,the depth of grinding was 0.3 μm and the X-axis feed step was 1.25 mm. The sectional profile of BK7 glass in the XY plane and YZ plane was measured by the Keyence LK-G10 laser displacement sensor before and after the grinding experiment.
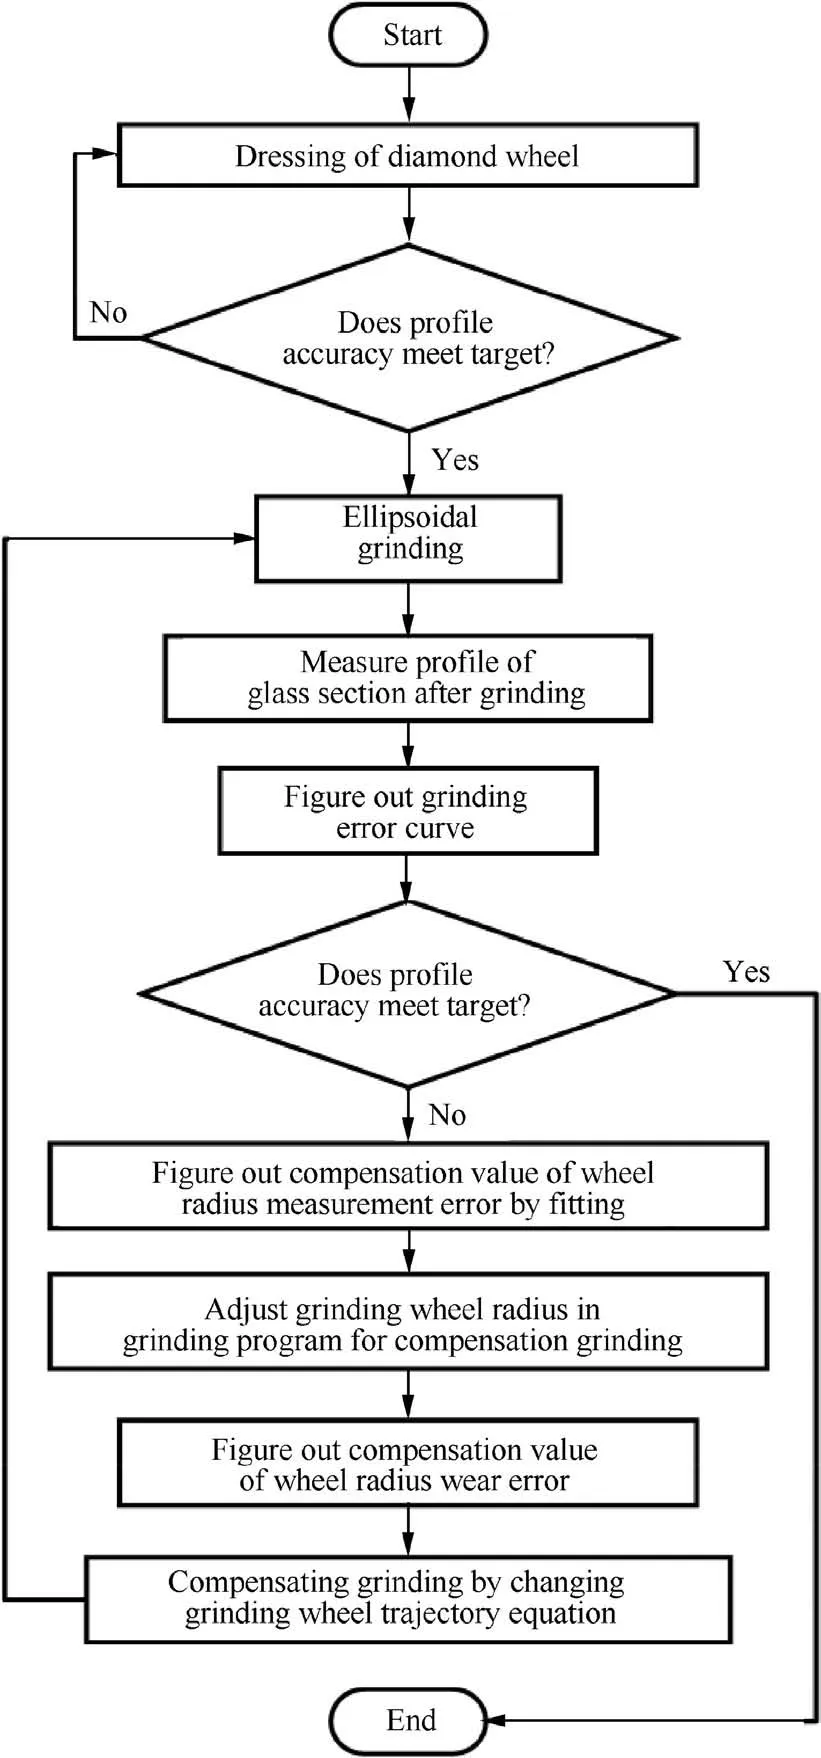
Fig. 9 Flow chart of error compensation scheme for ellipsoid grinding.
4.3. Results and discussion
Wheel profile error curves before and after dressing are shown in Fig. 11. The arc profile error of the grinding wheel was reduced from 16.5 μm (PV) to 5.0 μm after truing. It shows that the helical interpolation truing method can effectively reduce the wheel arc profile error.
The profile error curve of the glass section obtained by grinding with the undressed grinding wheel is shown in Fig. 12, and the profile error (in PV) value is about 12.0 μm.The arc-shaped diamond grinding wheel obtained by the helical interpolation truing experiment is used to grind the ellipsoid surface of BK7 glass, and the profile error of the glass in the YZ section after grinding is shown by the solid line in Fig. 12, with the profile error being 4.8 μm. It is shown that using the diamond wheel after dressing can achieve higher grinding accuracy.
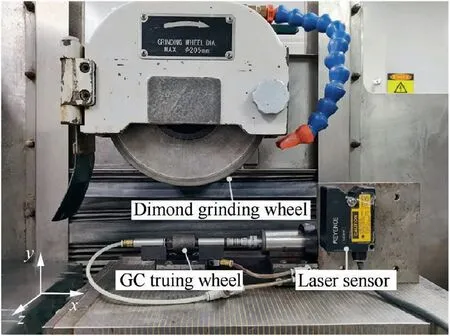
Fig. 10 Setup of helical interpolation precision truing experiments.
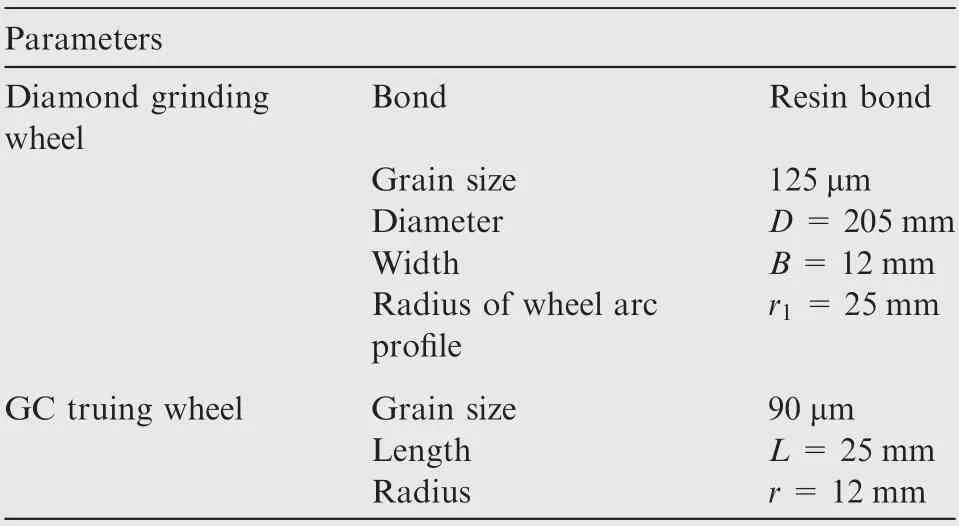
Table 2 Parameters of grinding wheel and dressing wheel.
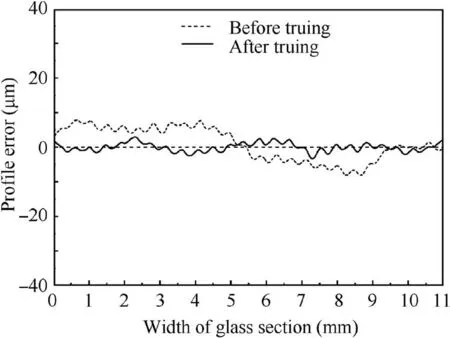
Fig. 11 Arc profile deviation curve of diamond grinding wheel before and after truing.
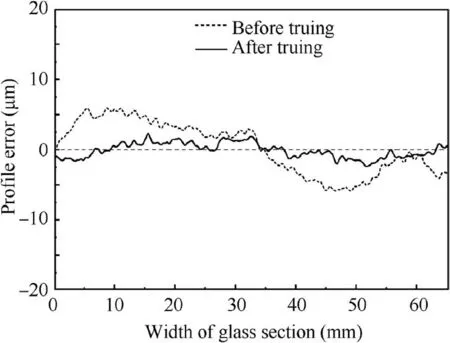
Fig.12 Effect of grinding wheel truing on profile error of ground ellipsoid BK7 glass.
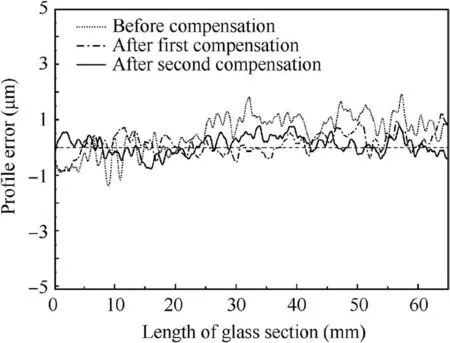
Fig.13 Profile error of glass section in XY plane before and after compensation grinding cycle.
The profile error of the glass section in the XY plane is shown in Fig.13.The dotted line in Fig.13 is the profile error of glass section after primary grinding,which is approximately an arched curve. The profile error (in PV) is about 3.5 μm.While it is out of accord with the above wheel radius measurement error curves. It is obvious that there were two or more error sources exist in the grinding process. According to the error analysis, it can be judged that the measurement error of wheel radius exists in the grinding process. Therefore, the measurement error of grinding wheel radius can be obtained by fitting the error curve based on Eq. (9). After adjusting the wheel radius value in the grinding program, the error is removed in the first error-compensated grinding, which is 234 μm. After removing the measurement error of the wheel radius, the profile error of the glass section after grinding is shown as the chain dotted line in Fig. 13, and the error value is reduced to 2.1 μm.The wear error of grinding wheel radius is calculated in each step according to Eq. (13), and the wear error of grinding wheel radius is compensated in the grinding process. The profile error of the glass section after grinding is shown as the solid line in Fig. 13, and the error value is reduced to 1.5 μm. After two compensation grinding cycle,the error was decreased to 42.8%.
5. Conclusion
The main errors in the ellipsoidal BK7 glass grinding process are analyzed in this paper, and a grinding error compensation scheme is proposed.The main conclusions of this work can be drawn:
(1) In the process of the ellipsoid grinding,the error sources in different section directions are different. In XY projection plane, the errors that affect grinding accuracy mainly include grinding wheel radius measurement error and grinding wheel radius wear error. The main error source in YZ projection plane is the arc profile error of grinding wheel.
(2) The mathematical prediction model of grinding wheel radius measurement error is established through geometric analysis and verified by artificially introducing measurement error during BK7 glass grinding experiment.The predicted value and variation trend of profile error coincide well with the experiment results.The relationship between the wear of the wheel radius and the cumulative grinding depth was obtained through the BK7 glass grinding experiment. The results show that the wear of the grinding wheel radius increases linearly with the increase of the cumulative grinding depth. By comparing the measurement error of grinding wheel radius with the wear error of grinding wheel,we can find that the influence of grinding wheel radius measurement error on profile accuracy are significant.
(3) The helical interpolation truing method is able to realize the precision truing of arc-shaped diamond wheels. The arc profile deviation of the grinding wheel can be reduced from 16.5 μm to 5 μm by the precision dressing method. The ellipsoidal surface was ground with the dressed grinding wheel,and the profile error of the glass section in the YZ plane after grinding was 4.8 μm.
(4) Based on the analysis of grinding errors, an ellipsoidal BK7 glass grinding error compensation scheme is proposed, and an error compensation grinding experiment is performed. The profile error of the glass section in the XY plane was reduced from 3.5 μm to 1.5 μm by compensating the measurement error of wheel radius in the error compensation grinding cycle,indicating that the error compensation can effectively improve the grinding accuracy.
Declaration of Competing Interest
The authors declare that they have no known competing financial interests or personal relationships that could have appeared to influence the work reported in this paper.
Acknowledgments
This work was supported by National Natural Science Foundation of China(no. 51875321),Shandong Provincial Natural Science Foundation (no. ZR2018MEE019) and Major Basic Research of Shandong Provincial Natural Science Foundation(no. ZR2018ZB0521, ZR2018ZA0401).
 CHINESE JOURNAL OF AERONAUTICS2021年4期
- CHINESE JOURNAL OF AERONAUTICS的其它文章
- Time delay compensation in lateral-directional flight control systems at high angles of attack
- Dual stability enhancement mechanisms of axial-slot casing treatment in a high-speed mixed-flow compressor with various tip clearances
- Development cost prediction of general aviation aircraft using combined estimation technique
- Improvement on shaped-hole film cooling effectiveness by integrating upstream sand-dune-shaped ramps
- Modeling and parameter identification of linear time-varying systems based on adaptive chirplet transform under random excitation
- An experimental method to obtain the hard alpha anomaly distribution for titanium alloy aeroengine disks
