Improving corrosive wear resistance of Mg-Zn-Y-Zr alloys through heat treatment
S.D.Wang ,M.Y.Wu ,D.K.Xu ,En-hou Han
aNorthwestern Polytechnical University,Xi’an 710072,China
b Key Laboratory of Nuclear Materials and Safety Assessment,Chinese Academy of Sciences,Institute of Metal Research,Shenyang 110016,China
c Department of Chemical and Materials Engineering,University of Alberta,Edmonton T6G 2G6,Canada
Abstract The wear behavior of an as-received Mg-Zn-Y-Zr alloy before and after a facile heat treatment was investigated under sliding in air and 0.5 wt.% NaCl solution.Results revealed that the wear resistance of the alloy was remarkably enhanced after the heat treatment,irrespective of testing condition.The wear mechanism was predominantly abrasive wear accompanied by oxidation under the dry sliding condition,while corrosive wear was dominant under sliding in the NaCl solution.The superior corrosive wear resistance was attributed to the homogenous distribution of fine I-phase precipitates in the alloy by the heat treatment,leading to a reduction in wear,corrosion as well as wear-corrosion synergy.The wear-accelerated corrosion rate was remarkably alleviated after the heat treatment.
Keywords: Magnesium alloy;Heat treatment;Corrosion;Wear;Tribocorrosion.
1.Introduction
Magnesium (Mg) alloys,which are known as the lightest metallic structural materials,have received considerable attention for their potential use in important sectors such as automobile,aerospace,3C industries,and biomedical applications [1–6].However,the relatively low strength,corrosion,and wear resistance have limited the wide application of Mg alloys in the above-mentioned field [7–9].To overcome these drawbacks,I-phase (Mg3Zn6Y,icosahedral quasicrystal structure) strengthened Mg-Zn-Y-Zr alloys have been developed by controlling the Zn/Y ratio of 5–7 [10,11].The reported yield strength of an as-cast Mg-Zn-Y-Zr alloy was as high as 450 MPa depending on the volume fraction of the I-phase[12].With the formation of the I-phase,the corrosion resistance of the as-cast Mg-Zn-Y alloy increased approximately tenfold in comparison with that in the absence of the I-phase[13].More importantly,the corrosion resistance of the I-phase containing Mg alloys could be further enhanced when the area of the exposed I-phase was increased during the corrosion[13,14].Therefore,I-phase strengthened Mg alloys could be considered as potential candidates as load-bearing components in many fields where high strength and corrosion resistance are required [15].
In reality,Mg alloys could be subjected to surface rubbing or sliding in corrosive environments,where corrosive wear resistance of the Mg alloys determines their degradation and failure in service [16].Although many surface modification and coatings,such as micro-arc oxidation [17,18],chemical conversion coatings [19,20],and organic coatings [21],could be employed to improve the wear performance of Mg alloys,it is very critical to improve the properties of bulk Mg alloys.This is because the corrosion acceleration and corrosive wear of bulk Mg alloys would inevitably occur after the damage of surface coatings,rendering a fast failure of these Mg alloys.For the Mg-Zn-Y-Zr alloys,the dry wear resistance could be optimized by controlling the I-phase that possesses the characteristics of high hardness and low friction coefficient [22–24].However,their corrosive wear performance associated with the I-phase has not yet been explored.For the safe application as engineering components from harsh environments,it is important to evaluate and optimize both the dry and corrosive wear performance of the Mg-Zn-Y-Zr alloys [25–27].
Considerable efforts have been devoted to investigate the wear behavior of Mg-Zn-Y-(Zr) alloys and improve their performance [22,28–33].Nevertheless,many of the studies were conducted under dry wear conditions.Zhang et al.studied the wear behaviors of the Mg-25 at.%Zn-(1,2.5 at.%)Y alloys under a dry sliding condition [28].It was found that the friction coefficients of the investigated alloys were dependent on the volume fraction and size of the I-phase.When the Y content was 2 at.%,the wear resistance of the alloy is the best because of the lowest friction coefficient from the high density and small size of the I-phase particles.An et al.reported that Mg97Zn1Y2alloys exhibited good wear resistance under dry sliding in air [29].Five wear mechanisms,i.e.abrasion,oxidation,delamination,thermal softening,and melting,were determined when the tests were performed under different applied loads.The superior wear resistance under high applied loads was attributed to the high thermal stability of the ternary intermetallic phase in the Mg alloy.Sun et al.observed mild-severe wear transition in the Mg-Zn-Y alloys,which was caused by the softening effect in the surface layer material due to frictional heating-induced DRX realization [30].Lv et al.reported that the wear resistance of an ascast Mg-Y-Zn alloy was improved after laser surface melting,which was explained by the improved hardness because of the microstructural refinement in the melted zone [31].By introducing TiB2nanoparticles into the matrix of an as-cast Mg-Zn-Y alloy,Zhao et al.found that the wear resistance of the alloy was improved noticeably,which could be ascribed to the enhanced hardness,work hardening ability,and strength [32].Wan et al.studied the wear resistance of an I-phase strengthened Mg-Zn-Y alloy before and after an isothermal heat treatment at 500 °C[33].The coarse quasicrystal can be gradually dissolved and thus refined after the heat treatment,which led to a deterioration in the wear resistance.Somekawa et al.investigated the friction and wear behavior of Mg-Zn-Y alloys with a dispersion of quasicrystalline phase under the dry condition in air [22].It was determined that a homogenous distribution of the quasicrystalline phase in the coarse-grained matrix was conducive to the wear resistance,whereas the grain refinement was detrimental due to grain boundary sliding.
The above literature review indicates that the dry wear resistance of Mg-Zn-Y-Zr alloy could be effectively improved by controlling the volume fraction and distribution of the I-phases,which could be achieved by employing a simple heat treatment approach.In our previous research,it has been found that fine I-phase precipitations were prevalent in the Mg-Zn-Y-Zr alloy after a two-step heat treatment,which was beneficial to the improvement in mechanical properties and corrosion resistance [34].Meanwhile,the complete dissolution of MgZn2particles in the inhomogeneous zone could further contribute to the promotion of corrosion resistance of the Mg-Zn-Y-Zr alloy [34].Considering that the dry wear resistance of Mg alloys is generally enhanced after the I-phase reinforcement [22,35],it is likely that the wear resistance of the I-phase containing Mg-Zn-Y-Zr alloy under both dry and corrosive conditions could be simultaneously improved via the heat treatment.Investigating the influence of heat treatment on the corrosive wear resistance of the Mg-Zn-Y-Zr alloy is important not only for scientific understanding but also for industrial applications.However,to the best of the authors’knowledge,the effect of heat treatment on the corrosive wear behavior of the I-phase containing Mg-Zn-Y-Zr alloys has not been reported to date.
This work aimed to investigate the wear behavior of an Iphase containing Mg-Zn-Y-Zr alloy before and after a facile heat treatment by sliding wear under the dry condition and in 0.5 wt.% NaCl solution.The underlying mechanism for the variation in the wear resistance was studied and discussed in detail.
2.Material and methods
2.1. Specimen preparation
In this study,a forged Mg-Zn-Y-Zr alloy was used with its chemical composition (wt.%) of: 6.7 Zn,1.3 Y,0.6 Zr,and balance Mg.The forged plate was received from the Magnesium Alloy Research Department,Institute of Metal Research,Chinese Academy of Sciences,Shenyang,China.Rectangular specimens with a dimension of 8 mm × 7 mm × 5 mm were cut from the forged plate,which are referred toas-received specimens,hereafter.Some specimens were heat-treated in a tube furnace with a two-step procedure,i.e.at 300 °C for 1 h and 400 °C for 2 h in flowing nitrogen,and then quenched into room temperature water (referred to as heattreated specimens,hereafter).To reduce the risk of severe oxidation/nitridation/corrosion of Mg alloys during the heat treatment and quenching processes.A square piece of Mg alloy with a dimension of ∼50 mm × 50 mm × 15 mm was cut from the aforementioned forged plate.The Mg alloy square piece was wrapped up by several Al foil layers with good thermal conductivity prior to the heat treatment [34].After the heat treatment and quenching,the heattreated square piece was ground to remove the potential oxidation/nitridation layer and then cut into rectangular specimens,i.e.heat-treated specimens,with the same size as the as-received specimens.These measures reduce the potential effect of oxidation/nitridation/corrosion due to the heat treatment and quenching on the following tests.In our previous research,it has been found that as-received specimen has a microstructure containing coarse I-phase (Mg3Zn6Y),Wphase (Mg3Zn3Y2),and inhomogeneously dispersive MgZn2,and with an average grain size of ∼20 μm [34].The twostep heat treatment could effectively dissolve MgZn2and precipitate fine I-phase particles,which retained the coarse Iphase and W-phase but increased the average grain size to∼150 μm [34].All the surfaces except the studying surface were mounted using epoxy resin.The exposed surface area was 0.56 cm2.The specimens were ground with SiC papers down to 1200 grit and then polished using a suspension of 1 μm Al2O3particles.The polished specimens were degreased and rinsed with ethanol prior to any tests.The grinding and polishing steps would further remove the surface oxidation/nitridation layers if existed,which ensured both the as-received and heat-treated specimens had similar surface conditions for subsequent tests.Specimens for microstructural observation were etched by an etchant with the composition of 1 ml nitric acid,1 ml oxalic acid,and 98 ml distilled water.For comparison,specimens with the same dimension of 8 mm × 7 mm × 5 mm were cut from commercial AZ31 alloy and pure Mg.Then,the specimens were mounted,ground,and polished using the same procedures as that of the Mg-Zn-Y-Zr alloy.
2.2. Nanoindentation test
Nanoindentation tests were carried out at room temperature on a nanoindenter with a diamond Berkovich-type tip.The as-received and heat-treated specimens (i.e.Mg-Zn-Y-Zr alloy) were loaded and unloaded at a rate of 100 mN/min with a maximum load of 50 mN.The time of holding under the maximum load was 10 s.The load and depth of penetration into the specimens during the tests were recorded to calculate the hardness and elastic modulus of the specimens by using the Oliver and Pharr method [36].The specimens were polished and slightly etched in order to acquire reliable nanoindentation data.All the indents were made in the Mg matrix without the coarse second phases.The reported data for each condition were the average of at least twenty measurement results.
2.3. Dry and corrosive wear tests
Reciprocating wear tests under the dry sliding condition were performed in a UMT-2MT tribometer under ball-on-disk configuration at room temperature.Si3N4balls of 4 mm in diameter were used as the counter-face material.For each test,a new Si3N4ball was used to ensure the contact surface of the ball was fresh so that the test condition was consistent.The specific parameters of the tribometer were set as follows:reciprocating amplitude of 3 mm,sliding speed of 5 mm/s,applied load of 5 N,and duration of 20 min.The friction coefficient versus sliding time was recorded by the computer automatically.Corrosive wear tests were conducted under the same condition as those under the dry sliding condition except that the specimens were fixed in a cell containing 0.5 wt.%NaCl solution.The temperature of the solution was ∼20 °C.Each test was repeated at least three times to ensure reproducibility.
After the tests,the worn surface of the specimens was characterized to determine the wear rate and mechanisms.The volume losses corresponding to the wear tracks of the specimens were measured using a 3D Taylor Hobson surface profilometer.With the aid of the software of the profilometer,the cross-sectional profile of the wear tracks could be determined.Morphologies of the worn surface were examined using a Sigma 300 VP scanning electron microscope (SEM,Zeiss) equipped with a Bruker energy dispersive X-ray spectroscopy (EDS) system.
2.4. Electrochemical measurement during sliding wear in the NaCl solution
Electrochemical measurements during corrosive sliding wear in the 0.5 wt.% NaCl solution were performed using a Gamry Reference 600 electrochemistry workstation.All the sliding tests for the electrochemical measurement were conducted with Si3N4balls of 6 mm in diameter and under reciprocating amplitude of 3 mm,sliding speed of 5 mm/s,and applied load of 5 N.The temperature of the testing solution was ∼20 °C.A three-electrode system was used with a Pt plate as a counter electrode,a saturated calomel electrode(SCE) as a reference electrode,and the specimen as a working electrode.The variation of open circuit potential (OCP)was recorded before,during,and after sliding in the NaCl solution.The duration of the sliding was 1200 s.Potentiodynamic polarization measurements were performed during reciprocating sliding in the NaCl solution at a scan rate of 0.3 mV/s.Prior to the polarization,the corrosive sliding test had been conducted for 1200 s to reach a relatively stable condition.Corrosion potentials (Ecorr) and corrosion current densities (jcorr) were determined from the measured polarization curves using CorrView software in the mode of Tafel(traditional).To further reveal the corrosive wear mechanism,variations of current density were recorded during the sliding wear in the NaCl solution under the OCP,200 mV vs.OCP,and-200 mV vs.OCP,respectively.Before the measurement of current density,the OCP was monitored for 40 min to ensure the relatively stable state of the testing system.After the corrosive wear tests under the given potentials,the volume losses corresponding to the wear tracks of the specimens were measured using the 3D surface profilometer.Cross-sectional profiles of the wear tracks were also plotted.At least three replicated tests for each condition were performed to ensure reproducibility.
3.Results and discussion
3.1. Microstructure and nanoindentation results
Fig.1 shows the etched microstructure of the as-received and heat-treated specimens.The existence of coarse I-phase(Mg3Zn6Y),W-phase (Mg3Zn3Y2),and MgZn2inhomogeneous zone was labeled in the as-received specimen according to previous research(Fig.1a)[34],which is further confirmed by the element distribution of Mg,Zn,and Y in Fig.1c–e.Representative MgZn2inhomogeneous zone in the as-received specimen shows that fine MgZn2precipitates unevenly distribute in the Mg matrix (Fig.1b),which is ascribed to the inhomogeneous precipitation during the hot forging process as reported earlier [34].The presence of MgZn2inhomogeneous zone would inevitably increase the localized corrosion tendency due to the galvanic corrosion effect established between the MgZn2-rich region and the MgZn2-poor region,which may lead to severe localized corrosion and degraded corrosive wear resistance.After heat treatment,the size and morphology of the coarse I-phase and W-phase have not changed(Fig.1f).However,the MgZn2inhomogeneous zones disappear.Instead,a large number of fine I-phase precipitates distribute homogeneously in the Mg matrix;the magnified details of the microstructure are shown in Fig.1g.For the two-step heat treatment in this work,300 °C for 1 h was designed to dissolve the soluble phase MgZn2in the inhomogeneous zone,while 400 °C for 2 h was for the precipitation of the I-phase [34].Also,the grain size is significantly increased after the heat treatment (Fig.1f).Previous work by Hidetoshi et al.suggested that a homogenous distribution of the I-phase in the coarse-grained Mg-Zn-Y alloy was conducive to wear resistance,whereas grain refinement was not beneficial to the wear resistance [22].
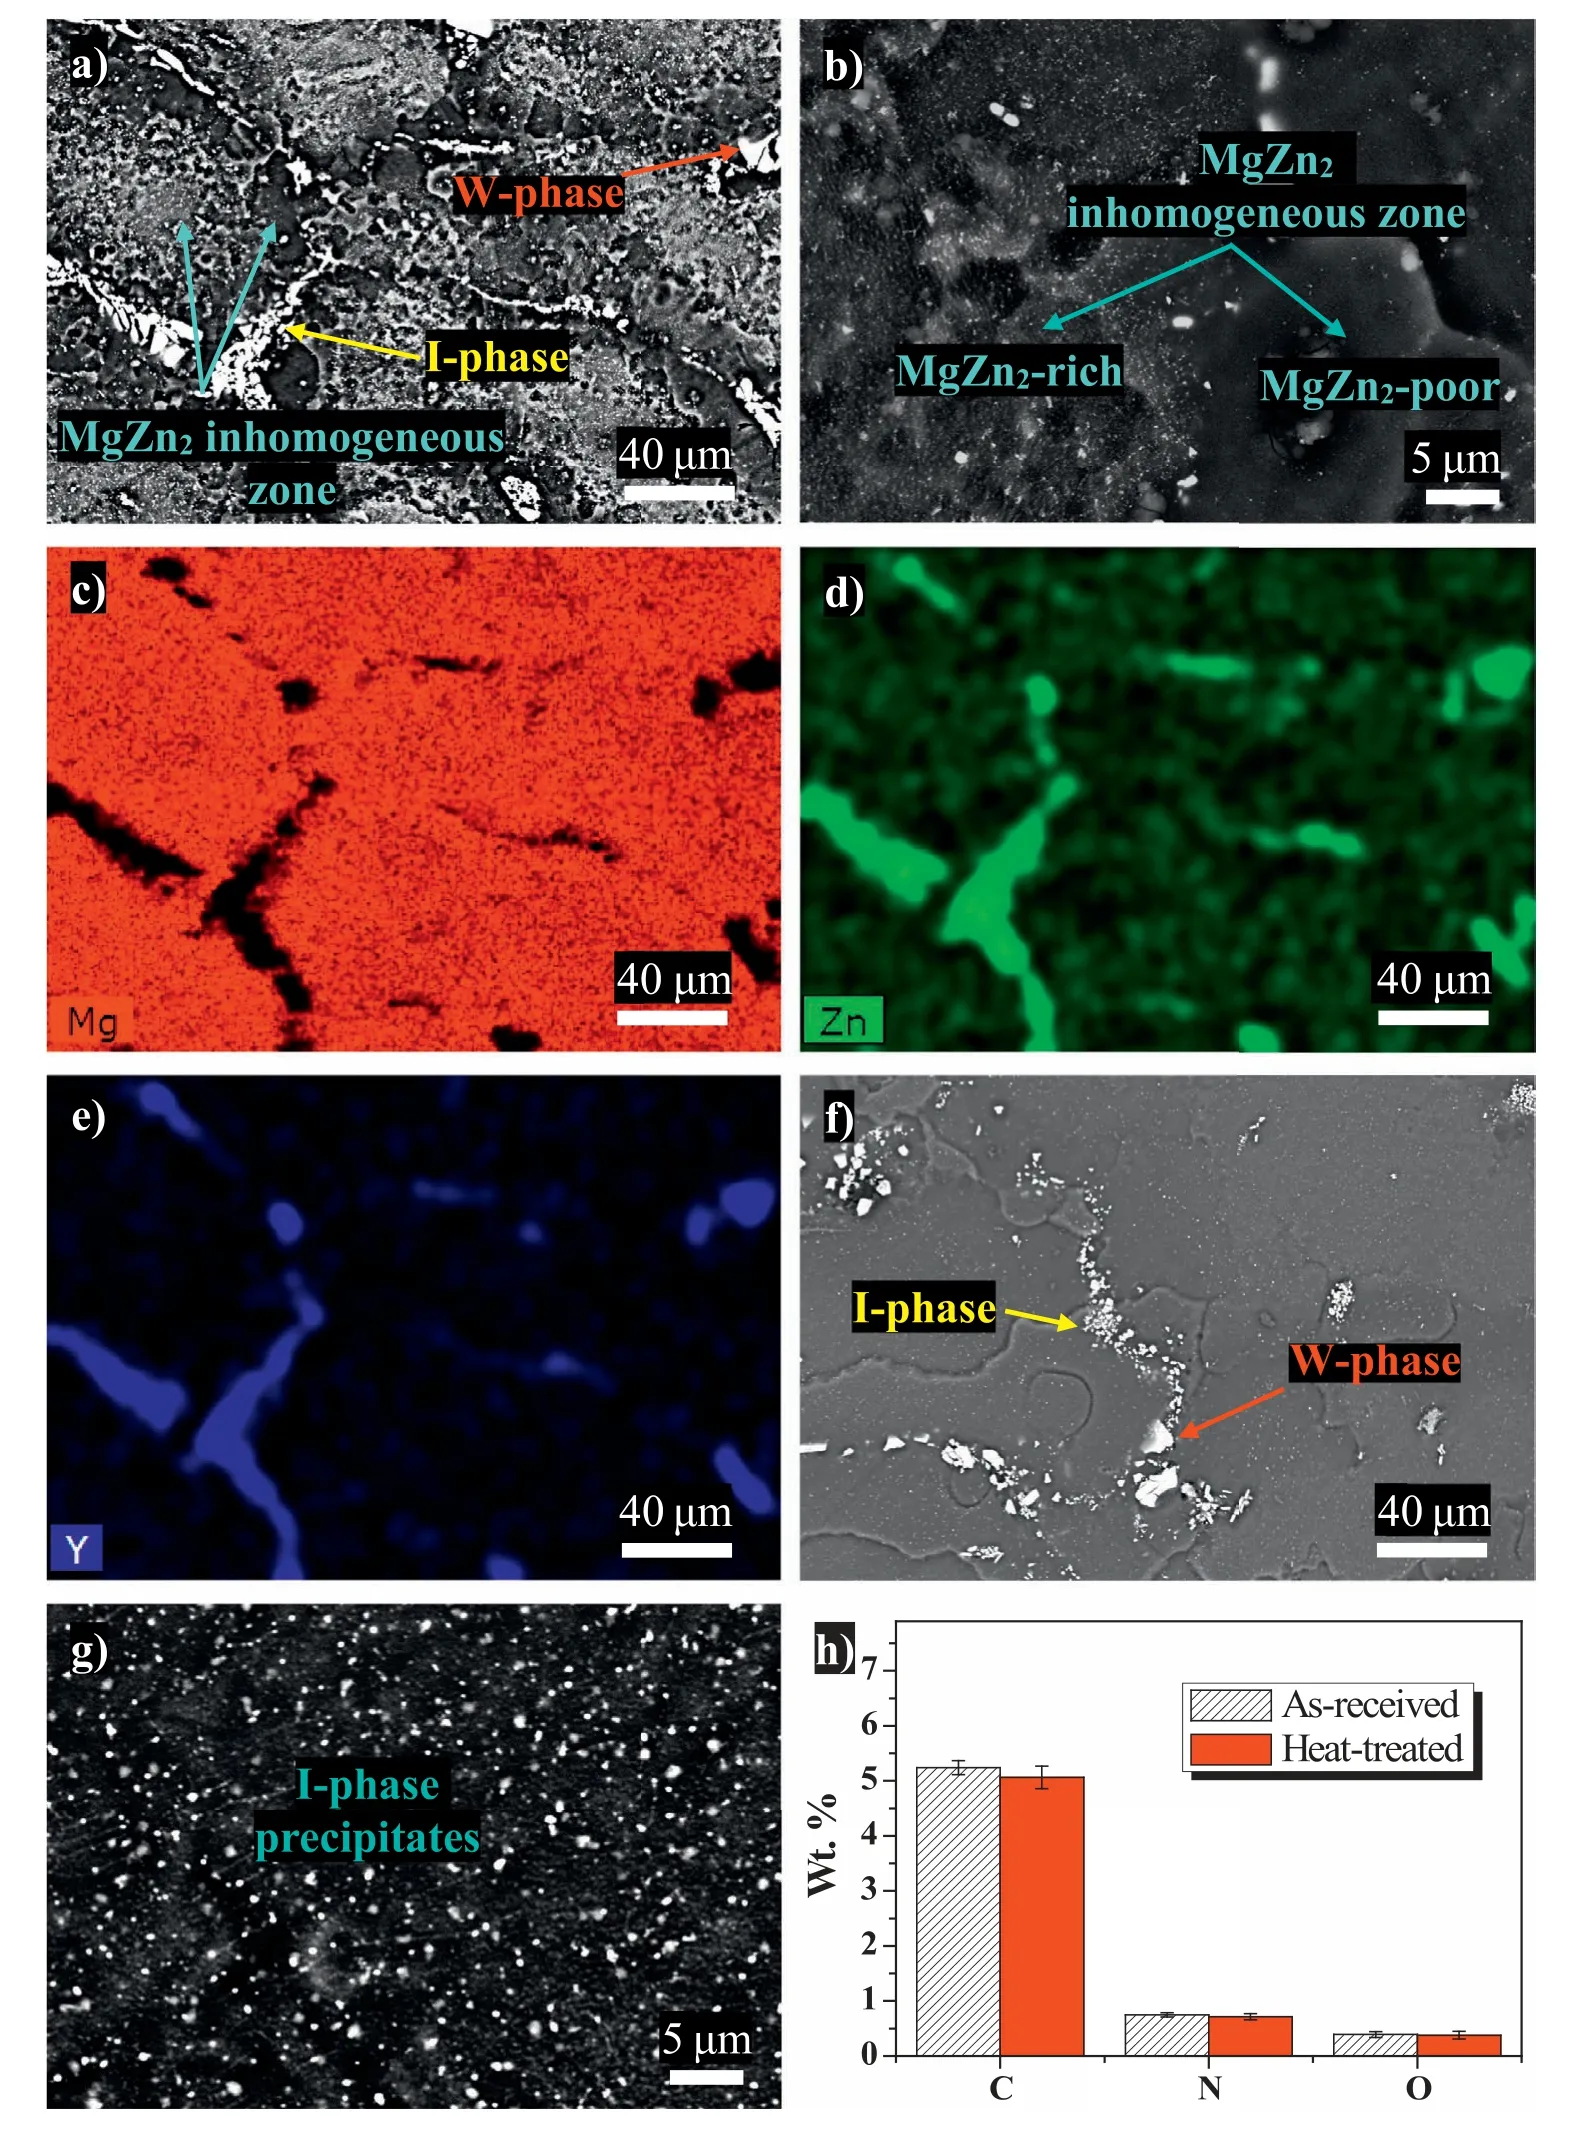
Fig.1.Microstructural evolution before and after the heat treatment: (a,b) low and high magnification backscattered electron imaging of the as-received specimen and (c–e) corresponding EDS mapping results of (a);(f,g) low and high magnification backscattered electron imaging of the heat-treated specimen.Image (h) is an EDS analysis of elements C,N,and O in five squared areas (200 μm × 200 μm) on polished surfaces of the as-received and heat-treated specimens.Standard deviation of the measured data is provided by the range marks.Note that C element might come from the contamination.
EDS analyses of elements C,N,and O in five squared areas (200 μm × 200 μm) on polished surfaces of the as-received and heat-treated specimens were conducted,as shown in Fig.1h.It reveals that the differences in the content of elements C,N,and O on the as-received and heat-treated specimens are negligible,implying the prepared heat-treated specimen surfaces are free of oxidation/nitridation layers and are ready for the subsequent wear tests.Note that C element might come from the contamination.It is justified that there are no significant differences in the surface composition of as-received and heat-treated specimens herein because all the specimens were ground and polished prior to any tests.In reality,the surface composition changes due to heat treatment and/or quenching are critical in the control of product quality,given the fact that an irregular-shaped Mg alloy product could hardly be ground or polished,which is different from the specimen preparation in this work.Under these circumstances,an effective approach is using inert gasses such as argon,which is even employed as a protective gas in the argonarc welding of Mg alloys,for the heat treatment [11,37].Additionally,heating in a vacuum furnace could also prevent surface oxidation and nitridation [38,39].Further,high-pressure argon or air quenching instead of water quenching would reduce the formation of oxides and hydroxides on the surface of Mg alloy products [40].
In order to determine the variation of mechanical properties because of the heat treatment,nanoindentation tests were carried out on the etched surface of the as-received and heattreated specimens (Fig.2).Since the coarse I-phase and Wphase have not changed,only the hardness of the Mg matrix was measured,as exemplified by Fig.2b,c.Representative load-depth nanoindentation curves obtained from the indents made on the as-received and heat-treated specimens were plotted (Fig.2a).The calculated mechanical properties of the specimens were summarized in Table 1.The hardness and elastic modulus for the as-received specimens are 724 MPa and 39 GPa,whereas the corresponding values are increased to 989 MPa and 45 GPa for the heat-treated specimens,respectively.By contrast,the creep distance of the heat-treated specimen is 2.0% which is slightly lower than the as-received condition (3.1%).The increase in the hardness,elastic modulus and creep resistance reveals that the precipitation of I-phase has played a role in the strengthening of the Mg matrix.The reinforcement of mechanical property because of the presence of I-phase precipitates has been well recognized,which is mainly ascribed to the unique properties of the icosahedral quasicrystalline phase (I-phase)such as high hardness,high Young’s modulus,high creep resistance,low friction coefficient,and low surface energy[10,22–24].Especially,the dispersive distribution of the Iphase particles in the Mg matrix and the strongα-Mg/Iphase particle interfacial bonding could effectively decrease the stress concentration and impede the movement of dislocations [10,41].Also,the activation energy for creep would be inevitably increased due to the interactions between dislocations and I-phase particles [42].The above results and reports indicate that the presence of the I-phase precipitates in the Mg matrix has remarkably increased the mechanical properties,which is conducive to the wear performance of the Mg alloys.

Table 1Mechanical properties of the as-received and heat-treated specimens measured by targeted nanoindentation.Standard deviation of the measured data has been provided.
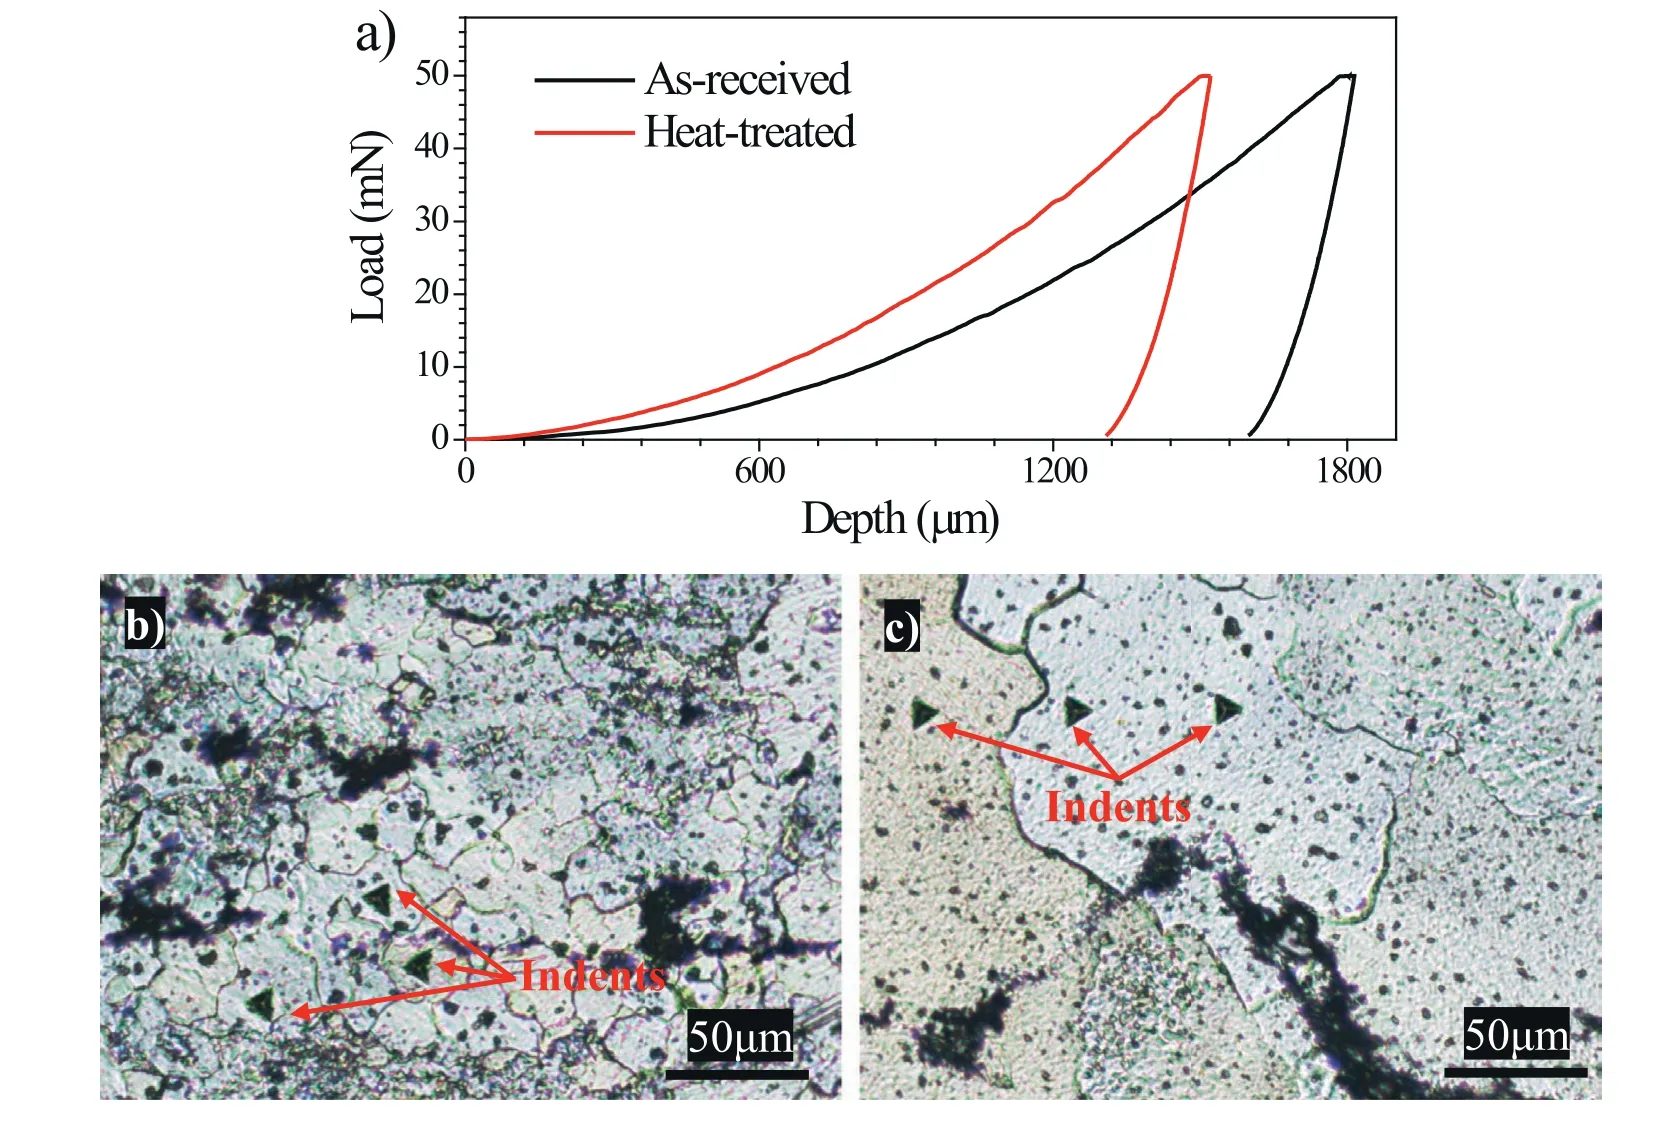
Fig.2.(a) Typical load-depth nanoindentation curves for the as-received and heat-treated specimens.Images (b) and (c) demonstrate a few indents where the tests were performed on the etched surface of the as-received and heat-treated specimens,respectively.
3.2. Wear rate and variation of coefficient of friction (COF)during sliding wear
Fig.3 shows the wear rate of as-received and heat-treated specimens after sliding in air and 0.5 wt.% NaCl solution.Under the dry sliding condition,the wear rate of the asreceived specimens is 2.3 × 10⁻³mm3/Nm,whereas the corresponding value for the heat-treated specimens decreases to 1.8 × 10⁻³mm3/Nm (Fig.3a).In the NaCl solution,the wear rates of as-received and heat-treated specimens decrease to 1.5 × 10⁻³mm3/Nm and 9.3 × 10⁻⁴mm3/Nm,respectively,as compared to their counterparts tested under dry sliding (Fig.3b).For comparison,the wear rates of commercial AZ31 alloy and pure Mg were provided.For both dry sliding wear and corrosive wear conditions,the wear rates of pure Mg and AZ31 alloy are much higher than the as-received and heat-treated Mg-Zn-Y-Zr specimens.The wear rates of the heat-treated specimens are the smallest among all the investigated specimens irrespective of the testing condition,indicating that the superior wear resistance of the investigated Mg-Zn-Y-Zr alloy after the heat treatment.
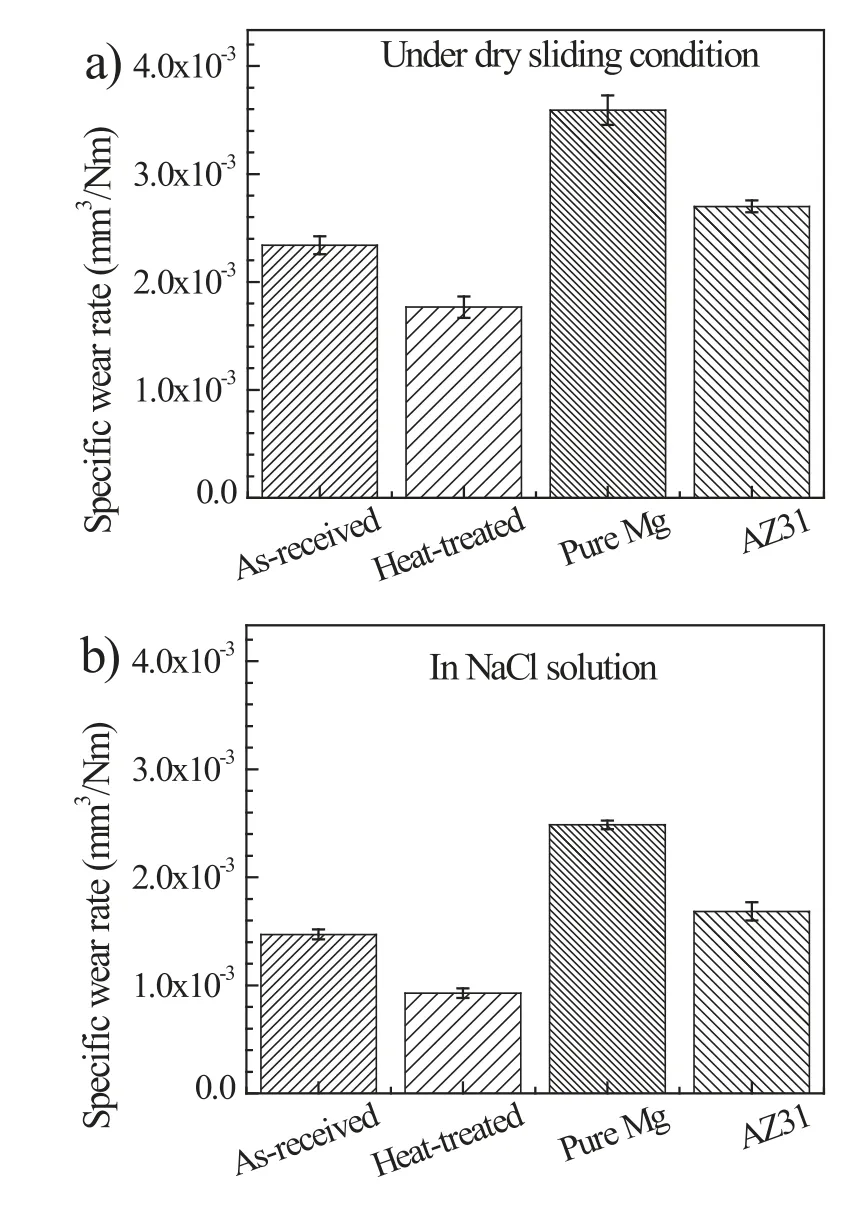
Fig.3.Specific wear rates of as-received and heat-treated specimens caused by sliding wear in: (a) air,and (b) 0.5 wt.% NaCl solution.Wear rates of pure Mg and AZ31 were provided for comparison.The range marks are the standard deviation of the measured data.
For a better understanding of the improvement in the wear resistance due to heat treatment,the variation of the coefficient of friction (COF) for the as-received and heat-treated specimens during sliding under the dry condition and in the NaCl solution were plotted in Fig.4.Under the dry sliding condition,the COF of the as-received specimen increases sharply within 200 s and then it rises slowly with large fluctuations (Fig.4a).Inversely,the COF of the heat-treated specimen becomes relatively stable after the sharp increase prior to ∼200 s.In the NaCl solution,the COFs of the asreceived and heat-treated specimens both become relatively stable within 200 s and the stabilized values are lower than their counterparts that tested under the dry sliding condition,indicating the lubrication effect of the aqueous solution(Fig.4b) [43].Beside,the solution is beneficial to reducing the friction heat and taking the wear debris away from the worn surface [44].Noticeably,the recorded COFs of the heat-treated specimens are invariably smaller than those of the as-received specimens,regardless of the testing condition.The reduction in the COF after heat treatment is well agreed with the reduced wear rate of the heat-treated specimens as compared with the as-received ones.The reduction in the COF is attributed to the high hardness and uniform dispersion of I-phase precipitates that possess a low friction coefficient.Somekawa et al.also found that the dispersion of I-phase in Mg-Zn-Y alloys was effective to improve the friction properties [22].It is well acknowledged that the combined properties of high hardness and low friction coefficient are generally indispensable for the improvement of wear resistance of the Mg alloys [10].For the heat-treated specimen,the combined effect of decreased COF and improved microhardness as validated by the nanoindentation data could effectively reduce the production of wear debris and delay any crack initiation during the reciprocating sliding processes[45].The reduced wear debris and delayed cracking could in turn serve to decrease the COF of the heat-treated specimens.
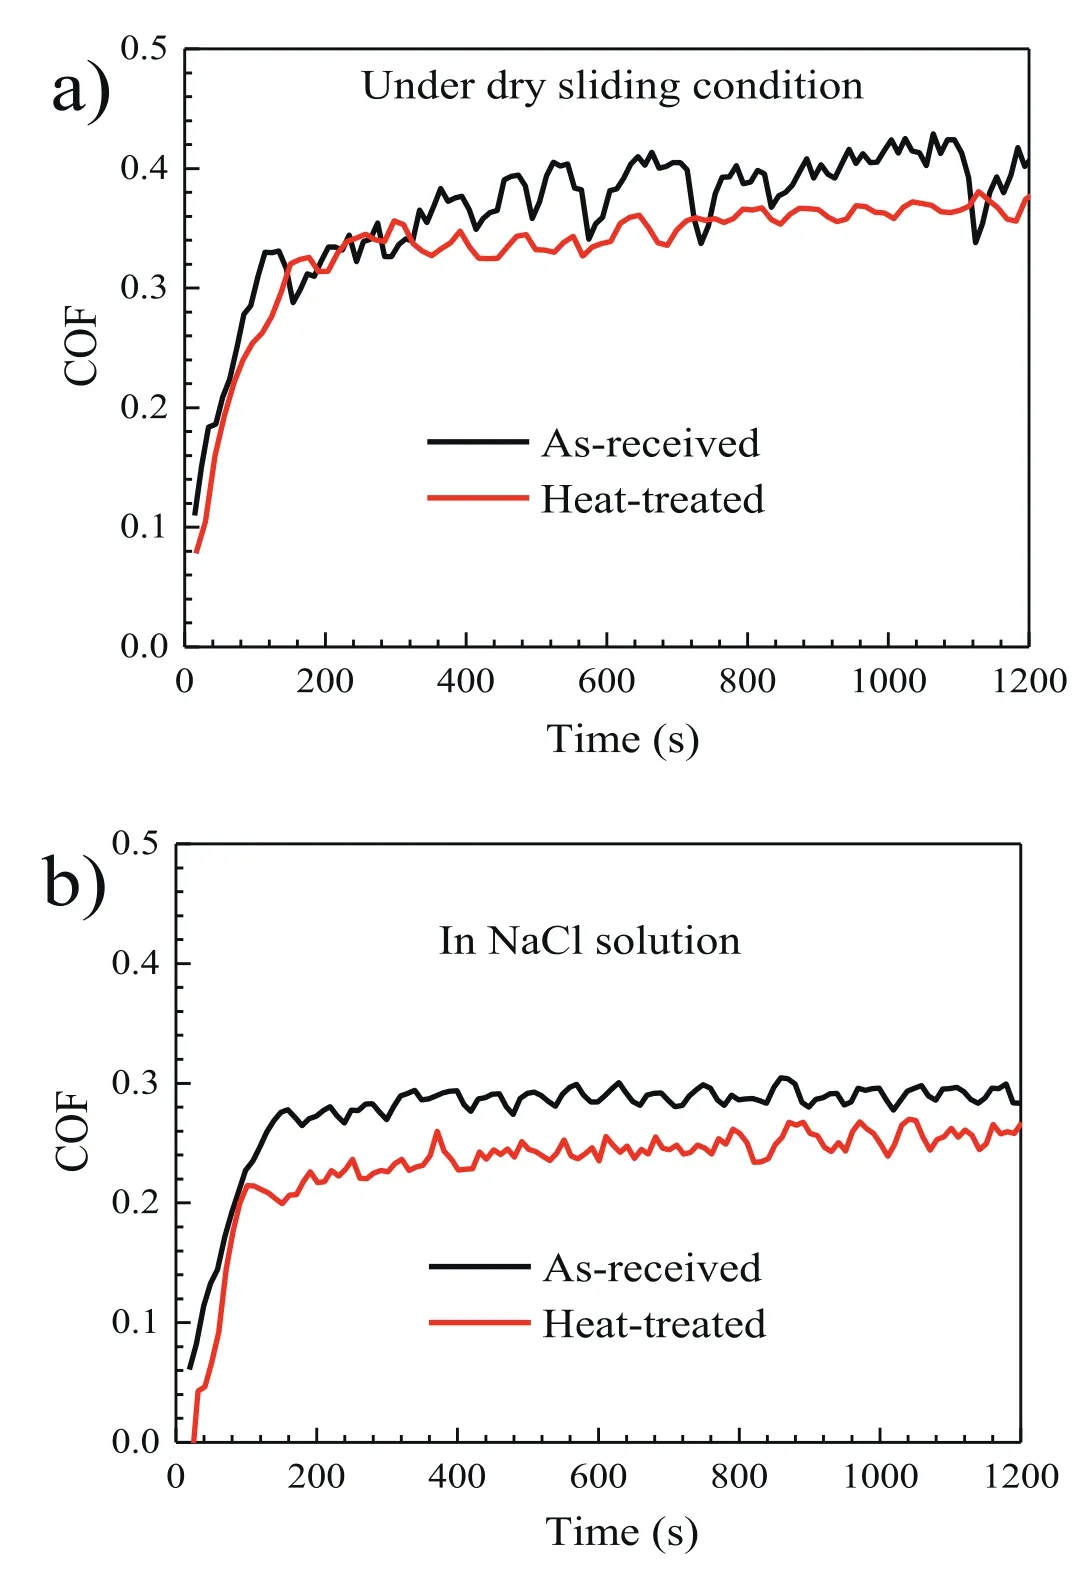
Fig.4.Variation of COF values for the as-received and heat-treated specimens during sliding in: (a) air,and (b) 0.5 wt.% NaCl solution.
3.3. 3D profile images of the wear scars after test
Fig.5 shows typical 3D profile images and corresponding cross-sectional profiles of the wear scars for the as-received and heat-treated specimens subjected to sliding under the dry condition and in the NaCl solution.Under the dry sliding condition,the worn surfaces of both specimens are extremely rough accompanied by many wide and deep grooves along the sliding direction (Fig.5a and c).These grooves on the wear tracks are generated because of the plowing effect during reciprocating sliding.The occurrence of plastic deformation or fragmentation,which is from the plowing effect of the hard Si3N4ball on the specimen surface,would lead to the formation of grooves and displace material to the two sides of the wear tracks (Fig.5a and c).Representative cross-sectional profiles of the wear tracks for the two specimens are shown in Fig.5b and d.It reveals the maximum depth of the wear tracks for the as-received and heat-treated specimens is 55 μm and 39 μm,respectively.In the NaCl solution,the surface of the wear tracks on both specimens is smoother as compared to the dry sliding condition (Fig.5e and g).Fine and shallow grooves are visible on the wear tracks,while displaced material on wear track edges could hardly be observed.It indicates the lubrication effect of liquid greatly reduces the severity of the sliding wear.For the as-received specimen,multiple pits are observed at the bottom of the wear track(Fig.5e),where localized corrosion could occur during sliding because of the presence of corrosive species (e.g.Cl-) in the NaCl solution [34,46].On the contrary,corrosion pits on the worn surface of the heat-treated specimen could not be found(Fig.5g).The cross-sectional profiles for the as-received and heat-treated specimens reveal their maximum depth of the wear tracks is 40 μm and 31 μm,respectively (Fig.5f and h).The wear tracks for the as-received specimens are slightly wider than those of the heat-treated specimens,regardless of the testing condition.These results have confirmed that the wear resistance of the specimens under both the dry and corrosive sliding conditions is improved by the heat treatment,which is consistent with the analysis of wear rate and COF.
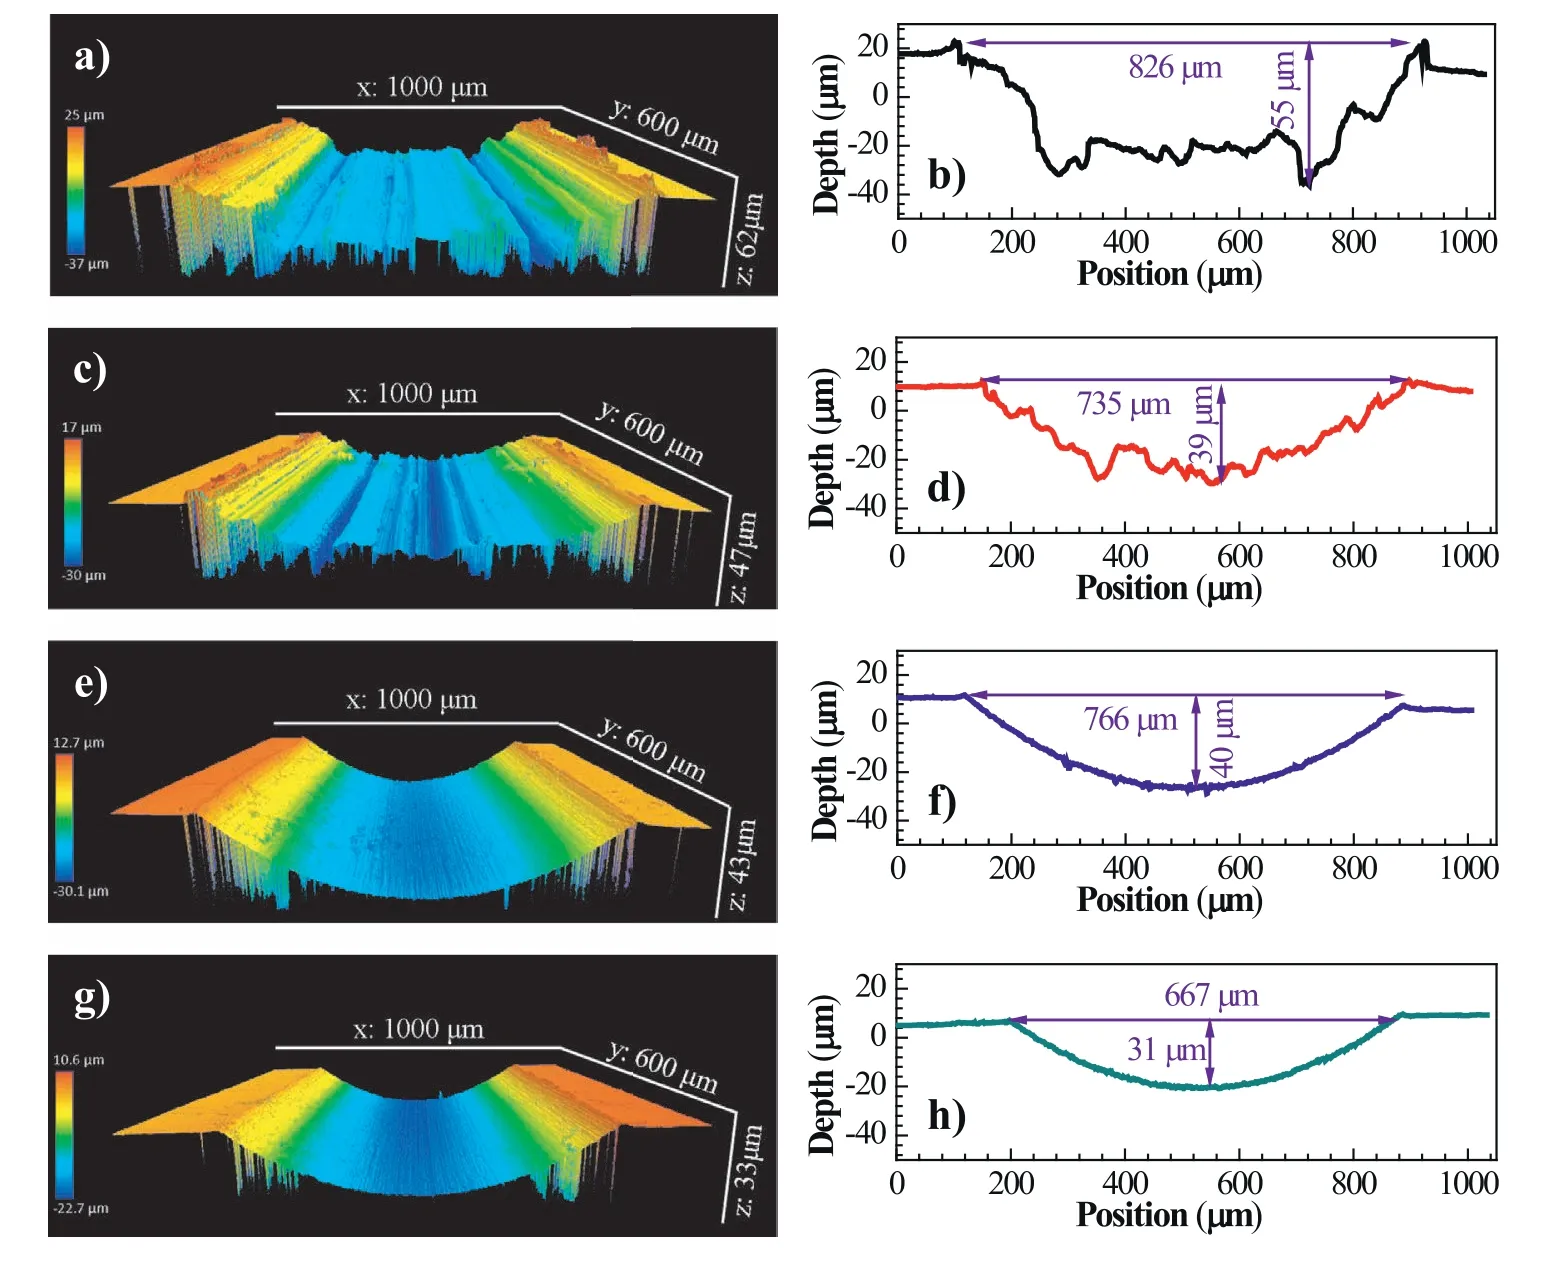
Fig.5.Typical 3D profile images and corresponding cross-sectional profile of the wear scars for the specimens subjected to sliding in air and NaCl solution:(a,b) as-received,air;(c,d) heat-treated,air;(e,f) as-received,NaCl solution;(g,h) heat-treated,NaCl solution.Images (b),(d),(f),and (h) are corresponding cross-sectional depth profiles of wear scars for the specimens in (a),(c),(e),and (g),respectively.
3.4. Wear mechanism assessed by worn surface morphology and EDS analysis
In order to understand the dominant wear mechanism,worn surface observation and corresponding EDS analysis were performed after the sliding tests.Fig.6 shows SEM images of the worn surface for the specimens tested in air.For as-received specimens tested under the dry sliding condition,wide grooves and ridges are immediately visible along the sliding direction,which are typical features of abrasive wear(Fig.6a) [47].Beside,numerous wear debris particles with different sizes appears on the worn surface.A high magnification image reveals that cracks are present in the coarse debris and the surrounding worn surface,indicating that the coarse debris particles being crushed and cracked during the reciprocating sliding process and high stress concentration induced by them(Fig.6b).It is reported that liberated wear debris that rolls over the contacting surfaces could create a three-body abrasion type situation,rendering more wear damage [48].EDS analysis of the debris reveals that it is mainly composed of Mg and O with a Mg/O atomic ratio of ∼1.1,together with a small amount of Zn (see inset of Fig.6b).Thus,the tribo-oxides in the debris are mainly MgO.Zhang et al.reported that the wear debris on the worn surface of as-cast Mg-25Zn-1.5Y quasicrystal materials was mainly MgO [28].Sun et al.observed MgO in the wear debris of Mg-Al-Zn-Y alloys containing small amounts of Y (less than 4 wt.%)during the sliding wear process [49].The EDS result in this investigation is in agreement with the above reports,which suggests oxidation of the highly oxyphilic Mg elements in the wear debris could occur during the abrasive wear process.
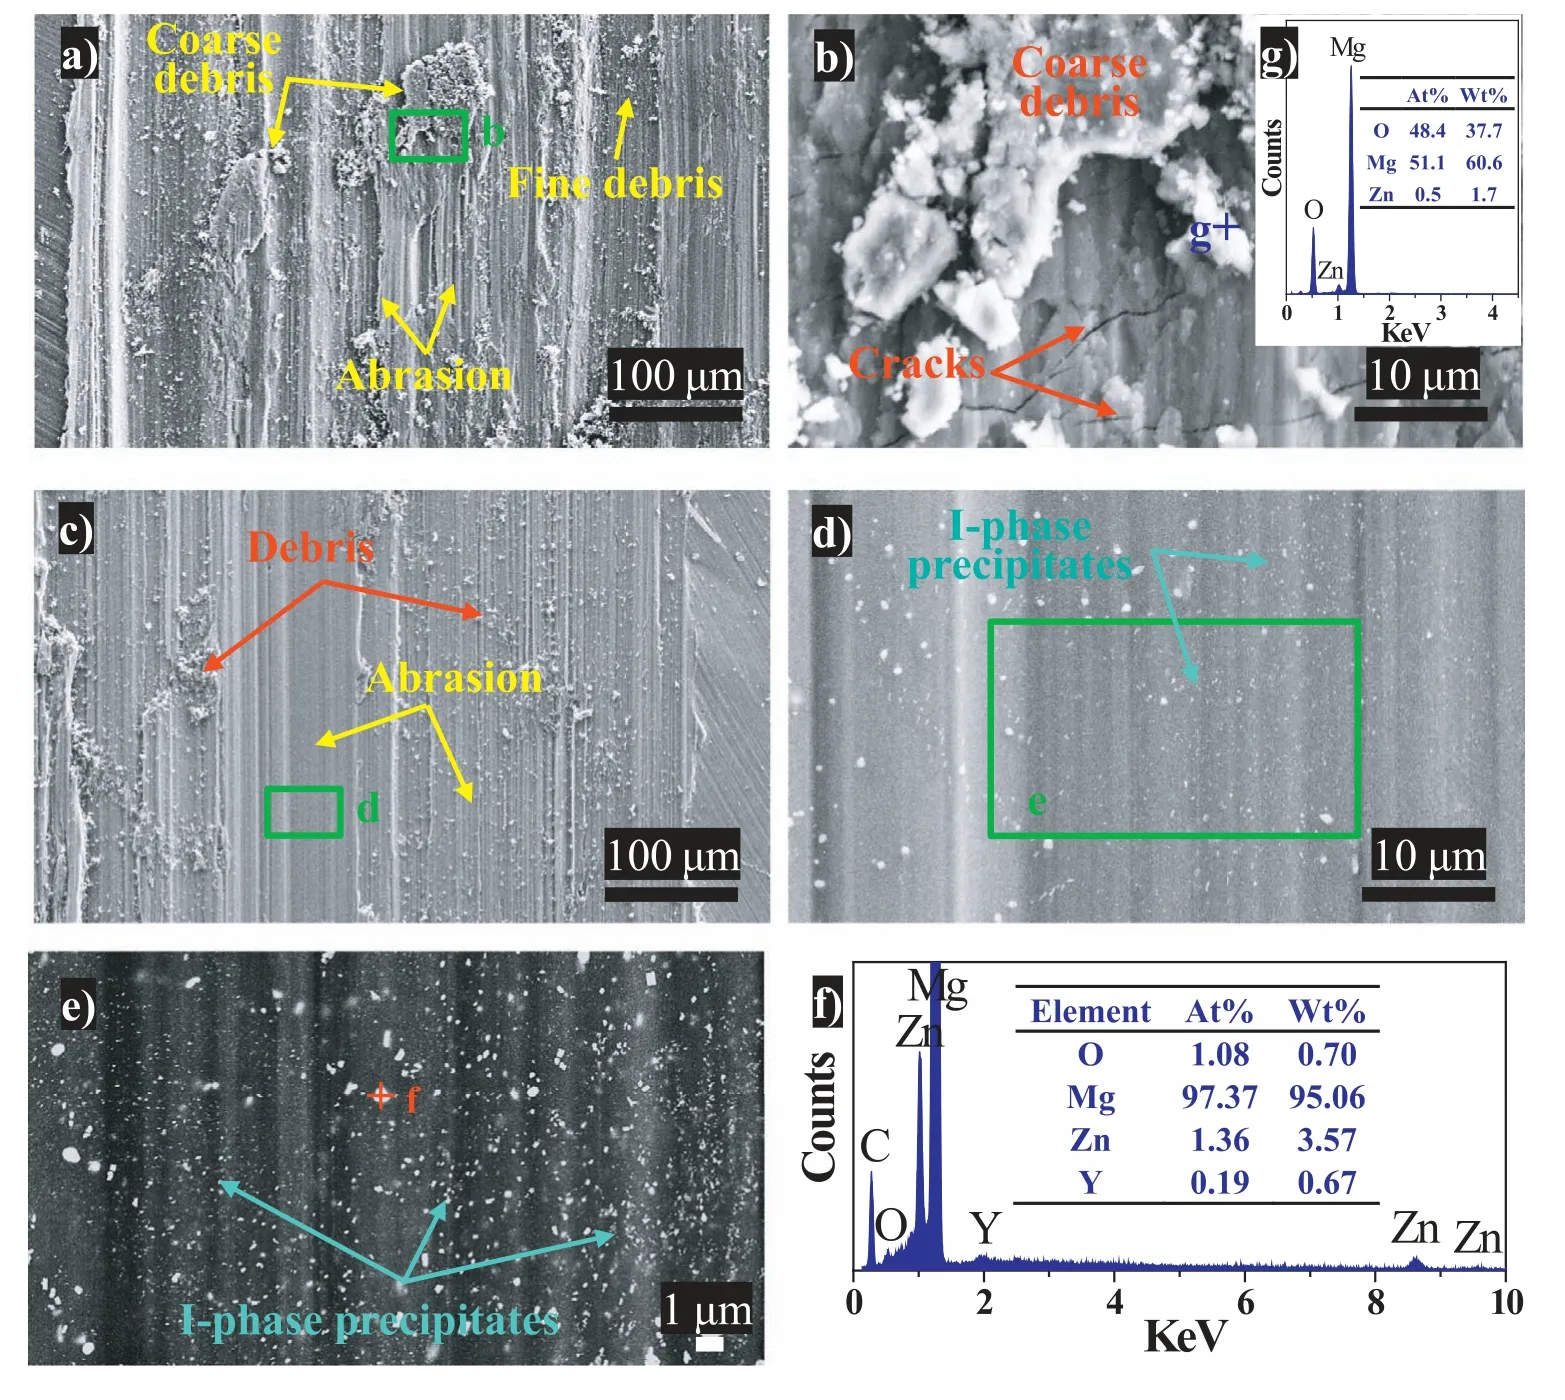
Fig.6.Secondary electron imaging of the worn surface of the specimens tested in air: (a,b) as-received;(c,d) heat-treated.Images (b) and (d) are high magnification observation of the corresponding marked areas in (a) and (c),respectively.Image (e) is backscattered electron imaging of the corresponding marked area in (d).Image (f) is EDS result of the marked area “f” in (e).The inset in image (b) is EDS result of the marked area “g” in (b).
For the heat-treated specimens,the grooves and ridges corresponding to the abrasive wear are visible on the worn surface,whereas the grooves become shallower in comparison with the as-received specimens (Fig.6c).Also,the debris becomes finer and cracks on the worn surface are not found.These results suggest the increase in the wear resistance resulting from the heat treatment.High magnification observation and EDS analysis confirm that a high density of fine Iphase (i.e.Mg3Zn6Y) precipitates is present in the Mg matrix(Fig.6d–f).Backscattered electron image reveals that the fine I-phases precipitates distribute homogeneously in the Mg matrix,which contributes to the high microhardness and,therefore,an improvement in the wear resistance [22].
Backscattered electron images of the worn surface of the as-received and heat-treated specimens and corresponding EDS mapping results were provided to further disclose the wear mechanism.For the as-received specimen,severe oxidation is observed predominantly in the Mg matrix on the worn surface(Fig.7a–c).Compared to the corresponding secondary electron image as shown in Fig.6a,it is clear that the oxidation zones could well match the areas where wear debris exists.Generally,fragments of the material,which are removed by the plowing effect of wear,would be crushed and adhered to the worn surface,as validated in Fig.6a.The presence of these wear debris could cause an increase in and large fluctuation of the COF (as validated in Fig.4a) as well as generation of more friction heat,which in turn increases the oxidation rate of the wear debris [50].For the heat-treated specimens,however,the oxidation could only be observed in some localized areas on the worn surface,which confirms the reduced production of wear debris during the sliding process(Fig.7d–f).The SEM and EDS analysis of worn tracks indicate that the dominant wear mechanism of the as-received and heat-treated specimens in this work is abrasive wear accompanied by oxidation.These results are consistent with previous results of other researchers [44,51].
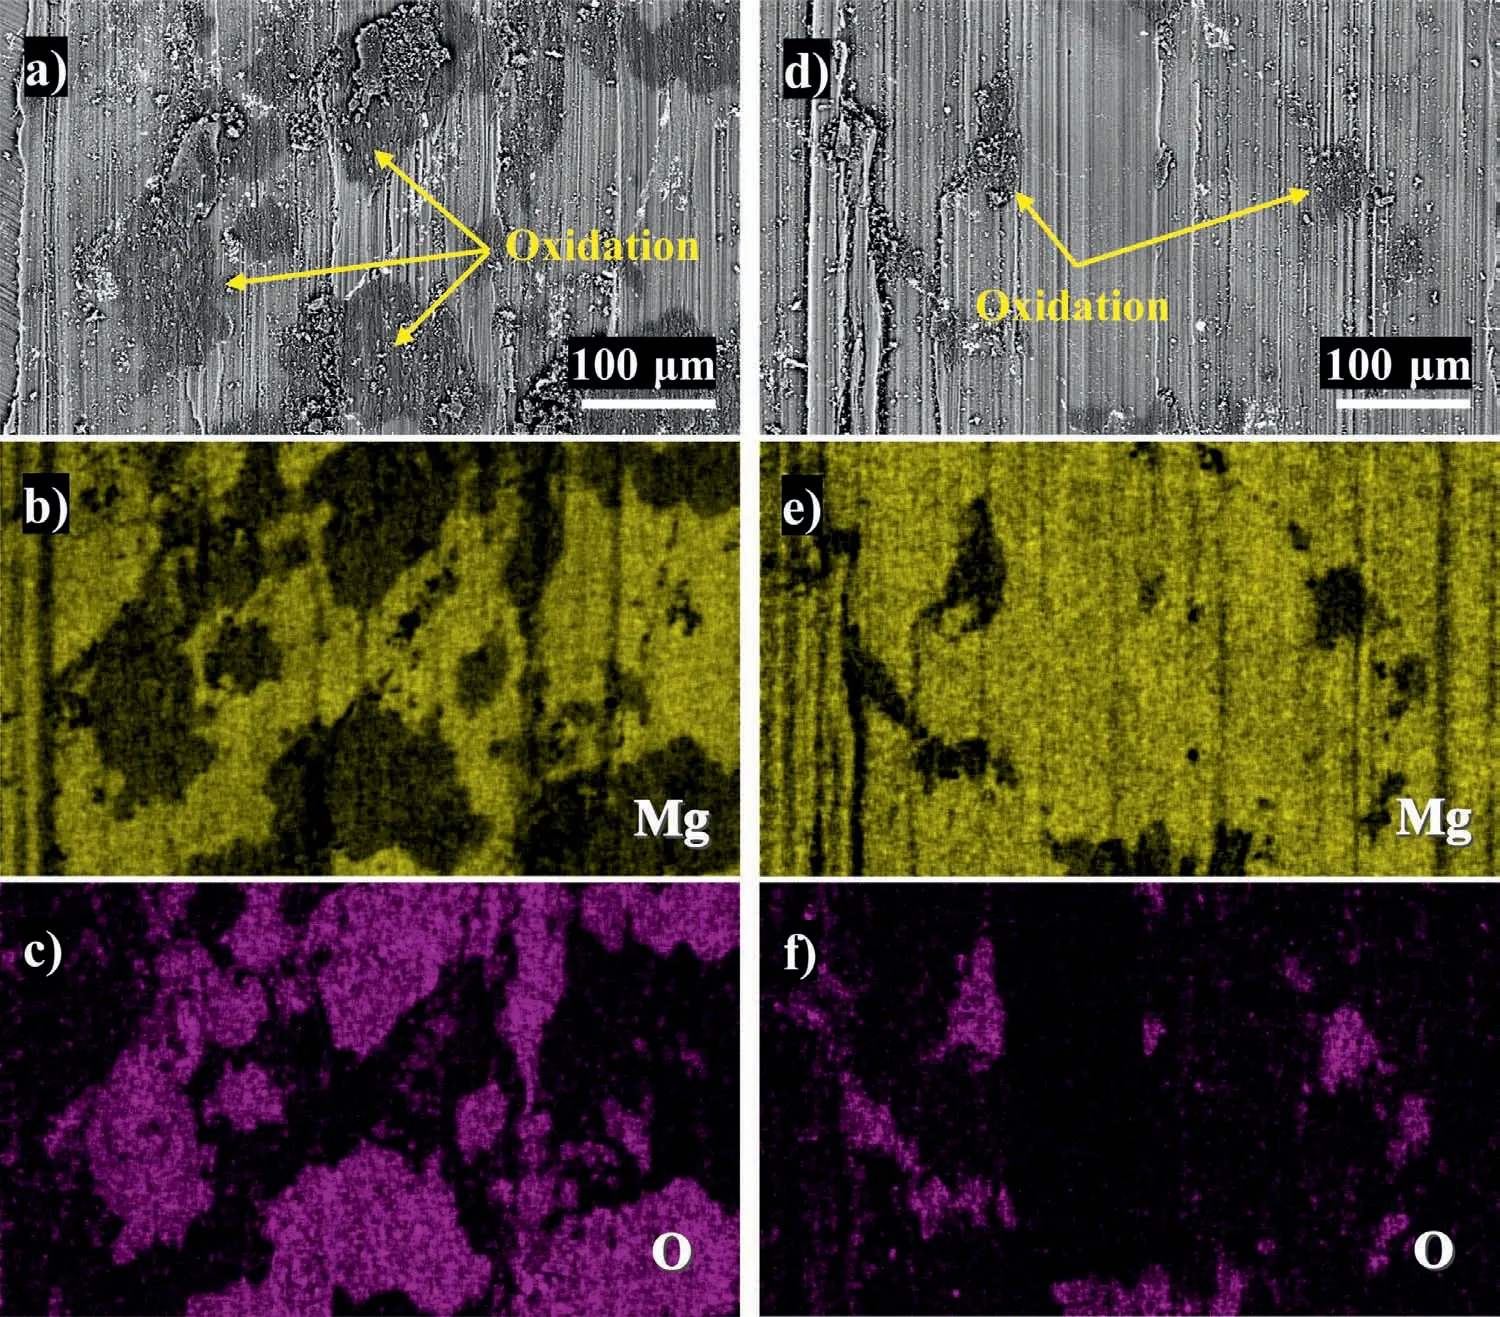
Fig.7.(a) Backscattered electron imaging of the worn surface of the as-received specimen and (b,c) corresponding EDS mapping results;(d) backscattered electron imaging of the worn surface of the heat-treated specimen and (e,f) corresponding EDS mapping results.
Fig.8 shows the worn surface of the specimens tested in the NaCl solution.Different from the dry sliding condition,the worn surface of the as-received specimen is relatively smooth accompanied by many fine grooves parallel to the sliding direction(Fig.8a).However,localized corrosion areas,which are mainly in the form of pitting corrosion and filiform corrosion,are present on the worn surface.In higher magnification observation,pits and porous corrosion products are visible in the localized corrosion areas,while multiple microcracks initiate around the pits (Fig.8b).Based on the EDS analysis,the composition of corrosion products is mainly Mg and O and a small amount of Zn and Cl.The atomic ratio of O/Mg is around 2,which is an indication of the presence of Mg(OH)2(Fig.8e).During the corrosive wear process,the dissolution of the Mg matrix (i.e.Mg-2e →Mg2+)is accompanied by the hydrogen evolution reaction (i.e.2H2O+2e →2OH-+H2),which leads to the formation of Mg(OH)2,i.e.Mg+2H2O →Mg(OH)2+H2[52].Since the dissolution of the Mg matrix is inevitable and could be accelerated by the sliding wear[43],the deposition of Mg(OH)2on the worn surface is thus rationalized.The Mg(OH)2deposits are normally porous and brittle,which are prone to be crushed and removed away from the worn surface during sliding in the NaCl solution,leaving the underlying localized corrosion areas exposed [44,53].Also,the micro-galvanic effect between the discrete wear debris and Mg matrix may render the formation of new pits or growth of the existing pits[44,54–57].The corrosion pits may not yield a significant impact on the coefficient of friction as that of coarse wear debris,as evidenced by the negligible fluctuation of the COF for the tests under the lubricated sliding condition in NaCl solution (Fig.4b).However,stress concentration at the pre-existing pits would make the surface vulnerable to corrosion and wear attack[58].Under repeated sliding abrasion,microcrack initiation at the pits could occur,promoting further localized corrosion at the cracked regions and thus leading to severer abrasive wear [59–62].These results are a good indication of the existence of corrosion-accelerated wear and wear-accelerated corrosion,i.e.the phenomenon of wear-corrosion synergy,on the worn surface of the as-received specimens [43,63].

Fig.8.Secondary electron imaging of the worn surface of the specimens tested in the NaCl solution: (a,b) as-received;(c,d) heat-treated.Images (b) and (d)are high magnification observation of the corresponding marked areas in (a) and (c),respectively.Images (e) and (f) are EDS results of the marked areas “e”and “f” in (b) and (d),respectively.
For the heat-treated specimens,the worn surface is relatively smooth along with many fine grooves(Fig.8c).Interestingly,localized corrosion areas could hardly be observed on the worn surface,indicating the superior corrosion resistance of the heat-treated specimens.A high magnification image indicates that the worn surface is composed of abrasive grooves without appreciable corrosion deposits (Fig.8d).EDS analysis of the worn surface reveals that a small amount of O could be detected beside the composition of the Mg matrix,i.e.Mg and Zn (Fig.8f).It suggests a small number of magnesium hydroxides or oxides are formed on the worn surface during the corrosive sliding wear.
Corrosive wear,or the so-called tribocorrosion,is a material degradation resulting from simultaneous action of corrosion and wear [63].The synergistic effect of severe corrosion and wear renders a higher wear rate,which suggests either the corrosion degradation or the wear aggravation,would expedite the corrosive wear [63].Previous studies revealed that the corrosion resistance of the as-received specimen that containing inhomogeneously distributed MgZn2particles was low and that severe localized corrosion was prone to form in theα-Mg matrix [34].Given the poor corrosion resistance and wear resistance of the as-received specimen,it is convincing that its corrosive wear resistance is inferior to that of the heat-treated specimen.
It has been reported that the homogeneously distributed I-phase precipitates in the heat-treated specimens rather than the previously existing MgZn2particles preceding the heat treatment could improve the corrosion resistance by the following reasons [34]: (1) the potential difference between Iphase and the Mg matrix is only 25 mV,which is remarkably lower than that of MgZn2(can be as high as 629 mV)[64,65].Thus,micro-galvanic corrosion induced by the Iphase is very limited;(2) heterogeneous distribution of the MgZn2could further lead to the more galvanic corrosion between the MgZn2-rich zone and its surrounding Mg matrix;(3) fine or nano-scale second phases would hardly cause evident localized corrosion,especially when the second phases are uniformly distributed in the Mg matrix[66,67];(4)a layer of thin oxide film (composed of mainly Y2O3),will form in the presence of the disperse I-phase precipitates,which impedes the formation of porous Mg(OH)2deposits in the following corrosion process [13,68].As suggested above,either corrosion suppression or wear alleviation is in favor of corrosive wear protection [63].The improved corrosion resistance and wear resistance because of the presence of fine I-phase precipitates could contribute to the enhancement in the corrosive wear resistance of the heat-treated specimens.
3.5. Electrochemical evaluated corrosion response during the sliding wear in NaCl solution
In order to further reveal the wear mechanism,electrochemical evaluated corrosion response during the sliding wear in the NaCl solution was performed.Variation of OCP with time recorded before,during,and after sliding in the NaCl solution for the as-received and heat-treated specimens is shown in Fig.9.The curves for pure Mg and AZ31 alloy were also plotted for comparison.For pure Mg and AZ31 alloy,the OCP increases sharply within the duration of 300 s prior to sliding,indicating the fast corrosion process and formation of a corrosion product layer with nobler potential (mainly oxides and hydroxides of Mg) on the specimen surface [69–71].This corrosion product layer is loose and porous,which could not provide effective protection to the sliding wear[70].As sliding begins,a potential drop to more cathodic values is observed,which results from the rupture and removal of the corrosion product layer exposing the bare specimen to the NaCl solution.During the entire course of the corrosive wear test,the OCP remains at a relatively stable value with some fluctuations.These fluctuations could be caused by localized corrosion processes or debris-induced variations in the COF[72–74].The larger fluctuation of pure Mg as compared to the AZ31 alloy suggests the inferior corrosion and wear resistance of the former than the latter.After the sliding,the OCP increases again suggesting the worn surface reacts again with the NaCl solution to form a new corrosion product layer.The OCP values after sliding are higher than those before sliding,indicating the corrosion product layer on the unworn surface becomes thickened during the sliding process[75].It suggests the pure Mg and AZ31 can hardly stabilize during corrosion because of the low protectiveness of the loose corrosion product layer [70,75].
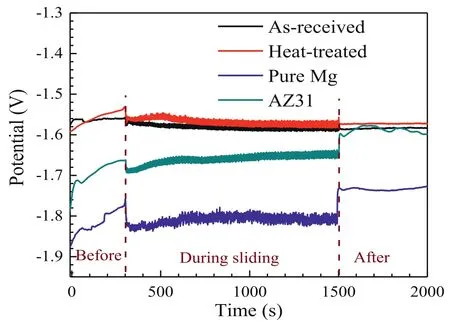
Fig.9.Variation of OCP with time recorded before,during,and after sliding in the NaCl solution for the as-received and heat-treated specimens.The curves for pure Mg and AZ31 were plotted for comparison.
For the as-received and heat-treated Mg-Zn-Y-Zr specimens,the OCP starts at relatively high values and increases slightly prior to the sliding,suggesting the corrosion resistance of the Mg-Zn-Y-Zr alloy is higher than the pure Mg and AZ31 alloy.Once the sliding starts,the OCP values for both specimens decrease slightly because of the damage and removal of the corrosion product layer [73].During the sliding,the OCP values are relatively stable accompanied by minor fluctuations,which suggests their relatively high resistance of corrosion and corrosive wear under the lubricated sliding condition.After the sliding,the OCP values remain stable at the same potential levels as those during the sliding.It indicates the worn surface has been stabilized during sliding or/and the potential of the worn surface is similar to that of the unworn surface.Note that the stabilized OCP values during and after the sliding for the heat-treated specimens are slightly higher than the as-received counterparts,implying an improved resistance of the corrosion and corrosive wear because of the presence of homogeneously distributed I-phase precipitates after the heat treatment.
Potentiodynamic polarization tests of the as-received and heat-treated specimens during sliding in the NaCl solution were performed.The current density for the heat-treated specimen is much smaller than that of the as-received specimen at any applied potentials,as shown in Fig.10.Using the Tafel extrapolation method [76,77],the corrosion parameters for both specimens were fitted.The corrosion potential(Ecorr)and corrosion current density (jcorr) are-1.61 V and 155 μA/cm2for the as-received specimens,and-1.60 V and 30 μA/cm2for the heat-treated specimens,respectively.Thejcorrvalue for the as-received specimens is around 5.2 times higher than that of the heat-treated specimens.It indicates that for the tests under sliding in the NaCl solution,the corrosion rate of the specimens could be remarkably reduced after the heat treatment.
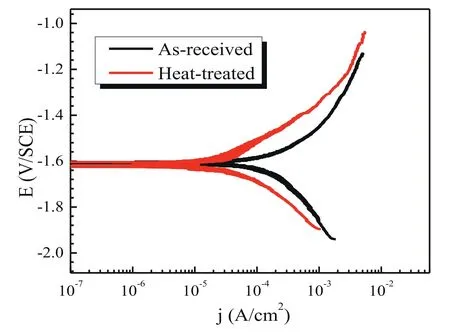
Fig.10.Potentiodynamic polarization curves of the as-received and heattreated specimens during sliding in the NaCl solution.
For further revealing the wear-corrosion synergy,the variation of current density with time recorded during sliding in the NaCl solution under OCP,200 mV vs.OCP,and-200 mV vs.OCP was plotted,as shown in Fig.11.All the sliding tests start after a delay of around 20 s to record the current variations under the above-given potentials in the absence of sliding wear.The current variations in the absence of sliding wear were used as a reference.
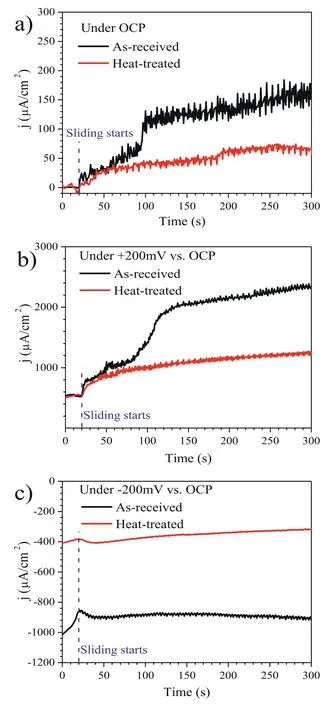
Fig.11.Variation of current density with time recorded during sliding in the NaCl solution under: (a) OCP;(b) 200 mV vs.OCP;and (c)-200 mV vs.OCP.
Under the OCP condition (Fig.11a),the current densities for both as-received and heat-treated specimens are approximately zero during the 20 s duration before sliding,suggesting the system is relatively stable.Once the sliding initiates,the current densities for both specimens increase in the positive direction with time,suggesting the sliding wear damages the corrosion product film,exposes fresh specimen surface,and thus accelerates the dissolution rate of Mg matrix on the worn surface [63].During the sliding,the current densities fluctuate appreciably,which could be ascribed to the repeated rupture and formation of the corrosion product film,localized corrosion process,or the debris-induced variations in the frictional response [72–74].Noticeably,there exists an increasing difference in current density with time between the as-received specimens and the heat-treated specimens.The enhancement of the current density for the as-received specimen is ∼3 times higher than the heat-treated specimen,indicating wear-accelerated corrosion is severer for the former than the latter.It also suggests that I-phase precipitation due to the heat treatment is beneficial to the alleviation of wearaccelerated corrosion during the sliding process.This trend well agrees with the result of the potentiodynamic polarization curves (Fig.10).
Under the 200 mV vs.OCP condition (Fig.11b),the current densities for both specimens are ∼537 μA/cm2in the 20 s of duration before the sliding,which indicates the anodic potential of 200 mV vs.OCP significantly increase the corrosion rate of the specimens.During the sliding,the trends of current density variation for both as-received and heattreated specimens are similar to their counterparts under the OCP condition (Fig.11a),whereas the current densities under the anodic polarization condition are significantly larger.These results suggest that the corrosion response by the anodic polarization would be further enhanced by the sliding wear process.However,the wear-enhanced corrosion rate is more pronounced for the as-received specimens.
Under the-200 mV vs.OCP condition (Fig.11c),the current density for the as-received specimen is around-1000 μA/cm2,which decreases to a less cathodic value,i.e.-880 μA/cm2during the 20 s of duration prior to sliding wear.The decrease in the current density might be attributed to the presence of loose corrosion product film on the specimen surface [78,79].When the sliding starts,the current density remains relatively stable at this level with some fluctuations.For the heat-treated specimen,the current density is around-400 μA/cm2during the 20 s of duration prior to sliding wear.When the sliding starts,the current density decreases gradually to about-315 μA/cm2at the time of 300 s.The fluctuations in current density can hardly be observed for this condition.Under the cathodic potential of-200 mV vs.OCP,the cathodic current should be predominantly from the hydrogen evolution reaction,while the corrosion of the specimen could be effectively suppressed [46,80].It has been found that cathodic polarization measurements upon severely corroded Mg surface with a thick corrosion product film exhibited an enhanced cathodic activity relative to the less corroded surface[78,79].Salleh et al.reported that the kinetics of the hydrogen evolution rate on the Mg(OH)2-covered surface was considerably higher than that on the polished surface,which was attributed to the enhanced self-dissociation of water on the Mg(OH)2-covered surface [81].Thus,the higher cathodic current density for the as-received specimen indicates that hydrogen evolution reaction is more facile on its surface with more corrosion products.The large fluctuations in current density for the as-received specimens may be attributed to repeated spallation and formation of the corrosion product film on the worn surface during the sliding wear[82].
Fig.12a shows the wear rate of the as-received and heattreated specimens after sliding in the NaCl solution under the given potentials.For both the as-received and heat-treated specimens,the wear rates are the highest for the 200 mV vs.OCP condition (i.e.1.9 × 10-3mm3/Nm and 1.4 ×10⁻³mm3/Nm),the second for the OCP condition (i.e.1.3 ×10-3mm3/Nm and 8.9 × 10⁻⁴mm3/Nm),and the lowest for the-200 mV vs.OCP condition (i.e.9.9 × 10-4mm3/Nm and 7.1 × 10⁻⁴mm3/Nm).The wear rates of the heat-treated specimens are always smaller than the as-received counterparts under all the test conditions.Fig.12b–d shows typical cross-sectional depth profiles of wear scars for the specimens after corrosive sliding wear under the OCP,200 mV vs.OCP,and-200 mV vs.OCP,respectively.For both specimens,the maximum depth and width of the wear scars are the largest for the 200 mV vs.OCP condition,the second for the OCP condition,and the smallest for the-200 mV vs.OCP condition.Under each condition,the corresponding values of the heattreated specimens are smaller than those of the as-received ones,which is consistent with the wear rate results.These results further suggest that the specimens containing I-phase precipitates after the heat treatment are less susceptible to the wear-corrosion synergy as compared to those as-received specimens,which are consistent with the above electrochemical analysis.
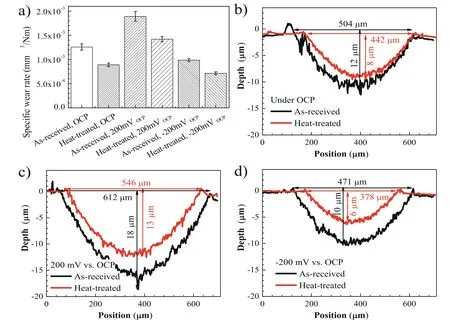
Fig.12.(a) Specific wear rates of as-received and heat-treated specimens caused by sliding wear in the NaCl solution under the given potentials.The range marks are the standard deviation of the measured data.Images (b–d) are corresponding cross-sectional depth profiles of wear scars for the specimens subjected to sliding in the NaCl solution under (b) OCP,(c) 200 mV vs.OCP,and (d)-200 mV vs.OCP,respectively.
It is well acknowledged that anodic polarization corresponds to an increase in the corrosion rate,whereas cathodic polarization leads to a suppression in the corrosion rate of Mg alloys [83].Thus,the above findings reveal that the synergistic effect of severe corrosion and wear corresponds to a higher wear rate,whereas the combined effect of corrosion suppression and wear leads to a lower wear rate.The resistance of corrosive wear generally depends on the mechanical wear,corrosion,and wear-corrosion synergy [84].Since the wear-corrosion synergy is very complicated and cannot be directly measured [63],it is difficult to determine its specific value in the overall corrosive wear process in this work.However,worn surface characterization and electrochemical analysis have proved that the corrosion-accelerated wear and wearaccelerated corrosion,which are characteristics of the wearcorrosion synergy,are weakened for the heat-treated specimens with I-phase precipitation (Figs.8,10,and 11).Also,the dry sliding wear resistance and corrosion resistance of the specimens are improved concurrently because of the heattreatment-induced I-phase precipitation.Thus,the increase in the corrosive wear resistance of the heat-treated specimens is attributed to the homogenous distribution of fine I-phase precipitates in the Mg matrix by the heat treatment,leading to a reduction in wear,corrosion as well as wear-corrosion synergy.
The results of this work have proved that the precipitation of I-phase in the Mg matrix by the heat treatment is critical to simultaneously improve many properties of Mg alloys,including microhardness,dry wear as well as corrosive wear resistance,beside the corrosion resistance,mechanical strength,and corrosion fatigue strength as reported earlier [34,85].The facile heat treatment approach as proposed in this investigation could be considered in the design and improvement of Mg alloys containing beneficial secondary phases (e.g.Iphase) to achieve higher resistance to wear under various environments.
4.Conclusions
The influence of heat treatment on the wear behavior of Mg-Zn-Y-Zr alloy was investigated by sliding wear tests under the dry condition and in the 0.5 wt.% NaCl solution;the following conclusions were drawn:
(1) Microhardness of the specimens was remarkably increased after the heat treatment,which was conducive to the improvement of the wear performance.
(2) The wear rate of the heat-treated specimens was lower than that of the as-received specimens as well as the commercial AZ31 and pure Mg,irrespective of testing condition.The wear rate in the NaCl solution was reduced comparing to that under the dry condition,which was mainly ascribed to the lubrication effect of the aqueous solution reducing the coefficient of friction.
(3) The dominant dry wear mechanism of the specimens before and after heat treatment was abrasive wear accompanied by oxidation.The dry wear resistance was improved for the heat-treated specimens containing a high density of fine I-phase precipitates as compared to the as-received ones.
(4) The superior corrosive wear resistance was attributed to the homogeneous distribution of fine I-phase precipitates in the Mg alloy by the heat treatment,leading to a reduction in wear,corrosion as well as wear-corrosion synergy.It is experimentally proved that I-phase precipitation by the heat treatment is an effective approach to improve the abrasive wear and corrosive wear resistance of the Mg-Zn-Y-Zr alloys.
(5) Electrochemical results indicated that the wearaccelerated corrosion rate was remarkably alleviated after the heat treatment.
Data availability
The raw/processed data required to reproduce these findings cannot be shared at this time as the data also forms part of an ongoing study.
Declaration of competing interest
None.
Acknowledgments
The authors wish to thank the National Natural Science Foundation of China Projects under Grant [Nos.5207011217,51871211 and 51701129].Special thanks to the Magnesium Alloy Research Department,Institute of Metal Research,Chinese Academy of Sciences,Shenyang,China,for providing the magnesium alloys used in this work.
 Journal of Magnesium and Alloys2023年6期
- Journal of Magnesium and Alloys的其它文章
- Ameliorating the re/dehydrogenation behaviour of MgH2 by zinc titanate addition
- Inhibiting effect of I-phase formation on the plastic instability of the duplex structured Mg-8Li-6Zn-1.2Y (in wt.%) alloy
- PEO coating on Mg-Ag alloy: The incorporation and release of Ag species
- Underlying mechanisms of variation in yield asymmetry and strain hardening behavior of extruded pure Mg with Gd addition
- Edge crack damage analysis of AZ31 magnesium alloy hot-rolled plate improved by vertical roll pre-rolling
- High sintering and dielectric performance: The improved (Mg,Zn)3B2O6 ceramics with the help of the DFT calculation
