Application of ultrasonic waves in measurement of hardness of welded carbon steels Fatih UZUNa,*, Ali Nezihi BILGEb
Deprtment of Chemicl Engineering, Yeditepe University, 26 Agustos Yerleskesi, 34520 Istnul, TurkeyDeprtment of Energy Systems Engineering, Bilgi University, TurkeyReceived 7 Jnury 2015; revised 30 April 2015; ccepted 4 My 2015 Aville online 30 My 2015
Application of ultrasonic waves in measurement of hardness of welded carbon steels Fatih UZUNa,*, Ali Nezihi BILGEb
aDepartment of Chemical Engineering, Yeditepe University, 26 Agustos Yerleskesi, 34520 Istanbul, TurkeybDepartment of Energy Systems Engineering, Bilgi University, Turkey
Received 7 January 2015; revised 30 April 2015; accepted 4 May 2015 Available online 30 May 2015
Abstract
The ultrasonic contact impedance technique and ultrasonic wave velocities have been widely used for non-destructive hardness measurement. Ultrasonic wave velocity shift provides through the thickness average hardness, however, the correlations are performed according to surface hardness. In order to accept this technique as a particular non-destructive method for determination of hardness, it is necessary to test it with industrial applications. A widely used joining (welding) technique is selected for this purpose. Samples of carbon steels with three different carbon contents, but similar composition, are annealed in order to obtain the softened samples with different hardness values. Rockwell B scale hardness of heat treated samples, which are assumed to be isotropic, are determined and correlated with ultrasonic wave velocity shifts. Effect of welding process on hardness is investigated using ultrasonic wave velocity shifts, and the results are verified with destructive hardness measurements.
Copyright©2015, China Ordnance Society. Production and hosting by Elsevier B.V. All rights reserved.
Keywords:Ultrasonic wave velocity; Average bulk hardness; Welding; Steel carbon content
E-mail address: fatihuzun@me.com (F. UZUN).
Peer review under responsibility of China Ordnance Society.
http://dx.doi.org/10.1016/j.dt.2015.05.002
2214-9147/Copyright©2015, China Ordnance Society. Production and hosting by Elsevier B.V. All rights reserved.
1. Introduction
Hardness is a measure of the resistance of materials against the changing effects of external shape. The magnitude of this property is related to yield strength, tensile strength and modulus of elasticity of materials. Accordingly, the investigation and measurement of hardness have vital importance. During the decades, various destructive and non-destructive hardness test methods have been developed. The nondestructive methods are portable and can be used on materials at the service, but a widely accepted non-destructive hardness test method, the ultrasonic contact impedance technique, is limited to measure the surface hardness. The pulse echo ultrasonic waves can be used to investigate the internal hardness variations. These waves travel through the thickness of material and give the average magnitude of hardness within the bulk volume. However, some production methods, such as welding process, cause the irregular deformations of the interior crystal structure of materials. Different sections of materials can have different hardness, and so the reliability of this technique for the welded structures should be investigated.
Ultrasonic wave velocity can be correlated with the measurements of an accepted hardness test technique for the materials with different hardness values. For this purpose, heat treatment techniques, such as annealing, should be used to obtain the samples of a material. Time and temperature are the main variables of annealing process, which should be determined carefully in order to obtain the materials with desired hardness. Some studies have been conducted to investigate the behaviors of materials under different annealing conditions. During these studies, the annealing treatments were performed with different parameters to investigate their effect on hardness. Li et al. [1] investigated the annealing softening behaviorof cold-rolled low-carbon steel. The annealing behavior and mechanical properties of severely deformed interstitial-free steel were studied by Gazder et al. [2]. The annealing behavior of martensitic steel was investigated by Kimura et al. [3]. Fargas et al. [4] investigated the effect of annealing temperature on the mechanical properties of hot-rolled duplex stainless steel. Euh et al. [5] studied the effect of temperature on hardness improvement in vanadium carbide coated steels. Irani et al. [6] studied the effect of forging temperature on the hardness of low carbon steel gears. The effect of annealing temperature on properties of stainless steels was investigated by Negm [7]. Kang et al. [8] investigated the effects of recrystallization annealing temperature on the mechanical properties of twinning induced plasticity steels. The effect of annealing temperature on microstructure, phase composition and mechanical properties of thixo-cast 100Cr6 steel was studied by Rogal et al. [9]. Liu et al. [10] investigated the decrease in hardness during the isothermal process at 700°C for Fe—24Mn-0.7Si-1.0Al TWIP steel.
Various correlations between ultrasonic parameters and material properties have been proposed. Bibliographies and detailed explanations of previous studies were discussed in the handbook of the American Society of Nondestructive Testing [11]. Effect of hardness on ultrasonic waves was investigated by various authors. Kleesattel et al. [12] developed a correlation for measurement of surface hardness and proposed the ultrasonic contact impedance hardness test method in 1961. Rosen et al. [13] presented a relation between ultrasonic attenuation and hardness of aluminum—copper alloys by varying the age hardening processes. Another correlation between ultrasonic wave velocity and hardness was developed by Rosen et al. [14], for hardness prediction of aged aluminum alloy 2024.
Ultrasonic waves propagate in materials at a constant velocity. This behavior allows them to be used for nondestructive investigation purposes. Different studies were conducted to determine the hardness of various materials using the velocity variations of ultrasonic wave. Tariq et al. [15] correlated the material properties, including hardness, of selected aluminum alloys with ultrasonic wave velocity variations. Bouda et al. [16], Lukomski, et al. [17], Chou et al. [18] and Rayes et al. [19] developed the correlations between ultrasonic wave velocity and steel hardness to determine the thickness average hardness. These studies showed that the velocity measurements of pulse-echo ultrasonic wave provide average hardness through the thickness of materials, but the correlations were performed using surface hardness. Isotropic materials were used in these studies, and it was assumed that the inner hardness of samples was consistent with surface hardness. However, these correlations were not tested in industrial applications. This study aims to investigate the feasibility of through-thickness average hardness investigation method using a widely used industrial method. For this purpose, welding process, which causes the formation of irregularities in the material, is selected, and the hardness variations after welding of three different types of materials are investigated. Results of the ultrasonic method are verified by the widely used destructive surface hardness measurement method.
2. Methodology
Ultrasonic technique for investigation of average hardness through the thickness has some restrictions. Correlations can only be performed using destructive surface hardness measurement methods which cause suspicion on the accuracy of the results. Accordingly, the ultrasonic waves for average hardness measurement have not been widely used for industrial purposes. This study aims to propose the reliability of ultrasonic waves for average hardness investigation using a real industrial application on three different types of steels.
Welding is a complicated process that causes the irregular changes in the grain structure of materials. Rapid heating and cooling cycles of the welding process cause the formation of hardened zones around the weld beam. Variation of hardness during this process differs at different sections of a material related to distance from those at weld center and heat input. For this purpose, the welding process is selected as an industrial application for investigation of the reliability of ultrasonic bulk hardness measurement method in the conditions of non-homogeneous hardness. In addition, the most common variable in the composition of steels is carbon content so that the carbon steels with different carbon contents are used in order to observe the success of this method for different materials.
In order to investigate the feasibility of ultrasonic waves for hardness measurement, the low alloy steels with similar composition but different carbon contents are used. Ultra lowcarbon interstitial free steel (IF steel) is used as a carbon free steel sample. Low carbon and medium carbon steels with 0.092 weight % and 0.478 weight % carbon contents are other steel types with higher carbon content. Samples of each steel typearepreparedwithdimensionsof 20 mm×20 mm×10 mm. Each sample is annealed at varying temperatures from 100°C to 1150°°C. The samples are heated to the annealing temperature, kept at this temperature for 2 h and then cooled down to room temperature in the oven.
The Rockwell hardness test is a simple hardness measurement technique which can be applied to a wide variety of materials [20]. The depth of a prescribed load is determined, and converted to a hardness value [21] in this technique. Eq. (1) [22] is used to calculate Rockwell hardness,

where HR is Rockwell hardness; N is numerical constant; h is remaining depth of penetration; and S is scale division. There are various Rockwell scales that are marked by additional capital letter to HR. HRB scale is used for soft and middle hardness steel, aluminum, and brass. Carbon steels with carbon content lower than 0.5 weight % are classified as soft and middle hardness steels, and consequently, HRB scale is usedin this study. The hardness measurements are performed before and after the annealing treatments and repeated 10 times.
In this study, it is aimed to determine the hardness of materials non-destructively. It is required to obtain full penetration into the material through the thickness for measurement of average hardness. For this purpose, there are various nondestructive testing methods which are widely used for detection of discontinuities in materials. Among these methods, the radiography can only provide visual images, the diffraction methods require expensive and importable equipment, and the eddy current and magnetic particle methods visualize the defects, but they are not able to provide the results about grain structure of materials. Sound waves are also used for nondestructive evaluation of materials for industrial and scientific purposes. Effects of material properties and grain structure are also a known fact. Accordingly, it is decided to use the ultrasonic sound waves for determination of bulk hardness through the thickness of materials.
Longitudinal ultrasonic waves propagate and vibrate in the same direction and travel through a medium at constant velocity. Pulse echo technique, in which waves are transmitted and received by the same transducer, is used with this type of waves. Immersion ultrasonic systems transmit the longitudinal waves in water, as shown in Fig. 1. Echoes reflect back from the surface and back wall of a material. Computer integrated system measures the time difference between two echoes and calculates wave velocity using Eq. (2)where V is wave velocity; d is thickness; and t is time.

Three sample plates of each steel type and their weld grooves are prepared according to the geometric properties given in Fig. 2. The depth of the weld groove is 3 mm with a side angle of 60°, and the width of its bottom part is 2 mm. The weld groove with a length of 93.3 mm is located in the center. Length of the weld grove is determined as one-third of length of base plate.
The welding process is required to be performed using a fully automated system with common parameters for each type of steel. Submerged arc welding technique is a proper method to this end, which minimizes the possible operator errors. Dupont et al. [23] evaluated the effects of welding parameters on the arc and melting efficiency, compared various arc welding processes and determined the efficiencies of those processes, including submerged arc welding. That efficiency parameter is preferred to be used during the welding of samples. The parameters of the submerged arc welding process are given in Table 1. Other parameters are not selected according to technical investigation. They are determined according to the requirements of the operator in order to perform a real industrial application of welding process.
In this study, the welding process is performed at TEKFEN Manufacturing and Engineering Co. lnc. Facility. AWS EM12K submerged arc wire is selected as filler material. Single pass weld is performed to fill each weld groove and then the samples are left to cool in stagnant air. Rockwell and ultrasonic hardness measurements of welded samples are repeated after 24 h following the welding process.
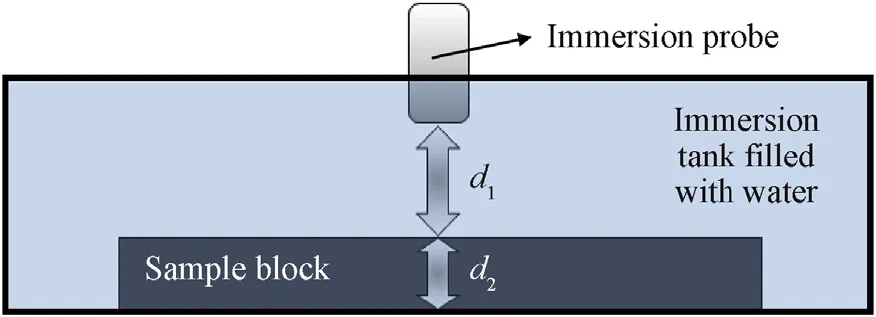
Fig. 1. Schematic illustration of the immersion ultrasonic system.

Fig. 2. Illustration of sample geometry and hardness measurement section.
3. Correlation
Hardness and ultrasonic wave velocity measurements are performedbeforeandaftereachannealingstage.Theirvariation in initial condition are investigated in terms of annealing temperature,andthenthevariationsofhardnessandultrasonicwave velocityarecorrelatedforeachsteeltype.Theinitialhardnesses of steel samples are given in Table 2. The second-order polynomial function of these correlations are given in Eq. (3)


Table 1Parameters for submerged arc welding process.

Table 2Initial hardnesses of steel samples.
where Δh is variation of hardness; v0is initial ultrasonic wave velocity; v is measured ultrasonic wave velocity; and a1, a2and a3are constants.
The left column in Fig. 3 illustrates the variations of hardness and ultrasonic wave velocity related to annealing temperature. Results show that there is an inverse relation between the two data. The relation between hardness and ultrasonic wave velocity variation for each sample are proposed in the right column in Fig. 3. Careful observations showed that the relation of hardness and ultrasonic wave velocity has a regular order for each carbon content, but these orders do not fit the exponential, logarithmic or linear trends. On the other hand, the high order polynomial trends provide good regression analysis results, but provides unrealistic fluctuation. Investigations showed that the best fitting to hardness and ultrasonic wave velocity relation data is obtained with the second-order trends, and accordingly the trend of each data is determined in terms of the second-order polynomial function. Without heat treatment, no change occurs in the hardness of the material. At that point the variations of ultrasonic wave velocity and hardness are zero so that the upper and lower values of the third coefficient (a3) of the second-order polynomial are limited to zero.
The initial hardness of steel is related to its carbon content, and its hardness increases with the increase in carbon content. On the other hand, the magnitude of hardness variation, related to annealing process, decreases with the increase in carbon content. There is also a relation between ultrasonic wave velocity and carbon content of sample. The magnitude of increase of ultrasonic wave velocity decreases with the increase in carbon content. Results also show that there is a relation between ultrasonic wave velocity and hardness.Ultrasonic wave velocity increases with the decrease in hardness. At some annealing stages, the hardness increases, and the ultrasonic wave velocity decreases with the increase in hardness.
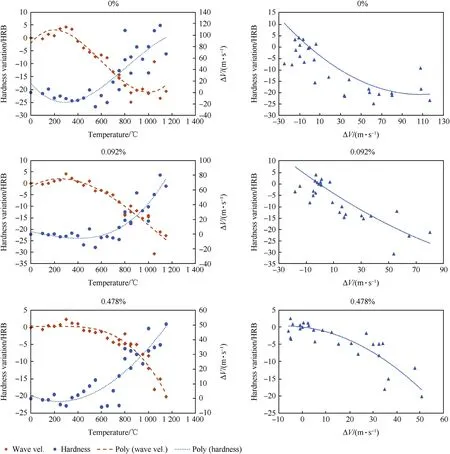
Fig. 3. The variations of hardness and ultrasonic wave velocity and the correlations between them in steels with 0, 0.092 and 0.478 weight % of carbon contents.
Investigations on the relation between ultrasonic wave velocity and hardness show that a convex function is obtained when the carbon content is zero. Increasing the carbon content replaces the function from convex to concave, because the ultrasonic wave velocity varies with a lower rate after the increase in carbon content. The hardness decreases with the increase in ultrasonic wave velocity in all cases. The secondorder polynomial functions are given in Eqs. (4)—(6):


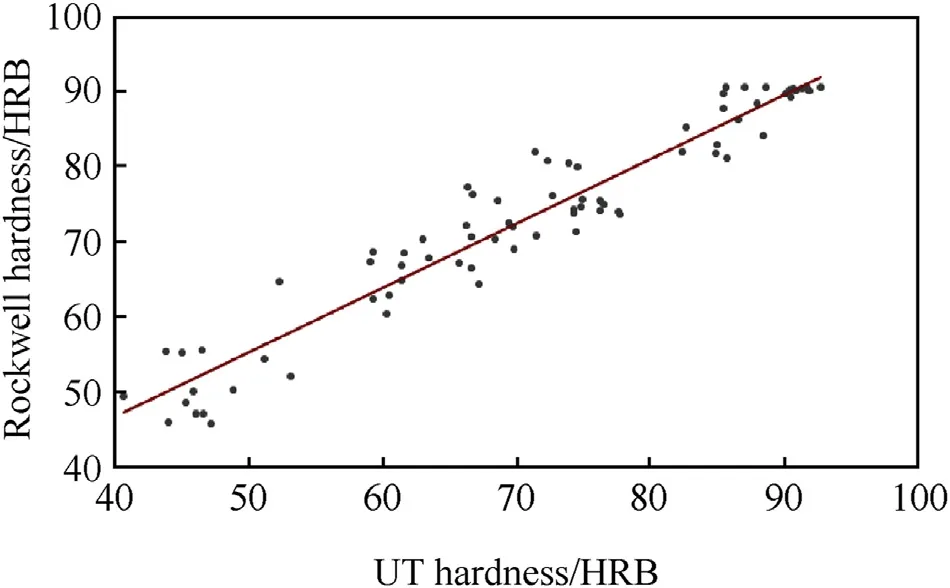
Fig. 4. Comparison of measured and predicted hardness values of isotropic test samples.
Eq. (4) is used for carbon-free IF steel. Correlations for steels with 0.092 and 0.478 weight % of carbon contents are defined using Eqs. (5) and (6), respectively.
Rockwell hardness measurements are compared with predictions of the correlations. The investigations are performed using the isotropic samples. It is accepted that the hardness within these samples is homogeneous. Accordingly, the results are plotted with a first-order trend line, as shown in Fig. 4. Trend line perfectly fits the data points with R2value of 0.925. It can be stated that the correlations developed based on ultrasonic wave velocity variations have success on the determination of average hardness.
4. Hardness of welded steel
Ultrasonic wave velocity measurements cannot be performed on weld beam because of the rough surface so that the ultrasonic and Rockwell hardness measurements are accomplished as close as possible to weld beam, which is at 10 mm away from weld center, as illustrated in Fig. 2. The measured results of all three samples are merged and analyzed in a single distribution.
Similar to hardening process, the temperature of weld zone increases up to melting point temperature during welding then decreases rapidly after the removal of heat source. Phase transformations and rapid heating and cooling cycles cause the formation of compression and tension zones in different sections of materials. Consequently, the isotropic structures of materials cannot be sustained during the welding process.
The welding process causes the formation of residual stresses within and around the weld beam. The relation between hardness and residual stress was investigated [24,25]. These studies showed that hardness is affected by residual stress in materials. The ultrasonic waves are also used to observe the bulk residual stresses in welded steel [26,27]. Similarly, the thickness average hardness is expected to be investigated for welded materials. Results show that the hardness of IF steel increases as a result of the welding process around weld beam, as illustrated in Fig. 5. Hardness increases around the weld beam. The increase in surface hardness starts in the measurement points at 40 mm away from the weld center, but this distance is around 20 mm for the thickness average hardness.
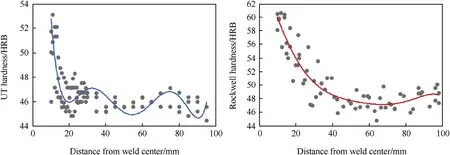
Fig. 5. Hardness distribution in IF steel after welding.
Low carbon steel has a different hardness distribution compared to IF steel, as illustrated in Fig. 6. A sharp increase in hardness around the weld beam is observed. It is a fact that the carbon element increases the hardnesses of steels. Similar to hardening process, rapid heating and cooling around weld beam arise with an increase in hardness. In addition to the rate of hardening, the rapid heating and cooling cycles during the welding process result in gathering the carbon atoms around the heated zone and the hardness increase in that zone.
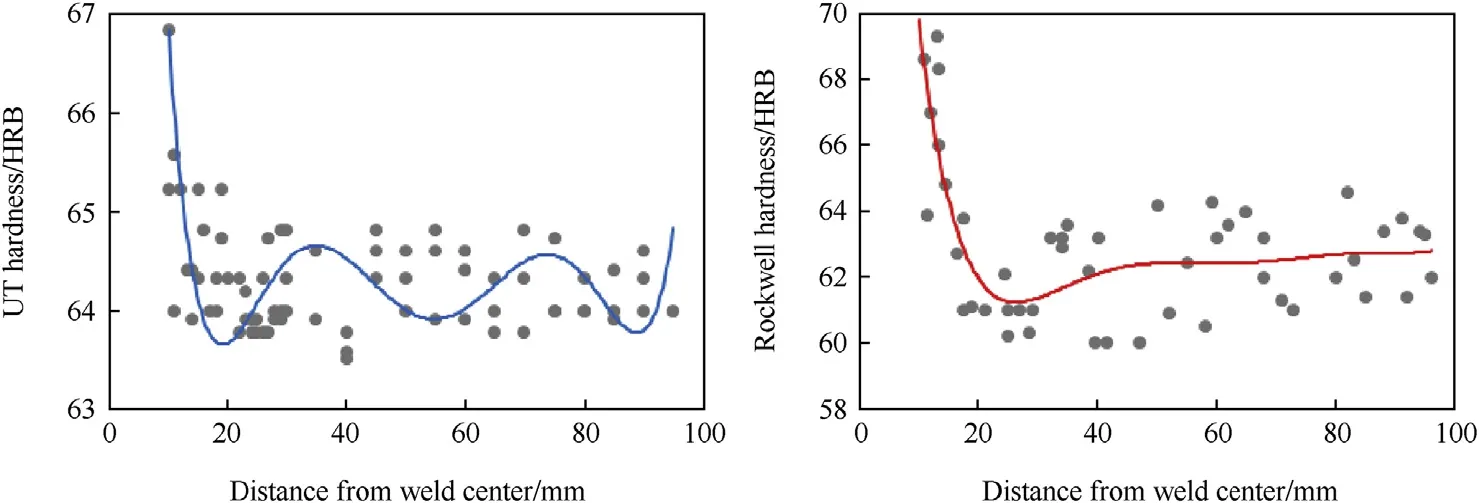
Fig. 6. Hardness distribution in low carbon steel after welding.
Ultrasonic and Rockwell hardness distributions in low carbon steel are illustrated in Fig. 7.
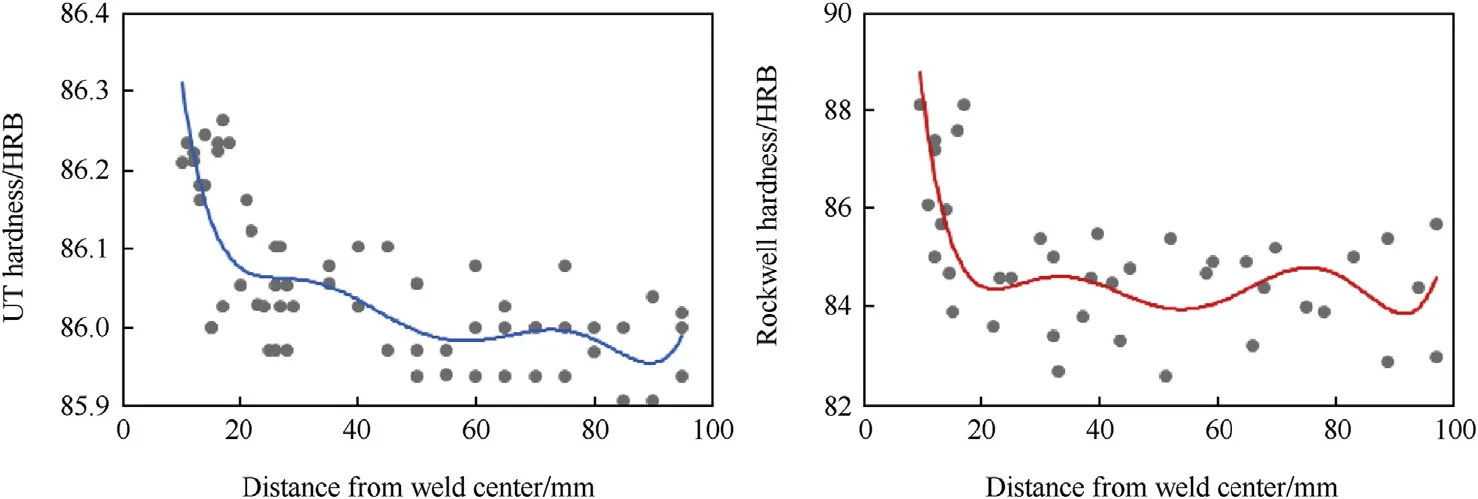
Fig. 7. Hardness distribution in medium carbon steel after welding.
Two methods show similar distributions, but the hardness increases around the weld beam, observed with ultrasonic technique, is lower than Rockwell technique. It can be stated that the small variations in average thickness through the thickness can be observed using this non-destructive technique.
Similar hardness distributions are observed with ultrasonic and Rockwell hardness measurements of all three steel types, but ultrasonic hardness measurement brought a narrower gap between highest and lowest values. The results show that the maximum Rockwell hardness value reached around the weld beam is higher than the average ultrasonic hardness value, and their magnitudes increase with the increase in carbon content.
5. Conclusion
Pulse-echo through the thickness ultrasonic waves were accepted to be used as an alternative hardness measurement method, however, this non-destructive technique does not have enough industrial applications because the reliability of this method has never been investigated. In spite of bulk hardness within a volume, the surface hardness tests are being performed for industrial purposes. This study showed that the ultrasonic waves are capable of effectively determining the hardness variations in a material in an industrial application.
Through the thickness, the ultrasonic wave velocities are correlated with surface hardnesses of isotropic materials to measure average hardness within the bulk volume, but the materials cannot sustain their isotropic structures during manufacturing processes. The welding process of steels is an example of industrial operation that the grain structure of materials changes around the weld zone. In this study, the ability of this technique, to measure the hardnesses of anisotropic materials, is investigated. The results show that this technique can be accepted as a viable method for bulk hardness investigation. Destructive surface method and nondestructive bulk method provide similar hardness distributions, but the magnitudes of average and surface hardness values are different. These methods should not be accepted as alternatives to each other.
References
[1] Li Z, Wang TS, Zhang XJ, Zhang FC. Annealing softening behaviour of cold-rolled low-carbon steel with a dual-phase structure and the resulting tensile properties. Mater Sci Eng A 2012;552:204—10.
[2] Gazder AA, Hazra SS, Pereloma EV. Annealing behaviour and mechanical properties of severely deformed interstitial free steel. Mater Sci Eng A 2011;530:492—503.
[3] Kimura A, Kasada R, Sugano R, Hasegawa A, Matsui H. Annealing behaviorofirradiationhardeningandmicrostructurein helium-implanted reduced activation martensitic steel. J Nucl Mater 2000;283:827—31.
[4] Fargas G, Anglada M, Mateo A. Effect of the annealing temperature on the mechanical properties, formability and corrosion resistance of hotrolledduplexstainlesssteel.JMaterProcessTechnol 2009;209:1770—82.
[5] Euh K, Kim YC, Shin K, Lee S, Kim NJ. Effect of tempering on hardness improvement in a VC/steel surface-alloyed material fabricated by high-energy electron-beam irradiation. Mater Sci Eng A 2003;346: 228—36.
[6] Irani M, Taheri AK. Effect of forging temperature on homogeneity of microstructure and hardness of precision forged steel spur gear. Mater Chem Phys 2008;112:1099—105.
[7] Negm NZ. Effect of annealing temperature on properties of H2/N2 rf plasma-treated stainless steel. Surf Coatings Technol 2006;201:1763—7.
[8] Kang S, Jung Y-S, Jun J-H, Lee Y-K. Effects of recrystallization annealing temperature on carbide precipitation, microstructure, and mechanical properties in Fe—18Mn—0.6 C—1.5 Al TWIP steel. Mater Sci Eng A 2010;527:745—51.
[9] Rogal Ł Dutkiewicz J. Effect of annealing on microstructure, phase composition and mechanical properties of thixo-cast 100Cr6 steel. Mater Charact 2012;68:123—30.
[10] Liu JB, Liu XH, Liu W, Zeng YW, Shu KY. Microstructure and hardness evolution during isothermal process at 700°C for Fe—24Mn—0.7 Si—1.0 Al TWIP steel. Mater Charact 2010;61:1356—8.
[11] Birks AS, Green RE, MacIntire P. Nondestructive testing handbook. Ultrasonic Testing (UT). American society for nondestructive testing. 3rd ed., vol. 7. American Society for Metals; 1991.
[12] American Society for Testing, Materials. Annual Book of ASTM standards 2007: iron and steel products. Section 1. ASTM; 2007.
[13] Rosen M. Analytical ultrasonics for characterization of metallurgical microstructures and transformations. In: Vary A, Corp Noyes Data, editors. Materials analysis by ultrasonics. New Jersey, USA: Park Ridge; 1987. p. 79—97.
[14] Rosen M, Ives L, Ridder S, Biancaniello F, Mehrabian R. Correlation between ultrasonic and hardness measurements in aged aluminum alloy 2024. Mater Sci Eng 1985;74:1—10.
[15] Tariq F, Naz N, Baloch RA. Characterization of material properties of 2xxx series al-alloys by non destructive testing techniques. J Nondestruct Eval 2012;31:17—33.
[16] Bouda A, Benchaala A, Alem K. Ultrasonic characterization of materials hardness. Ultrasonics 2000;38:224—7.
[17] Lukomski T, Stepinski T. Steel hardness evaluation based on ultrasound velocity measurements. Insight-Non-Destructive Test Cond Monit 2010;52:592—6.
[18] Hsia S-Y, Chou Y-T. Assessing the hardness of quenched medium steel using an ultrasonic nondestructive method. Adv Mater Sci Eng 2014; 684836:1—8.
[19] El Rayes MM, El-Danaf EA, Almajid AA. Ultrasonic characterization of heat-treatment effects on SAE-1040 and -4340 steels. J Mater Process Technol 2015;216:188—98.
[20] Chandler H. Hardness testing. ASM international; 1999.
[21] Kuhn H, Medlin D. ASM handbook. Vol. 8: mechanical testing and evaluation. Materials Park, OH 44073-0002, USA: ASM International, Member/Customer Service Center; 2000. p. 998.
[22] Herrmann K. Hardness testing: principles and applications. ASM International; 2011.
[23] Dupont JN, Marder AR. Thermal efficiency of arc-welding processes. Weld J 1995;74:S406—16.
[24] Tosha K, Iida K. Residual stress and hardness distributions induced by shot peening. In: Proc international scientific committee on shot peening-4, Tokyo, Japan; 1990. p. 379—88.
[25] Abbate A, Frankel J, Scholz W. Measurement and theory of the dependence of hardness on residual stress. DTIC Document. ARDEC. 1993.
[26] Uzun F, Bilge AN. In: Total residual stress measurement by using ultrasonic techniquevol. 24. Gazi University Journal of Science; 2011. p. 135—41.
[27] Uzun F, Bilge AN. Immersion ultrasonic technique for investigation of total welding residual stress. In: 11th international conference on the mechanical behavior of materials (Icm11)10; 2011. p. 3098—103.
* Corresponding author. Tel.: +90 5354569882.
- Defence Technology的其它文章
- Gas tungsten arc welding of ZrB2
—SiC based ultra high temperature ceramic composites R.V. KRISHNARAO*, G. MADHUSUDHAN REDDY - Influence of tool pin profile on microstructure and corrosion behaviour of AA2219 Al
—Cu alloy friction stir weld nuggets Ch. VENKATA RAOa, G. MADHUSUDHAN REDDYb, K. SRINIVASA RAOa,* - Optimization of process parameters of aluminum alloy AA 2014-T6 friction stir welds by response surface methodology Ramanjaneyulu KADAGANCHIa, Madhusudhan Reddy GANKIDIb,*, Hina GOKHALEb
- Effect of hot-humid exposure on static strength of adhesive-bonded aluminum alloys
- Numerical modeling of friction stir welding using the tools with polygonal pins M. MEHTAa, G.M. REDDYb, A.V. RAOb, A. DEc,*
- Microstructure and pitting corrosion of shielded metal arc welded highnitrogen stainless steelRAFFI MOHAMMEDa, G. MADHUSUDHAN REDDYb, K. SRINIVASA RAOa,*

