Non-destructive Testing Method for Crack Based on Diamond Nitrogen-vacancy Color Center
ZHAO Long, WANG Xin, ZHAO Bowen, WU Guiyuan, LUO Dacheng,ZHANG Shaochun
(1. State Grid Anhui Electric Power Research Institute, Hefei China 230601; 2. China Prosp & Quantumtech Co,Ltd, Hefei China, 230088; 3. State Grid Anhui Electric Power Co., Ltd.; 4. CAS Key Laboratory of Quantum Information, The University of Science and Technology of China, Hefei 230026, China)
Abstract: Magnetic field measurement plays an extremely important role in material science, electronic engineering, power system and even industrial fields. In particular, magnetic field measurement provides a safe and reliable tool for industrial non-destructive testing. The sensitivity of magnetic field measurement determines the highest level of detection. The diamond nitrogen-vacancy (NV) color center is a new type of quantum sensor developed in recent years. The external magnetic field will cause Zeeman splitting of the ground state energy level of the diamond NV color center. Optical detection magnetic resonance (ODMR), using a microwave source and a lock-in amplifier to detect the resonant frequency of the NV color center, and finally the change of the resonant frequency can accurately calculate the size of the external magnetic field and the sensitivity of the external magnetic field change. In the experiment, a diamond containing a high concentration of NV color centers is coupled with an optical fiber to realize the preparation of a magnetic field scanning probe.Then, the surface cracks of the magnetized iron plate weld are scanned, and the scanning results are drawn into a two-dimensional magnetic force distribution map, according to the magnetic field gradient change of the magnetic force distribution map, the position and size of the crack can be judged very accurately, which provides a very effective diagnostic tool for industrial safety.
Keywords: Diamond Nitrogen-vacancy Color Center, Iron Weld, Magnetization, Optical Fiber Sensor,Scanning
1 Introduction
Non-destructive testing is an emerging discipline that detects whether the physical properties, state, and internal structure of the test object are cracked, intermingled, etc., without damaging the test object[1].In industrial production, cracks in the welded structure will not only bring various inconveniences to life,but also cause devastating disasters. According to statistics, most of the accidents of welding structures in the world are caused by welding cracks, and the remaining very few are caused by unreasonable design and material problems. Therefore, in the various stages of equipment design, experiment, manufacturing, non-destructive testing plays a key role in controlling and improving its quality, ensuring the reliability of materials, parts and products, and improving productivity. It is inspection reliable technical means necessary for product quality, product safety,and product life extension.
In the field of industrial manufacturing, mechanical construction often needs to be combined into a complete mechanical device by welding. The sealing property of welding determines the quality, service life and even safety performance of the mechanical device,and the non-destructive testing technology of weld inspection can be used for the factory inspection of the device. The traditional welding seam inspection methods include ultrasonic inspection, radiographic inspection, magnetic particle inspection or penetrant inspection, etc.[2]. Without damaging the performance and integrity of the welded seam being inspected, the inspection of whether the quality of the welded seam meets the specified requirements and design intent.These technologies are widely used in pressure pipes,boilers, ships, aerospace and even various lifting equipment. And different technologies have different kind of advantages, for example, ultrasonic detection methods can detect tiny cracks with high sensitivity and fast speed, but the detection technology is difficult and the display of defects is not intuitive. Another example is magnetic particle detection with low cost and simple technology, but the sensitivity is not high,and the detection results are easily affected by subjective factors[2]. Therefore, a flaw detection method with high sensitivity and simple technology is extremely important for the industrial field. It can not only improve the efficiency of industrial manufacturing, but also greatly enhance industrial safety, which is of great significance to the modernization of my country’s industrial manufacturing.
After magnetization of the steel plate, there will be magnetic leakage at the cracked weld position,making the magnetic field sensing an important detection method in non-destructive testing technology. At this case, with the development of quantum information technology, scientists have discovered a variety of quantum measurement systems including superconducting interferometers, neutral cold atoms, solid-state spins, etc[3]. These quantum systems can achieve extremely high magnetic field measurement sensitivity. The application of quantum sensing to the field of non-destructive testing has become a new trend[4]. Among many quantum systems, the quantum measurement system of nitrogen-vacancy color center is favored by scientific researchers because of its easy manipulation, high sensitivity and spatial resolution.This article mainly applies the nitrogen-vacancy color center based quantum sensing technology to the traditional non-destructive testing field, and provides a new detection method[5-8].
2 Measuring Principle
2.1 Quantum Measurement Based on the Nitrogen-vacancy Color Center
First, a brief introduction to the physical properties of the diamond NV color center and the principle of quantum precision measurement based on it.
As shown in Fig.1(a), Solid-state defects such as NV centers exhibit quantum properties similar to traditional atomic systems yet confer technical and logistical advantages for sensing applications. NVs are point defects composed of a substitutional nitrogen fixed adjacent to a vacancy within the rigid carbon lattice. Because diamond has a symmetrical regular tetrahedral crystal structure, the NV color center has C3vsymmetry, and the NV color center has four axial directions[9-10].

Fig.1 (a) The Lattice Structure of the Diamond NV Color Center. (b) Energy Level Structure of Diamond NV.
In the absence of external magnetic field, the ground state energy level will be split into ms=0 and ms=±1 , where the zero-field split D = 2.87GHz.When the NV color center is irradiated with a laser with a wavelength of 532nm, the ground spin state ms=0 will transition to the excited state ms=0, and then, it will return to the ground state ms=0 and release red fluorescence. If the NV color center is at ground state ms=±1, when it transition to the excited state ms=±1, some of NV color centers will first return to the metastable state1A, and then transition back to the ground state ms=0. A small amount of photons are emitted, therefore we determine the spin state by the photon counts when exciting the NV color center with a 532nm laser[3,11].
The Hamiltonian of the diamond NV color center in the ground state can be expressed by the following formula[4,12-15]:

Where D=2.87GHz, gSis the electron spin g factor, generally about 2.003, and μBis the Bohr magnetic moment. In the case of an external magnetic field, the Hamiltonian of the NV color center electron spin can be expressed as:
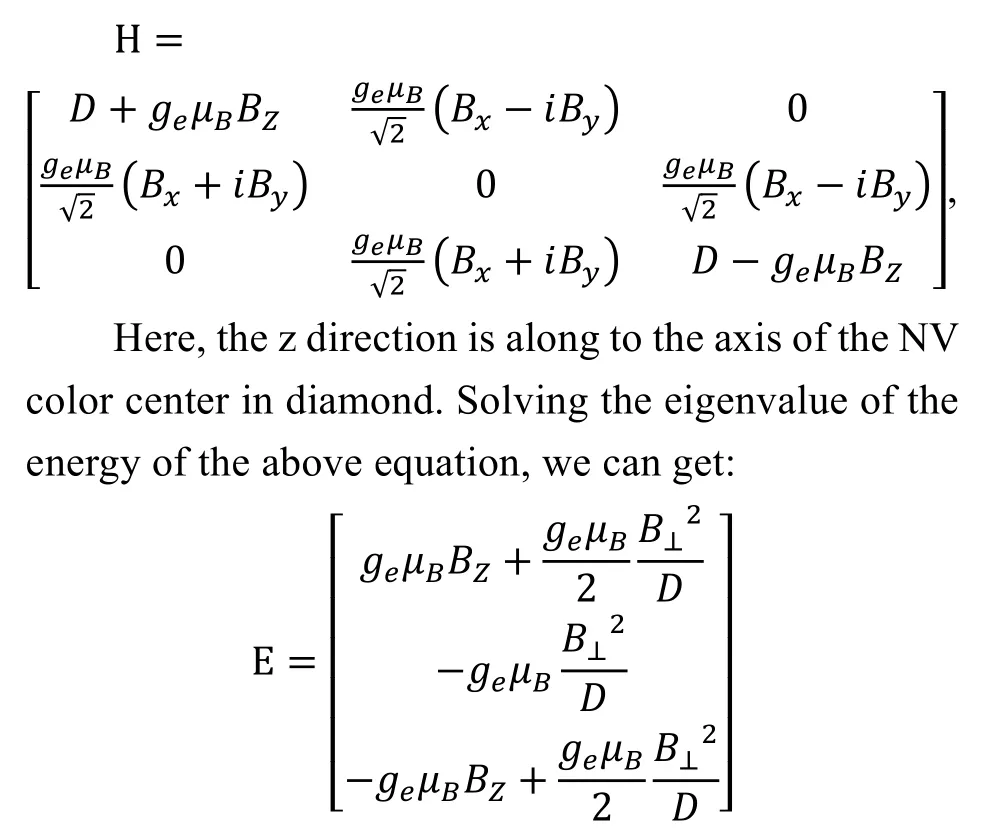

From Eq.2, it can be seen that the angle between the same magnitude of the magnetic field and the NV color center axis (z direction) is different, which will cause the different resonance frequency of ground state.For ensemble NV color center diamond samples (the four axial NV color centers are uniformly distributed),when the direction of the magnetic field is parallel to one of the axial directions, only four peaks will appear in the final spectrum because of the magnetic field. As shown in Fig.2(a), the magnetic field can be calculated according to Eq.3 through the resonance frequencies f-1and f+1corresponding to the peaks on both sides.In order to improve the detection efficiency of the magnetic field, the frequency of the microwave is generally locked to the position with the largest slope in the ODMR spectrum[12,13], as shown in Fig.2(b). The maximum response to changes is finally reflected in the changes in fluorescence. This method can be used to achieve real-time magnetic field measurement.
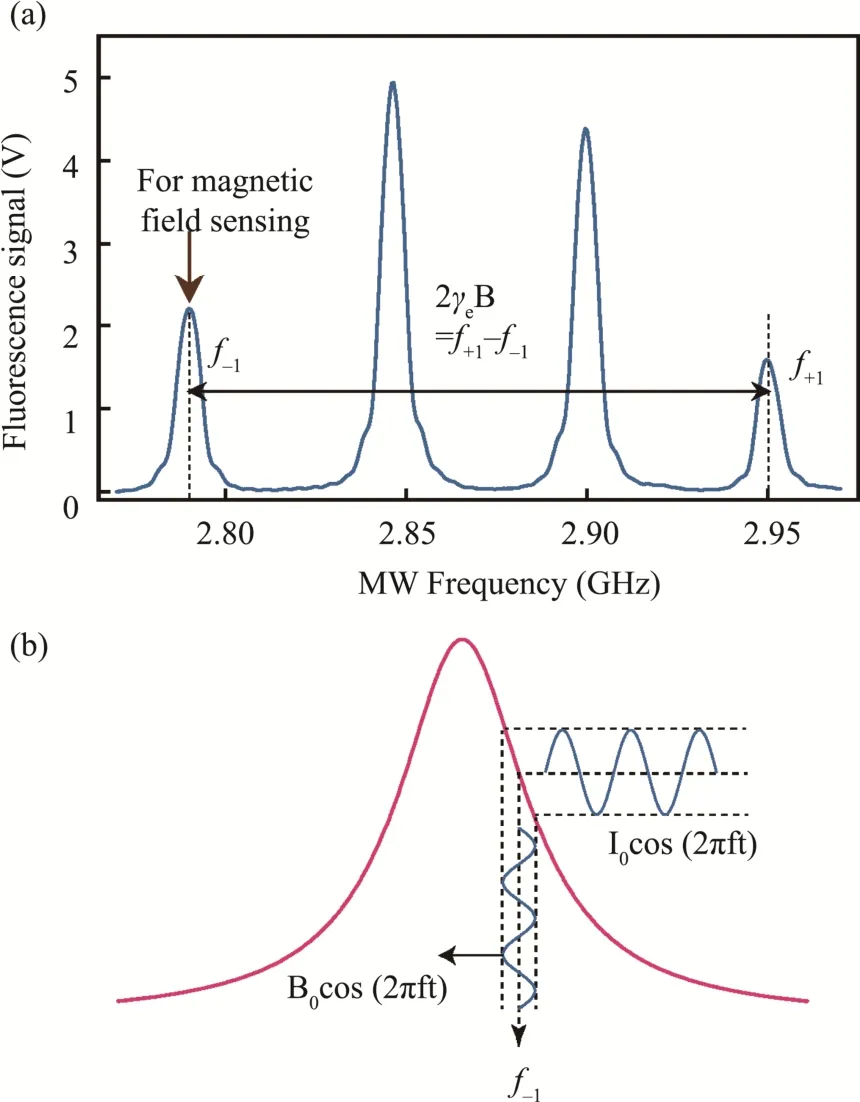
Fig.2 (a) Measured ODMR Spectrum under an External Magnetic Field. (b) Fix the Microwave Frequency at the Position Shown in (a). The Change of the External Magnetic Field Directly Causes the Change of the Fluorescence Signal
2.2 Principle of Magnetic Flux Leakage Detection
As shown in Fig.3, for the process of defect magnetic leakage, the steps of generating leakage magnetic field include defect magnetic refraction(Fig.3(a)), defect magnetic diffusion (Fig.3(b)), defect magnetic compression (Fig.3(c))). If there are defects(scratches, cracks, etc.) on the surface of a ferromagnetic object, and the ferromagnetic body is in contact with the air, the magnetic field will undergo magnetic refraction, and the magnetic field inside the ferromagnetic object will refract the surface of the object due to the magnetic boundary conditions. In this case,magnetic diffusion is formed. However, due to the complicated spatial magnetic field in space, the diffused magnetic lines are squeezed inside, which eventually leads to the reverse magnetic compression[4,15]. The final defect leakage magnetic field Bmflcan be expressed as:
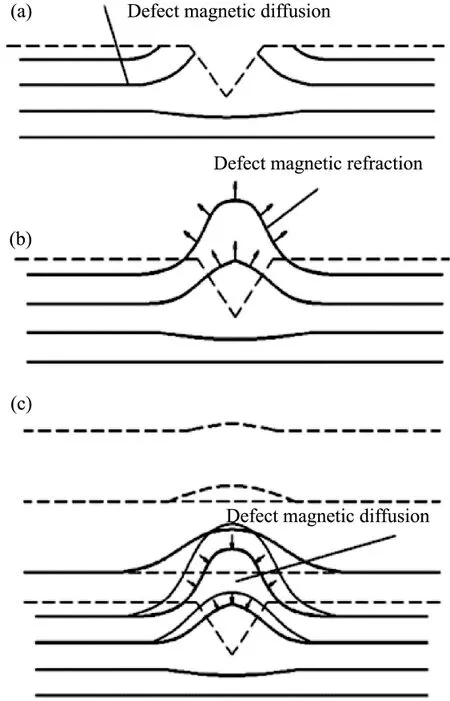
Fig.3 Defect Flux Leakage Process

where Br,Bdand Bcare the magnetic flux density of the defect magnetic refraction, the magnetic flux density of the defect magnetic diffusion, and the magnetic flux density of the defect magnetic compression, respectively.
The crystal lattice defects in diamond can reach the nanometer scale, which provide a magnetic field probe with extremely high spatial resolution. Iron plate welds in the industry are often difficult to judge by the eyes, which will inevitably bring a lot of safety hazards.By magnetizing the iron plate, magnetic leakage will occur at the weld. With the employment of NV color center, such a high sensitivity and high spatial resolution of magnetic measurement can accurately locate magnetic leakage and provide timely safety warnings.
2.3 Apparatus and Method
The optical experiment setup of the NV color center based quantum sensing system is shown in Fig.4.Here, we used a homebuilt fiber system to excite and detect the NV centers. A diamond attached on the tip of a multi-mode optical fiber (step refractive index, with a core diameter of 200μm and a numerical aperture of 0.37) has been mechanically polished and cut into a membrane with dimensions 200×200×100μm3.The laser generates a green laser with a wavelength of 532 nm, which is coupled into the fiber by a fiber coupler, and then transmitted to the diamond NV color center probe through the dichroic mirror. The diamond NV color center will emit red fluorescence under the excitation of a 532nm laser. Then the red fluorescence passes through the filter and is detected by the photodetector. In the experiment, magnetic field sensing is realized by fiber-diamond probe, which consists of a diamond glued on the end of the fiber and a copper wire wrapped as microwave antenna.
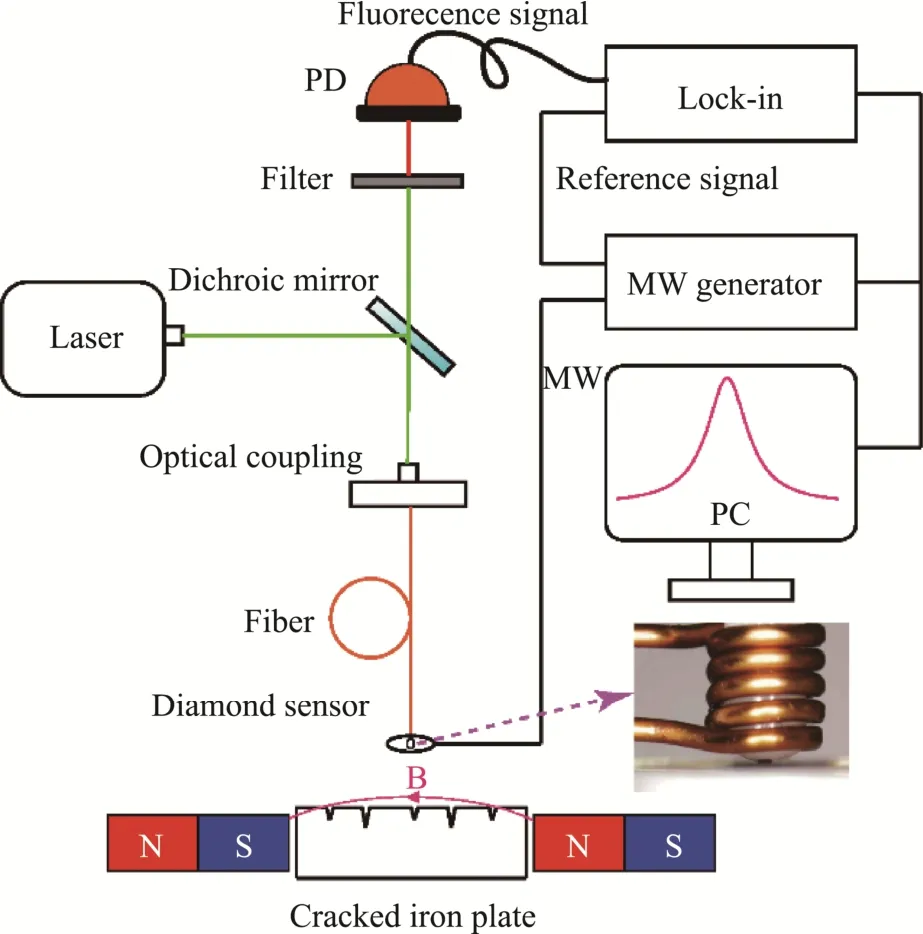
Fig.4 Optical Fiber-diamond Coupling Sensor Optical System, Electronics System and Scanning Detection System
The microwave system includes a microwave source, a microwave switch, a microwave amplifier and a microwave circulator. The microwave source,and its stability determines the signal-to-noise ratio of the self-selected signal[12-15]. The function of the microwave switch is to control the on-off of the microwave signal. The microwave circulator allows only one-way transmission of microwave signals and prevents the microwave signals transmitted in the reverse direction from burning out the microwave amplifier.The microwave signal generated by the microwave source in the system passes through the microwave switch, microwave amplifier and microwave circulator,and is transmitted from the microwave antenna to the diamond NV color center probe, and finally realizes the control of the electron spin of the NV color center.
The computer is to control the microwave source and the lock-in amplifier. We use the software written in python to control the microwave source and lock-in amplifier, mainly to set the frequency sweep points,sweep range and other parameters of the microwave source sweep signal. In our scheme, the microwave source will generate AM signals. The modulated signal output by the microwave source is used as the reference signal of the lock-in amplifier. Once we fix the microwave frequency, the output signal of the lock-in amplifier is magnetic-field-dependent, thus we can achieve real-time magnetic field sensing.
2.4 Magnetic Flux Leakage Detection Method Based on Nitrogen-vacancy Color Center
The diamond NV color center ensemble has four-axis symmetry, so in the presence of an external magnetic field, the ODMR fluorescence spectrum will present eight peaks. However, in order to detect the magnetic field in a specific direction, we need to apply a bias magnetic field align with one of the axial directions to separate the fluorescence spectrum[15-16]. In this case, four peaks will appear in the ODMR fluorescence spectrum of the NV color center, and the contrast between the two peaks in the middle is relatively large, as shown in Fig.2(a). In the experiment,we used two neodymium iron boron permanent magnets to magnetize the plate weld, as shown in Fig.4.Two magnets are respectively applied on both sides of the iron plate, so that a closed magnetic circuit is formed inside the plate, and the magnetization of the plate is completed at this time.
3 Results and Discussion
3.1 Measurement Results of NV Color Center Measurement System
When applying the bias magnetic field align one of NV axis and setting the microwave frequency at the maximum slope of ODMR spectrum, we can map the defect-induced magnetic flux leakage by scanning the fiber-diamond probe. Fig.5 shows the iron plate with welds selected in the experiment. Two kinds of experiments were done on this. First, the flat area without any cracks in the iron plate was scanned, as shown in Fig.5(b). It can be seen that there is almost no crack detection result, but it still shows a magnetic field gradient. The main reason is that the surface of the iron plate will have a magnetic field in a specific direction due to the permanent magnets applied on both sides. In a small area, it can be assumed that this magnetic field is constant and will not affect the crack detection results.
Then, in order to distinguish the difference between scratches and cracks on the surface, an“x-shaped” cut was made on the surface of the plate,and the area was scanned with the same magnetic field as the above method. The scanning result is shown in Fig.5(c). When an “x-shaped” Scratches is made on a smooth flat surface, an x-shaped magnetic flux leakage will appear on the flat surface. However, since the cut is very shallow, the magnetic field varies in a small range. Finally, we find a location of the welding gap on the iron plate, and then detect the surface magnetic field distribution in the same way. We selected two areas corresponding to the area with one (Fig.5(d)) or multiple (Fig.5(d)) welds, which can be identified with magnetic filed mapping by our fiber-diamond sensor.Due to deeper defects, the detected magnetic leakage is greater than that of “x-shaped” Scratches.
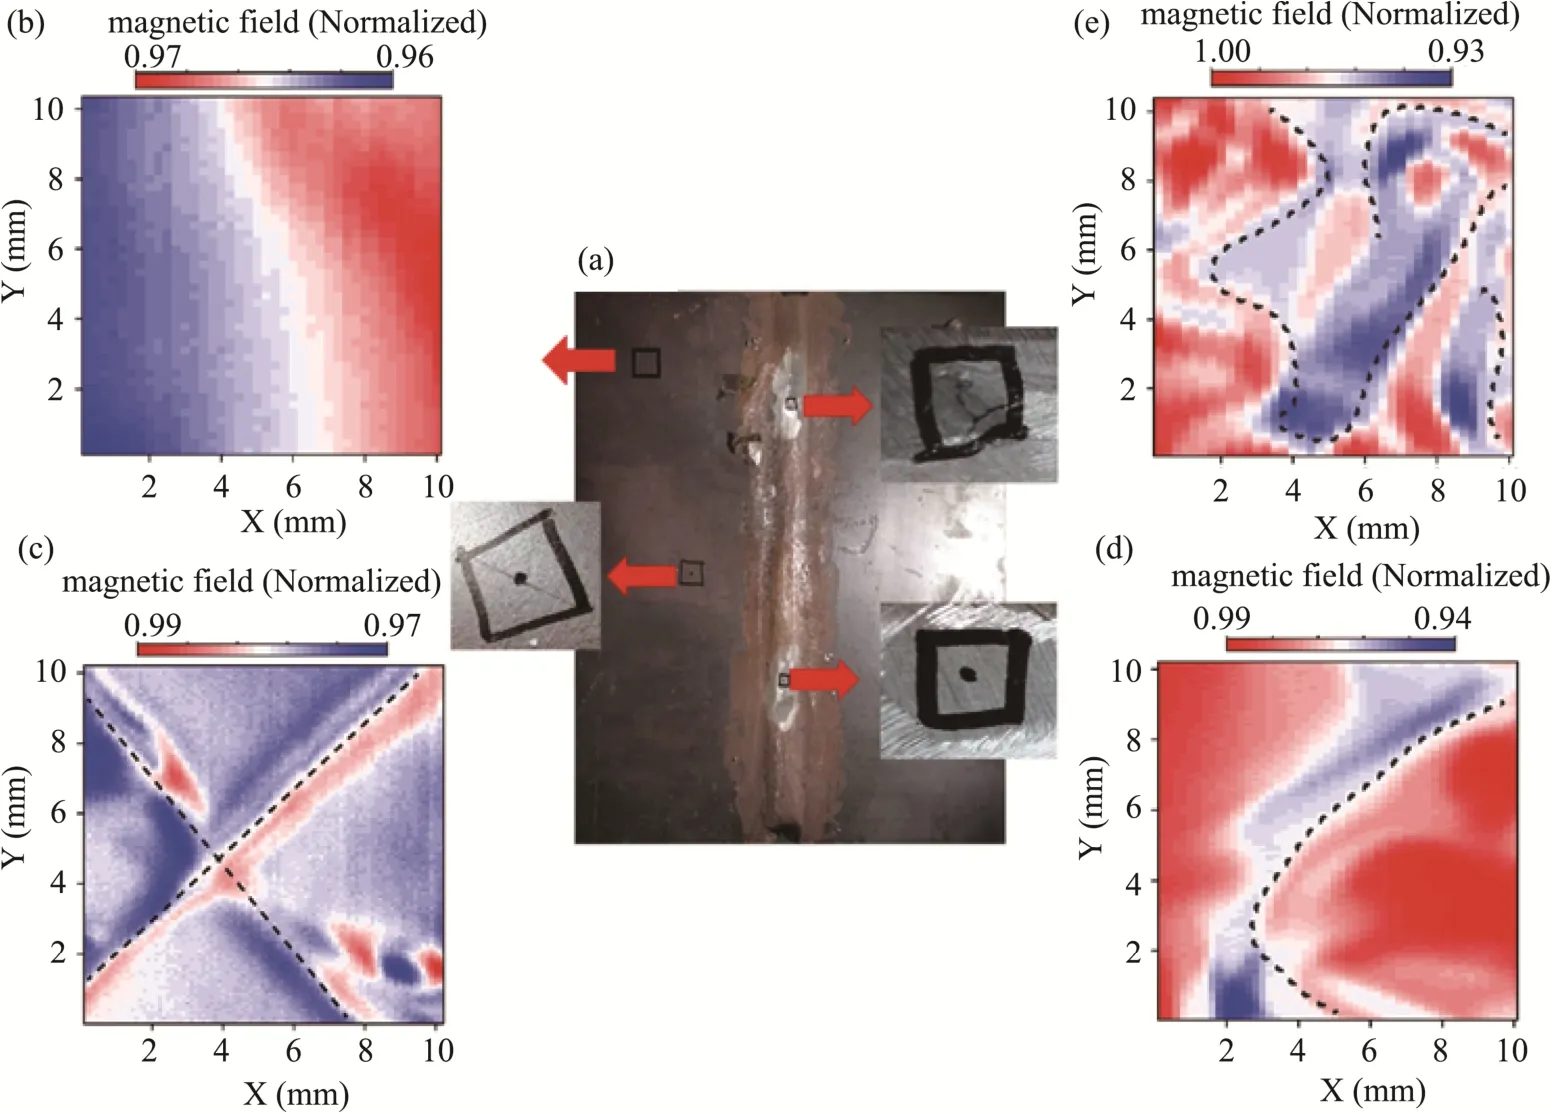
Fig.5 (a) Iron Plate with Weld. (b) the Area Where There Are No Welds in the Iron Plate. (c) Scanning Results of Artificial Scratches in the Iron Plate. the Dotted Line in the Figure Is the Crack Area. (d) the Result of a Simple Crack Scan in the Iron Plate, the Dotted Line in the Figure Is the Crack Area. (e) Scanning Results of Complex Cracks in the Iron Plate. the Dotted Line in the Figure Is the Crack Area
In the above measurement, the magnetic probe is close to the surface of the iron plate (the distance between the two is 200−400μm), thereafter the magnetic field distribution on this surface can be mapped.These results show that when there are cracks in the weld, the surrounding magnetic flux leakage is much complicated. In this case, the magnetic mapping presents higher contrast. On the contrary, the defect is likely to be scratches with low contrast, which is not the defect of industrial inspection.
3.2 Measurement Result of Traditional Magnetic Particle Test Piece
In order to verify the sensitivity of the optical fiber-diamond magnetometer for magnetic flux leakage detection, the standard test piece for magnetic flux leakage detection is placed in a flat iron plate, and then two permanent magnets are applied to both ends of the iron plate to magnetize the iron plate. In this case, the standard test piece on the iron plate can be magnetized.Similarly, move the fiber-diamond probe to 50um above the test piece, and scan the magnetic field on the surface by moving the test piece. The result is shown in the Fig.6, it can be clearly seen that the distribution of the magnetic field is almost the same as the shape of the groove in the test piece. Such result confirms the applicability and high sensitivity of NV color center optical fiber magnetic sensor in the application of magnetic flux leakage detection.
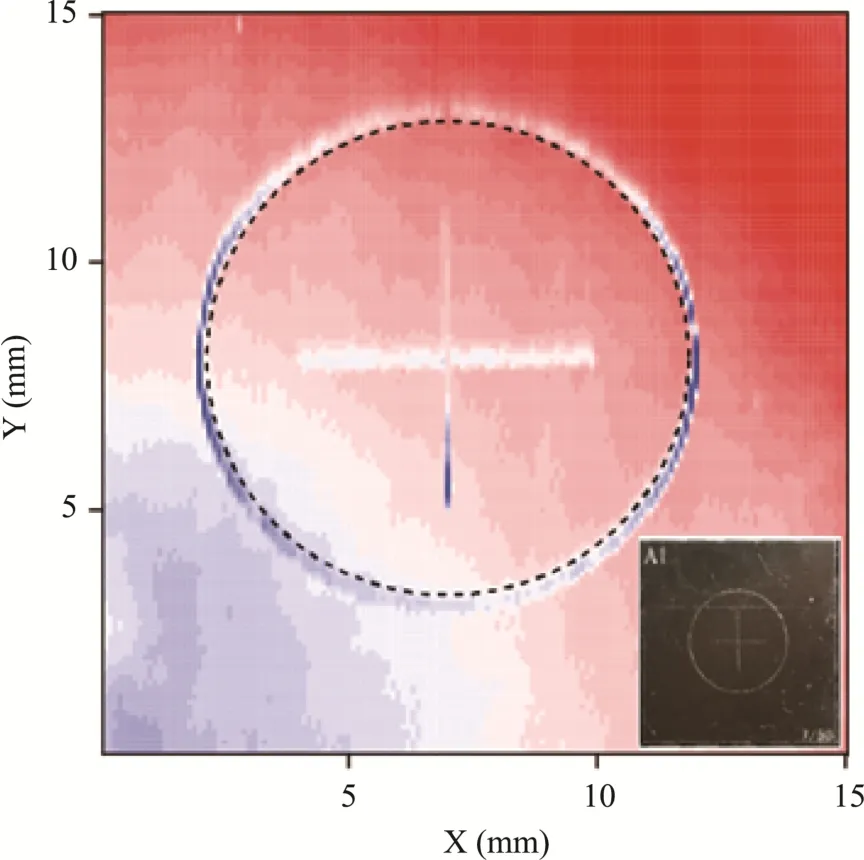
Fig.6 The Result of Magnetic Field Scanning on the Surface of the Test Piece Using an Optical Fiber-diamond Probe. in the Illustration Is a Photo of the Standard Test Piece Used for Magnetic Particle Testing, Where the Parameters of the Groove Are: Depth 7um, Width 50um
4 Conclusion
According to the above results, we can get the following conclusions:
1. The NV color center quantum magnetic measurement system can realize the magnetic field mapping.At the same time, if there are defects on the surface of the iron plate weld, the magnetic field will change.Therefore, the NV color center quantum magnetic measurement system can achieve industrial iron Non-destructive testing of plate welds.
2. Following are the advantages of NV color center based quantum magnetic measurement system.First, the quantum sensing system based on NV color center is extremely sensitive, that is, it has a high response to weak magnetic field changes. Based on this,we can detect the magnetic field in a certain area[16].Second, the use of two-dimensional stepper motor technology can realize the visual representation of the two-dimensional magnetic field. Similarly, in the future, three-dimensional stepping motors can be used to scan the spatial magnetic field[17,18]. Third, the NV color center is used to scan the magnetic field. The magnetic field resolution and spatial resolution generally change inversely.
3. Following are the disadvantages of NV color center quantum magnetic measurement system. The current quantum sensor system based on the NV color center has relatively strict requirements on the size and flatness of the scanning area. When the surface of the plate weld is not flat, many other factors will also cause the magnetic field near the NV color center probe to change, so the measured result is not accurate. In the future, this problem can be solved by setting the movement trajectory of the NV color center probe according to the surface change of the iron plate weld. It is believed that with the development of industrial technology, the NV color center quantum magnetic measurement system can be applied to a variety of industrial measurement situations[19-21].
Acknowledgement
This work is supported by the Provincial Control Technology Project No. 52120519002N.
- Instrumentation的其它文章
- Design of a Logistics Automated Guided Vehicle
- Iris Segmentation Based on Matting
- Research on Hand-eye Calibration Technology of Visual Service Robot Grasping Based on ROS
- Target Path Tracking Method of Intelligent Vehicle Based on Competitive Cooperative Game
- Research on Surface Defect Detection Technology of Wind Turbine Blade Based on UAV Image
- Time Symmetry Analysis of Nonlinear Parity Based on S-P Compensation Network Structure

