3DPMD-Arc-based additive manufacturing with titanium powder as raw material
Hoefer Kevin and Mayr Peter
Chemnitz University of Technology-Chair of Welding Engineering, Reichenhainer Strae 70, Chemnitz 09126, Germany
Abstract The study aims to demonstrate the suitability of the 3DPMD for the production of titanium components with and without reinforcing particles in layer-by-layer design. Various demonstrators are prepared and analyzed. The microstructure, the porosity and the hardness values of the different structures are compared with each other through metallographic cross-sections. The uniform distribution of the carbides and the interaction with the matrix was analyzed by SEM and EDX.The miller-test method (ASTM G75-07) was used to determine data for the relative abrasivity of the structures. In summary, 3DPMD offers the possibility to produce titanium structures with and without reinforced particles. Using automated routines, it is possible to generate metal structures using welding robots directly from the CAD drawings. Microstructures and properties are directly related to the process and therefore material-process-property relationships are discussed within this work.
Key words additive manufacturing, plasma, titanium,3D plasma metal deposition, reinforced particles
0 Introduction
Additive manufacturing(AM) of titanium components offers several advantages compared to conventional production technologies such as higher material utilization efficiency and increased geometric possibilities. In comparison to laser powder bed processes, arc-based additive manufacturing processes have the additional advantage of an almost unlimited assembly space, higher deposition rates and an improved utilization factor of raw materials. Disadvantages of wire-based methods are the restricted availability of different types of wire consumables, the wire feed rate directly coupled to the heat input and the lack of possibility to create multi-material structures in-situ.
Within this work, the 3D plasma metal deposition (3DPMD) method, based on a plasma powder deposition process is introduced. 3DPMD has some special advantages compared to the established plasma powder process and additive processes. For example, up to four powders, which can be different in terms of material and powder fraction, can be mixed within one layer. This allows a targeted adaption of local properties (microstructure, mechanical properties, wear resistance, porosity, etc.) to the aimed load type and level. The introduction of reinforced particles (e.g. tungsten or titanium carbides) into the component is a simple example.
An essential component of modern manufacturing process chain is the additive manufacturing. It is defined by the manufacturing of workpieces by the layer-by-layer application of shapeless material by a production process[1].
Currently dominant technologies in the market for theAM of metal parts are selective laser sintering (SLS), selective laser melting (SLM) and electron beam melting (EBM). These beam-based methods are based on the principle of layer-wise remelting of high purity metal powders. The high demands on the quality of the powder with regard to grain size, degree of agglomeration and moisture lead to a very complex and price-intensive design and production. For this reason, the available material spectrum is very limited. Characteristics of the methods are low layer thicknesses (up to 200 μm), slow building rates (up to 105 cm3/h), limited component size and space, the need for additional laser protection or vacuum devices and high investment costs[2].
In the case of robot-assisted arc-based additive manufacturing, the described disadvantages of the beam-based methods are not or only relevant to limited extent. The heat-reduced and process-controlled gas metal arc welding process cold metal transfer (CMT) is a widely applied method[3-4]. Advantages of the arc-based process with wire are the higher build rate up to 1 500 cm3/h[2], the lower costs of the raw material as well as the low process complexity[5]. A disadvantage of the wire-based AM is the direct linking of the heat input to the application or melting rate.
The focus for the application of the AM is on the production of complex components and on the reduction of component weight and sizes. One approach to reduce the weight of the parts is the adaptation of the component to the real stresses. One example of this is the topological optimization of components based on the model of bionics. The real forcepaths in the component are simulated, the geometry is analyzed and subsequently adapted.
Another approach besides geometryadaptation, is the adaptation of local properties (material, microstructure) to the real loads. This principle is also based on observations from nature, for example the water-repellent effect of the lotus leaves.
The allocation of local property changes by the variation of the raw material is not feasible with the above-described methods. A classic example of this is the inclusion of hard materials for a partial increase in wear resistance[6]. This is prevented in the field ofpowder bed technologies by the construction principle (doctoring of powder from a single powder bunker). In the area of the wire-based AM, it is possible to produce particle reinforced components by filler wires. However, disadvantages are the limited portion of reinforced particles in the wire, in case of a slag forming filler wire a continuous process is not possible and the content of carbides within the layer could not be changed.
The described method 3DPMD eliminates these disadvantages and can produce local property changes by mixing up to four powders within one layer with a variable content of reinforced particles.
1 3D-plasma-metal deposition
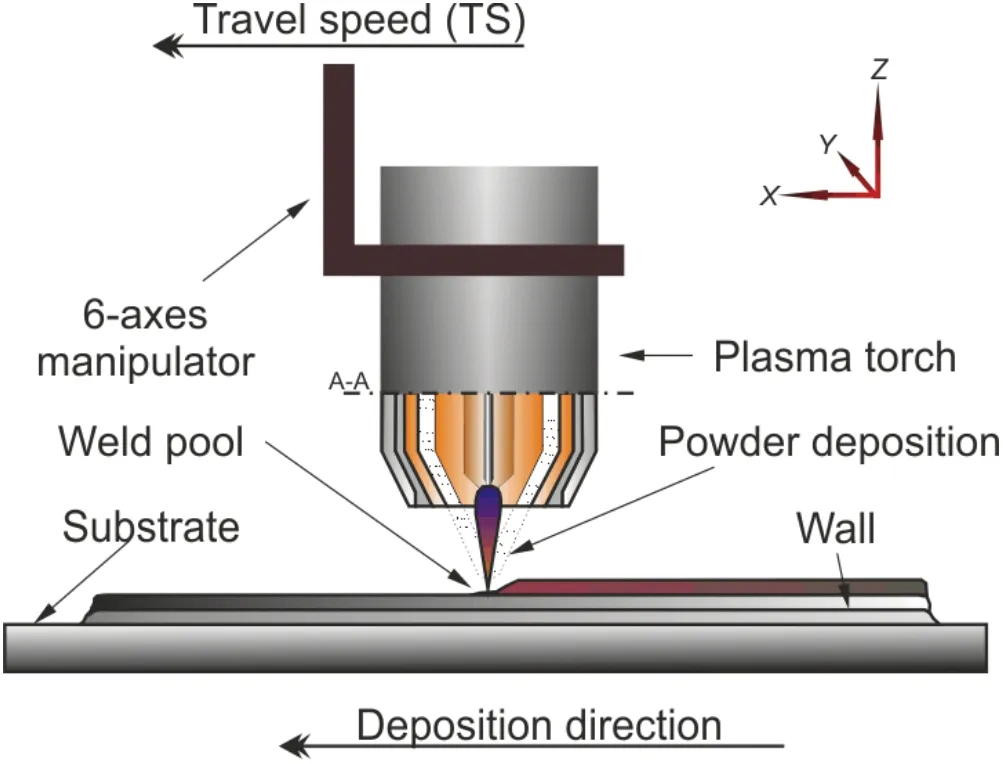
The newly developed process variant 3DPMD, based on a classical PTA process, is able to generate 3-dimensional objects. 3DPMD is a robot-supported and arc-based process that combines the advantages of the classical PTA with new technology, see Fig.1.

Fig.1Processsetup3DPMD
The generation starts with the virtual slicing of the CAD part into defined layers. Based on the respective contour information of the layer, a robot program is generated automatically, which contains both- the path movement and the necessary welding commands. During the subsequent AM-construction process, up to four powders, which can be different in terms of material and powder fraction, can be mixed within one layer respectively in the same melt pool. This allows a targeted adaptation of local properties (microstructure, mechanical-technological properties, porosity, etc.) to the real loads.
The aim of the work is to show the possibility of the new developed process 3DPMD to produce homogeneous titanium parts with a local adaptation of the properties.
For this purpose, special components were produced,analyzed and compared. The external shape, the microstructure and the mechanical properties were investigated.
To evaluate the improvements of local properties, wear tests were performed. For testing the bonding between the single layers Charpy impact test was carried out.
2 Materials and experimental procedure
Due to the special properties of titanium, low-density (ρ= 4.5 g/cm3)[7]and high-strength (up toRm= 895 MPa)[8], the material is mainly used in aerospace applications. A disadvantage of the material is the high affinity of titanium to oxygen aboveT= 400 ℃. Therefore, processing is only possible under an inert atmosphere and with a residual oxygen content of maximum 10 ppm[7]. Higher oxygen level in the working area leads to more precipitations and the embrittlement within the material.
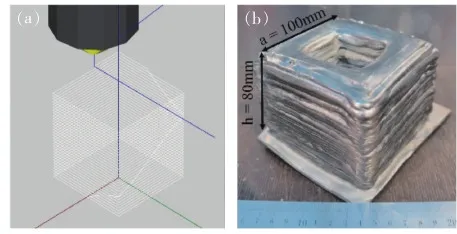
Within the investigation, a non-standardized, pure titanium powder was used to produce the AM-parts. A Ti6Al4V metal sheet witht= 10 mm was utilized as base for the building process (base metal). The demonstrator part was a cuboid with a side length ofl= 100 mm and a wall thickness ofb= 20 mm. The high of the part wash= 80 mm.
Fig.2 shows the test setup for 3DPMD and consists of a power source Plasma Star 500 (Imax= 500 A) in combination with the welding torch Plasma Star MV230 (Imax= 230 A, two separate powder feeds). The titanium powder with a particle size up to 300 μm was fed by a meander disk feeder. An integrated vibration system prevents a clogging in the powder feed tube through the coarse powder shape, see Fig.3a. A Plasmastar PF II disk conveyor with a feed rate up to 250 g/min is used to transport the tungsten carbides (WC). These have a particle fraction from 50-150 μm, see Fig.3b.

Fig.2Testsetup

Fig.3SEMpicturesofthepowdershape(a)Ti(b)WC
High-purity argon was used as shielding gas at 12 L/min and as plasma gas at 1.5 L/min. To protect the weldment, form the environment, the building process works in a shielding gas chamber. The chamber was vented with 20 L/min high purity argon 6.0. The distance between the plasma anode and the work piece was 10 mm (contact tip work distance, CTWD), the electrode set back was 2 mm. The welding torch moved with a relative speed of 30 cm/min. A six axis articulated arm robot REIS RV20-16 was used as a manipulation system. The parameters used are summarized in Table 1.
Table1Testparameters

Layer thickness/mmBuilding rate/(cm3·h-1)Building time/minWelding current/AWelding speed/(cm·min-1)CTWD/mmShielding gas/(L·min-1)1.51353401303010Ar 12
The heat input into the manufactured part was calculated using the energy input per unit length[9]. For the determination of the mechanical and technological properties, various metallographic cross-sections were prepared, polished and etched. Subsequently, several images of the macro- and microstructure were analyzed. The analysis of the resistance to abrasive wear is carried out by the Miller tests according to ASTM G75-07[10]. In addition, a mapping of the micro hardness of every layer was carried out with a Durascan 70 automated hardness indenter.
3 Results and discussion
Fig.4 depicts the virtual simulation and the manufactured part. Previous investigations show that the shiftment of the layer start point with 3mm/° enhances the quality of the structure.

Fig.4Depictionoftheproducedgeometry(a)SlicedCADmodelwithstartpointshifting(b)Manufacturedpart
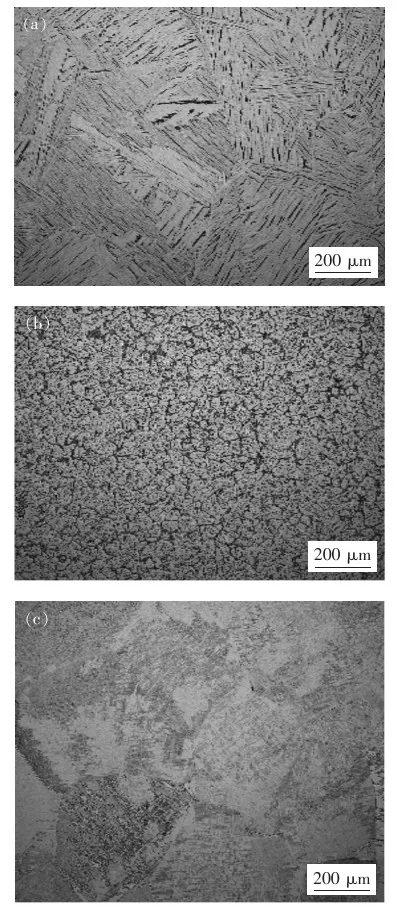
The main evaluation criterias are the structure and the mechanical technological properties of the AM-part. For this purpose metallographic cross sections were prepared and the microstructure was investigated, see Fig.5.
The layers of the pure titanium part (Fig.5a) are characterized by a lamellar structure. In comparision with the base metal (Fig.5c) the alpha titanium slats are coarser (dark area) and the grains are bigger. The higher cooling time through the building process is the reason for this[4]. The structure from the reinforced titanium part with WC is completely different. Fig.5b shows a fully equiaxed microstructure without tungsten carbides inside. The heat input of 3 kJ/cm and the high plasma arc temperature (up to 18 000 K) could leads to a thermal decomposition of the WC and an influnce to the microstructure. Further studies will consider this.

Fig.5Comparisonofmicrostructure(a)Ti(b)Ti+WC(c)Tibasemetal
The main objective of using reinforced particles is to improve the wear resistance of the component. Fig.6 shows that the abrasion of the pure titanium part is 20% higher than at the reinforced part. The higher strength and ductility of the equiaxed microstructure could by the reason for this[8, 11]. A comparison with the wear resistance of base metal is currently underway.

Fig.6Wearbehavioroftheadditivelayers(analyzedbyMillertestASTMG75-07)
The enhanced wear resistance of the Ti+WC part is confirmed by the hardening measurement, see Fig.7. The results show that the hardness from the reinforced component with 520 HV1 is 30% higher than for the pure titanium component (395 HV1) and 62% above that of the base material. The hardness of the base metal was 320 HV1.

Fig.7Resultsofhardnessmeasurements
4 Conclusions
The aim of the project was to demonstrate the suitability of the 3DPMD process for additive manufacturing of titanium parts. The biggest benefit, beside the possibility to produce large scale structures, the lower powder and investment cost compared with Laser and EB, is the chance to produce particle reinforced components.
(1) Homogeneous structures can be produced without internal defects and with an acceptable surface.
(2) The results shown that the mechanical and technological properties of the reinforced structures are better that at pure titanium.
(3) The wear resistance is 20% and the hardness of the surface 30% higher thanthat of unreinforced titanium.
(4)By adapting the anode geometry and optimizing the gas flow conditions of the process gases, significant improvements can be achieved. The integration of a cooling system could reduce the build time and improve the structure of the generated parts.
(5) The process is more than suitable for the additive manufacturing of titanium parts and provides compelety new possibilities in the design of high stressed components.
- China Welding的其它文章
- Feature extraction of welding defect based on machine vision
- Supervised descent method for weld pool boundary extraction during fiber laser welding process
- Thermodynamic study on welding wire design of high nitrogen austenitic stainless steel
- Effect of pulse M-Arc frequency on Tri-Arc DE droplet transfer and weld forming
- Effect of electrode morphology on steel/aluminum alloy joint
- Wear resistance of Zr/WC composite coatings on Cr12MoV steel surface by electric spark deposition

