Ballistic behavior of boron carbide reinforced AA7075 aluminium alloy using friction stir processing-An experimental study and analytical approach
I.SUDHAKAR,G.MADHUSUDHAN REDDY,K.SRINIVASA RAO*
aDepartment of Mechanical Engineering,MVGRCE,Vizianagaram,India
bDefence Metallurgical Research Laboratory,Hyderabad,India
cDepartment of Metallurgical Engineering,Andhra University,Visakhapatnam,India
Ballistic behavior of boron carbide reinforced AA7075 aluminium alloy using friction stir processing-An experimental study and analytical approach
I.SUDHAKARa,G.MADHUSUDHAN REDDYb,K.SRINIVASA RAOc,*
aDepartment of Mechanical Engineering,MVGRCE,Vizianagaram,India
bDefence Metallurgical Research Laboratory,Hyderabad,India
cDepartment of Metallurgical Engineering,Andhra University,Visakhapatnam,India
High strength-to-weight ratio of non-ferrous alloys,such as aluminium,magnesium and titanium alloys,are considered to be possible replacement of widely accepted steels in transportation and automobile sectors.Among these alloys,magnesium is self explosive and titanium is costlier,and aluminium is most likely to replace steels.Application of aluminium or its alloys is also thought of as an appropriate replacement in defence f i eld,especially to enhance the easiness in mobility of combat vehicles while maintaining the same standard as that of conventional armour grade steels.Hence most of the investigations have been conf i ned to aluminium or its alloys as base material and open an era of developing the newer composite materials to address the major limitation,i.e.tribological properties.The surface composites can be fabricated by incorporating the ceramic carbides like silicon carbide,carbides of transition metals and oxides of aluminium using surface modif i cation techniques,such as high energy laser melt treatment,high energy electron beam irradiation and thermal spray process which are based on fusion route.These techniques yield the fusion related problems,such as interfacial reaction,pin holes,shrinkage cavities or voids and other casting related defects,and pave the way to need of an eff i cient technique which must be based on solid state.Recently developed friction stir processing technique was used in the present investigation for surface modif i cation of AA7075 aluminum alloy,which is an alternative to steels.In the present investigation,160 μm sized boron carbide powder was procured and was reduced to 60 μm and 30 μm using high energy ball mill.Subsequently these powders were used to fabricate the surface composites using friction stir processing.
AA7075 aluminium alloy;Friction stir processing (FSP);Surface metal matrix composite (SMMC);Boron carbide (B4C);Ballistic performance;Target
1.Introduction
A shift in paradigm has been witnessed from heavier material to lighter one in the automobile sectors.It is always a challenge imposed by corporate average fuel economy (CAFÉ)standards so that the major share of material used in vehicle outf i t must be replaced by light metals,such as aluminium,magnesium and titanium [1,2].Being magnesium self explosive and titanium costlier,aluminium and its alloys paves a way to encroach several domains where ferrous alloys have dominated[3-8].The mechanical properties of steel,such as high energy absorbing property,high strength,greater notch toughness and high hardness,make as it a globally accepted primary material in defense [9-14].Even though aluminium and its alloys possess all the requisite mechanical properties to become a potential armour material,its lower melting point,less strain rate sensitivity and poor tribological property forbids it's usage[15,16].Surface layering of monolithic materials with harder material and subsequent existence of tougher material to dissipate the kinetic energy of projectile have been found to be the effective measures towards improving the penetration resistance of targets in defense [17-20].Several methods,such as plasma spray,chemical vapour deposition (CVD),physical vapor deposition (PVD),electron beam welding(EBM),plasma transferred arc welding (PTAW),laser surfacing,are generally used to produce surface composite [21-26]by changing the surface morphology of substrate.These surface modif i cation techniques are based on fusion technique and not free from some limitations like poor interfacial bond integrity,casting defects such as pores,and shrinkages voids.Hence a newly developed solid state process,i.e.friction stir process [27],has been chosen for fabricating the targets.Keeping the above facts in view,high strength AA 7075 aluminium alloy has been chosen as substrate for fabricating the surface composites or targets by incorporating boron carbide using friction surfacing.
2.Material and methods
Base metal or AA7075-T6 aluminium alloy,i.e.,substrate having chemical composition (%of weight),consists of 5.6%zinc,2.5%magnesium,1.6%copper,0.23%chromium,0.3%manganese,0.2%titanium,0.4%silicon and 0.5%iron,and the remaining is aluminium.The initial thickness of base metal was 40 mm.160 μm-sized boron carbide powder of 99.92%purity was received and reduced to 60 μm and 30 μm using high energy ball mill,and subsequently these powders were used to fabricate the surface composites or targets with 40 mm in thickness using friction stir processing.
Trial runs were made by varying the rotational speeds and feed rate to obtain the sound surface composites on substrate using friction stir processing.Surface composites,i.e.,targets,were fabricated by reinforcing 160 μm,60 μm and 30 μm-sized boron carbide powders in two stages using a f l at tool and tool with pin.The metallographic samples were prepared from both base and targets using Kellar reagent (95%H2O,2.5%HNO3,1.5%HCl,and 1%HF)as etchant to understand the particle distribution of boron carbide (B4C).Hardness of targets was measured using Vicker hardness tester under a load of 0.3 kgf. Ballistic testing was carried out on targets in a ballistic testing tunnel as per the military standard (JIS.0108.01)and the standardized testing conditions.An experimental setup is shown in Fig.1.The target plates were tested with 7.62 mm-diameter lead projectiles located at 10 m from the projectile exit region. The striking velocity of the projectile was measured using infrared light emitting diode photo-voltaic cells by measuring the time interval between the interceptions caused by the projectile running across two transverse beams at f i xed distance a part.The probes were placed at 6 m and 8 m from the nozzle of the gun barrel.The f i rst probe activates the timer and the second probe de-activates it.Few numbers of preliminary experiments were performed,and the adjustments were made to obtain the required impact velocity of the projectile onto the target.The velocity of projectile was measured to be 830 ± 10 m/s.
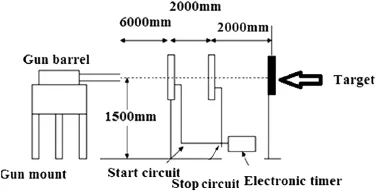
Fig.1.Schematic diagram of ballistic test [28].
After ballistic test,the targets were subjected to macroscopic examination to evaluate the ballistic performance by considering the perforation depth of projectile.In the present work,the depth of penetration was calculated analytically by the conservation of energy balance,i.e.,kinetic energy possessed by projectile during impact is equal to energy spent in multi-layers. Shearing area,i.e.,outer surface area of projectile,was taken into consideration for the analytical f i ndings.Shearing strength was taken as half of the ultimate tensile strength.Ultimate tensile strength was estimated from the equivalent conversion of Vicker hardness values obtained for the targets.Schematic diagram is represented to f i nd the depth of penetration into the target using an analytical approach,as shown in Fig.2.For better illustration,a model calculation is given below.
=Work done against first l aayer
+work done against supporting layer.
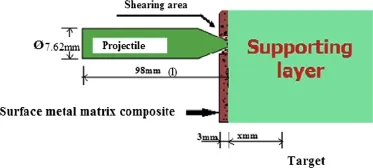
Fig.2.Model for analytical assessment of ballistic performance.

Fig.3.Friction stir processed surface with the cracks along the tool travel and the voids along the transverse section.

Fig.4.Sound surface composite fabricated using FSP.
+ π(D)(l)(she aar stress of supporting layer)(x)
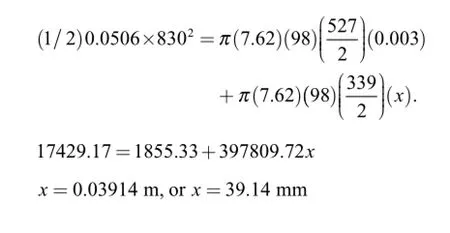
where m=0.0506 kg,V=830 m/s,D (diameter of projectile)=7.62 mm,length of projectile (l)=98 mm,thickness of f i rst layer (t)=3 mm,i.e.,fabricated surface composite layer thickness which is maintained constant for all targets,and x=traveling distance of projectile in the supporting layer.
Shear stress of first layer =ultimate tensile stress of layeer2
Depth of penetration (39 . 14 +3) =42. 14mm
A similar approach was adopted for evaluating the penetration depth in SMMC B4C-60 μm and SMMC-30μm,and the penetration depth of 40.5mmand 38.17 mm were obtained,respectively.An attempt was made to introduce an empirical constant such that analytical obtained depth of penetration approach experimental one.
Empirical constant was calculated by taking the average of ratio between experimental depth to analytically obtained values and found to be 0.707.
Shear stress of supporting layer =ultimate tensile stress off supporting layer2
Ultimate tensile stress for target is calculated empirically from hardness conversions tables.Hence,monolithic AA 7075 aluminium alloy having ultimate tensile strength of 339 MPa acts as a supporting layer for other fabricated targets.
Ultimate tensile strength of SMMC B4C-160 μm is 527 Mpa.
The above expressions are used to calculate the penetration depth of projectile intoTarget-1
3.Results and discussion
3.1.Fabrication of surface composite using friction stir processing
Higher rotational speed (greater than 1200 rpm)of rotating tool resulted in intense plastic deformation which led to the surface cracks along the tool traveling direction and the voids in the transverse section of processed surface composite,as shown in Fig.3.Similarly,the rotational speed less than 750 rpm during friction stir processing caused an improper mixing of B4C particles and yielded the earlier results.
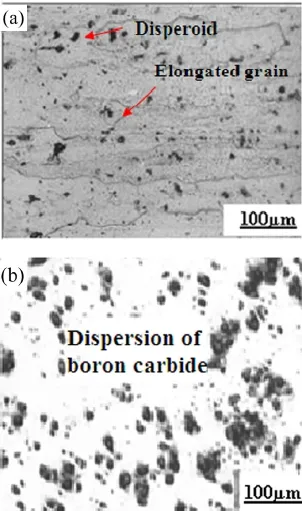
Fig.5.Microstructure of the elongated grains.(a)Microstructure of base;(b)surface composite.
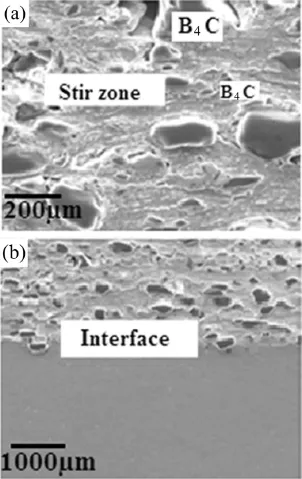
Fig.6.SEM micrograph.(a)SEM image of stir zone;(b)transverse section of SMMC.
Higher transitional feed rate as wells as larger plunging speed during fabrication of surface composite using friction stir processing resulted in tool breakage.It was observed that the threaded portion of tool used for mixing the hard boron carbide particles during the second stage of friction stir processing was worn.Tool wear may be attributed to the presence of harder boron carbide particles which are responsible for wearing out the threaded portion of pin.After a number of trials for fabrication of surface composite,the friction stir processing parameters,such as tool rotational speed of 925 rpm-1000 rpm,a longitudinal feed rate of 50 mm/min and plunging speed of 30 mm/min,resulted in the formation of surface metal matrix composites without voids along the transverse section and surface cracks,as shown in Fig.4.It was also found that the tracks of rotational tool have specif i c pattern in the form of onion rings,as shown in Fig.4.Tool movement from right to left about horizontal axis was maintained to obtain a defect-free surface composite during surfacing.
3.2.Microstructure
Base metal consists of the elongated grains along the rolling direction as evident from the optical micrograph shown in Fig.5(a).
During fabrication of surface metal matrix composite(SMMC),the stirring action of tool results in changing the dimensions of boron carbide particles either by rounding off the sharp corners or breaking off the sharp edges and leads to f i ner particle size.Hence,the estimated average size of the boron carbide particles in the stir zone is signif i cantly smaller than received powder,which can be witnessed from Fig.5(b).Friction stir processing involves stirring action of pin with high rotational speed which generates frictional heat between tool and workpiece.This heat is responsible for softening the material around the tool and helps in the distribution of reinforcement particles to form a surface metal matrix composite.The effect of stirring on the fabrication of surface composite and the distribution of boron carbide particles can be easily witnessed from SEM micrograph,as shown in Fig.6(a).The degree of boron carbide particle distribution is dependent on pin height of processing tool.A pin with 3 mm in height was used during thefabrication of surface composite,which is identical with the magnitude of interface,as shown in Fig.6(b).
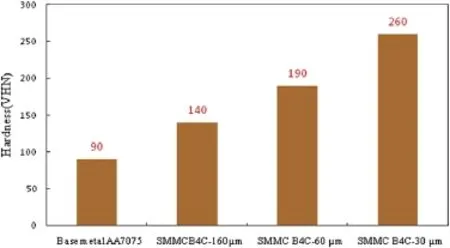
Fig.7.Hardness of targets.
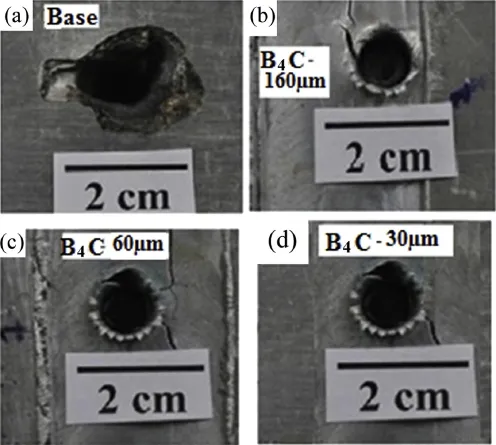
Fig.8.Front view of targets after ballistic test.(a)Base;(b)B4C-160 μm;(c)B4C-60 μm(d);B4C-30 μm.
From Fig.6(a)and (b),it can be interpreted that FSP causes the homogeneous dispersion of boron carbide particles in the stir zone and leads to the formation of defect-free interface and adherent B4C particles in substrate.
3.3.Hardness testing
The hardness data of base metal and friction stir processed alloy under different conditions is presented in Fig.7.There is signif i cant improvement in hardness by the addition of boron carbide particles into substrate during friction stir processing. The stirring action of rotating tool results in the mechanical rupture of boron carbide,and a large number of high angle boundaries are produced.These high angle boundaries impede the free movement of dislocations and enhance the strength and hardness.Fine dispersion of carbide particles in the AA7075 aluminium alloy matrix hinders the free movement of dislocations and enhances the hardness of surface composites,which is well validated with Orwan mechanism [29].
3.4.Ballistic behavior
Lead projectile was used to evaluate the ballistic performance of fabricated target under different conditions.Damage,in the form of a perforation hole with measurable depth of penetration,width and cracks around the hole,was noticed in the targets after ballistic test.Among these noticeable outcomes obtained during ballistic test,the depth of penetration (DOP)of targets was taken to evaluate the ballistic performance.Fig.8 shows the macro photographs of targets after ballistic test under the different conditions of targets.
From Fig.8,it can be interpreted that the base,i.e.,AA7075 aluminium alloy,exhibited the fragments,the projectile was almost penetrated,and other targets exhibited petaling failure.It can also be noticed that the craters are in the base.From the front ends of targets in other cases,the presence of projectile inside the targets can be witnessed.
From Fig.9,it can be inferred that the degree of penetration is more signif i cant in the base metal compared to other targets in all the trials for evaluating ballistic performance of base metal,It was found that the base metal was perforated in all the trials for evaluating ballistic performance of base metal,while in very few trials (about 5%)the projectile caused damage to a depth of 80%of base metal,as shown in Fig.9(a). As the armour materials are fabricated for high safety,AA7075 aluminium alloy cannot be suitable for fabrication of combat vehicles.Depth of penetration of projectile was measured from the cross section of each target and presented in Table 1.Similarly,the analytic results were also presented in Table 1.Fig.10 shows the graphical representation for better illustration.
From Table 1 and Fig.10,it can be witnessed that the depth of penetration is found to be very close to each other and are well validated.However,the variation in the results may be attributed to the assumption that the targets are considered to be isotropic and the perfect shearing,i.e.between projectile surface and inner portion of target is taken into account duringanalytical calculation.Shear strength is considered to be half that of ultimate tensile stress,and the ultimate tensile strength is obtained from conversion of Vickers's hardness data.
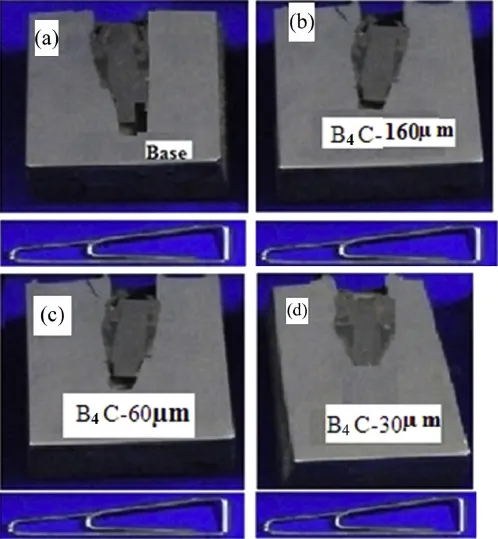
Fig.9.Cross section of targets after ballistic test.(a)Base (b)B4C-160 μm;(c)B4C-60 μm;(d)B4C-30 μm.

Table 1Analytical and experimental results of ballistic test.
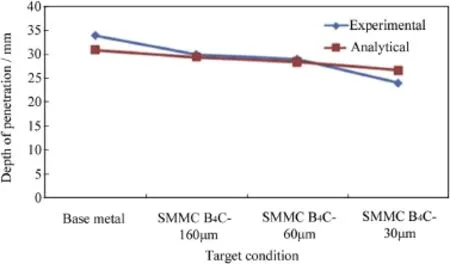
Fig.10.Analytic and experimental values of ballistic test.
It can be observed that SMMCs/targets have exhibited better ballistic performances compared to the base metal.It may be attributed to the frictional characteristic of SMMC and projectile.During travel of projectile inside the armor,a strong friction between the contact pair causes damage to the surface of the projectile tip due to abrasive action of harder(B4C)particles on SMMC and leads to the macro deformation and breaking of the projectile tip.Hence,the depth of penetration of projectile into the armour material/targets (SMMC)is reduced.The f i ne grade target,i.e.,SMMC B4C-30 μm,consists of more number of boron carbide particles compared to the coarse grade target. The intactness of boron carbide particles,which is the measure of surface hardness,of the targets favors abrasive action damages the projectile surface and reduces the travel of projectile inside the armour material.
From the above,it can be established that the friction stir processedAA7075 alloy plates/targets successfully stopped the projectile whereas the uncoated base metal was perforated completely.The targets with f i ner grade boron carbide particles have better ballistic performance compared to the base metal.The observed result is in agreement with hardness data.
Hence it can be concluded that the friction surfacing can be successfully used to deposit the hard boron carbide powders on the surface of armour grade AA7075 aluminium alloy and enhance the ballistic resistance of selected AA7075 aluminium alloy.
4.Conclusions
1)Friction stir processing has uniformly distributed the boron carbide particles in AA7075 aluminum alloy matrix and enhances its surface hardness compared to that of base.
2)Increase in ballistic eff i ciency may be attributed to the frictional characteristics of armour surface and projectile,which favors the damage to the surface of the projectile tip by abrasive action of harder (B4C)particles on the target and leads to the macro-deformation and breaking of the projectile tip.
3)Analytic approach to estimate the penetration depth has been done for the f i rst time and the results obtained are closer to the experimental f i nding.Variation in the f i ndings may be accounted to the assumptions of considering the isotropic nature of target,and the shear strength is obtained on hardness data.
4)For the f i rst time,the present work demonstrated successfully that the friction stir processing route is an effective strategy for enhancement of ballistic performance of AA7075 aluminium alloy which f i nds wider range of defence applications.
Acknowledgement
The authors would like to thank Director,Defence Metallurgical Research Laboratory and Hyderabad,India for his continued encouragement and permission to publish this work. Financial assistance from Armament research board,New Delhi,India is gratefully acknowledged.
[1]Statistical Data of Automotive Materials Committee,Japanese Society of Automobile Industry,May 1997.
[2]North American Passenger Car and Light Truck.1999.
[3]Aluminum Content Report.Ducker Research Co.TM30.Advanced materials and processing.Southf i eld Metals 1999(3):10-7.
[4]TakeuchiK, IsobeY, ToyamaT.JJapan InstLightMetals 1998;48(9):446-58.
[5]Sako R.vol.9.Nihon Parkerizing technical report.1996.p.28-37.
[6]Mizuno H,Uchiyama K,Sato S,et al..vol.12.Nihon Parkerizing technical report.2000.p.53-9.
[7]Ishii H,Furuyama O,Tanaka S.Metal Finish 1993;91(4):7-13.
[8]Kr Aune T,Westengen H.Autom Eng 1995;103(8):87-93.
[9]Ade F.Ballistic qualif i cation of armour steel weldments.Weld J 1991;70:53-4.
[10]Madhusudhan Reddy G,Mohandas T.Ballistic performance of high strength low-alloy steelweldments.JMaterialProcessTechnol 1996;57:23-30.
[11]Madhusudhan Reddy G,Mohandas T,Tagore GRN.Weldability studies of high strength low-alloy steel using austenitic f i llers.J Mater Process Technol 1995;49:213-28.
[12]Tore Borvika,Clausena Arild H,Odd Sture Hopperstada,Magnus Langsetha.Perforation ofAA5083-H116 aluminium plateswith conical-nose steel projectiles d experimental study.Int J Impact Eng 2004;30:367-84.
[13]Backman EM,Goldsmith W.The mechanics of penetration of projectiles into targets.Int J Eng Sci 1978;161:99-103.
[14]Gooch WA,Burkins MS,Squillacioti RJ.Ballistic testing of commercial aluminum alloys and alternate processing techniques to increase the availability of aluminum armor.In:23rd International symposium on ballistics.Tarragona,Spain 16-20 April.2007.
[15]Backman EM,Goldsmith W.The mechanics of penetration of projectiles into targets.Int J Eng Sci 1978;vol.16:1-9.
[16]Corbett GG,Reid SR,Johnson W.Impact loading of plates and shells by free-f l ying projectiles:a review.Int J Impact Eng 1996;vol.18:141-9.
[17]Johnson W.Impact strength of materials.London:Edward Arnold;1972.
[18]Ozsahin Evren,Tolun Suleyman.On the comparison of the ballistic response of coated aluminum plates.Mater Des 2010;vol.31:3188-93.
[19]Radin J,Goldsmith W.Normal projectile penetration and perforation of layered targets.J Impact Eng 1988;vol.7:229-38.
[20]Ozsahin E,Tolun S.Inf l uence of layer sequencing on ballistic resistance of polyethylene supported AA 7075 T651 plates.J Istanbul Technol Univ 2009;8(2):72-80.
[21]Pobolo IL,Shipko A.A f i rst and second generation electron beam surface engineering.Mater Manuf Process 1999;14:321-30.
[22]Yamana H,Shimizu S.Alloying of metals and carbides on an aluminium surface by electron beam welding.Weld Int 1998;12:160-4.
[23]Vreeling JA,Ocelik J,Pei YT,VanAgterveld DT,Hosson TM.Laser melt injection of ceramic particles in metals.Acta Mater 2000;48:4225.
[24]Abboud JH,West DRF.Microstructure of titanium injected with SiC particles by laser processing.J Mater Sci Lett 1991;10:1149.
[25]Pei YT,Ocelik V,Hosson JT.Jha BB,Galgai RK,Misra Vibhuti N editors.Futuristic materials.Bhubaneswar:Allied Publishers,Indian Institute of Minerals Engineers;2004,[chapter].
[26]Thomas WM,Nicholas ED,Needham JC,Murch MG,Templesmith P,Dawes CJ.Patent application No.9125978.8,Dec.1991.
[27]Mishra RS,Ma ZY.Mater Sci Eng R 2005;R50:1-78.
[28]Sudhakar I,Madhu V,Madhusudhan Reddy G,Srinivasa Rao K.Defence Technol 2014;1-8.
[29]Madhusudhan Reddy G,Sambasiva Rao A,Srinivasa Rao K.Friction stir processing for enhancement of wear resistance of ZM21 magnesium alloy.Trans Indian Inst Metal 2012;28-35.
Received 18 March 2015;revised 20 April 2015;accepted 22 April 2015 Available online 3 June 2015
Peer review under responsibility of China Ordnance Society.
*Corresponding author.
E-mail addresses:sudhakar1679@gmail.com (I.SUDHAKAR),gmreddy_
dmrl@yahoo.com (G.MADHUSUDHAN REDDY),arunaraok@yahoo.com
(K.SRINIVASA RAO).
http://dx.doi.org/10.1016/j.dt.2015.04.005
2214-9147/© 2015 China Ordnance Society.Production and hosting by Elsevier B.V.All rights reserved.
Ballistic performance testing as per the military standard (JIS.0108.01)was carried out.In the present work,an analytical method of predicting the ballistic behavior of surface composites was developed.This method was based on energy balance,i.e.,the initial energy of impact is same as that of energy absorbed by multi layers.An attempt also has been made to validate the analytical results with the experimental f i ndings.Variation between the analytical and experimental results may be accounted due to the assumptions considering such as isotropic behavior of target and shearing area of contact as cylindrical instead of conical interfaceAs the analytical model yields the ballistic performance in the closer proximity of experimentally obtained,it can be considered to be an approximation to evaluate the ballistic performance of targets.
© 2015 China Ordnance Society.Production and hosting by Elsevier B.V.All rights reserved.
- Defence Technology的其它文章
- Effect of f i bre orientations on the mechanical properties of kenaf-aramid hybrid composites for spall-liner application
- Studies on impact sensitivity of nanosized trinitrotoluene (TNT)conf i ned in silica processed by sol-gel method
- Enhancement of seal life through carbon composite back-up rings under shock loading conditions in defence applications
- Optimization of three-loop missile autopilot gainunder crossover frequency constraint
- Friction assisted solid state lap seam welding and additive manufacturing method
- Azo-bridged triazoles:Green energetic materials

