In fluence of Al2O3particles on the microstructure and mechanical properties of copper surface composites fabricated by friction stir processing
L.SUVARNA RAJU*,A.KUMARDepartment of Mechanical Engineering,KITS(S),Huzurad,TelanganIndia Department of Mechanical Engineering,NIT,Warangal,TelanganIndia
1.Introduction
Friction stir processing(FSP),a solid state technique based on the principle of friction stir welding,is used for material processing in order to modify the microstructures and mechanical properties of surface composites and to fabricate the surface composites[1,2].Firstly the tool without pin is used and traverses along the grove consisting of reinforcement particles thus forging it.Later the tool with pin is used and moves along the desired line to cover the region underneath the shoulder.Friction between the tool and work piece results in localized heating that softens and plasticizes the work piece.During this process, the material undergoes plastic deformation,thus resulting in grain re finement to improve its mechanical properties.
Pure copper is used in many industrial applications due to its high thermal and electrical conductivity,plasticity,softness and formability.Although pure copper is mostly used in electrical applications such as high-performance electric switches and sliding contact materials[3].However,excessively high softness besides low hardness and wear resistance of pure copper limit its structural applications.Ceramics,such as alumina(Al2O3)are good choice for the improvement of high hardness and wear resistance of pure copper.Since alumina is insoluble in the copper matrix,its original particle size nor spacing is neither altered even at high temperature.This characteristic of alumina makes the strength and conductivity of the resulting composite stable even at elevated temperature[4].Copper is selected as matrix material owing to its superior properties and it has proved its usefulness ranging from domestic to space and defense applications.In recent years,copper matrix composites have been shown to be promising candidates in several applications such as those in homo-polar machines,spot welding electrodes and seam welding wheels,heat exchangers,rotating source neutron targets and rocket nozzles[5].Furthermore,these composites are superior in nature for elevated temperature applications when reinforced with ceramic particles.These copper surface composites with reinforcement of ceramic particles are used in an environmentwhere wear resistance is of prime consideration.
Sun and Fujii[6]fabricated Cu-SiC surface composite via FSP in one and two passes,the joints processed after two passes resulted in a particle-rich and free region formed in the stir zone(SZ),the particle rich region consists of re fined grain structure due to the SiC particles(SiCp)stimulated nucleation in the dynamic recrystallization(DRX)of copper during the FSP process.Barmouz et al.[7]fabricated the Cu/SiC surface composites via FSP with 5 μm and 30 nm SiCp and without SiCp by varying the volume fraction.From the result,it is observed that FSP of pure copper without powder increased the percentage of elongation and decreased the tensile strength whereas FSP of copper with SiCp it is observed that the tensile properties of the surface composites were slightly lower than the base metal(BM).Several researchers[2,8]reported that the process parameters like tool pin pro fi le,tool rotation rate,traveling speed and tool penetration depth,exhibited signi ficant effects on the properties of metal matrix composites.Azizieh et al.[9]studied the effect of rotation speed and probe pro fi le on microstructure and hardness of AZ31/Al2O3nano composites.Mahmoud et al.[10]and Kurt et al.[11]investigated the effect of rotation speed and traveling speed on formation and obtained properties of Al/SiC composites.This conventional parametric design of experiment approach is time-consuming and calls for enormous resources.Hence efforts must be placed on developing effective,analytical methods to study FSP process.To study the effect of process parameters by limiting the number of experiments using statistical methods such as the Taguchi approach could be very useful[12].
From the reported literature,it is observed that in fluence of Al2O3reinforced particles on mechanical properties of Cu-Al2O3surface composites(CASCs)via FSP was not studied.Hence the objective of present investigation is to study the in fluence of reinforcement particles on mechanical properties of CASCs fabricated via FSP and obtain the optimum combinations using Taguchi method.In respect of this,the Taguchi L9method was adopted to analyze the effect of each processing parameters(i.e.volume percentage of reinforcement particles,tool tilt angle and concave angle of shoulder)for optimum tensile strength of CASCs produced by one pass FSP.
2.Experimental procedure
In this study a pure copper plate with dimensions of 200 mm×100 mm×3 mm was used to fabricate the surface composites with a vertical milling machine(Make HMT FM-2,10 hp,3000 rpm).In order to produce surface composites 20 μm Al2O3particles(Al2O3p)were contrived in a square groove.The square groove was made in the advancing side which is 1 mm far away from the centre line of the tool rotation on the copper plate[13]and the groove size was varied.The Al2O3p were compressed into the groove and the upper surface of the groove was closed with a FSP tool without pin to prevent Al2O3p to escape from the groove.In the next stage the tool is plunged with the pin into the plate to stir the material along with the reinforcement(stir zone)to produce the surface composites.The schematic sketch of FSP to produce surface composite is shown in Fig.1.The optimum rotational and traverse speeds,resulting in an optimum level of mechanical properties were taken as 900 rpm and 40 mm/min respectively[14].Mechanical properties of the BM are presented in Table 1.H-13 tool steel with shoulder diameter,square pin diameter and length of the pin are considered as 24,8 and 2.5 mm respectively.The specimens were clamped on to backing plate and fi xed by the bolts.Single pass FSP was used to fabricate CASCs.
After FSP,microstructural observations were carried out at the cross section of SZ of surface composites normal to the FSP direction,mechanically polished and etched with 100 ml distilled water,15 ml HCl and 2.5 g ferric chloride.Microstructure changes were observed by optical microscope(Model:Nikon;Make:Epiphot 200),in the SZ.
The tensile specimens were prepared as per the ASTM E8 standards by Wire cut Electrical Discharge Machine to the required dimensions which is normal to the FSP direction.The tensile test was conducted with the help of a computer controlled universal testing machine(Model:Autograph;Make:Shimatzu)at a cross head speed of 0.5 mm/min.Similarly the impact specimens were taken in transverse to the processing direction as per ASTM A370 standards.The charpy‘V’notch impact test was carried out using pendulum type impact testing machine at room temperature.The schematic sketch of both tensile and impact specimens were shown in Fig.2.The fractured surfaces of the tensile and impact tested specimens were analyzed using a scanning electron microscopy (SEM-Hitachi,SU 6600)to study thefracture morphology and establish the nature of the fracture.
Microhardness test was carried out using Vickers digital microhardness tester(Model:Autograph,Make:Shimatzu)with a 15 g load for 15 s duration at the cross section of SZ of surface composites normal to the FSP direction.
2.1.Experimental design using Taguchi's method
The working range of selected parameters under the present study and constant process parameters are presented in Tables 2 and 3 respectively.In this study trial experiments were conducted by varying the volume percentage(vol.%age)of the reinforcement particles and keeping the other parameters constant to find the working range of vol.%age of reinforcement particles.Feasible levels of the process parameters were chosen in such a way that the surface composite should be free from defects.
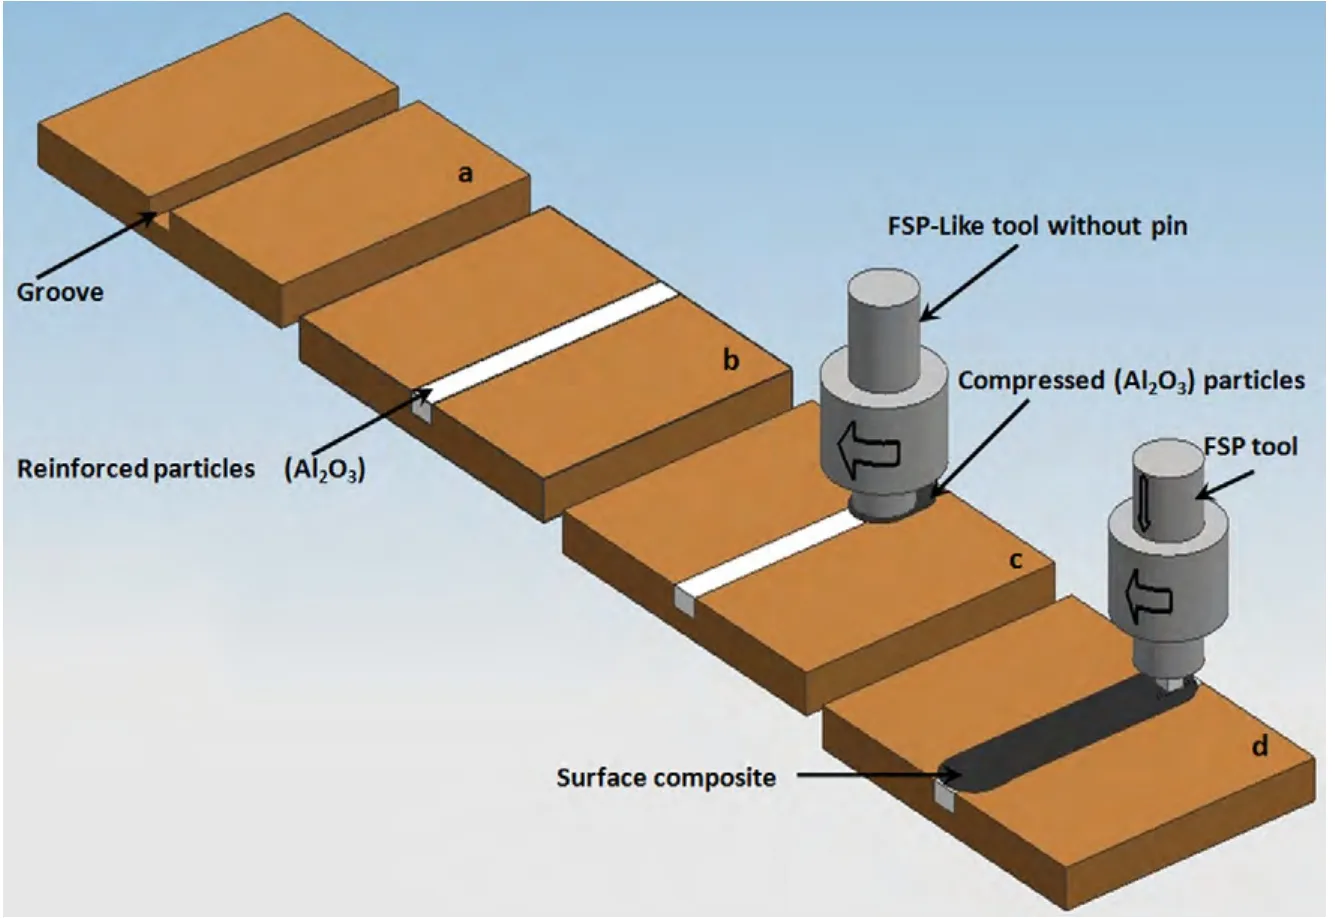
Fig.1.Schematic diagram of friction stir processing.

Table 1 Mechanical properties of base metal.
Taguchi's technique has been used widely in engineering design[15].It is an ef ficient tool which enables the up gradation of the performance of the product,process and design with signi fi cant prediction of cost and time[16].The main trust of Taguchi's technique is the use of parameter design,which is an engineering method for product or process design that focuses on determining the parameter settings producing the best level of a quality characteristic with minimum variation.It is simple,ef ficient and systematic approach to determine optimal process parameters.Taguchi design provides a powerful and ef ficient method for designing processes that operate consistently and optimally over a variety of conditions.This technique reduces drastically the number of experiments that are required to model and optimize the responses.Experimental design methods were developed in the early years of 20th century and have been extensively studied by statisticians since then,but they were not easy to use by practitioners[17].Taguchi's approach to design of experiments is easy to be adopted and applied for users with limited knowledge of statistics;hence it has gained a wide popularity in the engineering and scienti fi c community.There have been plenty of recent applications of Taguchi techniques to materials processing for process optimization.The system performance could be optimized by means of systematic setting of design parameters and reducing the fl uctuations.Taguchi's method employs a special design of orthogonal arrays to study entire process parameters space with small number of experiments[18].Taguchi de fines three categories of quality characteristics in the analysis of Signal/Noise ratio(S/N ratio).They are categorized as(i)the Smaller-thebetter(ii)the Larger-the-better and(iii)Nominal-the-better.The S/N ratio for each combination of the process parameters is computed based on Signal Noise analysis.A larger S/N ratio corresponds to better quality characteristics in all the above mentioned three categories.Therefore,the optimum level of process parameters is the level of highest S/N ratio.S/N ratio for Larger-the-better is characterized using Equation(1)

where ‘η’denotes S/N ratio of experimental values,‘yi’represents the experimental value of the ith experiment and ‘n’is the number of experiments.

Fig.2.Schematic diagram of tensile and impact specimens.

Table 2 Working range of the selected parameters.
In this study,the analysis was carried out using statistical software MINITAB-16.The two points are considered before selection a particular orthogonal array for conducting experiments;i.e.the number of parameters and interactions of interest and the number of levels for the parameters of interest.The non-linear behavior,if it exists among the process parameters can only be studied if more than two levels of the parameters are used.Therefore,each parameter was analyzed at three levels.Each of three level parameters has two degrees of freedom(DF)[DF equals to the number of levels minus one].The total DF required for three parameters each at three levels is six.As per Taguchi's method the total DF of selected orthogonal array must be greater than or equal to the total DF required for the experiment.Hence L9(34)orthogonal array was selected in the present work.Each condition of experiments was repeated twice in order to reduce the noise error effects.The format of L9orthogonal array was presented in Table 4.
The quality characteristics such as ultimate tensile strength(UTS),yield strength(YS),percentage of elongation(%EL),microhardness and impact toughness(IT)of surface composite were evaluated for all the trials and then statistical analysis of variance was carried out.Based on analysis of variance,the contribution of each element in fl uencing the quality characteristic is evaluated.The optimum combinations of process parameters were predicted and veri fi ed.
3.Results and discussion
3.1.Microstructure
The optical microstructures of all(FSP 1-9)the CASCs were examined and presented in Fig.3.It is observed that the sample made at the optimum condition(i.e.A3B2C1)resulted in uniform distribution of the reinforced particles in the processed zone.This may be due to the position of the groove exactly tangent to the tool pin.It is also observed that,severe plastic deformation and frictional heating in the SZ during FSP resulted in generation of a recrystallized equiaxed microstructure which is due to the occurrence of DRX.

Table 3 Constant process parameters.
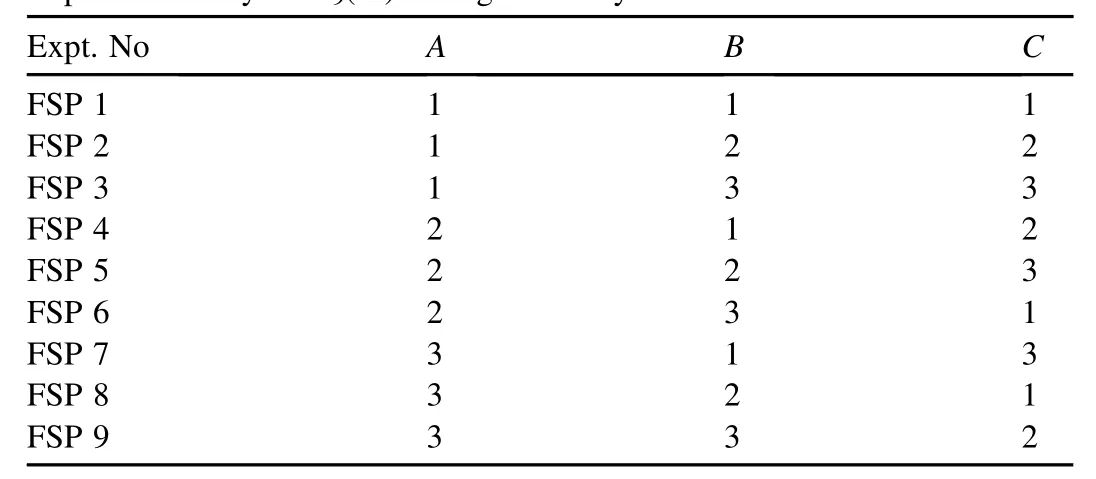
Table 4 Experimental layout L9(34)orthogonal array.
3.2.Mechanical properties
Mechanical properties such as UTS,YS and IT were evaluated and presented in Table 5.It is observed that the increase in UTS and YS of the surface composites is accompanied by a decrease in ductility with increase in volume fraction of the Al2O3particles[19].The increased UTS of the surface composites over the pure copper matrix is due to the grain re finement of copper in the surface composite which can be related to the interaction between the powder particles and dislocations within the matrix.It is also found that with increase in the addition of Al2O3reinforcement particles recrystallization temperature is increased by pinning grain boundaries of the copper matrix and blocking the movement of dislocations and thus improving strength at elevated temperature[20].The elongation of the friction stir processed specimens with the addition Al2O3particles were reduced as compared to the pure copper[21].This may be due to increase in vol.%age of reinforced particles which increases the effective slip distance of dislocations during the deformation.Higher impact toughness value was observed at higher volume fraction of the reinforced particles with copper matrix.This is attributed to the addition of reinforced particles which causes softening of the matrix due to frictional heat of the tool shoulder and pin.
The highest hardness value of 137 HV have been observed in the SZ for the sample processed at condition of FSP 8.This may be due to presence of finer grains with hard Al2O3particles in the SZ.The continuous DRX due to the stirring action of the tool pin creates new nucleation sites leading to reduction of the grain size.
3.2.1.Fractography
The tensile and impact fracture surface of the BM and friction stir processed samples made at FSP 8,FSP 6 and FSP 4 conditions of experimental layout corresponding to optimum,medium and lower values of quality characteristics were analyzed by SEM to reveal the fracture surface morphology and the results are presented in Figs.4 and 5 respectively.The fractured surface of the BM failed in a ductile manner by the micro void coalescence mechanism which shows the fine dimple structure at the fractured surface of the BM.The tensile and impact fracture surfaces of friction stir processed samples made at optimum condition(i.e.A3B2C1)shows ductile fracture as compared to FSP 4 and FSP 6.This may be due to the presence of many fine voids and dimples formed at fractured surfaces in which the grain size is finer for FSPed specimen made at optimum condition.Fracture surface of the FSPed samples under FSP 4 and FSP 6 conditions shows both ductile and brittle failure.This is due to dispersion of very large number of reinforcement Al2O3particles which severely limits the movement of dislocations and decreases the ductility signi fi cantly.
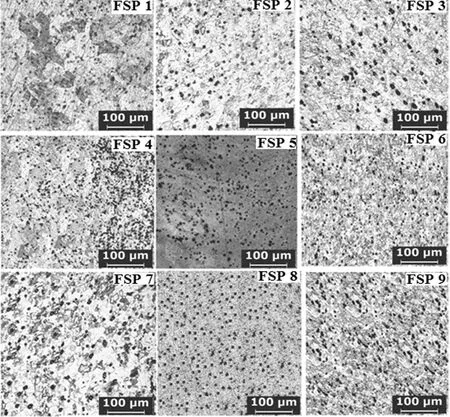
Fig.3.Optical microstructures of FSP1 to FSP 9 surface composites.
Regression analysis is used to evaluate the data on all the properties of CASCs.These developed regression equations were used in predicting the UTS,YS and IT within the factorial space exploited.
3.2.2.Development of regression models
The responses Y such as UTS,YS and IT are the function of vol.%age of Al2O3,tool tilt angle and concave angle of shoulder.The response function can be expressed as
Y=f(vol.%age of Al2O3,tooltilt angle,concave angle of shoulder)Y=f(A,B,C)

Table 5 Mechanical properties of copper-Al2O3surface composite.
For the three factors,the selected polynomial(regression)could be expressed as
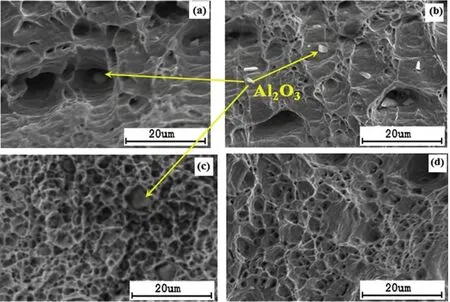
Fig.4.Fractographs of tensile(a-d)of FSP samples(a)FSP4(b)FSP6(c)FSP8(d)BM.

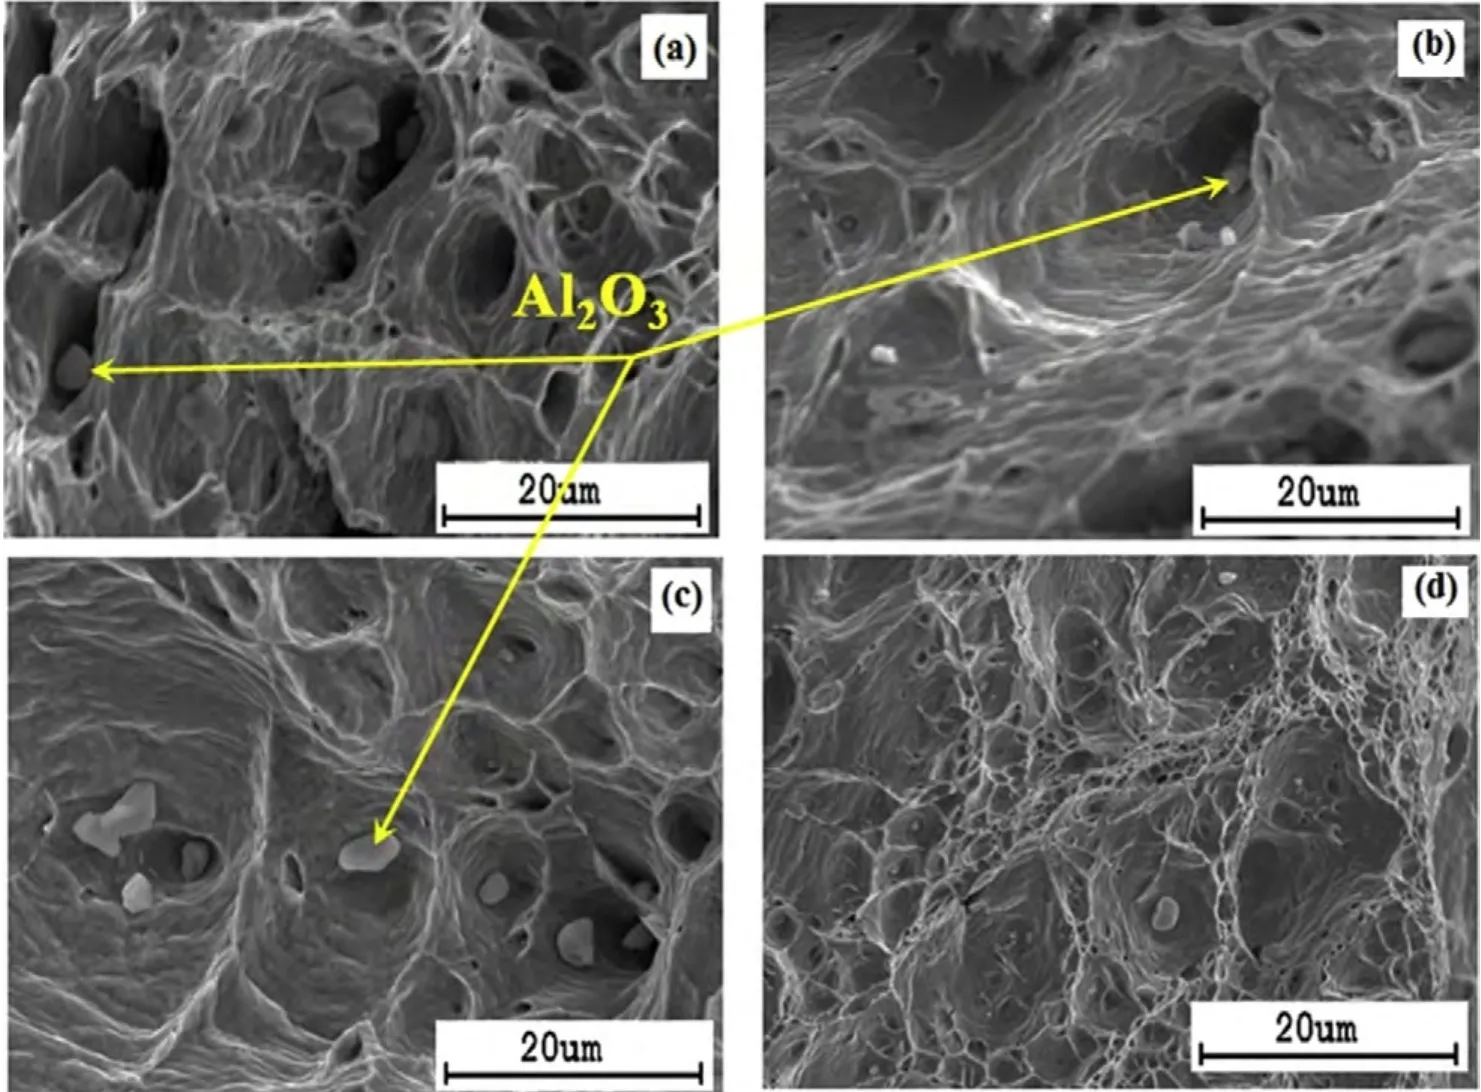
Fig.5.Fractographs of impact(a-d)of FSP samples(a)FSP4(b)FSP6(c)FSP8(d)BM.
where Y denotes the performance characteristics and A,B,and C are the process parameters,b0is the free term of the regression Eq.(2)the coefficients b1,b3and b5are the quadratic terms,b2,b4and b6are the liner terms and ‘3’is the experimental error.The coefficients of the variables are calculated for different responses[22].After determining the coefficients,the regression equations were developed.These equations were used to predict the UTS,YS and IT within the factorial space exploited[23].The correlation coefficients for the observed properties were summarized in Table 6.High correlation coefficient indicates good relationship between the process parameters and t2he observed property data.The coefficient of correlation(R)is de fined as the ratio of explained variation to the total variation and measure of degree of fi t of the model.When it approaches to unity,the developed model fi ts the actual data wit2h given con fi dence.Here all models have higher values of Ri.e.above 95%which means that the regression model provides an excellent explanation of relationship between parameters and responses.All these models are statistically signi fi cant at 95%con fi dence level.
3.2.3.Optimization and validation of process parameters performance characteristics
The optimization of vol.%age of reinforced particles,tool tilt angle and concave angle of shoulder using Taguchi technique permits evaluation of the effects of individual elements independent of other elements on the identi fi ed quality characteristics i.e.UTS,YS and IT.The in fluence of process parameters can be evaluated by determining the S/N ratio for each factor at each level.From the main effect plots analysis,the optimum parametric combinations for better mechanical properties are obtained and the predicted values for various responses at optimum condition are calculated using the predicted S/N ratio(ηopt)in the following equation

where ‘ηjm’is the mean S/N ratio of optimum level and ‘j’is the number of process parameters that affect the response.For validation of the optimum results,experiments are conducted at optimum condition and the results are presented in Table 7.It is observed that experimental values were closer to the optimum values.
3.2.4.Analysis of variance(ANOVA)
The main purpose of the ANOVA is the application of a statistical method to identify the effect of individual factors on the process responses.The Taguchi experiment method could not judge the effect of individual parameters on the entire process.The percentage of contribution using ANOVA is used to compensate for this effect.The percentage of contribution is the portion of the total variation observed in the experiment attributed to each signi fi cant factors and/or interaction which is re fl ected.In order to find the effect of process parameters on various responses,ANOVA is performed and the results are presented in Table 8.The calculated F-values of the ANOVA for various responses determine the relative signi fi cance of different process parameters.Results of ANOVA revealed that the process parameters have signi fi cant effect on all the quality characteristics.The same optimum condition is observed in UTS,YS and IT.
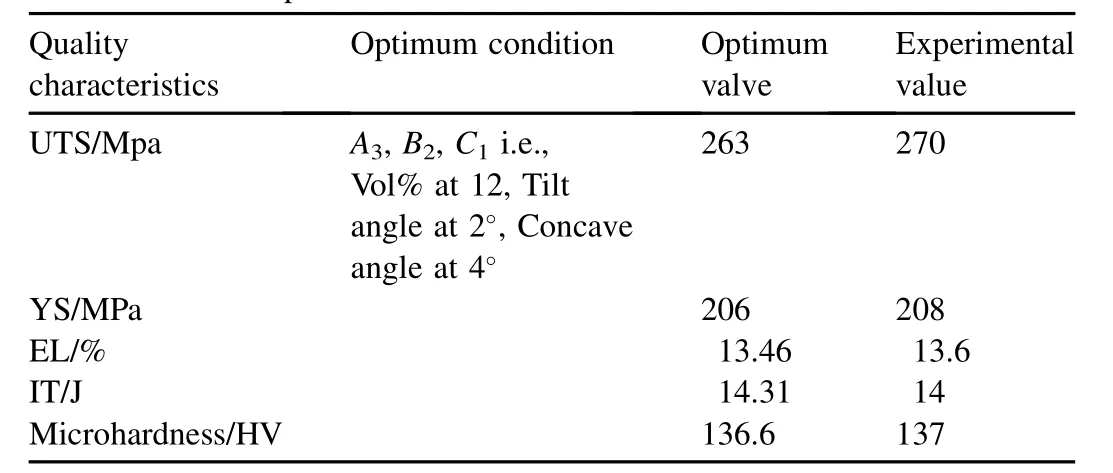
Table 7 Validation of the optimum results.
3.2.5.Percentage of contribution
Based on the results presented in Table 8.Vol.%age of reinforcement particles(Al2O3)is found to be the most in fl uencing process parameter followed by tool tilt angle and concave angle atthe toolshoulder.Thepercentageofcontributionisthe portion of the total variation observed in the experiment attributed to each signi fi cant factor.The percentage of contribution is the functionofthe sum ofthe squares for eachsigni fi cantitemand it indicates the relative power of a factor to reduce the variation.If the factor levels are controlled precisely then the total variation could bereduced by anamountwhich isindicated by percentage of contribution.The percentage of the vol.%age of reinforcementparticlesishigherbecausetheseparticlesplayanimportant role in material strength through dislocation and grain boundary pinning mechanism.The presence of hard reinforcement particles thus enhances the hardness.
4.Conclusions
The in fluence of process parameters such as vol.%age of Al2O3p,tool tilt angle and concave angle of the shoulder on mechanical properties of Cu-Al2O3surface composites fabricated via FSP were investigated and the following conclusions were drawn.
1)The process parameters such as vol.%age of Al2O3particles,tool tilt angle and concave angle of the tool shoulder were found to have an important role in the quality of the obtained surface composites.
2)The same optimum condition(i.e.A3B2C1)is observed in UTS,YS,IT and microhardness of CASCs.This is due to the presence of hard Al2O3reinforcement particles in the copper matrix.
3)Tensile properties of CASCs increases with increase in the vol.%age of reinforcement particles.This is due to the addition of the hard Al2O3reinforcement particles which increases the recrystallization temperature by pinning grain boundaries of the copper matrix and blocking the movement of dislocations.
4)Severe plastic deformation and frictional heating in the SZ during FSP resulted in generation of a recrystallized equiaxed microstructure this may be due to the occurrence of DRX.
5)The tensile and impact fracture surfaces of friction stir processed samples made at optimum condition shows ductile fracture as compared to other conditions.This is due to the presence of fine equiaxed grains which results in the formation of fine voids and dimples at fractured surfaces.
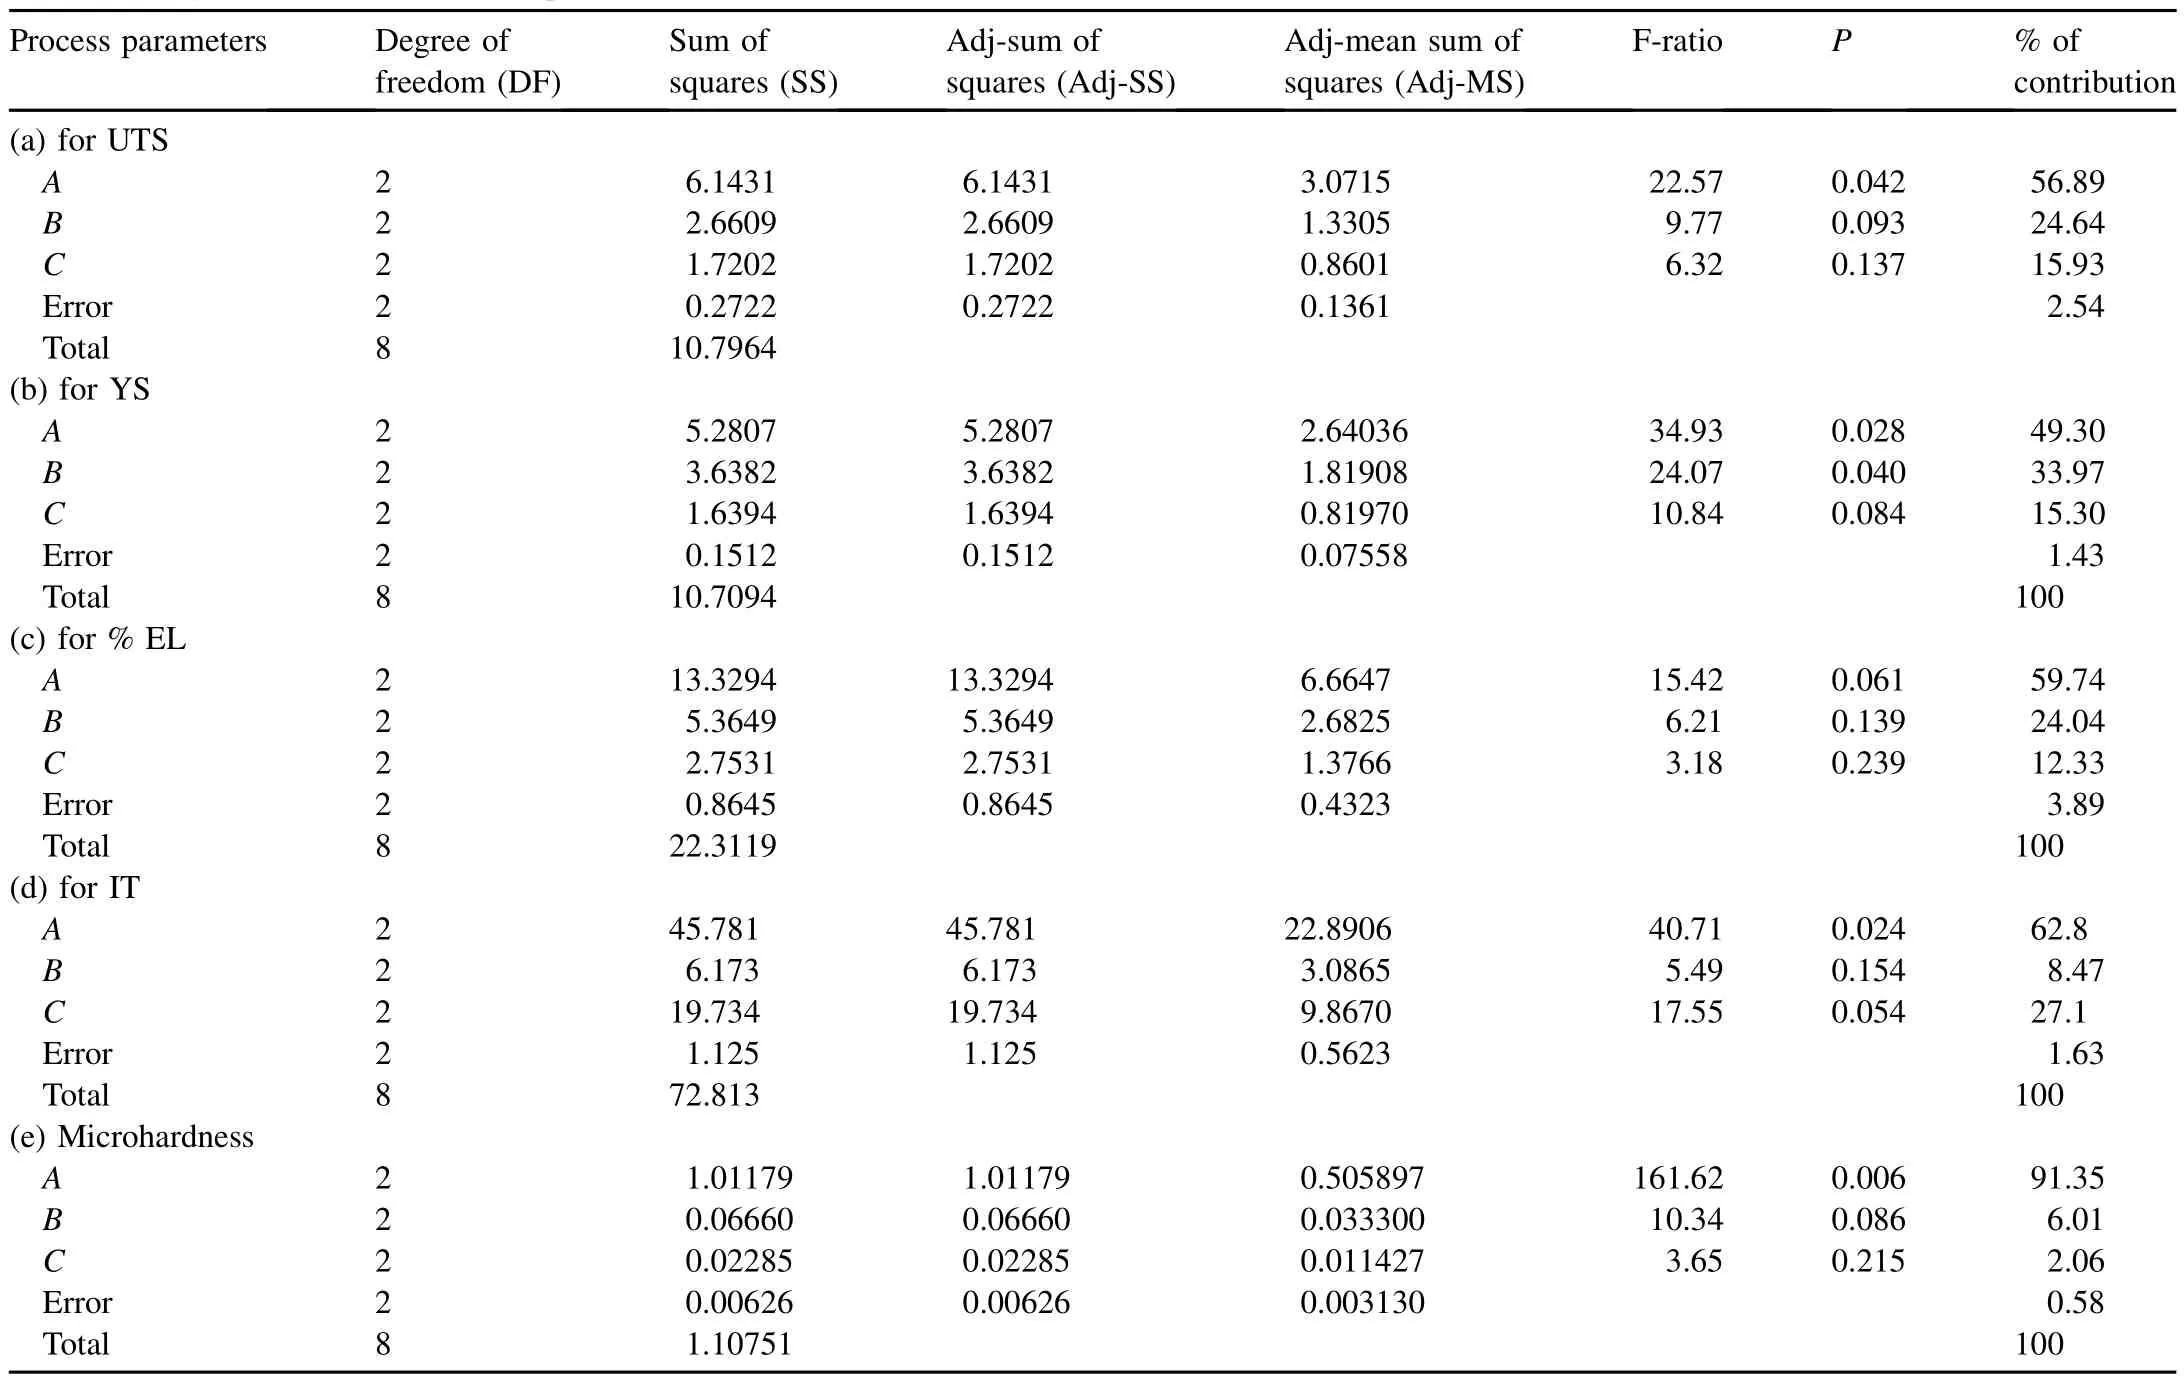
Table 8 ANOVA analysis results for various responses.
The authors would like to thank the authorities of National Institute of Technology (NIT), Warangal, Defence Metallurgical ResearchLaboratory(DMRL),Hyderabad,India and one of the author(L.Suvarna Raju)thankful to the Principal and the management of KITS,Huzurabad for their constant support during this work.
[1]Chang CI,Du XH,Huang JC.Achieving ultra fine grain size in Mg-Al-Zn alloy by friction stir processing.Scr Mater 2007;57:209-12.
[2]Mishra RS,Ma ZY,Charit I.Frictin stir processing:a novel technique for fabrication of surface composite.Mater.Lett A 2003;341:307-10.
[3]Kaczmar JW,Pietrzak K,Wlosinsi W.The production and application of metal matrix composite materials.J Mater Pro Tech 2000;106:58-67.
[4]Shojiro Ochai.Metallic properties of metallic composites.New York:Marcel Dekker Inc.;1994.
[5]Groza JR,Gibeling JC.Principles of particle selection for dispersion strengthened copper.Mater Sci Eng A 1993;171:115-25.
[6]Sun YF,Fijji H.The effect of SiC particles on the microstructure and mechanical properties of friction stir welded pure copper joints.Mater Sci Eng A 2011;528:5470-575.
[7]Barmouz M,Asadi P,Besharati Givi MK,Taherishargh M.Investigation of mechanical properties of Cu/SiC composite fabricated by FSP:effect ofSiC particles'sizeand volumefraction.MaterSciEngA 2011;528:1740-9.
[8]Asadi P,Faraji G,Besharati MK.Producing of AZ91/Sic composite by friction stir processing (FSP). Int J Adv Manuf Technol 2010;51(1-4):247-60.
[9]Azizieh M,KoKaBi AH,Abachi P.Effect of rotational speed and prove pro fi le on microstructure and hardness of AZ31/Al2O3nanocomposites fabricated by friction stir processing.Mater Des 2011;32(4):2034-41.
[10]Mahmoud ERI,Ikeuchi K,Takahashi M.Fabrication of SiC particle reinforced composite on aluminum surface by friction stir processing.Sci Technol Weld Join 2008;13(7):313-7.
[11]Kurt A,Uygur I,Cete E.Surface modi fi cation of aluminium by friction stir processing.J Mater Process Technol 2011;21(3):2034-204.
[12]Mahmoud ERI,Takahashi M,Shibayanagi T,Ikeuchi K.Effect of friction stir processing tool probe on fabrication of Sic particle reinforced composite on aluminum surface. Sci Technol Weld Join 2009;14(5):713-25.
[13]Devaraju A,Kumar A,Kotiveerachari B.In fluence of rotational speed and reinforcement on wear and mechanical properties of aluminum hybrid composites via friction stir processing. Mater Des 2013;45:576-85.
[14]Kumar A,Suvarna Raju L.In fluence of tool pin pro fi le on friction stir welding of copper.Mater Manuf Process 2012;27(12):1414-8.
[15]Ross PJ.Taguchi techniques for quality engineering:loss function,orthogonal experiments,parameter and tolerance design.2nded.New York:NY:McGraw-Hill;1996.
[16]Lakshminarayanan AK,Balasubramanian V.Comparison of RSM with ANN in predicting tensile strength of friction stir welded AA 7039 aluminium alloy joints.Trans Nonferrous Met Soc China 2009;19:9-18.
[17]Phadke MS.Quality engineering using robust design.Englewood Cliffs,NJ:Prentice-Hall.;1989.
[18]Sharma P,Verma A,Sidhu RK,Panday OP.Process parameter selection for strontium ferrite sintered magnets using Taguchi L9 orthogonal design.J Mater Process Technol 2005;168:147-51.
[19]Kheder ARI,Marahleh GS,Al-Jamea DMK.Strengthening of aluminum by SiC,Al2O3and MgO.Jordan J Mech Ind Eng 2011;5:533-41.
[20]Lianga S,Fana Z,Xua L,Fangb L.Kinetic analysis on AlO/Cu composite prepared by mechanical activation and internal oxidation.Compos Part A Appl Sci Manuf 2004;35:1441-6.
[21]Barmouz M,Besharati Givi MK,Sey fiJ.On the role of processing parameters in producing Cu/SiC metal matrix composite via friction stir processing:Investigating microstructure,microhardness,wear and tensile behavior.Mater Charact 2011;62(1):108-17.
[22]Kumar A,Shailesh P,Sundarrajan S.Optimization of magnetic arc oscillation process parameters on mechanical properties of AA 5456 aluminum alloy weldments.Mater Des 2008;29(10):1904-13.
[23]Mallaiah G,Kumar A,Ravinder Reddy P,Madhusudhan Reddy G.Influence of grain re fining elements on mechanical properties of AISI 430 ferritic stainless steel weldments-Taguchi approach.Mater Des 2012;36:443-50.
- Defence Technology的其它文章
- Analysis of parameter estimation using the sampling-type algorithm of discrete fractional Fourier transform
- Nitrogen analogs of TEX-A computational study
- Neural network modeling to evaluate the dynamic fow stress of high strength armor steels under high strain rate compression
- Scale-up synthesis and characterization of 2,6-diamino-3,5-dinitropyrazine-1-oxide
- Experiment and simulation of launching process of a small-diameter steel cartridge case
- Reliability sensitivity analysis based on multi-hyperplane combination method

