Simulation on the deformation controlling of T-joint LBW w ith auxiliary heat source for high strength alum inum alloy*
Dong Bizhe,YangWuxiong,Xiao Rongshi and Wang Qiming董皕喆,杨武雄,肖荣诗,王启明**
Simulation on the deformation controlling of T-joint LBW w ith auxiliary heat source for high strength alum inum alloy*
Dong Bizhe,YangWuxiong,Xiao Rongshi and Wang Qiming
董皕喆,杨武雄,肖荣诗,王启明**
To avoid the angular deformation of aluminum alloy T-joint weldments,a new method named welding with auxiliary heat source isproposed.Thewelding simulation isperformed with the commercial finiteelement software Abaqusand FORTRAN programme encoding a special conical heat source with Gaussian volumetric distribution of flux.The influence of the localmodel on the temperature,residual stress,and welding deformation distributions is investigated.The findings show that angular deformation achieved through numerical computation completely consistswith the experimental resultwhich has proved the effectiveness of the finite elementmethods developed.Variousmeasurements performed on small-scale welded test specimens provide a data base of experimental results that serves as a bench mark for qualification of the simulation result. Finally,the residual stress and strain states in a T-joint are predicted.
laser beam welding,auxiliary heat source,high strength aluminum alloy,angular deformation
0 Introduction
The aerospace industry has a strong focus on reducing design,manufacture,and maintenance costs.This focus on cost has resulted in the emergence of manufacturing processes,such as welding,being applied to the fabrication of aerospace primary structure.Air bus has applied laser beam welding to the fabrication of fuselage and pressure bulkhead plate-stiffener panels,implementing welding for a limited design range on the A318 and A380[1]. In North America,Eclipse Aviation has developed the E-clipse 500 business jet,laser beam welding in both wing and fuselage plate-stiffener-frame fabrication[2].
Compared with riveting process under the condition of the same structural stiffness,laser beam welding can reduce the weight of the fuselage panel by about 10%and the processing and production cost by around 15%,as well as improve the production efficiency[3].For the Airbus A380,the panel under nose is welded by double beam,with AA2524(plate)/AA7150(stringer)highstrength aluminum alloy[4-8].
In the laser beam welding process,angular deformation will be incurred by the factors as follows:(1)aluminum alloy has a large coefficient of thermal expansion but small elastic modulus;(2)the heat source produced from the bilateral welding of the double-beam laser is special,and the sheetmetal is large and thick;and(3)plate's multiple-passweld will lead to the complicated distribution ofwelding stress[9-11].For aircraftmanufacturers,the deformation of the large thin-walled structures has evolved into the greatest obstacle for their development and production.To address this problem,scholars from home and abroad have conducted large quantities of researches and come up with varieties of methods,such as pre-tensioning,dynamic thermal tensioning,and welding with extrusion.Despite being able to control and alleviate welding deformation,these methods show various deficiencies.In recent years,the research has manifested that finite elementmethods can contribute to building the laser beamweldingmodel of aluminum alloy T-joint[12-14].
Based on these researches,we proposed a method that lessens the angular deformation of welding by adding auxiliary heat source ofwelding to the bottom of the sheet. A comparative analysis is performed with the use of ordinary double-beam laser welding.The functioning form of auxiliary heat source is optimized by finite elementmethod to verify the correctness of heat sourcemodel.
1 Experim ental procedures
The geometry of two plateswelded into a T-joint,including the relevant dimensions,is presented in Fig.1. Plate and stringer aremade of the 1.88mm-thick 2524-T3 and 7150-T4 aluminum alloy,respectively,and the filler wiremade of the ER4047 Al-Sialloy weldingwirewith the diameter of 1.2mm.The chemical compositions of the experimentalmaterials are shown in Table 1.
Table2 shows the specific setting of laser parameters,with the welding speed reaching 8m/min and the incident angle of laser beam being 20°(shown as Fig.1).The welding wire is fed from the front,and the side-blown helium is used to protect the weld pool,with the rate of flow 15 L/min.

Fig.1 Laser welding with auxiliary heat source process

Tab le 1 Chem ical com positions of the experimentalmaterials

Table 2 Laser beam welding param eters
2 Finite element analysis
2.1Heat source model
As a highly nonlinear transient heat transfer process,the thermal analysis is concentrated on the prediction of the heat transfer in the weld pool,the temperature distribution in the overall weldment,and the shape and size of the fusion zone,heat affected zone and geometry of the molten pool.Specimenswith special heatmodelhave been considered for the execution of the simulations and experiments.(Gaussian surface heat source+Rotary-Gauss volume heat source)based on the analysis about the energy absorption and transfermechanism in the deep penetration laser welding process.

where csis the coefficient of heat flux concentration;rsis the effective radius of surface heat source;psis the laser' s surface heat source power;ηsis the effective coefficient of surface heat source;φis the material surface's effective laser absorption coefficient.
For the volume heat sourcemodel,there is a need for the loading of the two heat source models at the two corners of the T-jointafter the transformation of coordinates is completed by formula(Fig.2).By this way,the corner can be made consistent with the incident angle of laser beam,and then the tilted heat source that is bilaterally symmetric and simultaneously loaded can be also obtained.The Rotary-Gauss volume heat source model acquired under rectangular coordinate system can be expressed as follows: whereηvstands for effective coefficient of volume heats source;βformedium's absorption coefficient;pvfor laser's volume heat source power;rvfor effective radius of volume heat source;H for the effective depth of volume heat source;Y0and Z0for the coordinate center of heat source;andαfor the angle of coordinate system rotation. The v-energy source can be expressed as Eq.(3):


Fig.2 Distribution of heat source&Schematic of coordinate system rotation

2.2Governing equations and boundary conditions
To simplify the calculation process and attach importance to the main thermal field feature,only the thermal conduction in transient state is considered,and the fluid flow in the weld pool is ignored.The errors can be controlled in a reasonable limit by developing an appropriate heat source model for welding of T-joint.The transient thermal conduction equation is given by:

whereρis the density,c is the specific heat,k is the thermal conductivity,SVis the heat source term,T is the current temperature.
2.3 Finite elem entm odel and m esh
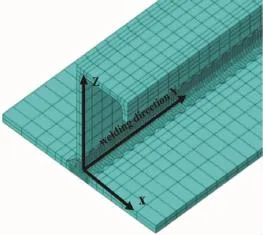
As regards the double-beam laser welding for the T-joint of thin-walled single-stringer aluminum alloy sheet,given the small size of the integral structuralmodel,the overall structuralmodel is decomposed with a compactmesh for the sake of accurate computation.Meanwhile,local welding position and heat effect in welding area are strictly divided according to unitdensity,and besides,this area is also partitioned geometrically.Small elements have been used in the fusion zone(FZ)and heat affected zone (HAZ)ofmodel in order to account for the high temperature gradient and non-uniform thermal strain occurring. Element size in FZ and HAZ was0.25mm×0.5mm× 0.375 mm.The mesh used in the model is shown in Fig.3.Finite element mesh for both thermal as well as mechanical analysis consisted of about 110 500 nodes and249 000 elementsof eightnode linear hexahedron with varying size.

Fig.3 M esh details
As double-sided heat source is added by the program DFLUX,the volume heat source thatexerts the function in form of heat conduction the functioning form is shown in Eq.(2)is also provided for the central part at the bottom.
3 Results and discussion
3.1Temperature field modeling
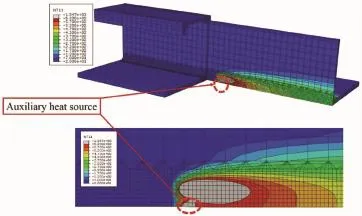
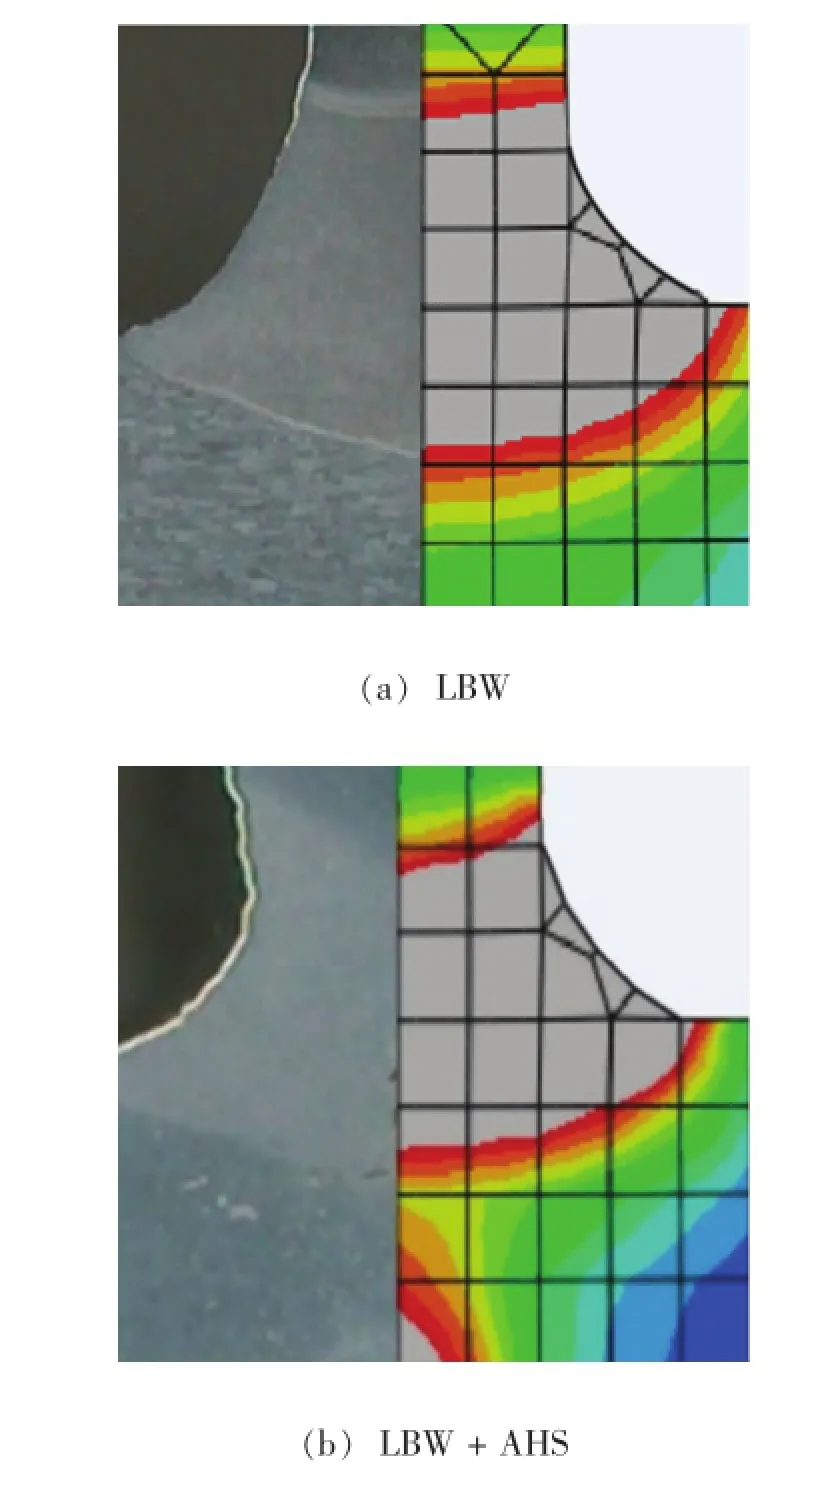
As is Fig.4 shown,the temperature field is split into two parts,where there is a spindly weld pool.The cross section of weld pool achieved through analog computation fits thatofactualweld cross sections(Fig.5),which suggests that the temperature field attained through numerical simulation is basically consistentwith the temperature distribution in actualweld.

Fig.4 Tem perature field of LBW simultaneous w ith auxiliary heat source

Fig.5 Tem perature distribution of cross section of the w eld joint
3.2 Validation of displacement
Fig.6 shows the angular deformation achieved by experiment and numerical simulation.Following the addition of AHS,angular deformation is improved significantly,and decreased to 0.26mm maximally when the AHS at the bottom is600W.
The mechanism formation regarding the deformation before and after the addition of AHS is analyzed according to the thin plate deformation theory of literature.
In the T-joint welding process without AHS,angular deformation will be easily triggered with little welding heat input and some temperature difference between upper surface and lower surface of the weld in the cooling process,as its neighboring regions have already cooled down to a considerable extentwell before the removal of heat source. As the regions under the action of contraction force are lower than the neutral surface of the welded plate,an lon-gitudinally upwardmomentwill be generated in thewelded plate to accelerate deformation.To a certain degree,after the addition of AHS,the temperature difference between plate upper and lower surfaces has been lessened,and the thick part of welded plate has slowed down the cooling process to extend the transverse shrinkage deformation of weld.It is found in all the cases that the transverse residual stresses(σxx)havemagnitudes approaching 120-140 MPa in the FZ and are largely tensile in nature,Meanwhile,a moment against longitudinal contraction force is generated at the back ofweld to prevent angular deformation and coordinate the overall deformation.

Fig.6 Angular deformation
3.3 Residual stress resu lt and analysis
According to Fig.7,before the addition of auxiliary heat source,thematerial in thewelding region is confronted with plastic strain,whereas after its addition,the rate atwhich the stress is transformed from compressive stress into tensile stress has been altered,it is believed that these stresses will have the strongest influence over the failure of the material.Moreover,the compressive nature of stresses in the HAZ is held responsible for the bending/ buckling distortion of the test plates and T-joint.
Fig.8 describes the distribution of the longitudinal residual stress along the width of plate figured out by analog computation.The distribution of residual stress shows the characteristics as follows:(1)both longitudinal tensile stresses before and after the addition of auxiliary heat source are smaller than the yield limit of 2524 aluminum alloy(around 300 MPa);(2)the distribution of longitudinal stress is characterized by remarkably symmetric double peaks;(3)the width between the two peaks is approximately equal to the laser spot diameter of auxiliary heat source,and after the welding,the plastic strain in the sheet has led to residual stress and deformation.

Fig.7 Distribution of residual stress along the w idth of sheet

Fig.8 Distribution of residual stress
4 Conclusions
(1)An experimental investigation for the LBW with auxiliary heat source has been carried out.Experimental results of sufficient accuracy have been obtained in order to decline an experimentally validated FE model.The maximum angular deformation,which declines to 0.26mm when the AHSat the bottom is500W,decreases by about 67%compared with thatof double-beam laser welding.
(2)A comparative analysis of the experimental and simulation results has shown good agreement for temperature and deformation fields.Correspondence between observed fusion zones and simulated weld pool geometries qualified the heat sourcemodel.Analysis of plastic strains suggested that they accumulated in weld joint.It is found in all the cases that the transverse residual stresses have magnitudes approaching 120-140MPa in the FZ and are largely tensile in nature,Meanwhile,a moment against longitudinal contraction force is generated at the back of weld to prevent angular deformation and coordinate the overall deformation.
References
[1] Zink W.Welding fuselage shells industrial laser solutions for manufacturing,Acta Materialia,2003,16(4):7-10.
[2] Schumacher J,Zerner I,Neye G,et al.Laser beam welding of aircraft fuselage panels.International Congress on Applications of Lasers Electro-optics,Los Angles,2002:2567-2576.
[3] Xiao R S.Laser beam welding ofaluminum alloys.The International Society for Optical Engineering,London 2008,6825 -6827.
[4] Williams J,Starke E.Progress in structuralmaterials for aerospace systems.Acta Materialia,2003,51(19):5775-5799.
[5] Heinz A,Hasler A,Keidel C,et al.Recent development in aluminum alloy for aerospace app lications.Materials Science and Engineering A,2000,280:102-107.
[6] NakaiM,Eto T.New aspects of developmentof high strength aluminum alloys for aerospace applications.Materials Science and Engineering A,2000,285(12):62-68.
[7] William C,John L,James T.Alum inum alloy for aircraft structure.Advanced Materials,2002,160(12):27-29.
[8] Mikami Y,Mochizuki M,Toyoda M.Measurement and numerical simulation of angular distortion of fillet welded T-joints.Welding International,2007,21(8):547-560.
[9] Guo SQ,Li L H,Welding distortion control of thin aluminum alloy plate by static thermal tensioning.Journal of Material Science and Technology,2001,17(1):163-164.(in Chinese)
[10] Zhang M M,Li JY.The control of pre-tensioning over the welding deformation of aluminum alloy.Development and Application of Materials,2005,2(1):36-38.(in Chinese)
[11] Li J,Yang JG,Liu X S.New methods to control stress deformation of thin-walled sheet through welding with trailing rotating extrusion.Journal of Mechanical Engineering,2010,46(12):81-84.(in Chinese)
[12] Zain-Ui-Abdein M,Nélias D,Jullien J F,et al.Experimental investigation and finite element simulation of laser beam welding induced residual stresses and distortions in thin sheets of AA6056-T4.Materials Science and Engineering A,2010,527(12):3025-3039.
[13] Zain-Ui-Abdein M,Nélias D,Jullien JF,etal.Finite element analysis of metallurgical phase transformations in AA6056-T4 and their effects upon the residual stress and distortion states of a laserwelded T-joint.International Journal of Pressure Vessels and Piping,2011,88(1):45-56.
[14] Reimers P,Gorba A.Nonlinear buckling analysis on welded airbus fuselage panels.IntelligentWell Interface Standardisation,Germany:2003.
*Thiswork was supported by the National Natural Science Foundation of China(Grant No.50305035).
**Dong Bizhe,Yang Wuxiong,Xiao Rongshi and Wang Qim ing,Institute of Laser Engineering,Beijing University of Technology,Beijing,100124. Xiao Rongshi,Corresponding author,E-mail:rsxiao@bjut.edu.cn
- China Welding的其它文章
- A Fe-Ni-Cr system filler metal for brazing of stainless steel*
- Numerical analysis of thermal process in continuous drive radial friction welding*
- Effect of refilling time on Microstructure and Mechanical properties of friction spot welded LY12 alum inum alloy*
- Simulation of phased array S-scan acoustic field in FSW joint of alum inum alloy extrudate w ith com p lex shape*
- Mechanical and corrosion properties of 445J2 ultra pure ferritic stainless steel joint*
- Analysis of grain grow th in hybrid weld HAZ based on the coupled thermo-fluid model

