Measuring Stress Distributions of Composite Joints by Lock-In Infrared Thermography Technique
LI Yong-sheng,WU Jian,WANG Wei-bo,LI Xu-dong
(1.National Key Laboratory on Ship Vibration&Noise,China Ship Scientific Research Centre,Wuxi 214082,China; 2.China Aero-Polytechnology Establishment,Beijing 100028,China)
Measuring Stress Distributions of Composite Joints by Lock-In Infrared Thermography Technique
LI Yong-sheng1,WU Jian1,WANG Wei-bo1,LI Xu-dong2
(1.National Key Laboratory on Ship Vibration&Noise,China Ship Scientific Research Centre,Wuxi 214082,China; 2.China Aero-Polytechnology Establishment,Beijing 100028,China)
Bonded connections between two structural members represent a potential weakness in the context of FRP materials.Due to their complex geometry configurations,stress distribution is normally difficult to measure by the traditional electromotive measuring way.In this paper,a new method of Lock-In infrared thermography technique was introduced to measure the stress distributions of those joints of composite materials.Testing samples in the research included two different types of joints, laminated composite tee-joints and composites-to-steel hybrid joints.Feasibility and credibility of using the Lock-In infrared thermography technique to measure stress distributions of complex structures were investigated by comparing the experimental results with the numerical analyses.The results show that this new technique can rapidly and effectively determine global stress distributions of complex structures such as composite joints.
composite joints;stress distribution;Lock-In;infrared thermography
0 Introduction
Composite adhesive joints have been widely used in engineering structures.Due to complex attributes of adhesive layer,disheterogeneous of constitute materials,low interlamina strength,composite joints seem easier to be damaged and fail compared to their metal counterparts.Measuring stress and strain distributions of such complex structures are very important not only to the design of engineering structures,but also to the safety and structure integrity assessments.Due to anisotropy of composites in nature,traditional electromotive methods for measuring strain distributions of composite structures are much more complicated than metal ones.Firstly,it is needed to stick strain gauges time after time to obtain elastic property values in all directions of composite structures,as well as more strict requirements for strain gauge itself.On the other hand,the constitutive relationship between stress and strain of composite structures is also more complex.Furthermore,due to the peculiar geometry of joints,the strain gauge generally cannot be stuck on the surface of object region and distribution of thestrain and stress cannot be directly achieved consequently.In addition,not so insignificant error is present in areas with big strain gradients such as the region of stress concentration,as the strain value obtained by strain gauges is normally not for a given point,but is the average value of the small local area it covers.Another deficiency is that the information directly achieved by traditional electromotive measure ways on such peculiar geometry as joints is somewhat not many.To overcome those deficiencies some new techniques which are non-contact,highsensitive and for global stress field have been developed in past some years.The Lock-In infrared thermography technique is one of these methods which can directly measure full field stress distributions of structures.
The theoretical fundament for the Lock-In infrared thermography technique includes two aspects:one is Thermoelastic Stress Analysis(TSA)[1],which is based on small temperature changes of the order of 0.001℃ which occur when a material is subject to a change in elastic strain,and this physical behaviour is typically referred to as the thermoelastic effect;the other is an infrared(IR)detector combined with Lock-In technique which is used to measure the small reversible temperature change associated with the thermoelastic effect from a component subjected to cyclic load.When a specimen is subject to a cyclic load,the induced strain produces a cyclic variation in temperature which is opposite in phase to the loading signal.In adiabatic conditions,the temperature variation is related to the first stress invariant,i.e.the sum of the principal stresses.The temperature cycle manifests itself as a cyclic variation in the photon emission from the surface of the material and can be measured using appropriate sensors.
To date TSA is a well established technique for the evaluation of stresses in isotropic engineering components[2-5],and the underlying theory has been summarised in a review[1].Techniques for obtaining the calibration constant for isotropic materials are well addressed in these publications;some common approaches have also been described and assessed in Ref.[6].While the thermoelastic theory devised for an isotropic body is not always valid for orthotropic composite materials.Stanley and Chan et al[7]applied the TSA theory to the thermoelastic stress analysis of orthotropic materials and considering the different coefficients of linear thermal expansion in different material directions.They validated the equation using two types of composite components.Since then a number of quantitative studies have been carried out on composite structures by deriving a calibration constant[8-10].Lately,Emery and Dulieu-Barton[11]proposed a generalised approach to the calibration of orthotropic materials for thermoelastic stress analysis.In this procedure,calibration constants are obtained by measuring the laminate strain,from a tensile calibration coupon,using a surface mounted extensometer and combining with the measured thermoelastic response.All these achievements presented the calibration relationship between the thermoelastic temperature change ΔT in orthotropic laminated composite materials and the thermoelastic signal S,which indicated the possibility of using the infrared thermography technique to measure the stress distributions of these kinds of composite materials and structures.
The Lock-In technique is an important part which belongs to the subject of weak signaldetecting.In 1992,Busse et al[12]published their paper,which creatively introduced the Lock-In technique in the field of infrared thermography testing,and gradually forming the Lock-In infrared thermography technique.When given a periodic loading,each point of the structure will emit a periodic temperature signal under the constraint of the theory of thermal-mechanics coupling,which is the premise to adopt the Lock-In technique.Chrysochoos[13]summarized and presented the complete theory of thermal-mechanics coupling based on all the achievements obtained before,which became the theory foundation of the Lock-In infrared thermography technique.So far Lock-In infrared thermography has been widely used to investigate the stress and damage states in structural components[14-16],as well as for fatigue assessment of high cost engineering structures,e.g.aerospace structural components[17-19].Navaranjan[14]has applied Lock-In infrared thermography to evaluate sandwich structured corrugated paperboard packaging.Li[17]adopted Lock-In infrared thermography technique to rapidly determine fatigue limit of aluminum alloy riveted component caused by initial stress.Fan et al[20]proposed a new method based on the infrared thermography to rapidly determine the fatigue behavior of Q235 steel.Since the Lock-In infrared thermography technique has been well developed,it is gradually applied to measure stress distributions of complex engineering structures.However, due to the complicity of composite material,stress distributions of complex composite structures estimated by the Lock-In infrared thermography technique have been rarely investigated.
In our previous research work[21],feasibility of measuring stress distributions of orthotropic composite materials in plane stress state by the Lock-In infrared thermography technique was analyzed and documented.In this paper,the technique is used to measure the stress distributions of laminated tee-joints of composite materials,and even more complex joints that composed of several materials such as metals,FRP composites and foams.Reliability of using the Lock-In infrared thermography technique to measure stress distributions of these complex joint structures are validated by comparing the experimental results with the data from numerical analyses,which shows good agreement.
1 Experiment
1.1 Models for investigation
Two different types of joints are investigated in this paper,laminated composite teejoints and composite-to-steel hybrid joints,respectively.Fig.1(a)shows a typical tee-joint which are often used to connect two orthogonally placed plate panels[22-23],such as deck-tobulkhead,shell-to-bulkhead,and floor-to-tanktop in a ship.The primary function of a teejoint is to transmit flexural,tensile and shear loads between two sets of panels meeting at the joint.In this connection,both elements are formed before joint is fabricated,and the joint is formed by placing laminated strips of reinforcement cloth which is called overlamination or boundary angle on both sides of joints.The resulting gap between the web and the flange of composite laminate is often filled with an appropriate resin,i.e.one which is compatible with thecloth material and generally one with a high failure strain.The weakness in this case[24]is due to the lack of reinforcement across the connected surfaces and through the occurrence of stress concentration associated with joint geometry and production considerations.

Fig.1(a)Laminated composite tee-joint (b)Composite-to-steel hybrid joint
Fig.1(b)shows a typical joint termed as composite-to-steel hybrid joint which has been already used on ships,such as the French La Fayette class frigate[25-27]as a connection between a composite helicopter hangar and the steel weather deck.At present,there has been increasing interest in the use of lightweight composite materials for naval superstructures to reduce structural weight,increase stability and stealth performance of naval ships,and so on. These results in a GRP/steel joint in which the joint and the glass-fiber composite sandwich structure can be formed simultaneously by a resin infusion process.The joint consists of a steel insert and a GRP/foam(or balsa)sandwich.The advantage of this kind of joints is that the steel insert allows for traditional welded attachment of a superstructure to the deck of the steel ship,while the weakness is great stress concentration arises at the end of the steel insert at the GRP/steel interface due to a sharp transition in the modulus of the materials.In the case that steel not inserted to the core,this region is even weaker for the distance between the two GRP skins of the GRP/core sandwich is a minimum.Thus,stress in this region is critical to the performance of these kinds of joints.
1.2 Calibration
For orthotropic materials,the small temperature change(ΔT)is related to the changes in the stresses in the principal material directions on the surface of specimen(Δσ11,Δσ22)by the following expression:

where T is the absolute temperature of specimen,ρ is the density,Cpis the specific heat at constant pressure,α1and α2are the coefficients of linear thermal expansion relative to material principal axes of the laminate.
To date the normal approach in thermoelastic researches on composite materials has been to use the following equation[28]:

where S is the thermoelastic signal and A*is a calibration constant based on the detector properties and material properties.
As the thermoelastic signal S obtained by the Lock-In infrared thermography technique is the first stress invariant I1,i.e.the sum of the principal stress components,when measuring stress distributions of the structure,an effective but relatively simple way for the calibration can be used as

where k is the calibration coefficient,by the following expression:

The unit of k is MPa/K.
Before measuring stress distributions of these joint structures,the suitable loading frequency f and the calibration coefficient k should be determined.The calibration coefficient k of laminated composite plate is determined in the similar way to that of the steel plate.As shown in Fig.2(a),under a periodic loading F,the temperature change ΔT on one side of the specimen is measured by the Lock-In infrared thermography detector.At the same time,the strain components in every direction are tested by strain gauges mounted on the other side of the specimen,based on which ΔI1can be calculated by Eq.(5)if for isotropic materials.

where Δεxand Δεyare the normal strains in x and y directions,respectively.
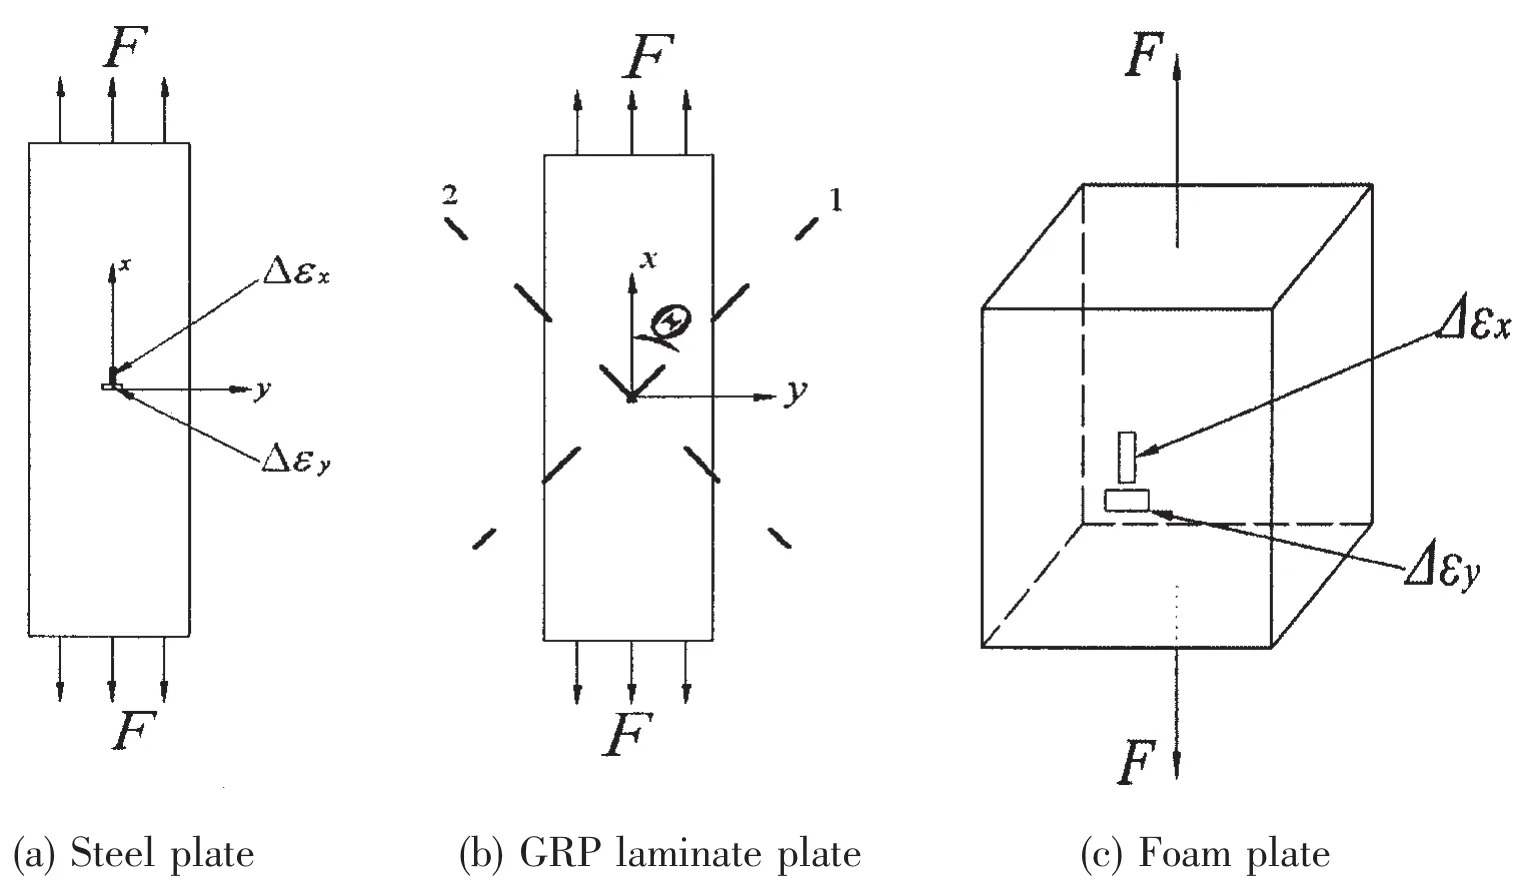
Fig.2 Sketch of the calibration specimen
For orthotropic composite materials in plane stress state,the relationship between the first stress invariant I1and the strain components can be deduced as


If the first and second principal material directions are parallel or vertical to the x and y directions,respectively,Eq.(6)can be simplified as

where ε1and ε2are the normal strains in the first and second principal material directions, respectively.Here only two pieces of strain gauges are needed for this case.

As can be seen that it is degenerated to the corresponding relationship for isotropic homogeneous metal materials,Eq.(5),which is as expected.In this paper,the GRP composite lamination plate used in the experiment and analysis is the 618 epoxy resin reinforced by multilayer E-glass weave fabric where the material properties belongs to this case.
For foam materials,the plate is machined to a cubic form as shown in Fig.2(c).Considering the symmetry of the loading state and geometry of the specimen,the strain value along the z direction can be approximately viewed as the same as along the y direction,Δεz=Δεy.So under a periodic loading F,ΔI1can be calculated by Eq.(8):

where Δεxand Δεyare the normal strains along the x and y directions respectively,and can be determined by strain gauges in calibration test.
1.3 Test set-up
A JADE-III550 Lock-In infrared thermography system supplied by CEDIP Company was used to record the thermoelastic data,and ΔT is observed from the surface of the component of interest using this detector which enables the full-field measurements.The IR detector incorporated in the system is a 512×512 pixel array capable of resolving a temperature change of1mK.The thermoelastic signal is processed digitally and allows the data to be recorded in a matter of seconds.This rapid processing enables data collection in practically real-time,providing clear benefit in stress check and damage propagation studies.The measuring process is shown in Fig.3.
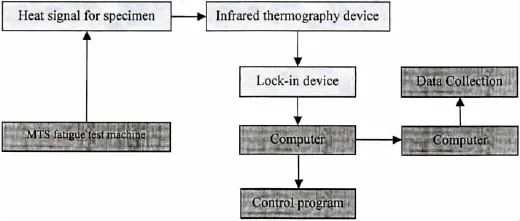
Fig.3 Flow chart of the measuring process by Lock-In infrared thermography system
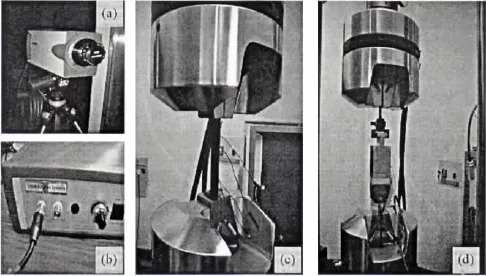
Fig.4 Test set-up(a)Infrared thermography device;(b)Lock-In device;(c)Calibration of GRP composite material,and(d)Calibration of foam material
During the test,test set-up is shown in Fig.4,periodic loadings for the specimen are provided by the MTS fatigue machine,and two sets of boundary fixture respectively for the composite T-joint and Composite-to-steel joint are specially designed to fix joint specimens in their experiments.Each specimen is subjected to a changeable elastic strain and surface temperature.The induced heat signal can be captured by Infrared theromography device and then analyzed and processed by Lock-In device.Two computers are used separately for MTS machine controller and infrared thermography data collection.
2 Experimental results and discussion
2.1 Calibration results
Fig.5 shows how the surface temperature change of specimen ΔT varies with differentloading frequency f for different materials.It can be seen that the temperature changes with the increase of loading frequency at the beginning (very low frequency band).However, when loading frequency increases to somewhat a critical point,the changes of temperature gradually reach a balance state.It is apparent that difference exists between characteristic curves for GRP materials and steel materials.Different from traditional metal materials,the GRP composite laminated plates consist of two different kinds of materials,the inserted fibres and the outside epoxide resin.It is reasonable to think that the heat exchange in the composite laminate specimen will occur in two aspects.One is between its constitutive materials,fibre and resin,the other is between the specimen surface and the surrounding air.However,as we know,GRP composite laminate is a bad conductor of heat,so the heat exchange between the specimen surface and the surrounding air is very weak. When the loading frequency is lower than a characteristic frequency point,corresponding to a quasi-adiabatic state where the heat exchanges between the fibres and the resin and between the material surface and the surrounding air are both decreased and gradually reach a balance,the heat conducted from inside glass fibres to the surface would far exceed the heat dissipating caused by the heat exchange between the specimen surface and the air around.This is the most possible reason why the surface temperature changes are relatively higher if the loading frequency is very low and this phenomenon is totally different from some metal materials as shown in Fig.5.When the loading frequency is higher than 1.5 Hz,the characteristic curve of surface temperature change with the loading frequency becomes flatter and then be stable.According to experimental results shown in Fig.5,the effective loading frequency for GRP composite lamination plate is set to be higher than 1.5 Hz afterwards,while for Q235 steel and PVC foam material loading frequencies are respectively set higher than 5 Hz and 3 Hz.
In order to obtain the calibration coefficient k for each material,a series of periodic loadings were applied to the calibration specimens at each loading frequency.For GRP composite laminated plates,different loading frequencies of 3 Hz and 4Hz are adopted to investigate the influence of frequency on the calibration coefficient k.The amplitudes of loadings were set as 1 kN,1.5 kN,2 kN,2.5 kN and 3 kN,separately.Calibration results are shown in Fig.6.It can be seen that the curves of stress invariants against the changes of temperature are linear. In fact,other calibration tests for the Q235 steel plate and foam plate,as shown in Fig.7(a)and Fig.7(b)also show the same phenomenon,which all demonstrates the calibration equation ΔI1=k·ΔT is reasonable.
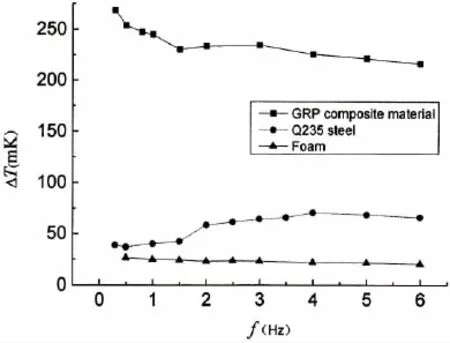
Fig.5 Calibration curves for amplitudes of surface temperature change versus loading frequency for different materials
The calibration coefficient k can then be attained from the tangent of the line of ΔI1against ΔT.From Fig.6,it can also be found that the two calibration lines of the GRP composites are very close under these two frequencies,indicating that increasing the loading frequency greater than 4 Hz will not result in a big difference in calibration for the GRP material.Thus,in this paper, the calibration coefficient k of the GRP material is determined as 230.2 MPa/K at frequency of 4 Hz.Analogically,calibration tests for the steel plate and foam plate were carried out under the loading frequency 5 Hz and 3 Hz,respectively.

Fig.6 Calibration results of the GRP composite laminates under different loading frequencies
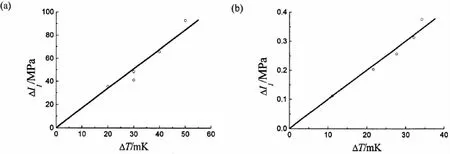
Fig.7 Calibration results of different materials under different loading frequencies(a)Q235 steel material at frequency f=5 Hz;(b)PVC foam material at frequency f=3 Hz
A series of periodic loadings were applied to all specimens for calibration at a specific frequency,with loading amplitudes of 8 kN,10 kN,12 kN,15 kN and 20 kN for the steel plate and 2 kN,3.84 kN,4.9 kN,5.85 kN and 6.8 kN for the hexahedral foam.Finally,the calibration coefficients k for steel plate and foam plate are determined as 1 787 MPa/K and 10.01 MPa/K,respectively.
2.2 Test results of tee-joint and discussion
Representative loadings were considered for tests of composite tee-joints.A major proportion of these joints in FRP ships is accounted for in the connections between two orthogonally placed plates such as deck-to-bulkhead,shell-to-bulkhead in a tank.In this way,these joints within a tank structure will be subjected to both vertical tensile loading and horizontal bending due to hydrostatic pressure,which can be simulated by a pull-off load of the web at 45°to the base with the flange of the joint restrained.During the experiment,periodic displacementcontrolled pull-off load of the web at 45°angle was applied to the joints as shown in Fig.8(a). Different loading frequencies and amplitudes of displacements can be applied and real-time figure of the induced heat signal can be captured as shown in Fig.8(b).The figure definitely shows the distributions of surface temperature of the joint,which indicate the full-field stress of the joint,especially by which the‘critical region’can be found.This is important,as previous work[24]has shown that the curved region of the overlaminate is the most susceptible to damage under 45°pull-off loads.
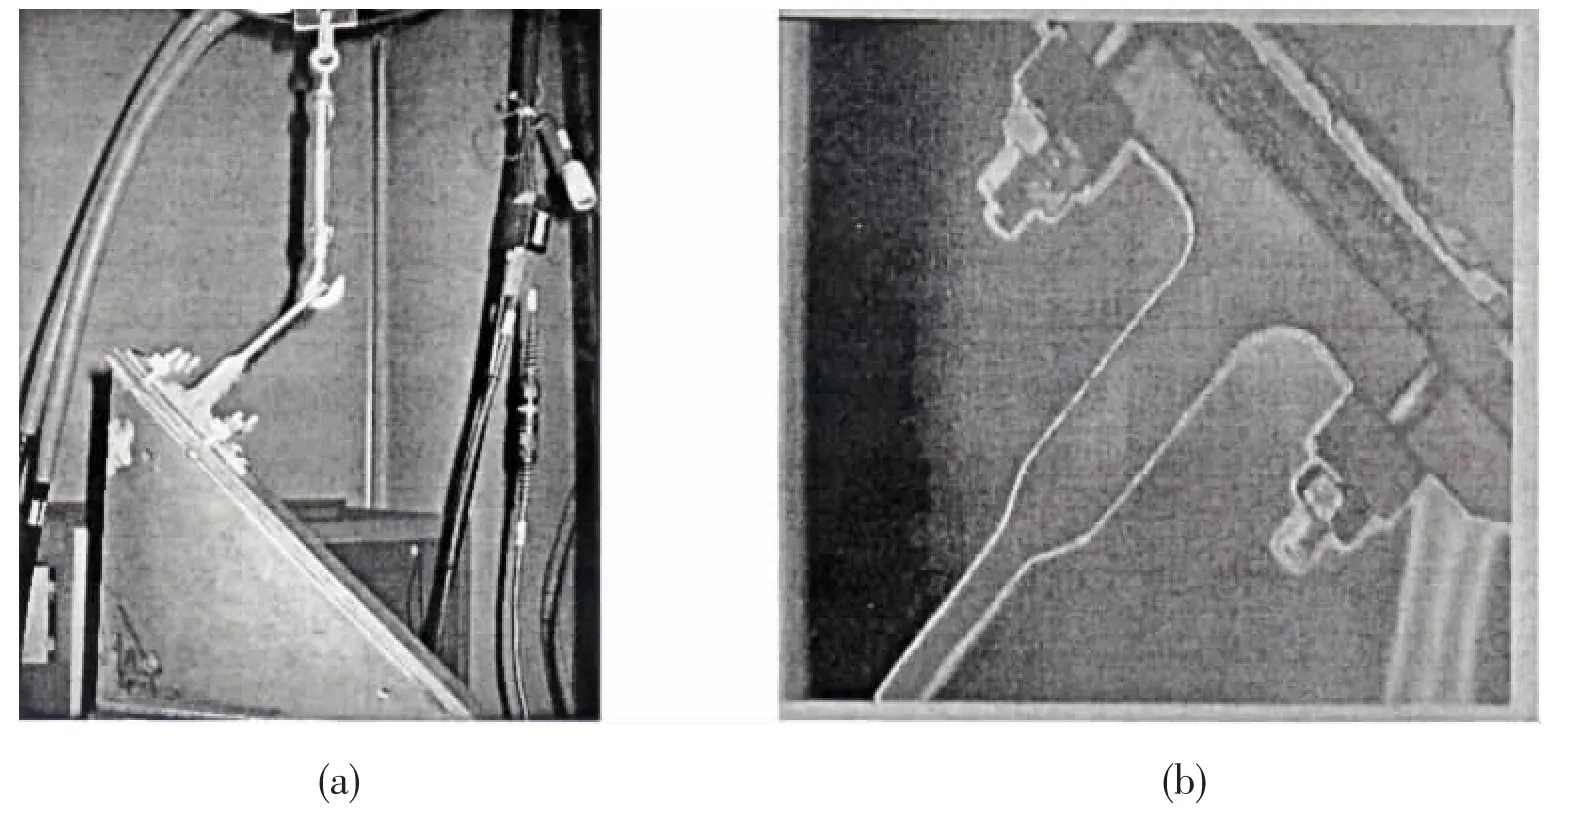
Fig.8 Test set-up and real-time figure of heat signal of typical laminated tee-joints using Lock-In infrared theromography technique(a)test set-up of tee-joints;(b)real-time figure

Fig.9 Distributions of surface temperature on the surface of the GRP composite tee joints(units:K)
In this curved region,the initial delamination is caused by excessive through-thickness stresses and subsequent damage may be caused as a result of high in-plane stress.Much more stress information of the curved region will be needed for investigation,while traditional electromotive way is not suitable,because stress information by strain gauges is not much enough due to the limited number of gauges,as well as the strain gauge is not easily stuck on the curved region.Figs.9 and 10 show a comparison of the surface temperature and stress distribution of the tensile side of the overlaminate of composite tee-joint under different loading displacementand frequencies,respectively.It is obvious that high temperature and stress emerged at the curved region,indicating the curved region is the most dangerous area for tee joint.Moreover, it can be apparently seen that different amount of heat left on the laminate surface due to different loading frequencies applied to the joint,as shown in Fig.9.Larger amount of heat has been left at lower frequency of 0.3 Hz than that at higher frequency of 1.5 Hz.The reason might be that heat generated by the constitutive materials of GRP can not quickly dissipate to the surrounding air at lower frequency and is mostly left on the laminate surface then captured by infrared thermography system.An increase of frequency may accelerate the heat dissipation speed and finally the heat conduct system may come into a‘balance state’.Under this state,heat conducted will be suppressed and adiabatic conditions can be approximately achieved.Fig.9(b)-(c)show that the borderline between different temperature areas become manifest and temperature gradients become smaller on the laminated surface when frequency increased to 1.5 Hz,which indicates that a‘balance state’has been reached.
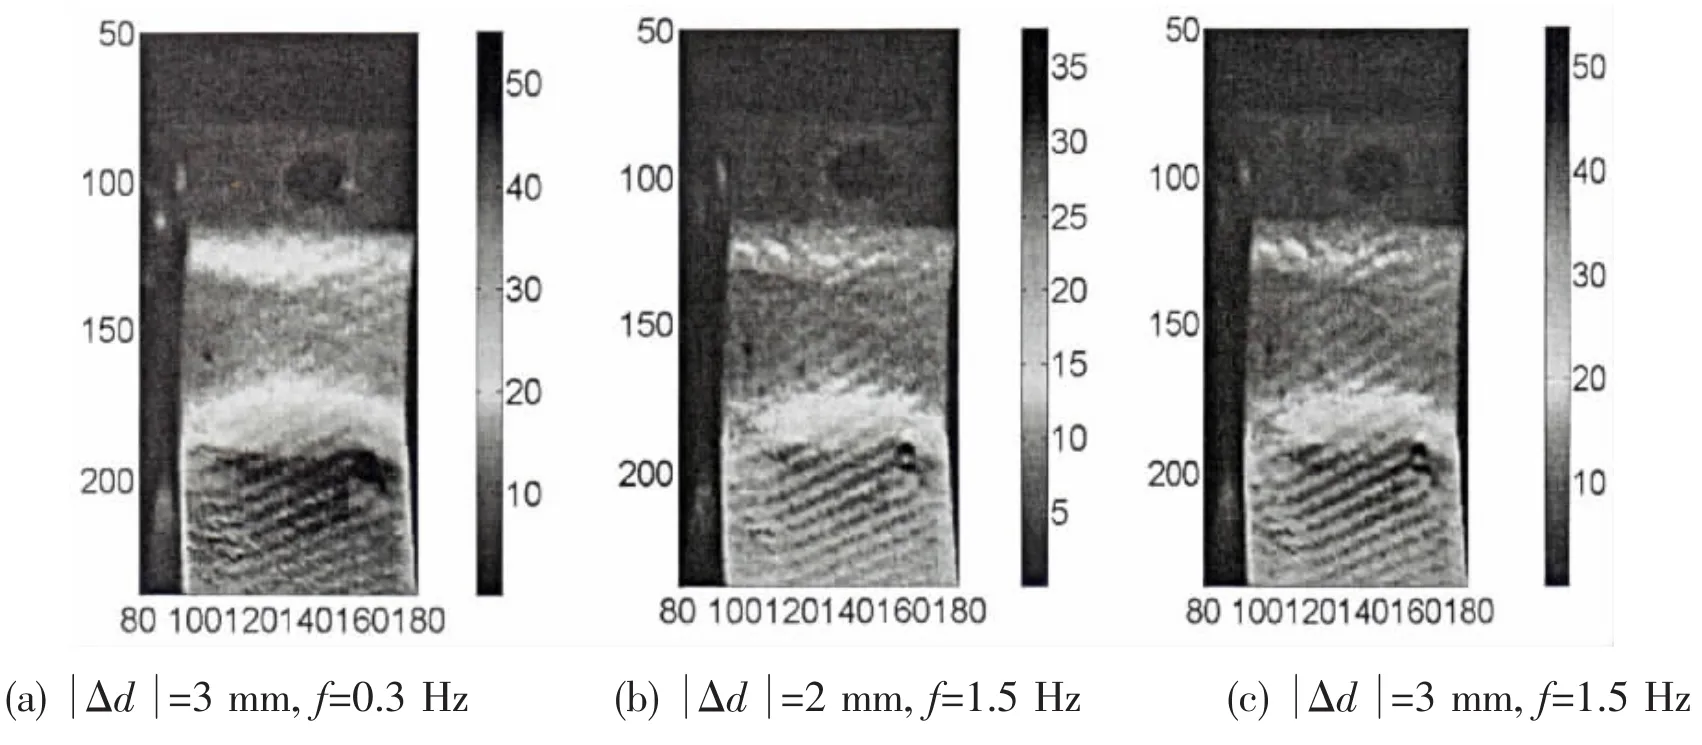
Fig.10 Distributions of stress on the surface of the GRP composite tee joints(units:MPa)
The stress distribution can then be achieved from the temperature data and calibration coefficient k.As shown in Fig.10,maximum stress in the tee joint under 45°pull-off tensile loading appears in the curved region,and is proportional to the magnitude of the force.Under the same loading frequency,higher stress generated at the higher loading magnitude,by comparing Fig.10(b)to Fig.10(c).While altering loading frequency,the distribution of the stress in the curved region varies although the maximum stress is the same.
Fig.11 shows the stress distribution of the whole joint.The assembly of web and boundary angle attaching to it is similar to a cantilever beam under this loading condition.Maximum tensile and compressive normal stresses occur at one end of cross section of the beam.Across the section,the stress varies linearly,and in the neutral plane of beam the stress reduces to zero.This stress pattern is reflected on Fig.11.The figure clearly shows that maximum tensile and compressive normal stress generates in the upper and lower surface of the beam-the boundary angles.However,at lower frequency,the stress distribution in the web is not linear, or even blurred and ambiguous,as shown in Fig.11(a)and Fig.11(b).Reason may be attributed to the heat conducted from higher region to the lower part and the stress distributions inthese parts then altered at lower frequency.Those blur spots vanished when increasing the loading frequency to 1.5 Hz and the stress distribution in the web is much more uniform and distinct,as shown in Fig.11(c)and Fig.11(d).Thus,a suitable frequency is necessary so that no heat exchange happens in the structure and the accurate elastic stress can be achieved according to the theory of thermal-mechanics coupling.It can be concluded that the distribution of temperature and stress on the laminate surface may be even uniform and tends to a balance as long as higher frequency applied to the tee joint.
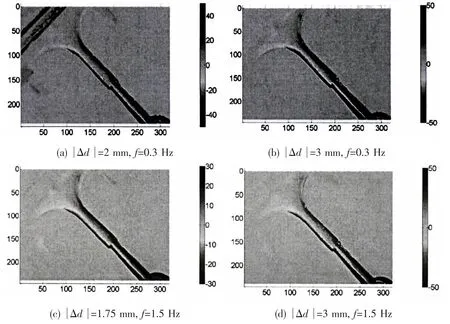
Fig.11 Distributions of stress on the surface of GRP composite tee joint(units:MPa)

Fig.12(a)Set up of composite-to-steel joint specimen and infrared thermography system; (b)Fixture of specimen with black paint sprayed on the surface;(c)Section of the specimen of composite-to-steel joint
2.3 Test results of composite-to-steel joint and discussion
Fig.12(a)shows test up for composite-to-steel joints.A periodic tensile loading was applied to the joints and heat signal was captured by infrared thermography system.A typical section of the specimen is shown in Fig.12(c),with the Q235 steel material,the PVC foam material of Divinycell HCP100,and GRP composite material positioned and formed the final joint.Matrix resin also acts as the adhesive between the GRP and steel.A proper length of steel was inserted to the core to remove the stress concentration in the region towards the end of the foam at the GRP/steel interface.To obtain distinct thermal picture,a special black paint was sprayed to the measured surface of the specimen,as shown in Fig.12(b).
The distributions of surface temperature and stress of GRP skins are illustrated in Figs. 13 and 14.From this view,only the induced heat signal of the flat side of GRP skins can be captured by the infrared thermography device.The GRP skins are 2 mm thick and keep flat on the bottom surface of the joint.Surface temperatures are corresponding to the thermoelastic signal of GRP skins.The calibration coefficient k of the GRP composite laminate(230.2 MPa/ K)is used to obtain stress distributions in skin,shown in Fig.14.As can be seen,the temperature and stress are concentrated at the end of steel at the GRP/steel interface.The stiffness in this region may be expected to be a minimum since there is a sharp transition in the modulus of the materials from steel to foam and the distance between the two GRP skins of the GRP/ foam sandwich is a minimum.The experiment results do support this,with a sharp increase of surface temperature and tensile stress occurring in this region,and the temperature and stress increases with load amplitudes.The disheterogeneous distribution of stress in this region is probably because the adhesion between steel and foam is not uniform during the process of specimen fabrication.The stress in the foam core material is also concerned,as failure may initiate in the foam core in the transition area within the joint due to excessive stress.In order to measure the stress distributions of foam core in this critical region,incident angle was adjusted to receive the heat signal and the corresponding surface temperature distribution was shown in Fig.15.It is interesting to see that the shape of the section can be clearly seen in the graph,correspondingly distinguishing the constitute material from the joint profile.From this figure,there appears to be different temperature distributions for different constitutive materials in the joint, including steel,foam and GRP.Higher temperature appears in the GRP skins under tensile loading,in contrast temperature in the steel and foam core is relatively lower.It is not difficult to understand that loads are mainly carried by steel and GRP skins when a tensile load is applied to the joint.Because the modulus of GRP material is less than steel material,the elastic strain generated and temperature changes in the GRP skins are more than those of steel.
For foam core,although load it bears is much less than steel and GRP material,but its strength is even much smaller than GRP,thus it is necessary to examine the stress in the foam core.Using the calibration coefficient k of foam material(10.01 MPa/K),the stress distributions of foam core within the joint are achieved,shown in Fig.16.
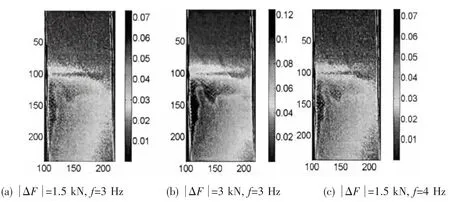
Fig.13 Distributions of surface temperature on the surface of the composite-to-steel joint
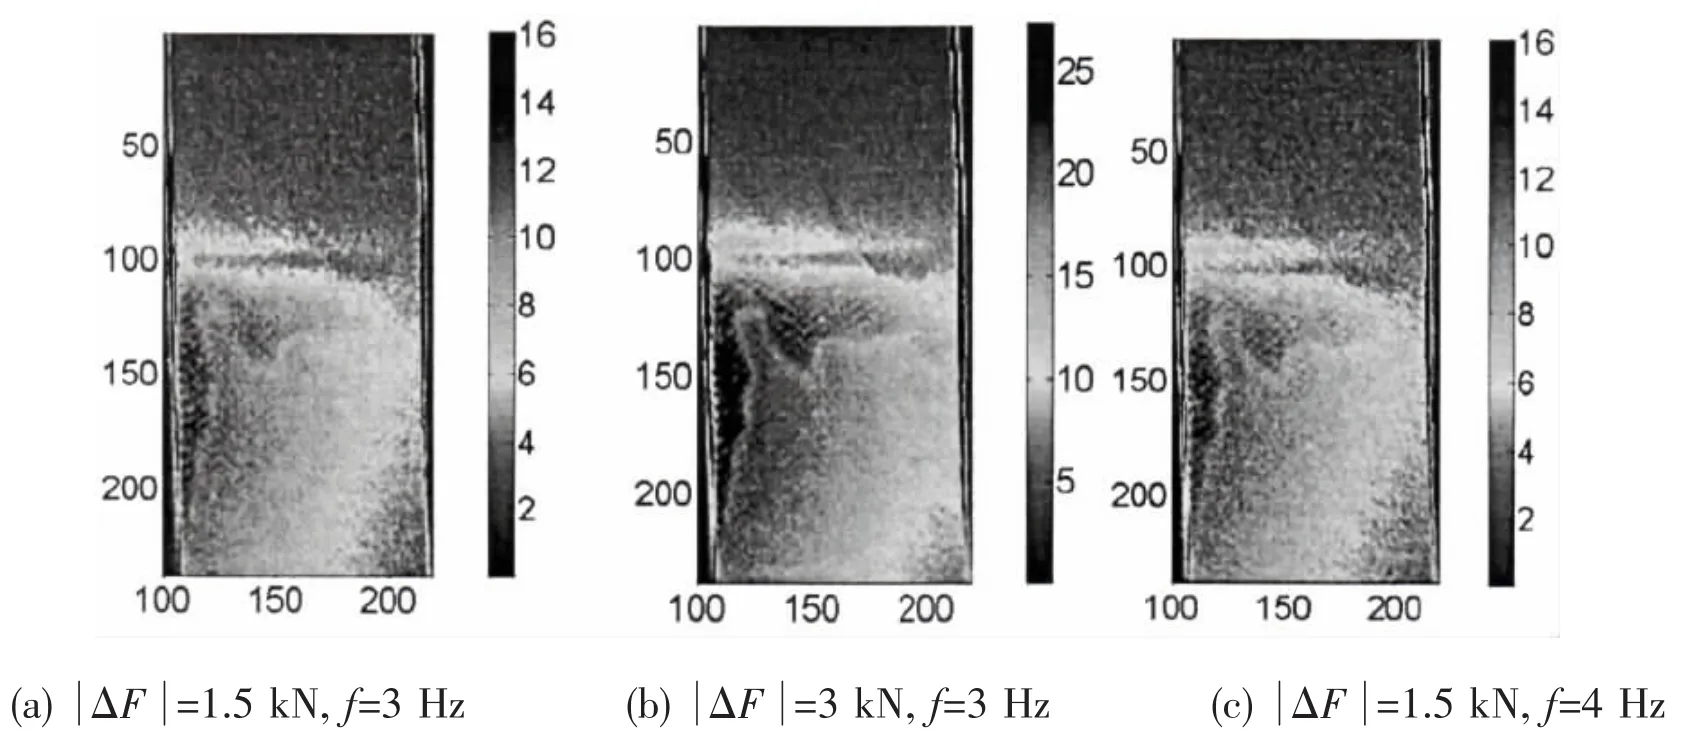
Fig.14 Distributions of stress on the surface of the composite-to-steel joint
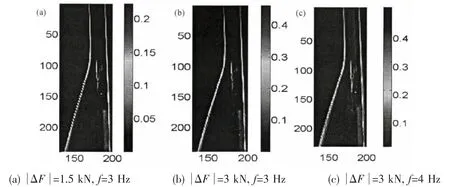
Fig.15 Distributions of surface temperature on the surface of the composite-to-steel joint
It should be pointed out that stress distributions colour for steel and GRP material in the graphs of Fig.16 are not valid,as their calibration coefficients are different from foam material which is used here,however it not influences the analysis of stress in the foam core.From the figure,stress concentrations were observed in the foam core near the foam/steel interface.As discussed earlier,increasing the load amplitude will also result in an increase of stress in the foam,shown in Fig.16(b).While under the same loading amplitude,if loading frequencies areincreased,by comparing Fig.16(c)to Fig.16(b),the stress distribution in the foam material seems to much more uniform and distinct.
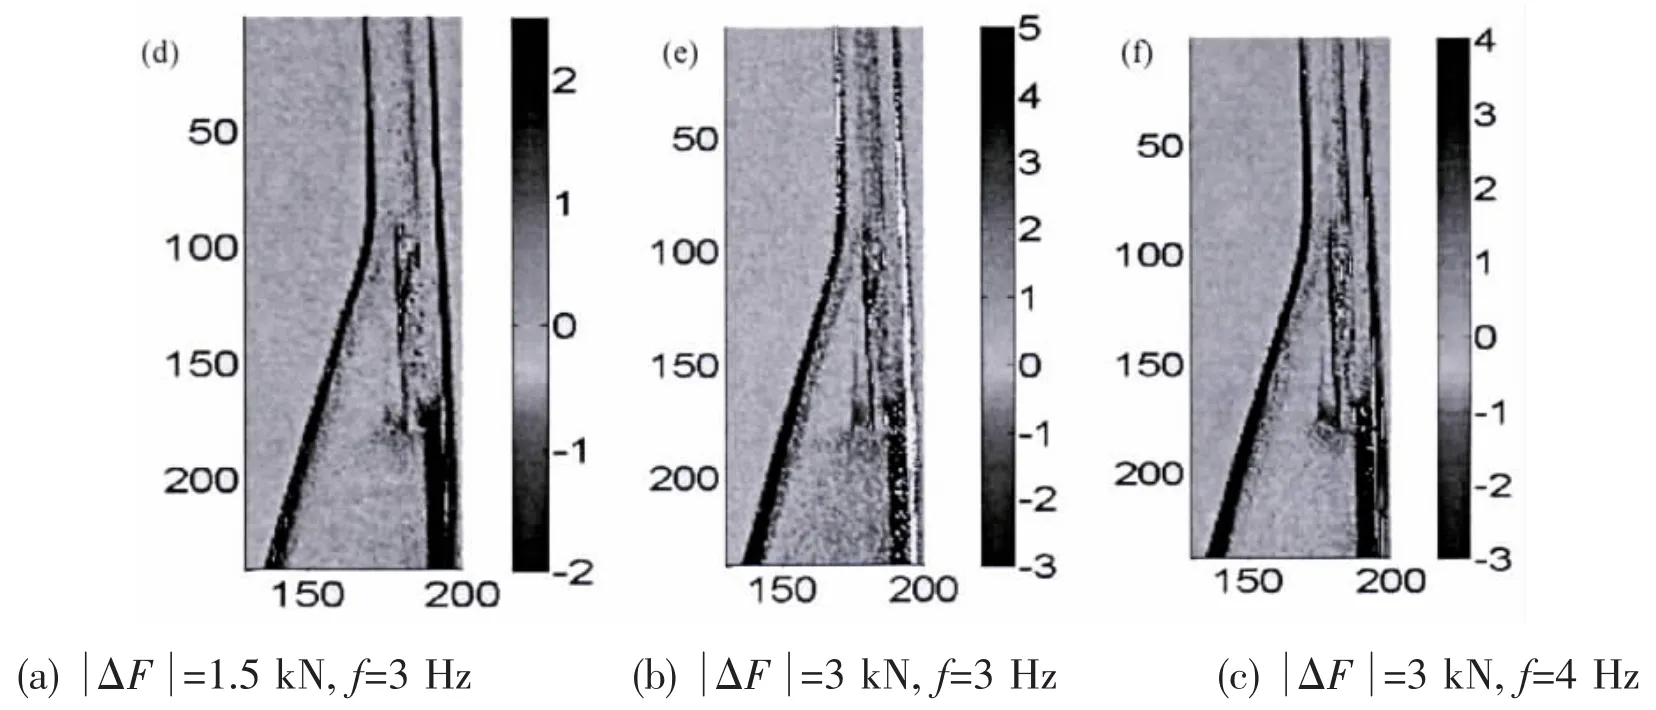
Fig.16 Distributions of stress on the surface of the composite-to-steel joint
3 Numerical validations
In order to prove the reliability and accuracy of the stress distributions by the Lock-In infrared thermography technique,numerical approach such as FEM tools is adopted to analyze the stress distributions of joints under the same loading conditions.Stress distributions of two kinds of joints from FE models have been compared with experimental results achieved in the above.The numerical analyses are processed by finite element package ABAQUS6.8.Eightnode solid element is used to form the mesh(Fig.17).For composite tee-joints,the boundary conditions are those of clamped of two sections of bottom plate and 45°pull-off load of 3 mm displacement was applied to the web.

Fig.17 Numerical models
As can be seen from the finite element predictions in Fig.18(b)and(d),the stress distributions are consistent with those by the Lock-In infrared thermography technique as shown in Fig.18(c)and(d),separately.
In the figure,notation S22 is the in-plane stress of each parts of the joint and is approximately equal to be the first stress invariant.As is expected,big in-plane stresses are gener-ated in the curved region of overlaminate within the joint.The predicted maximum tensile and compressive in-plane stress in the curved region are 48.23 MPa and-46.78 MPa,which agree well with the experimental results of approximately 50 MPa and-50 MPa,separately.Numerical results also show the stress concentration generated at the end of overlaminate at the web/overlaminate interface and the value is 48.31 MPa,only a little greater than value in the curved region.In addition,the linear numerical model indicates the same location of the biggest stress,which sufficiently proves the feasibility and reliability of the Lock-In infrared thermography technique to measure the stress distributions of complex structures such as joints.

Fig.18 Comparison of stress distributions from experiment with numerical analyses,under 45° pull-off displacement of 3 mm and loading frequency f=1.5 Hz(a)Numerical results, units:Pa;(b)Experimental results,units:MPa

Fig.19 Comparison of stress distributions from experiment with numerical analysis(a)Experimental results for stress of GRP skins;(b)Numerical results for stress of GRP skins;(c)Experimental results for stress of foam materials,and(d)Numerical results for stress of foam materials
For numerical model of composite-to-steel joint,boundary conditions are those of two clamped ends with steel and composite sandwich region separately which corresponding totension in the experiment.A 3 kN tensile load was applied to the steel end of the model.The results obtained from the numerical model are given in Fig.19(b)and(d),for in-plane stress of GRP and foam,respectively.According to the simplified mechanical analysis of joint,inplane stress S11 can be assumed to approximately be the first stress invariant in each part of the joint and then compared to experimental results.Compared results show that similar stress distributions appeared in the GRP skin near the steel end at the steel/GRP interface and the magnitude of the maximum in-plane stress agree very well with each other.Stress concentrations occur and influence the stress distribution in surrounding area.Maximum in-plane stress is generated in the GRP skin along the foam core side of the joint,which were reflected in both the experimental and numerical results.However,numerical results are much more uniform owing to the ideal conditions of adhesion between GRP and foam.In-plane stress of foam material is also compared,experimental and numerical results graphs are respectively shown in Fig.19(c)and(d).It can be seen that maximum tensile stress in the foam is generated at the steel/foam interface due to stress concentration.The maximum tensile stress in foam from experiment is 0.6 MPa,which is agreed well with 0.55 MPa from numerical simulation.The above comparison also demonstrates that the calibration constants obtained in experiment are both reasonable for these two materials.In this process,temperature and stress information for different material sections in a structure can be individually captured and then analyzed,and their interface can be distinguished by infrared thermography pictures.
4 Conclusions
In this paper,feasibility and credibility of applying the Lock-In infrared thermography technique to measure stress distributions in composite joints have been experimentally and numerically investigated.Stress distributions in two kinds of typical composite joints that are commonly used in marine industry,which termed as laminated composite tee joints under a 45° pull-off load,and composite-to-steel hybrid joint under a tensile load,respectively,were obtained by the Lock-In infrared thermography technique.Based on the theory of Thermoelastic Stress Analysis(TSA),an effective but relative simple way to obtain the thermoelastic constant, relating the temperature variation to the variation in the first stress invariant,is achieved.Then thermoelastic constant k for the different constitutive material involved in those joints,such as steel,laminated GRP(epoxy resin reinforced by E-glass weave fabric)and PVC foam material is obtained by a set of calibration tests and then used in the following measurement of stress distributions of joints.The composite T-joint and composite-to-steel hybrid joint are respectively tested under a 45°pull-off load and a tensile load with two sets of specially designed boundary fixture.In the experiment,it is found that the change of loading frequencies affects the measurement results apparently.If the loading frequency is not too low,the measurement results would not vary with the change of loading frequencies when measuring stress distributions of the composite joints by the Lock-In infrared thermography technique.The results ob-tained by the Lock-In infrared thermography technique are compared with the numerical results under the same loading conditions.It shows that in each case,the result from experiment coincides well with the numerical result,which proves the accuracy and reliability of using the Lock-In infrared thermography technique to measure the stress distributions of composite joints.
[1]Pitarresi1 G,Patterson E A.A review of the general theory of thermoelastic stress analysis[J].J Strain Analysis,2003,38 (5):405-417.
[2]Dulieu-Barton J M,Stanley P.Development and applications of thermoelastic stress analysis[J].J Strain Anal Eng Des, 1998,33(2):93-104.
[3]Diaz F A,Patterson E A,Tomlinson R A,Yates J R.Measuring stress intensity factors during fatigue crack growth using thermoelasticity[J].Fatigue Fract Eng Mater Struct,2004,27(7):571-584.
[4]Lin S T,Miles J P,Rowlands R E.Image enhancement and stress separation of thermoelastically measured data under random loading[J].Exp Mech,1997,37(3):225-231.
[5]Quinn S,Dulieu-Barton J M,Langlands J M.Progress in thermoelastic residual stress measurement[J].Strain,2004,40 (3):127-133.
[6]Dulieu-Smith J M.Alternative calibration techniques for quantitative thermoelastic stress analysis[J].Strain,1995,31(1): 9-16.
[7]Stanley P,Chan W K.The application of thermoelastic stress analysis to composite materials[J].J Strain Anal,1988,23(3): 137-143.
[8]Dulieu-Smith J M,Quinn S,Shenoi R A,Read P J C L,Moy S S J.Thermoelastic stress analysis of a GRP tee joint[J]. Appl Compos Mater,1997,4(5):283-303.
[9]Dulieu-Barton J M,Earl J S,Shenoi R A.Determination of the stress distribution in foam-cored sandwich construction composite tee joints[J].J Strain Anal Eng,2001,36(6):545-560.
[10]Boyd S W,Dulieu-Barton J M,Rumsey L.Stress analysis of finger joints in pultruded GRP material[J].Int J Adhes Adhes,2006,26(7):498-510.
[11]Emery T R,Dulieu-Barton J M,Earl J S,Cunningham P R.A generalised approach to the calibration of orthotropic materials for thermoelastic stress analysis[J].Composites Science and Technology,2008,68:743-752.
[12]Busse G,Wu D,Karpen W.Thermal wave imaging with phase sensitive modulated thermography[J].Journal of Applied Physics,1992,71(8):3962-3965.
[13]Chrysochoos A,Peyroux R,Licht C,et al.Thermomechanical couplings and pseudoelasticity of shape memory alloys[J]. Int.J Engng Sci.,1998,36(4):489-509.
[14]Navaranjan N,Jones R.Lock-in infrared thermography for the evaluation of the structural performance of corrugated paperboard structures[J].Composite Structures,2010,92:2525-2531.
[15]Bremond P.Noncontact imaging of stress in material and structures by thermoelasticity stress analyser[C]//In:Proceedings of testing expo 2004.Hamburg,Germany,2004.
[16]Tchankov D S,Vesselinov K V.Fatigue life prediction under random loading using total hysteresis energy[J].Int J Pres Ves Pip,1998,75(13):955-960.
[17]Li X D,Zhang H,Wu D L,Liu X,Liu J Y.Adopting lock-in infrared thermography technique for rapid determination of fatigue limit of aluminum alloy riveted component and affection to determined result caused by initial stress[J].Int.J of Fatigue,2012,36(1):18-23.
[18]Lee B L,Kim K S,Nam K M.Fatigue analysis under variable amplitude loading using an energy parameter[J].Int J Fatigue,2003,25(7):621-31.
[19]Fruehmann R K,Dulieu-Barton J M,Quinn S.Assessment of fatigue damage evolution in woven composite materials using infrared techniques[J].Composites Science and Technology,2010,70:937-946.
[20]Fan Junling,Guo Xinglin,Wu Chengwei.A new application of the infrared thermography for fatigue evaluation and damage assessment[J].International Journal of Fatigue,2012,44:1-7.
[21]Li X D,Wang W B,Li Y S,Wu D L.Measuring stress distributions of orthotropic composite material in plane stress state by the lock-in infrared thermography technique[J].Chinese Physics Letters,2011,28(6):064601.
[22]Pei Junhou,Shenoi R A.Examination of key aspects defining the performance characteristics of out-of-plane joints in FRP marine structures[J].Composites part A,1996,27A:89-103.
[23]Hawkins G L,Holness J W,Dodkins A R,Shenoi R A.The strength of bonded tee-joints in FRP joints[C]//Proceedings of Conference on Fibre Reinforced Composites,FRC92.Plastics and Rubber Institute,Newcastle-Upon-Tyne,1992.
[24]Phillips H J,Shenoi R A.Damage tolerance of laminated tee joints in FRP structures[J].Composites Part A,1998,29(4): 465-478.
[25]Boyd,Blake,Shenoi.Optimisation of steel-composite connections for structural marine applications[J].Composites:Part B,2007.
[26]Clifford S M,Manger C I C,Clyne T W.Characterization of glass-fiber reinforced vinyl ester to steel joint for use between a naval GRP superstructure and a steel hull[J].Composite Sturcts,2002,57(1-4):59-66.
[27]Cao J,Grenestedt J L.Test of a redesigned glass-fibre reinforced vinyl ester to steel joint for use between a naval GRP superstructure and a steel hull[J].Composite Struct,2003,60:439-445.
[28]Mollenhauer D,Iarve E V,Kim R,Langley B.Examination of ply cracking in composite laminates with open holes:A moire interferometric and numerical study[J].Composites Part A,2006,37:282-294.
锁相红外热成像技术应用于复合材料连接接头全场应力测量研究
李永胜1,吴 健1,王纬波1,李旭东2
(1中国船舶科学研究中心 振动与噪声国家重点试验室,江苏 无锡 214082;2中国航空综合技术研究所,北京 100028)
为了克服传统电测法测量结构应力的种种不足,文章对应用锁相红外热成像技术进行复合材料结构应力测量的可行性进行了研究。在研究中,首先结合正交各向异性复合材料的热弹性理论(TSA),提出了一种有效而又简洁的试验标定方法,并通过标定试验获取了文中所用玻璃钢材料所需的合理的加载频率f以及标定参数K,然后对两种典型的船用玻璃钢复合材料连接接头内的应力分布进行了测量,通过与数值计算结果的对比,验证了锁相红外热成像技术是一种快速、高效和可靠的结构全场应力测量手段。
复合材料;应力测量;锁相红外热成像;热弹性分析
TB332 TG115.28
:A
李永胜(1982-)男,中国船舶科学研究中心工程师;
TB332 TG115.28
:A
10.3969/j.issn.1007-7294.2015.09.007
1007-7294(2015)09-1097-19
吴 健(1986-)男,中国船舶科学研究中心工程师;
王纬波(1970-)男,中国船舶科学研究中心研究员;
李旭东(1979-)男,中国航空综合技术研究所高级工程师。
Received date:2015-06-07
Foundation item:Supported by Fundamental Research Fund of China(No.2009ZD41004)
Biography:LI Yong-sheng(1982-),male,engineer,E-mail:liyongsheng@cssrc.com.cn;
WU Jian(1986-),male,engineer,E-mail:wujian@cssrc.com.cn.
- 船舶力学的其它文章
- Evaluation Method for Inherent Deformation and its Application in Predicting Welding Distortion on Hull Blocks
- Research of Oil Film Stiffness Influence on Shafting Torsional Vibration Based on Wave Approach
- Extending the Scope of AR Model in Forecasting Non-stationary Ship Motion by Using AR-EMD Technique
- Low Noise Collocation on Fluid Pipeline System
- 《船舶力学》稿约须知

