Design of Experimental System for Measurement of Cam Profile
ZHONG Lirong,LING Xu
School of Mechanical Engineering,Chongqing University of Technology,Chongqing 400054,China
The cam mechanism has the advantages of compact and simple structure and convenient design etc.,as well as accurate implementation of movement rule of follower lever,and is widely applied in apparatus and instrument,machine tool,and automatic control.The key factor that decides whether the movement performance of the cam mechanism meets the design requirement is that the profile curve conforms to the design and manufacturing.Therefore,measurement of the cam profile cam is essential for cam inspection,through which the movement performance of the mechanism is also improved during research of the cam movement[1 -5].
Therefore,measurement experiment of the cam profile curve is important for basic mechanical experiment,and it is necessary to design a system adapting to the measurement experiment of the cam profile against the advantages and disadvantages of the existing measurement system of cam profile.
1.Measurement principle and method of cam profile curve
The existing measurement of the cam profile curve mainly include two of the following aspects,i.e.plotting and measurement of displacement of follower lever of the cam mechanism and coordinates of actual cam profile curve.The displacement of the follower lever is directly related to the cam mechanism in the movement of the cam.Thus,the curve of speed and acceleration of the follower lever may be drawn after the displacements of such lever are measured.Therefore,the measurement of the displacement curve is essential for measurement of the cam profile curve.
The measurement of actual profile curve of existing disc cam is subject to the principle for disc cam with knife-edge translating follower regardless of type of follower lever.As shown in Fig.1,put the follower lever down to the minimum radius of the cam profile curve(Rb of base circle),rotate the cam counter-clockwise,and read and record the displacement of the follower lever for each rotating angle of ψ.Keep rotating by same angle of ψ for n times before the follower lever returns to the initial position.Establish the polar coordinate systems and draw the cam profile curve based on the displacements and angles measured.Then,convert the displacements and angles into a rectangular coordinate system.Thus,the curve of speed and acceleration of the cam may be drawn by analyzing the displacement curve.
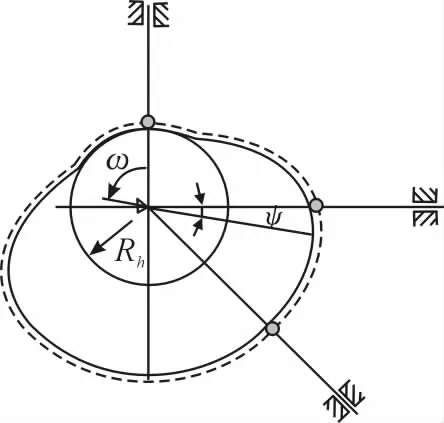
Fig.1 Measuring model of cam profile curve
The measurement experiment of the cam profile curve is to allow the students to perceptually recognize and understand the basic method to plot the cam profile curve based on the knowledge learned from basic course of principles of machinery.The digital display is used as the original experimental apparatus,and may be frequently damaged by students during use.Thus,a high cost will be caused.If a cheap,convenient and feasible measurement experiment system of cam profile curve may be made in simple conjunction of displacement sensor and data acquisition system by compiling on the VB visual interface,certain convenience will be brought for teaching of experiment.The schematic for measuring instrument of cam profile curve is as shown in Fig.2.
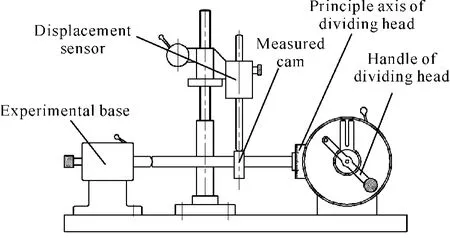
Fig.2 Schematic for measuring instrument of cam profile curve
Install the measured cam on an axis,clamp the measured cam between the experimental base and principle axis of dividing head,and rotate the measured cam and the principle axis.The rotating of handle of dividing head may simplify the control on rotating angle of the measured cam.In the rotating of the cam,the displacement measured by the displacement sensor is first sent to the data acquisition system for processing,and the processed displacement is sent to the computer for displaying on visual interface of VB software.And finally draw the cam profile curve.
2.Design of system hardware
The hardware in the measurement system of the cam profile curve includes displacement sensor,A/D module,and single chip microcomputer system etc.
Displacement sensor:it is used to measure the displacement of the cam profile curve,with output signal as analog.The Dr.series of miniature spring reset linear displacement sensor is used for the system,with effective stroke of 10mm to 150 mm,cushioning stroke of 3 mm,and accuracy of 0.1%to 0.06%FS.The miniature spring reset linear displacement sensor of Dr.series has an effective stroke of 10 mm to 150 mm,cushioning stroke of 3 mm,and accuracy of 0.1%to 0.06%FS.With a principle of slide rheostat used for,the miniature spring reset linear displacement sensor has a model of KTRA-20MM,effective stroke of 10 mm to 150 mm,cushioning stroke of 3 mm,and accuracy of 0.1%to 0.06%FS.The effective stroke should be maintained within 10 to 150 mm,with accuracy of 0.1%to 0.06%FS.
A/D module:it is a unit to convert the analog signal into digital before such signal is sent to the single chip microcomputer.This module is capable of converting the input analog into proportional digital.The TLC2543 chip is used for the system as a 12 serial analog-digital converter of the TI Company.The technique of successive approximation to switched capacitor is used to complete the A/D conversion.The I/O resource of single chip microcomputer 51 is saved and the resolution is high because of the serial input structure.Therefore,the A/D module is widely used in the apparatus and instrument.
Single chip microcomputer system:it is the core of entire data acquisition system,mainly used to accomplish the system initialization,operating mode control for single chip microcomputer,A/D conversion,and serial port communication etc.,and play a role in coordination of software and hardware.In consideration of the development efficiency and cost of the system,the 8051 series of single chip microcom-puter of the Intel Company is used,and mainly characterized by 8-bit CPU, an oscillator, a clock source,8K-bit program memory,256-bit data memory,32 I/O port lines,a programmable full-duplex serial port,five interrupt sources,and two nested interrupt structures of priorities etc[6 -7].
2.1.Design for ports of TLC2543 and single chip microcomputer
Since the 8051 series of existing single chip microcomputer does not have a SPI serial port,while the TCL2543 does,SPI function can only be fulfilled through software to have a port with the single chip microcomputer 51.The circuits of hardware ports are shown in Fig.3,in which U3 is OP27 operational amplifier which plays a role of impedance conversion because of low input impedance of TLC2543.In order to reduce the impact of noises from power supply,the external capacitors are C1,C2,C3,C11,C22 and C33 and input reference voltages of VREF+and VREF-define the upper and lower input limits of analog to produce the readings of full scale and zore scale.In the circuit design,the lines of+5V and 0V are connected to VREF+and VREF-respectively.Since the data bus of the single bus microcomputer is directly connected with the data output of the TLC2542 and the TLC2542 is represented by threestate output,if the A/D converter is not selected,the TLC2542 will be under the high impedance state.Therefore,if the A/D converter is directly connected to the data bus,which will not interfere with the transmission of data on the bus,so the DATAI and DATAO of data input and output is directly connected with the data bus.
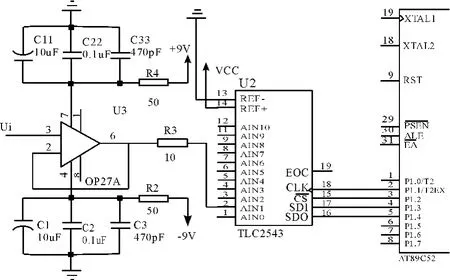
Fig.3 Circuit of ports of TLC2543 and single chip microcomputer
2.2.Design of serial port communication
Two main data transmission modes are used for communication between the computer and the external,i.e.parallel communication and serial communication.The parallel communication means that each signal passes independently at a high speed,while the connection is complex and tedious.The serial communication means that all signals pass the same channel at a low speed,while the connection is simple and convenient.The 51 series of single chip microcomputer is built with a full-duplex serial port with powerful functions,and has four kinds of operating modes with its Baud rate set through software.The generation,receiving and transmission of the timer and counter in the microcomputer may trigger the interrupt system.Therefore,the use of the system is quite convenient.The speed of serial communication completely meets the requirements for the system.The standard for RS-232C serial communication port used for the system is that use any of level between -3 V to -15 V to indicate the logic“1”;use any of level between+3V to+15V to indicate the logic“0”.The negative logic is used hereunder.Since the signal input and output is TTL level,the logic 1 is about 3.8 V,and the logic 0 is about 0.4 V for the 51 series of single chip microcomputer system,the conversion must be made for connection of RS-232C level and TTL level.MAX232 is just a chip to fulfill the level conversion between the positive and the negative.This chip only requires a 5V power supply and 5 1uf capacitors for level conversion.The design of serial communication circuit is as shown in Fig.4.
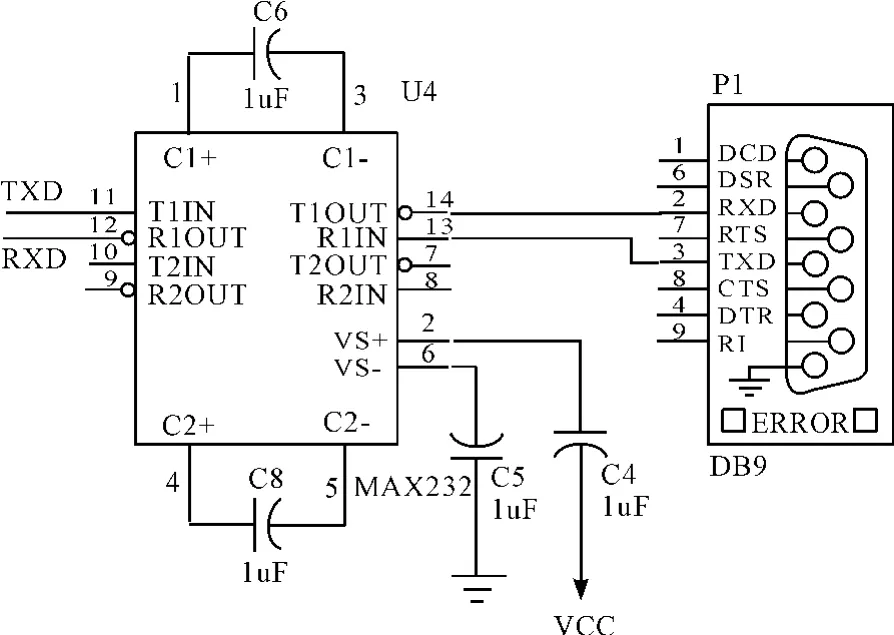
Fig.4 Design of port circuit
3.Design of system software
3.1.Programming by single chip microcomputer
As the core of the entire data acquisition system,the single chip microcomputer has multiple functions.It not only processes its work,but also controls the operation of A/D converter and serial port with the computer etc.The functional programs are modularized and divided into 3 modules for convenient debugging,connection and modification:
Processing module:its main functions include system initialization,control and operating modes of the single chip microcomputer,operating mode of A/D converter,and control mode of serial port etc.
Sampling control module:its main functions include operation of data acquisition including initialization of TLC2543,and conversion of modules etc.
Serial communication module:its main function includes the transmission of sampled data through serial port and computer for the single chip microcomputer.
The processing module of the single chip microcomputer is the main part of the entire program,and the rest modules operate under the allocation of the main program.The block flow diagram for the module is as shown in Fig.5.In the system design,the start of the single chip microcomputer operation is controlled by software.In case of wishing to start the acquisition,press the“acquisition start”button on the software panel and the corresponding command will be sent to the single chip microcomputer through serial port.The single chip microcomputer will execute the subsequent programs upon detecting the command,or the programs of the single chip microcomputer will be always waiting for command.Therefore,a waiting process for command of start exists after system initialization.After operation of the system,the design of A/D conversion system is made in principle of resource saving to the maximum extent,and since the limited data storage space of the single chip microcomputer is considered in the design of programs,if one data is acquired,it will be immediately sent to the computer for storage.

Fig.5 Flow diagram for processing module of single chip microcomputer
3.2.Design of computer software
Visual Basic6.0 software is used as development tools for software processing of the system.VB is the common programming language for developing serial communication programs on the Windows environment by the programmer.The two of methods to develop the serial communication programs with VB include calling of Windows API function and using of MSComm serial port control.In practice,the method of using VB serial port control is faster and more convenient than that of calling API function,and the same function may be fulfilled with less codes to improve the programming efficiency greatly.Therefore,the VB serial port control MSComm is used for the system to achieve the communication between the upper and lower computers[8 -11].
The VB interface designed includes radius of base circle,communication port,detecting by the lower computer,manual/automatic acquisition etc.in accordance with the requirement of measurement experiment system of the cam profile curve,in addition to the two coordinate systems of polar and rectangular coordinate curves drawn and acquired data displayed in the data field.The flow diagram and program interface is as shown in Fig.6.
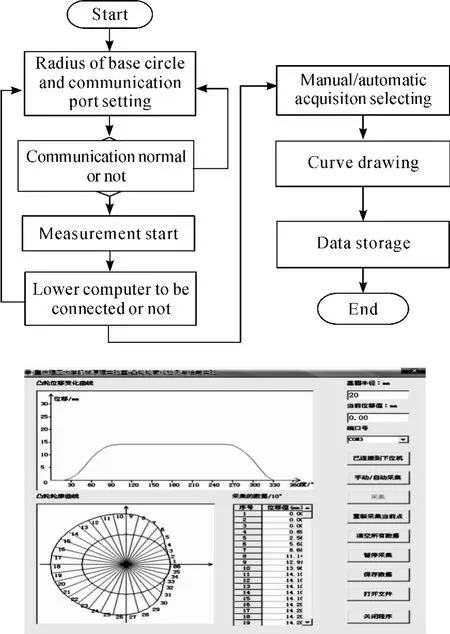
Fig.6 Flow diagram and program interface
4.Establishment of experimental platform
The measurement experimental platform of the cam profile curve is established through establishment of the mechanism and software and hardware platforms as shown in Fig.7.
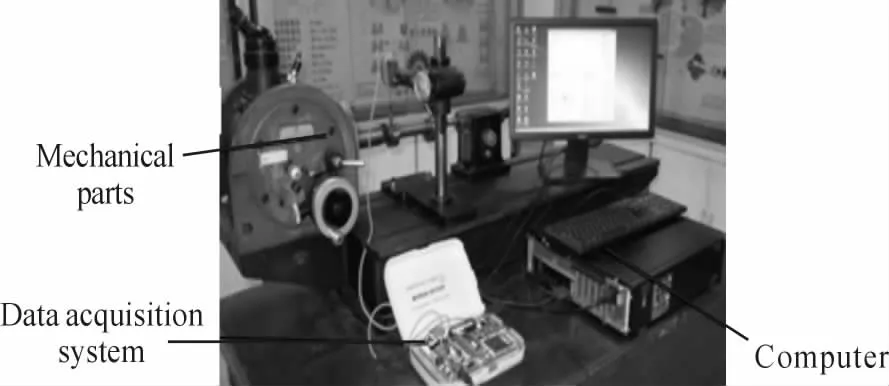
Fig.7 Measurement Experimental Platform of Cam Profile Curve
5.Conclusions
The experimental platform can be established with computer aided testing technique as shown in Fig.7 after the experimental equipment for measurement of the existing cam profile is upgraded.In the teaching of experiment course for measurement of cam profile,the demonstrative measurement experiment of cam profile curve can be carried out,and students may also plot the cam profile curve by hand.The students can have perceptual recognition towards the measurement of the cam profile curve by means of displaying on the computer friendly interface,which lays a foundation for comprehensive mastering of cam knowledge of the students.
[1] ZHU Wenjian,XIE Xiaopeng,HUANG Zhenchang.Experiment Courses of Mechanical Fundamentals[M].Beijing:Science Press,2005:222 -225.
[2] Del Min T,HUANG Menghung .Producing Follower Motions Through Their Digitized Cam Coutours[J].Joumal of Mechanieal Transnission,2003(2):98 -105.
[3] WANG Hao,ZHANG Ce,LIN Zhangqin.Meshing A-nalysis of the Planetary Indexing Cam Meshing[J].Journal of Mechanical Design,2005(3):51 -53.
[4] QIU Hua,LIN Changjun.AUniversal optimal approach to cam curve design and its applications[J].Mechanism and Machine Theory,2005,40:669 -692.
[5] WANG Hao,ZHANG Ce.Innovative design of indexing cam mechanisms[J].Chinese Journal of Mechanical Engineering,2004(2):151 -154.
[6] ZHENG Feng,WANG Qiaoying,LI Jianying.51A MCU Application System[M].Edition 2.Beijing:China Railway Press,2011:108 -182.
[7] Neelamegam P,Rajendran A.Linear heating system for measurement of the rmolumines cence using 8031/51 microcontroller[J].Bulletin of Materials Science,2003,26:235.
[8] LI Jiangquan,TANG Zhihui,ZHU Dongqin.Measurement,Control and Application Practices for Visual Basic Data Acquisition and Serial Port Communication[M].Beijing:Posts & Telecom Press,2010:172 -182.
[9] Diane Zak .Programming with Microsoft Visual Basic 6.0[M].Beijing:Publishing House of Electronics Industry,2002:234-389.
[10] ZHANG Qili.Development for CAD System of Disc Cam Mechanism[J].Electromechanical Engineering.2008,25(2):90-91.
[11] YANG Xiaoping,ZHANG Jun.VB Cam Mechanism -based Development for CAD Dynamic Illustrative System[J].Mechanical Design and Manufacturing,2007(5):93- 94.
- 机床与液压的其它文章
- Experimental Study on Mechanical Properties of Low Carbon Steel with Ultrasonic Vibration Tensile
- Finite Element Analysis for a New Friction-based Limited-slip Differential Housing
- Precision Measurement of Series Motor Housing Based on CMM
- Wavelet Analysis Fault Information and Realization in Virtual Instrument
- Synchronous Motion Servo-control of Biaxial Cross Coupling Based on Intelligence Fusion Strategy
- Simulation and Optimization Analysis of Circuit Breaker Operating Mechanism

