Study on gas metal arc welding of two types of TMCP steels
Research Institute,Baoshan Iron &Steel Co.,Ltd.,Wuhan 430080,China
Abstract:Gas metal arc welding experiments were conducted on two types of steels with 0.41% carbon equivalent (Ceq) and 0.31% Ceq using WER70T wire and 20% CO2 and 80% Ar as shielding gas.The two types of steels show satisfactory weldability.The transition temperatures of 50% upper shelf energy (Tk0.5) for Charpy-V impact test of both the welded joints are below -40 ℃.However,the toughness of the fusion line zone and heat-affected zone (HAZ) of the two steel joints exhibits differences,with the toughness of 0.41% Ceq steel being better than that of 0.31% Ceq steel.The Tk0.5 of the fusion line zone and the HAZ of 0.41% Ceq steel is below -60 ℃,whereas that of 0.31% Ceq steel is above -40 ℃.The welded joint of 0.41% Ceq steel has low hardness fluctuation,while that of 0.31% Ceq steel exhibits a narrow,softened zone,which has no obvious influence on the tested tensile strength.The coarse grain heat-affected zone (CGHAZ)microstructure of 0.41% Ceq steel is bainite,while that of 0.31% Ceq steel is bainite with ferrite and minor pearlite.
Key words:thermo-mechanically controlled processing (TMCP); composition; gas metal arc welding (GMAW); mechanical properties; microstructure
1 Introduction
Thermo-mechanically controlled processing (TMCP) is performed to realize strengthening through grain refining,precipitation,and phase transformation.It is one of the most important methods in the green manufacturing of steels and is gaining increasing applicability.Traditional TMCP (T-TMCP) is conducted at a low temperature for a large-scale reduction in the austenite non-recrystallization zone,leading to austenite hardening and strengthening after subsequent controlled cooling.The steel made with this regime is indicated as #1 in Tables 1 and 2.With the advent of ultra-fast cooling technology,a new-generation ultra-fast cooling TMCP (UFC-TMCP) steel was developed based on T-TMCP steel.UFC-TMCP steel has decreased amount of alloying elements and increased Nb content.Nb can raise the austenite recrystallization temperature,allowing rolling to be performed at a higher austenite non-recrystallization temperature.Then,through fast cooling (100 K/s) from the final rolling to phase transformation start-ing,the hardened status of the dynamic phase transform point is maintained.Next,through the sub-sequent controlled cooling procedure,the steel with the desired strength is obtained[1].Because UFC-TMCP avoids low-temperature large-reduction roll-ing,the processability of the steel is improved,and the rolling load and energy consumption are reduced.For the experiment,steel #2 (in Tables 1 and 2) is produced using this method.Comparative gas metal arc welding (GMAW) tests were conducted on these two steels,and their weldability was analyzed.
2 Welding procedures and conditions
In the GMAW experiment,a 1.2 mm diameter Mn-Si-Ni-Cr-Cu welding wire WER70T developed by Wuhan Iron & Steel Co.,Ltd.(WISCO) was employed.The mechanical properties of the welded deposit metal of WER70T wire are shown in Table 3.The groove figuration of the welding workpiece is illustrated in Fig.1,with the groove vertical to the rolling direction.

Table 1 Compositions of test steels Unit:%

Table 2 Mechanical properties of test steels

Table 3 Mechanical properties of deposit metal WER70T
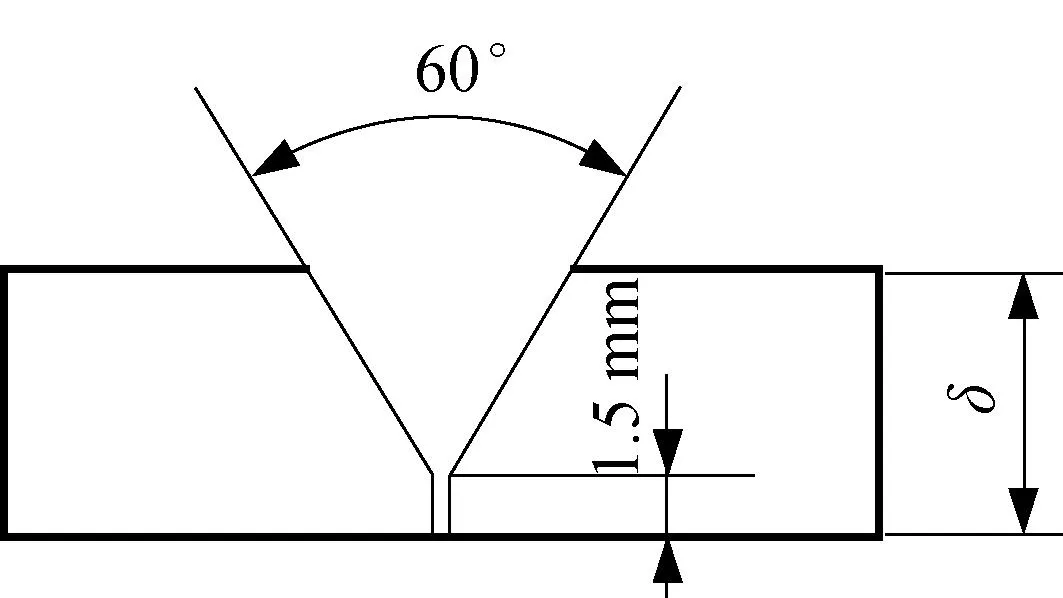
Fig.1 Schematic of the welding workpiece groove
The welding conditions and parameters are shown in Tables 4 and 5.Considering the compositions and mechanical properties of the steels,the cold crack sensitivity factor (Pcm) values are low,0.17% for steel #1 and 0.14% for steel #2.Therefore,the cracking resistance is good.Preheating and after-weld heat treatment are not needed.The welding pro-cesses are stable and of a little splash,and the weld joint is of good appearance.The ultrasonic wave inspection was conducted on the welded joints,and the results were qualified.

Table 4 Welding test conditions

Table 5 Welding test parameters
3 Mechanical properties test
3.1 Impact,tensile,and bending tests
The mechanical properties of welded joints were analyzed,including V-notched impact,tensile,and bending tests,with the notch tip of the heat-affected zone (HAZ) impact test sample placed 1 mm away from the fusion line.A round sample was used for the all-weld-metal tensile test and a flat sample for the welded joint tensile test.The results of the tensile,bending,and impact tests, are shown in Table 6 and Fig.2.

Table 6 Results of tensile and bending tests of welded joints
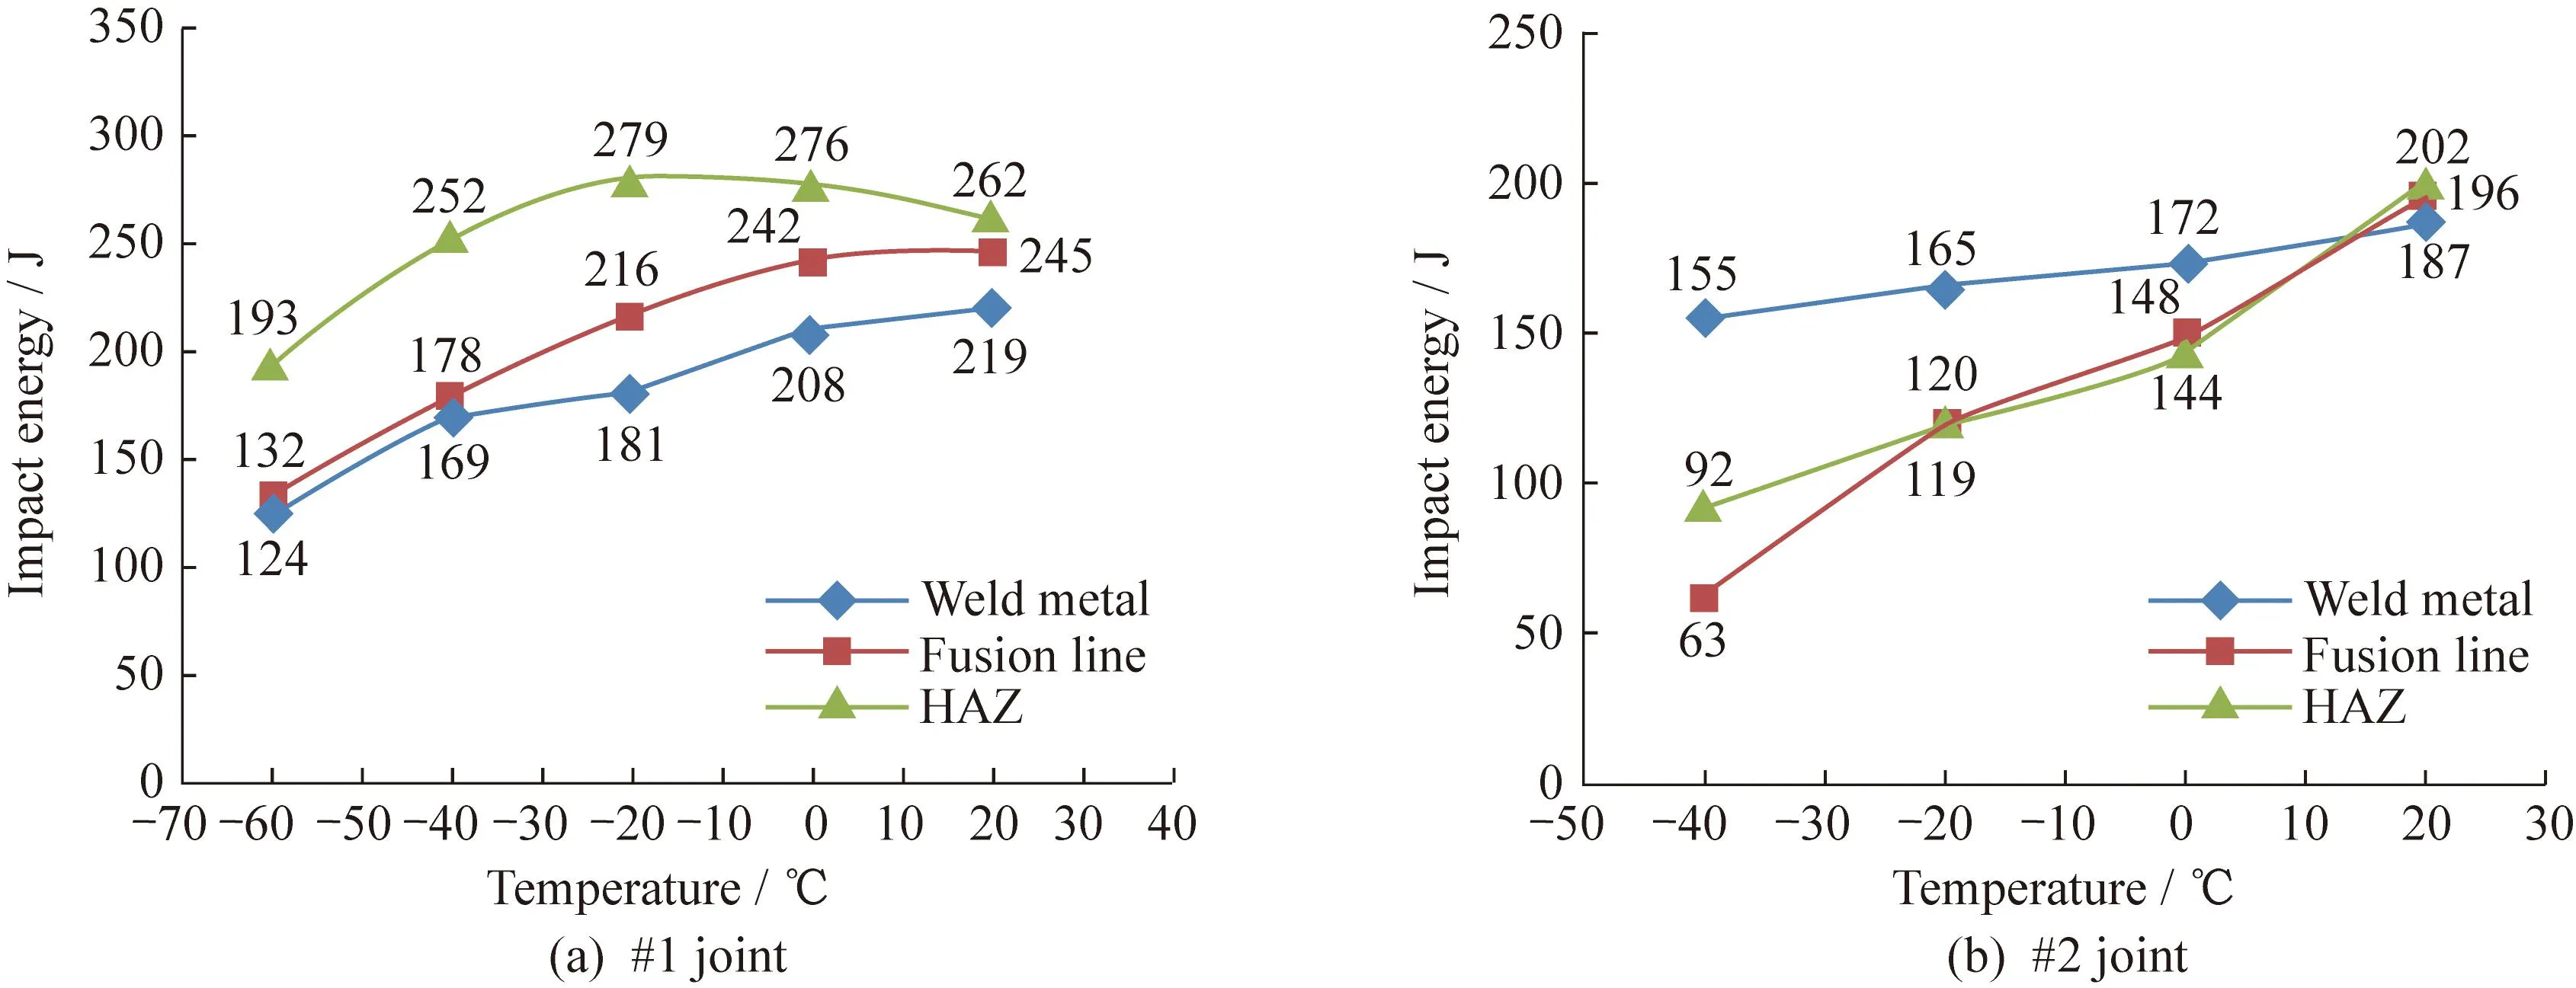
Fig.2 Impact energy vs.temperature for welded joints
The toughness of the two welds is similar (Fig.2) with respect to the transition temperatures of 50% upper shelf energy (Tk0.5) below -40 ℃.How-ever,the toughness of the fusion line and HAZ of the two joints is different.The impact energy of joint #1 is higher than that of joint #2,and theTk0.5of the fuse line and HAZ of joint #1 is below -60 ℃,while that of #2 is above -40 ℃.The toughness of the welded joint decreased and fluctuated with the decrease in alloying elements in steel,as was reported for X80 steel[2].
3.2 Hardness survey
The cross-section samples were ground and polished and then etched with 5% nital.Various HAZs of the joint appeared after the treatment.The Viker hardness of GMAW welded joints was surveyed,beginning from welds,through HAZs,to base metals,at 0.5 mm intervals.
The hardness distribution of sample #1 is shown in Fig.3.Fig.3(a) exhibits the macroimage of the welded joint,and Fig.3(b) shows the surveyed hard-ness along the line 2 mm below the frontal surface of the sample.The maximum hardness appears on the low-temperature HAZ,which is even distinguishable after etching,and the second high hardness appears adjacent to the fusion line.Fig.3(c) displays the sur-veyed hardness along the center line of the sample,where the maximum hardness appears on the coarse grain heat-affected zone (CGHAZ) adjacent to the fusion line,and the second high hardness appears on the low-temperature HAZ,which is even distin-guishable after etching.The area,2-3 mm outwards from the fusion line,is slightly softened (the vertical distance to the fusion line is about 0.8 times of above distance),and the hardness of the HAZ is not lower than that of the weld metal (WM) or base metal (BM).
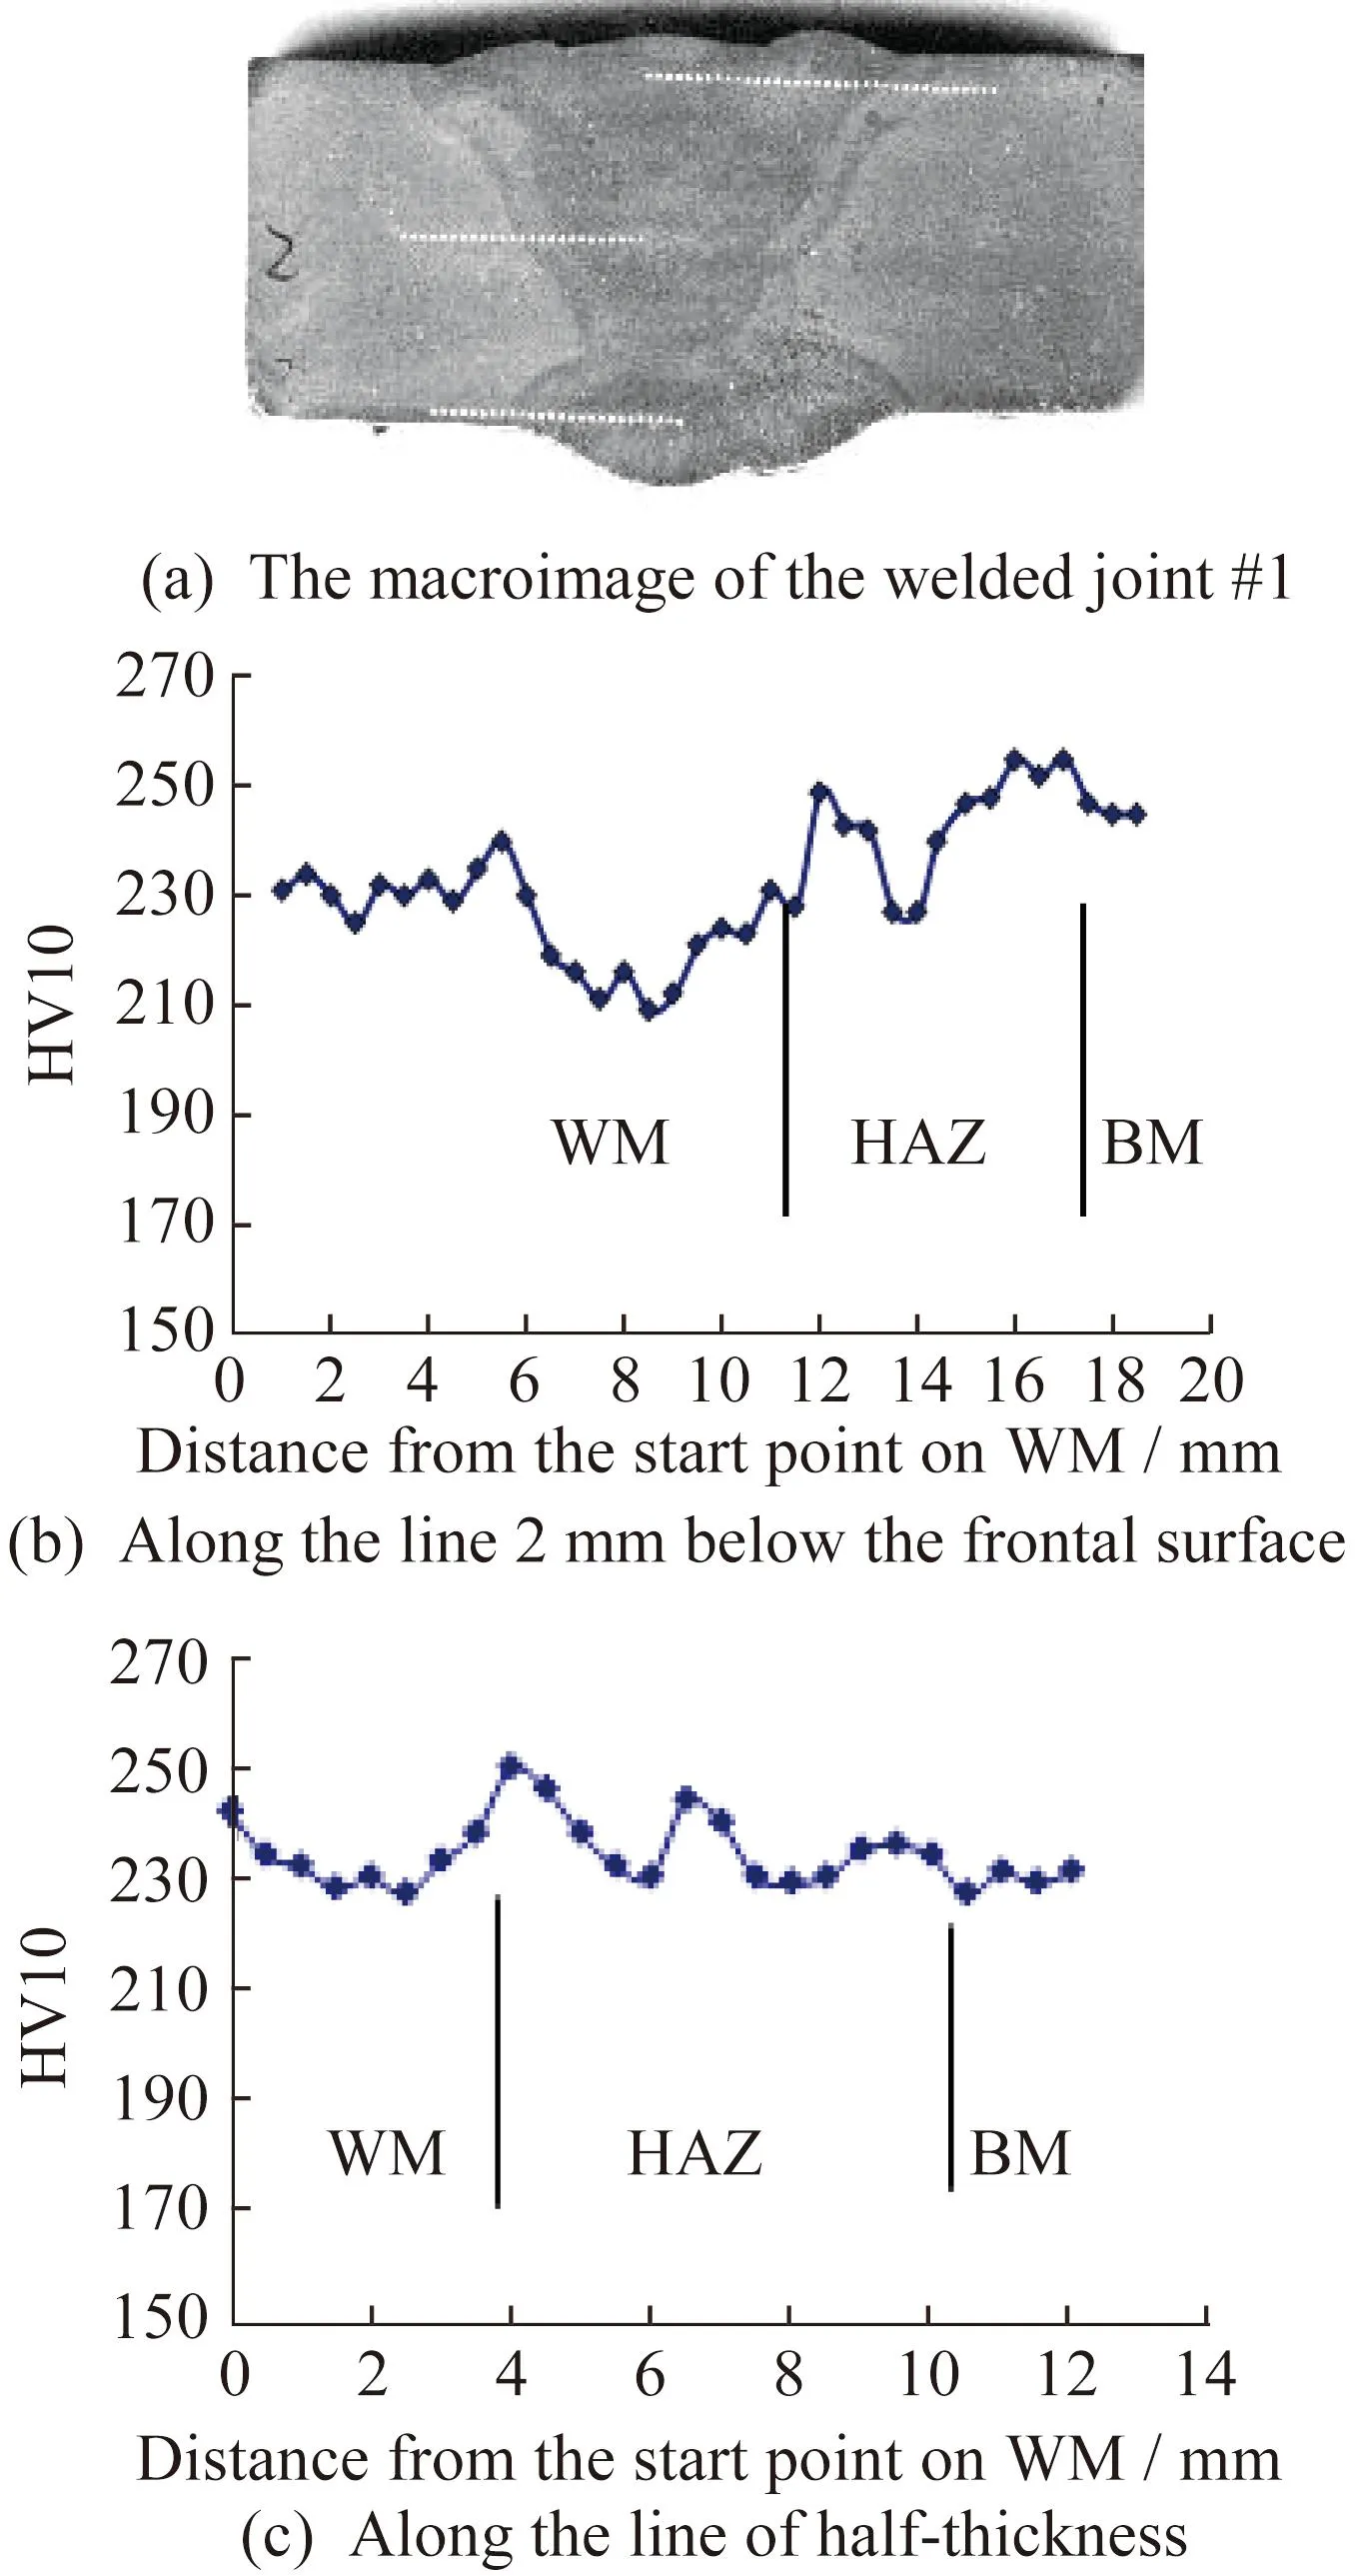
Fig.3 Hardness distribution of sample #1
The hardness distribution of sample #2 is shown in Fig.4.

Fig.4 Hardness distribution of sample #2
The hardness fluctuation on the HAZ of sample #2 is larger,as shown in Fig.4.The maximum hardness along the 1/2 thickness line appears on the low-temperature HAZ,which lies outward about 4.5 mm from the fusion line;the maximum hardness beneath the surface is about 5 mm from the fusion line.The hardness on the CGHAZ is the second highest.The minimum hardness along the 1/2 thickness line appears 2-3 mm outward from the fusion line;the minimum hardness beneath the surface is 3-4 mm away from the fusion line.In comparison,along the 1/2 thickness line,the hardness is lower.If the distance is converted into a vertical distance to the fusion line (about 0.6 times the above-related testing distance from beneath the surface line and 0.8 times for the 1/2 thickness line,respectively),and when the different thermal cycles conditions of different parts are considered,the hardness distribution on the two areas is found to be similar.
The maximum hardness or the average hardness of sample #1 is higher than that of sample #2,and sample #1 does not show obvious softening,but sample #2 does.The vertical distances from the softened zone to the fusion line for the two samples are similar.The maximum hardness of the sample #2 lies in the low-temperature HAZ,while that of the sample #1 lies in the fusion zone or low-temperature HAZ.
HE et al.[3]performed a pulse GMAW experi-ment on 2.5 mm thick fine-grain steel with 5 s oft8/5.The HAZ on the 1/2 thickness is the widest,and its grain immediately adjacent to the fusion line is as coarse as that in a thermal-simulated experi-ment at 1 400 ℃ peak temperature.The second grain became obviously smaller.And from the third grain,the peak temperature decreased to 1 200 ℃.If the zone with a peak temperature of 1 450-1 150 ℃ was defined as a coarse HAZ,its width is about 0.8 mm.The width of the area where the ferrite-pearlite transformation occurred at the temperature from 1 150 to 950 ℃ is about 1 mm,and the width of the fine grain HAZ (FGHAZ) is about 0.8 mm.The hardness on CGHAZ of the GMAW welded joint is higher and decreases with the occurrence of ferrite and pearlite and reaches the lowest on FGHAZ,which is softened compared to the base metal.
4 Microstructure analysis
The transverse section sample for microstructure analysis is taken,ground,polished and etched with 5% nital and observed using the Olympus-GX71 optical microscope.The microstructures of various zones of welded joints including WM,CGHAZ,FGHAZ,intercritical heat-affected zone (ICHAZ) and BM are shown in Figs.5 and 6.

Fig.5 Microstructures of joint #1
Since the welding procedures for samples #1 and #2 are the same,the difference observed between the HAZ microstructures of the two samples is mainly caused by the different compositions of the samples.Sample #1 is alloyed with additional Cr,Ni,and Mo,but sample #2 is not.The alloy element content and the carbon equivalent (Ceq) value decreased from 0.41% (sample #1) to 0.31% (sample #2).Therefore,different amounts of ferrite are formed in sample #2 in different HAZs even though it is micro-alloyed with niobium and titanium.The microstructure of the welded joints is subjected to steel compositions and welding technologies,and the following relationship among them exists[4]:
(1)
For the tempered HAZ (THAZ),as the welding reheating temperature is belowAc1for the two steels,almost no phase change can be observed using an optical microscope.However,the preci-pitation of carbides and niobides can occur in THAZ,which can cause hardening to some extent.
Fig.7 shows the HAZ Charpy impact test sample where its notch tip generally covers various zones,including WM,CGHAZ,FGHAZ,ICHAZ,and THAZ,and the impact test reflects the toughness of the hybrid.The microstructures of the hybrid zone of sample #1 are acicular ferrite and bainite;acicular ferrite is a kind of bainite that is roughly uniform,contributing to toughness and stability pro-perties.The microstructures of the hybrid zone of sample #2 are acicular ferrite,bainite,ferrite,and pearlite;they change significantly from CGHAZ to ICHAZ,causing the fluctuation in mechanical properties.
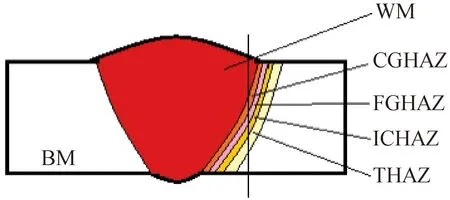
Fig.7 Illustration of impact sample notch tip covering various zones
Considering the compositions,microstructures,toughness,and hardness of the HAZ of the samples #1 and #2,and from the weldability perspective,it can be seen that some amount of alloy elements is beneficial for TMCP steel.However,considering the cost and properties,the two types of steels can play important roles in suitable applications.
5 Conclusions
(1) For both types of TMCP steels with carbon equivalents of 0.41% and 0.31%,welded using WER70T wire,the GMAW joints exhibit good properties,and theTk0.5of the joints is found below -40 ℃ during the Charpy impact test.
(2) The toughness of the fusion line and HAZ exhibits differences,with the toughness of 0.41%Ceqsteel being better than that of the 0.31%Ceqsteel.TheTk0.5of 0.41%Ceqsteel is below -60 ℃,whereas that of 0.31%Ceqsteel is above -40 ℃.
(3) The microstructure of the HAZ of the 0.41%Ceqsample contains bainite and acicular ferrite,while that of the 0.31%Ceqsample broadly contains acicular ferrite,bainite,ferrite,and pearlite.The 0.31%Ceqsample exhibits larger fluctuation than the 0.41%Ceqsample with regard to HAZ hardness and toughness.
(4) For TMCP high-grade steel,a certain amount of alloying elements is beneficial for the HAZ mechanical properties.
 Baosteel Technical Research2023年4期
- Baosteel Technical Research的其它文章
- Failure analysis of the needle valve body of R18CrNi8 steel
- Research progress on protective coatings against molten nitrate salts for thermal energy storage in concentrating solar power plants
- Effect of quenching and tempering processes on properties and microstructure ofG115 steel
- Accuracy analysis of iron content of galvanized coating using an X-rayfluorescence spectrometer with an L-spectrum
- Effect of lump ore ratio on the metallurgical properties of blast furnace charge
- List of winners of excellent papers of Baosteel TechnicalResearch in 2023
