Stress Field Analysis of 135-degree Sharp Corners Based on Notch Stress Strength Theory
SHEN Wei,YAN Ren-jun,Nigel BARLTROP,YANG Ping,LIU En-qian,QIN Kai
(1.Key Laboratory of High Performance Ship Technology of Ministry of Education,Departments of Naval Architecture,Ocean&Structural Engineering,School of Transportation,Wuhan University of Technology,Wuhan 430063,China;2.Department of Naval Architecture and Marine Engineering,University of Strathclyde,Glasgow G4 0LZ,United Kingdom)
0 Introduction
Geometrical discontinuities in mechanical components and structures provoke,as is well known,more or less localized perturbations of stress field.In ship and ocean engineering,structure ability to resist damage subject to loading is becoming the essential factor to meet the requirement of both cost saving and the strength improvement.The simplest type of plate girder structure consists of plates,stiffeners and brackets.Stress concentrations at these corners cause cracks initiate and propagate under cyclic loadings.Knowledge of such stress distributions in the neighborhood of stress raisers is frequently required for an accurate design of the component[1].
Sharp notches stress field in the vicinity of crack initiation points is an intriguing problem,particularly when the analysis aim is to establish a direct link between stress level and the fatigue strength of welded components[2].Williams[3]pointed out that,according to the elasticity theory,the asymptotic stress near a re-entrant corner is singular and its degree of the singularity just depends on the notch opening angle.Since Williams’pioneering work,several studies have been undertaken to determine the stress field present at various notch geometries where the interface between two elastic solids intersects a traction-free edge.Bogy[4-5]systematically studied the order of stress singularity.The effect of the wedge angle between the interface and free surface on the nature of these singularities was included in their investigations.Gross and Mendelson[6]focused on the definition and evaluation of generalized SIFs.They used SIFs to describe the V-shaped sharp corner stress field and took the case of angle θ=0 as the NSIFs.In order to describe the influence of the stress distributions on fatigue behaviour close to weld toes,Lazzarin[7-8]quantified the contributions of the symmetric and skew-symmetric loading modes.The numerical results are summarized into expressions which also take into account the influence of the main geometrical parameters of the welded joint.
According to above definitions,N-SIFs can be used to predict the structure strength and fatigue behaviour of mechanical components weakened by V-shaped re-entrant corners,where the singularity in the stress distribution makes any failure criterion based on elastic peak stress no longer applicable.However,the quantitative formula is not very straightforward and convenient.Gao and Xu[9-10]presented the simple prediction formula applicable to notch stress intensity factors(for opening mode)but neglected the influence of(for sliding mode).However,it is not reasonable to neglect the influence ofBased on the singularity strength theory,this paper proposes a simple method using the singularity strength‘as’to estimate the stress field distribution(both σθ,Ιand σθ,Π)at the corner.Then,by comparing the expected results of 135-degree sheet corner with those obtained by N-SIF formula,the contribution of the singularity strength‘as’is quantified for different geometries,and summarized into concise expressions.The results are also expected to describe and explain sharp corners strength analysis.
1 Singular stress fields analysis
1.1 Williams method
Williams[3]stated that,even in a sharp open notch,the stress field is singular close to the tip.In a polar frame of reference(r,θ),the stress field around the corner is the summation of Mode I(opening type)and Mode II(sliding type)stress.

where r is the distance to the corner;Eq.(2)determines the eigenvalues λi.For details of λi,please see Eq.(3).

where‘q’is related to the opening angle 2α by means of the expression(see Fig.1).Parameters are defined in Fig.1.Accordingly,symbols around the 135°corner can be defined as shown in Fig.2.
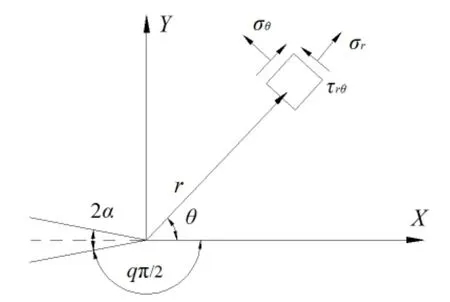
Fig.1 Symbols of sharp V-shaped notch stress field
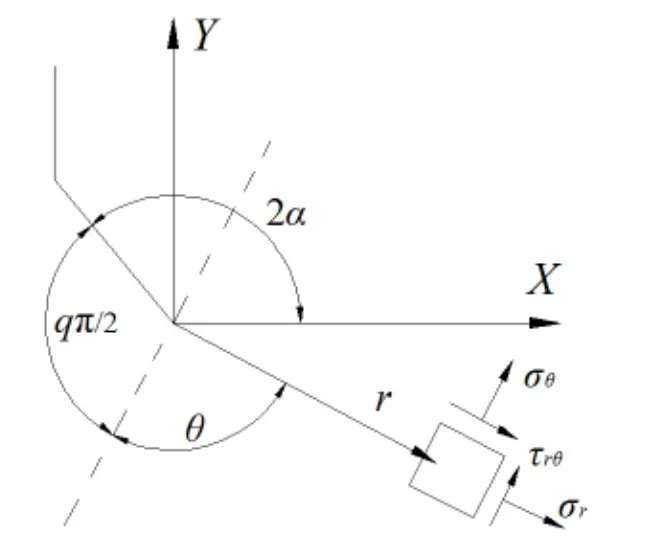
Fig.2 Symbols around the 135°corner
Then,stress components for mode I(tension)are given by[7]:

For mode II(shear)by[7]:

In order to give a physical meaning to the constant values present in Williams’formula,Gross and Meldenson[6]proposed to extend the definition of the SIF,commonly used to describe crack stress fields,to open notches.Based on the stress field components,the definitions for N-SIFs are:

When 2α=0,K1equals to the SIF K1of the linear elastic fracture mechanics.Substituting Eq.(5)into Eqs.(3)and(4),the real and imaginary parts of the complex constant aiare:

It is therefore possible to present Williams’formula for stress components as a function of the N-SIFs for Mode I,tension:

for ModeⅡ,shear:

where r is the distance to the corner;is a non-dimensional parameter that depends on the overall geometry and can be tabulated in the same way as stress concentration factors;σ0is the nominal tensile or bending stress.
1.2 Modified singularity strength method
According to the studies of Lazzarin and Tovo[7-8],the axial stress distribution of Mode I at a corner can be written as:

And for ModeⅡ:

where x is the distance to the corner;
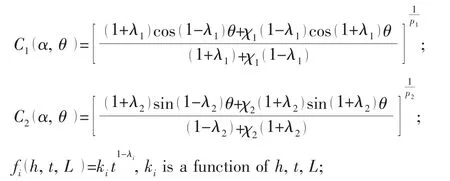
pi=1-λi,for different corner angles,from Williams[1],are shown in Tab.1.Parameters are defined in Fig.2.

Tab.1 Values of constants and exponents as a function of notch opening angle[1-7]
For a given corner(2α),piand Ciα,()θare constants;kiis a function of h,t,L.Takingall the constants into ki,a new function can be defined asthen Eq.(9)becomes Eq.(10),for Mode I:

And for ModeⅡ:

To simplify the calculation of g h,t,()L ,a new parameter‘as’is introduced and named as singularity strength to describe the stress field at the corner,see Eq.(11):

2 Numerical analysis
2.1 Calculation model
As shown in Fig.3,a commonly used planar cruciform corner and a 135°bracket joint are analyzed.All the models were investigated by means of FEM using a highly refined mesh.By taking double symmetry into account,only a quarter of the joint was analyzed under a plane strain hypothesis.Quadrilateral plane elements were used,and the main plates were under uniformly distributed load(T=100 MPa).At the weld toe,the shape ratio,defined as the smaller element dimension,was close to 10-5m(see Fig.4).
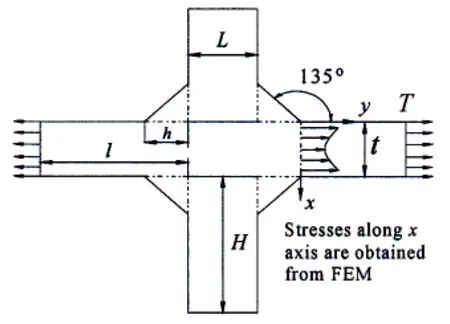
Fig.3 The analyzed edge detail
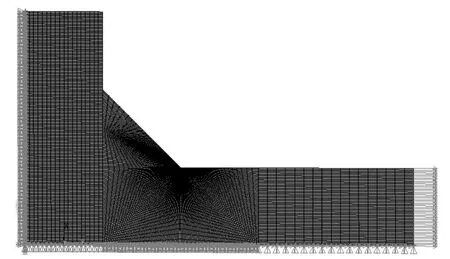
Fig.4 FE model under tensile load
FEA was performed to determine the influence of the attachment geometry;the dimensions(L,H)of the attachment were changed from 0.5 m to 3 m;the length of the main plate l meets the requirement of providing uniform stress field near the corner,and the width t was changed from 1 m to 4 m;the equivalent thickness of the plate is accepted as 10 mm.

Tab.2 External dimensions(units:m)
2.2 as under tensile loading
Finite element analysis is employed for the stress calculation in the direction perpendicular to load(see Fig.3).If the width of the attachment is fixed as constant(L=0.5 m,1 m,3 m),the stress values are plotted with different bracket height values shown in Fig.5.
The following observations can be highlighted based on the above curves:
(1)The width of the attachment L plays a decisive role on the axial stress around the corner.With the increase of L,the growth of stress distribution in the corner is obvious(see Fig.5).
(2)When L,H and t are constants,with the increase of bracket height H,the axial stress will increase slowly.However,the axial stress is almost the same when the main plate width t increases.
For a given corner,the stress distribution at the corner can be determined from Eq.(12).Therefore,it is crucial to find a method to estimate the‘as’in a simple way.The parameter‘as’can be determined through the least squares curve fitting method based on the above numerical data.The fitting parameters are listed in Tab.3.
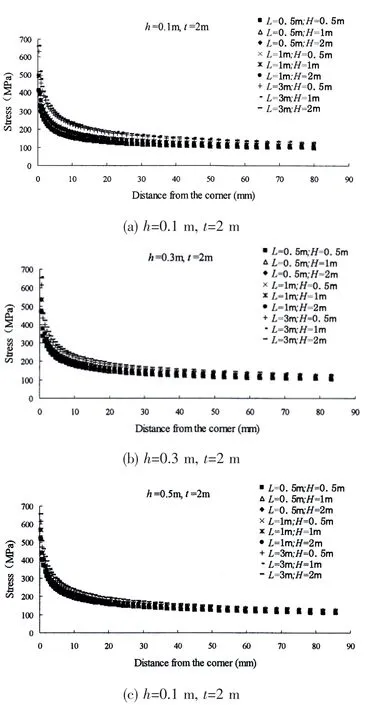
Fig.5 Stress distribution plots
From the previous studies[11-12],the‘as’values are only dependent on the value of H and L for right corner.However,it is differ-ent for 135°corner.Owning to the different contribution of parameters L, H,h and t to as,it is necessary to select the main parameters.When the value of h/L is large,the triangle bracket can be equivalent to the width L of the rectangle additional plate;when the value of h/L is small,the role of the bracket h is lower,then,we can get the fitting‘as’according to the different contribution values of other parameters.
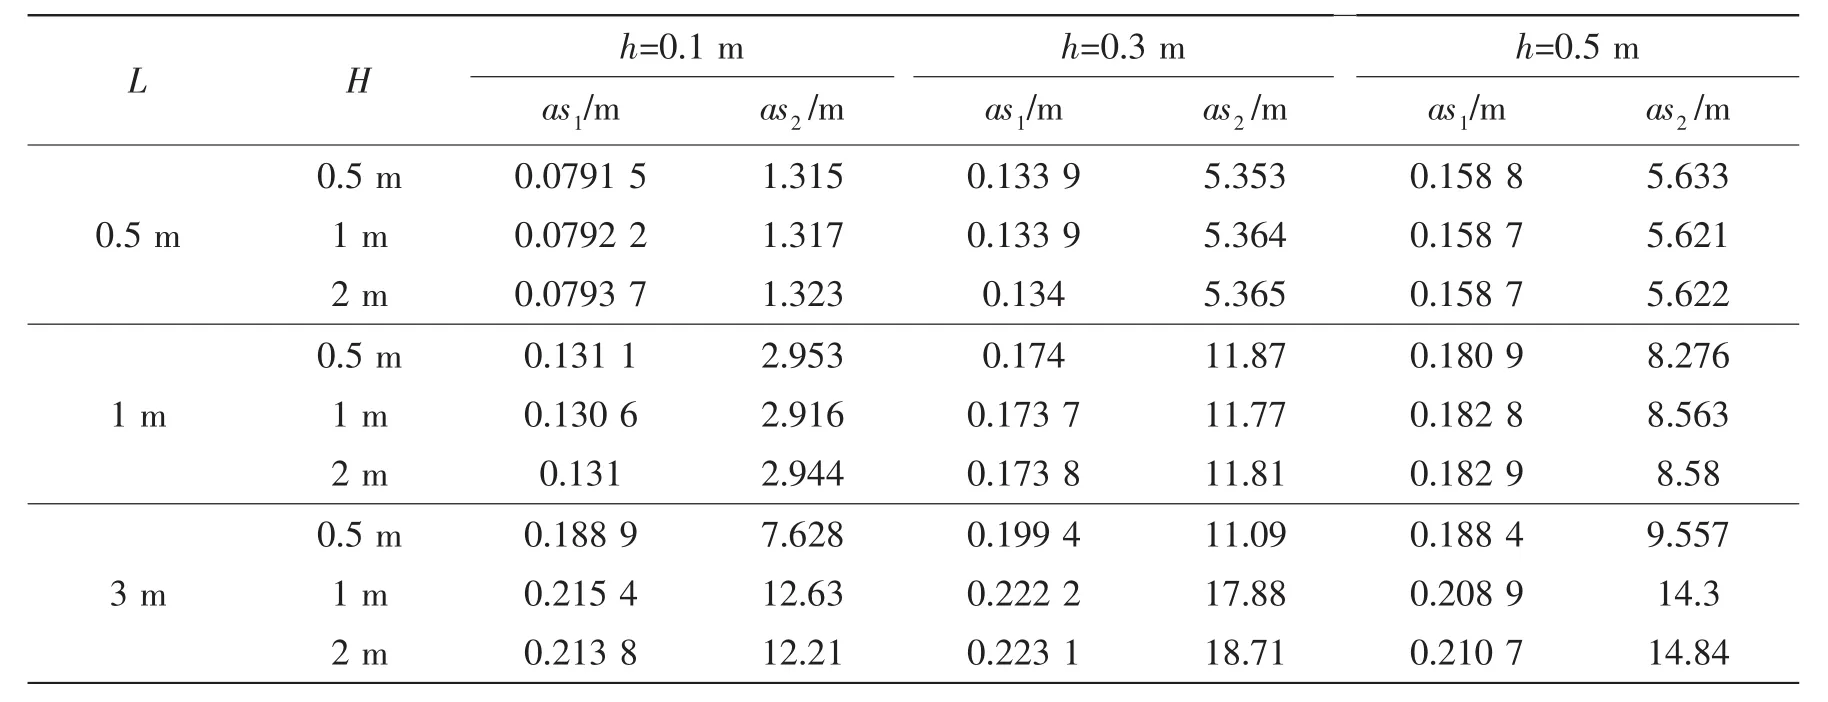
Tab.3 The results of fitting asi (t=1 m)
The results show that‘as’value can be determined by two characteristic quantities,and the smaller of the two characteristic quantities is closer to the numerical results,see Fig.6.Therefore,a simple estimate of‘as’can be obtained from Eq.(13)for the 135°corner:

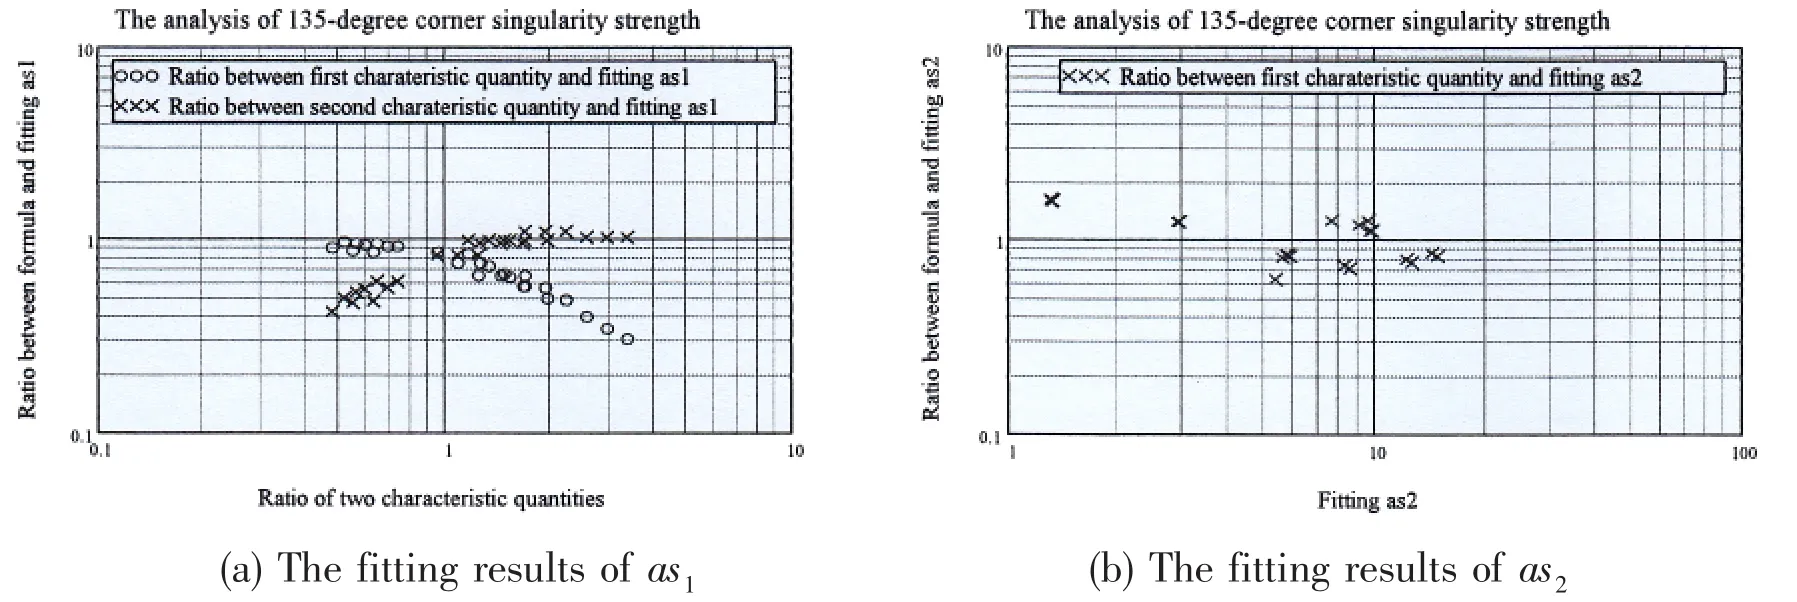
Fig.6 The analysis of singularity
3 Verification of as
The results of numerical simulation were checked by the Lazzarin and Liveri’s method[8].As shown in Tab.1 and Fig.2,when 2α=135°and θ=22.5°,λ1=0.674,λ2=1.302,χ1=4.153,χ2=-0.569.Substituting the Eq.(6)into Eqs.(7)and(8),it is therefore possible to present Williams’formula for stress components as functions of the N-SIFs:

where

Expressions for k1and k2have already been reported for transverse non-load carrying fillet welded joints subjected to tensile stresses[7].

According to symbols shown in Fig.3,h is the height of the weld bead and L the width of the attachment.Estimates based on Eq.(17)are accurate when 0≤L/t≤3.0 and 0.25≤2h/t≤2.5.Out of these geometrical conditions,a finite element analysis should be carried out,according to the procedures detailed in Ref.[7].
Compared with the FE results and N-SIF’s results,error values are controlled in a reasonable scope,as shown in Fig.7.
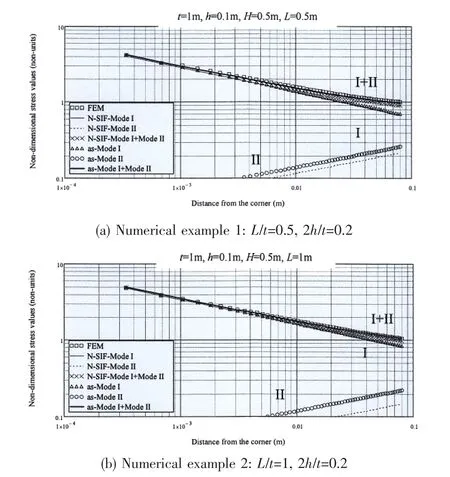
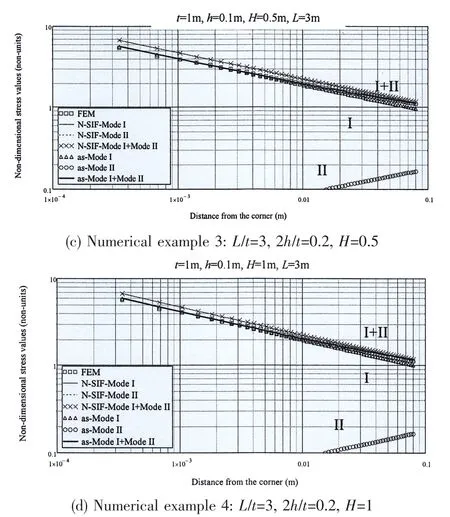
Fig.7 Stress comparison results
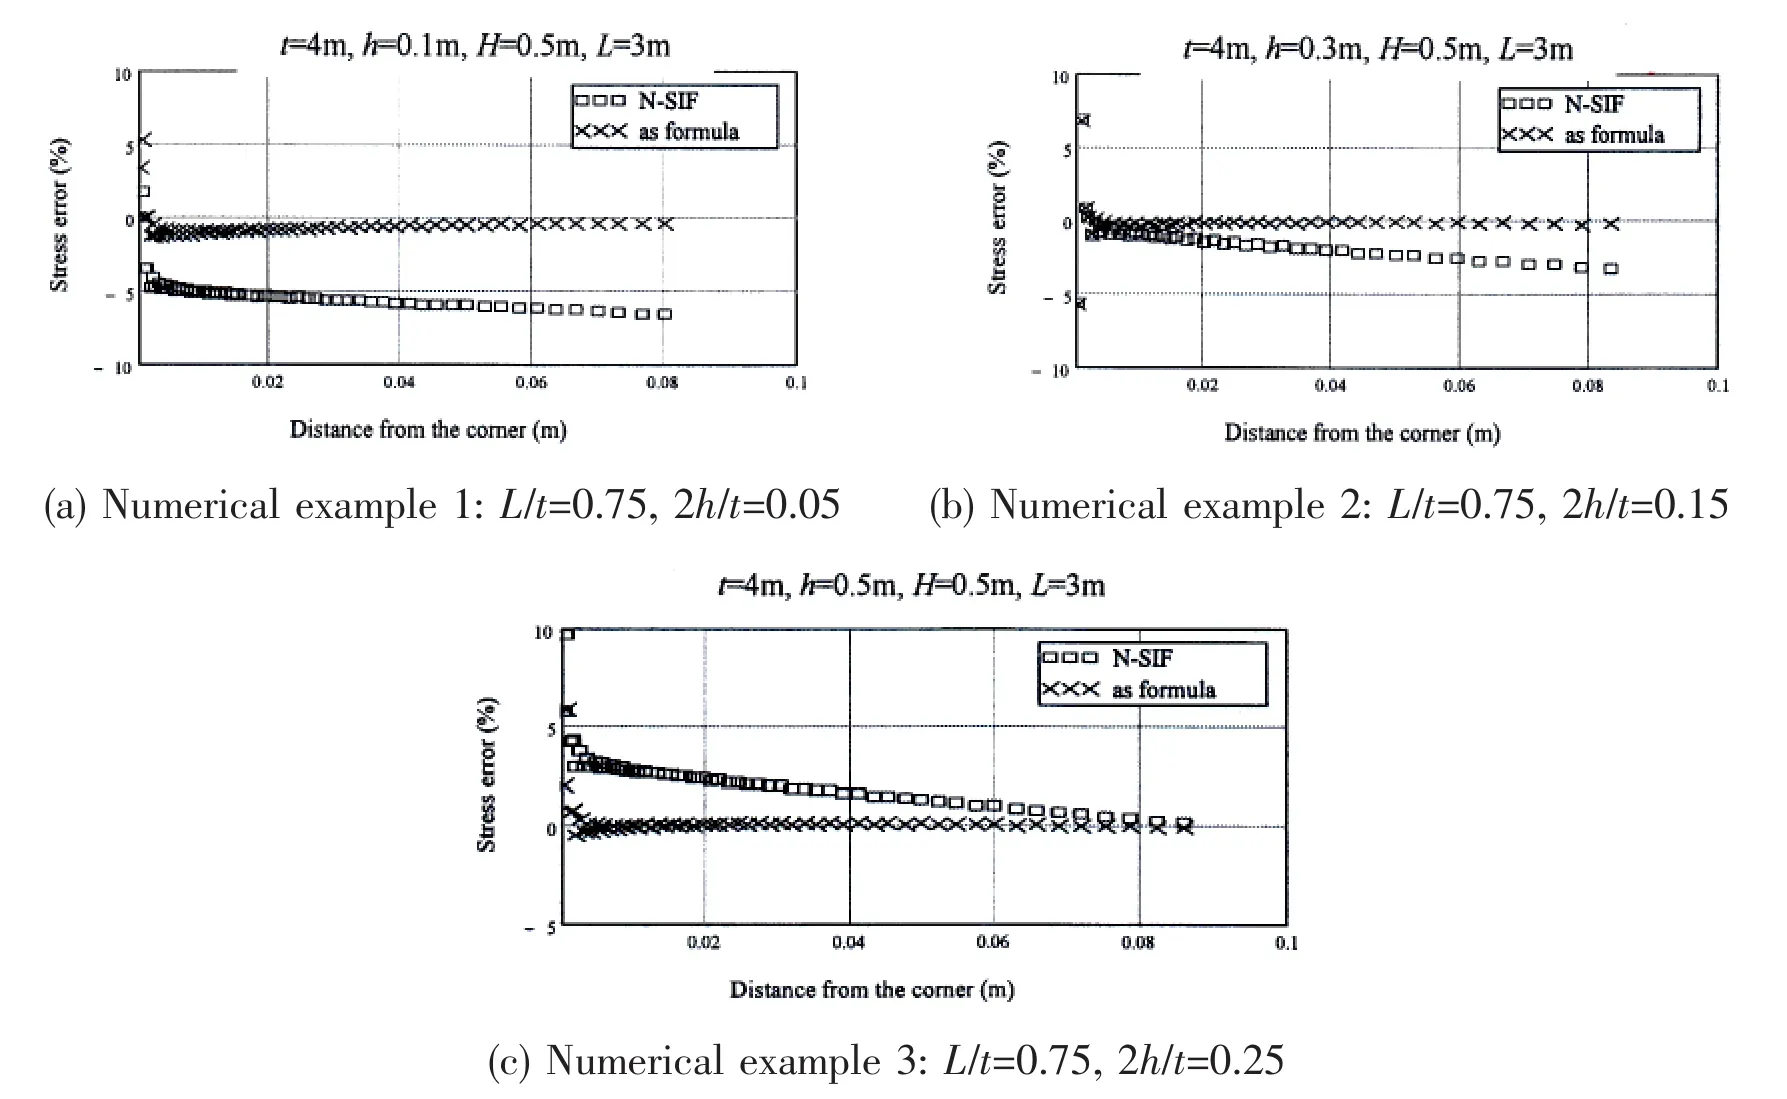
Fig.8 The error analysis
By substituting the‘as’value estimated from Eq.(13)into Eq.(12),the stress distribution along the stress line(as shown in Figs.5 and 7)can be determined.Compared with the FE re-sults obtained from ANSYS,the maximum error will not exceed 10%,as shown in Fig.8,which is smaller than that of N-SIF formula.This approach seems to accurately describe the whole stress field in the highly stressed zones.
4 Conclusions
Singularity strength‘as’is introduced to describe the stress field distribution around the corner.It is concluded that using the singularity strength method to calculate the stresses at the corner is simple.Obviously,from the Eq.(1),when λ2is greater than 1.0,only Mode I is singular.This happens when 2α is greater than 102°[8].As to the opening angle 135°,with the distance from the corner increasing,the Mode I stress σθ,Ιdecreases while Mode II stress σθ,Πincreases gradually.Although the Mode I stress is still dominant,Mode I stress should not be ignored.These results are consistent with the ones in the Refs.[7-8].A comparison between formula expected values and numerical simulation values has given satisfactory results.The results can be the reference for welded joint fatigue and strength analysis.
Acknowledgements
This work is supported by‘the Fundamental Research Funds for the Central Universities’(2013-JL-007).The authors would like to thank Professor Xu Li,Dr.Lou Benqiang and Gao Song for their preliminary exploratory research.The authors also wish to extend their heartfelt thanks to Professor Nigel Barltrop and Dr.Enqian Liu,University of Strathclyde(UK),for the helpful discussions about this work.
[1]Lazzarin P,Tovo R.A unified approach to the evaluation of linear elastic stress fields in the neighborhood of cracks and notches[J].International Journal of Fracture,1996,78:3-19.
[2]Atzori B,Lazzarin P,Tovo R.Stress field parameters to predict the fatigue strength of notched components[J].Journal of Strain Analysis for Engineering Design,1999,34(6):437-453.
[3]Williams M L.Stress singularities resulting from various boundary conditions in angular corners of plates in extension[J].Journal of Applied Mechanics,1952,19:526-528.
[4]Bogy D B.Edge-bonded dissimilar orthogonal elastic wedges under normal and shear loading[J].Journal of Applied Mechanics,1968,35:460-466.
[5]Bogy D B.Two edge-bonded elastic wedges of different materials and wedge angles under surface tractions[J].Journal of Applied Mechanics,1971,38:377-386.
[6]Gross R,Mendelson A.Plane elastostatic analysis of V-notched plates[J].Fracture Mechanics,1972,8:267-327.
[7]Lazzarin P,Tovo R.A notch stress intensity factor approach to the stress analysis of welds[J].Fatigue and Fracture of Engineering Materials and Structures,1998,21:1089-1103.
[8]Lazzarin P,Livieri P.Notch stress intensity factors and fatigue strength of aluminium and steel welded joints[J].International Journal of Fatigue,2001,23:225-232.
[9]Gao S,Xu L,Wang D Z,Barltrop N.Research of stress assessment for the 135-degree sheet corner based on singularity strength theory[J].Journal of Wuhan University of Technology,2013,35(12):72-79.
[10]Xu L,Gao S,Barltrop N.Simple method of fatigue assessment for structure with singular point[J].Ship Engineering,2013,35(6):9-14.
[11]Xu L,Barltrop N.SCF and crack growth analysis of ship connection details[C]//3rd International ASRANet Conference,2006.Glasgow,UK,2006.
[12]Lou B Q.A geometric method of fatigue SCF and fracture SIF assessment[D].Glasgow,UK:University of Strathclyde,2013.
- 船舶力学的其它文章
- Numerical Study on the Hydrodynamic Interaction of Ship-ship Models in Calm Water
- Coupling Motion Analysis on a Dynamic-Positioning S-laying
- Design of Energy Harvesting Efficiency of‘Haiyuan 1’Wave Power Generating Platform’s Buoy Testing System based on LabVIEW
- Research on Numerical Simulation of Ship-ice Collision Based on MD Nastran
- Vibration Response Analysis of an Underwater Submersible
- Identification Method for Exciting Force Source Inside Underwater Structure Based on PSO_GA

