Effect of deep cryogenic treatment on the microstructural,mechanical and ballistic properties of AA7075-T6 aluminum alloy
S.Dharani kumar ,U.Magarajan ,Saurabh S Kumar ,Roríguez-Mill′an M
a Centre for Machining and Material Testing, KPR Institute of Engineering and Technology, Coimbatore, India
b Department of Mechanical Engineering, Sri Venkateswara College of Engineering, Chennai, India
c Scientific Officer, Ballistic Research Centre & Testing Range, National Forensic Sciences University, Gandhi Nagar, India
d Department of Mechanical Engineering, University Carlos III of Madrid, Legan′es, Madrid, Spain
Keywords:Deep cryogenic treatment AA7075-T6 Mechanical properties Ballistic Adiabatic shear band
ABSTRACT The study focused on investigating the effect of Deep Cryogenic Treatment(DCT)on the mechanical and ballistic properties of AA7075-T6 aluminum alloy.The microstructure,microhardness,tensile strength,and impact strength of the Base Material (BM) and DCT-treated 7075 samples were analyzed through metallographic analysis and mechanical tests.The microstructure of the DCT-treated 7075 samples revealed fine grains and a distribution of secondary phase particles.The tensile strength,impact strength,and microhardness of DCT-treated samples increased by 7.41%,4%,and 9.68%,respectively,compared to the BM samples.The fractography analysis of the tensile samples showed cleavage facets,microvoids,and dimples in both the samples.The ballistic behavior of the BM and DCT target plates were studied by impacting hard steel core projectiles at a velocity of 750±10 m/s.The target plates failed due to petaling and ductile hole enlargement,and the depth of penetration(DOP)of the DCT target was less than that of the BM target,indicating a higher ballistic resistance.The post-ballistic microstructure examination of the target plates showed the formation of an Adiabatic Shear Band (ASB) without any cracks.It was concluded that the DCT treatment improved the mechanical and ballistic properties of the aluminum alloy due to grain refinement and high dislocation density.
1.Introduction
Military vehicles need substantial armour on the battlefield to protect the troops and the vehicle from projectiles such as small arms ammunition,large calibre projectiles,anti-tank rounds,and other air delivered weaponry.These projectiles' impacts have the potential to seriously damage the vehicles and harm or even kill the crew.Impact of the projectile causes a greater amount of kinetic energy to be transmitted into the target through penetration,may result in a number of damage mechanisms,such as radial mode of brittle fracture,ductile hole enlargement,front and rear petalling,spalling,plugging,etc.Therefore,research on the ballistic capabilities of armour materials is crucial for scientists and armour designers.
Steel is the worldwide dominant material for manufacturing armoured military vehicles because of its properties such as excellent tensile strength,high energy absorption,good hardness,and excellent.However,they are materials with a high density,which implies an increase in the vehicle's fuel consumption.Lightweight materials enable modern mechanization to be smaller,agile,and efficient.Many industries and service economies are now becoming more reliant on these materials consecutively.Like many other economic sectors,the defence industry uses a wide range of lightweight materials that make them essential for ballistic applications.Researchers now have a greater interest in lightweight materials,which is also related to the high density of steel and its degradation from the earth's core [1].Military vehicles that use lighter materials in place of steel can transport more personnel,fuel,and ammunition.The light-weight vehicles can move quickly and with agility over the terrain while conducting reconnaissance and engaging enemy targets.During a surprise flanking maneuver,the lightweight vehicles would also engage in combat with larger,fully armoured vehicles [2].Because of their low density,high specific strength-to-weight ratio,andexcellent mechanical qualities,aluminum,and its alloys are highly intriguing in this regard.
Demir et al.[3]found that AA7075-T651 aluminum offers better ballistic resistance than AA5083 and AISI4140 steel against a 7.62 mm armour-piercing projectile.Among all grades,the AA7075 grades stand out as being especially popular.Al-Zn-Mg-Cu elements,which have stronger tensile qualities,greater specific strengths,higher fracture toughness,improved energy absorption capacity,good corrosion resistance,and thermal conductivity are the main alloying components used in AA7075 grades.Sudhakar et al.[4,5]studied the ballistic resistance of friction stir processing of the AA7075 alloy.The addition of molybdenum disulphide and boron carbide on the surface of the AA7075 alloy reduced the DOP by 50%compared to the BM.Mohan et al.[6]examined the effect of shallow cryogenic treatment (SCT) on the microstructure and mechanical characteristics of AA7075-T6.The mechanical parameters of the SCT samples were found to be enhanced by roughly 30%,17%,and 7%,respectively,in terms of hardness,yield strength,and ultimate tensile strength.The EBSD findings reveal precipitation,improved second-phase particle distribution,and increased dislocation density in the SCT alloys compared to BM.The high dislocation density and precipitation hardening enhanced the strength and hardness of the alloy.Ludmila et al.[7]evaluated the effects of combining a conventional heat treatment with a cryogenic treatment on the aluminum alloy AA7075.Two sets of samples were processed: one set underwent solution annealing and aging treatment,and the other underwent a 24-h cryogenic treatment at-185°C.Tensile strength and wear resistance were enhanced by cryogenic treatment,although impact toughness and corrosion resistance were reduced.The cryogenic treatment promotes the formation of frames like twinning and grain orientation [8].Lulay et al.[9] concluded that impact toughness of the AA7075 was improved after cryogenic treatment.Chaanthini et al.[10] substitute eight different soaking hours for the traditional heat treatment technique SCT in order to improve the mechanical properties,followed by an 18-h tempering process at 160°C.Volume contractions,grain rotations,and the matrix's vacancies and micro-pores all result from the dislocation effect brought on by SCT.The metallurgical behavior of the strengthening precipitates and the insoluble particles that are finely dispersed along the grain boundaries of the matrix during the tempering process results in higher tensile strength,elongation,and fracture toughness.Cryogenic treatment on AA7075 was studied by Li Jun et al.[11] at 0°C,-60°C,-120°C,and -196°C for its effects on the microstructure,residual stress,and dimensional stability of the 7075 aluminum alloy.According to the findings,cryogenic treatment can promote uniform Mg,Cu,and Zn distribution,improve the density of fine secondary phases,and enable the dissolution of coarse secondary phases into the matrix in the 7075 Al alloy.After CT,it was discovered that the residual stress had been released and the 7075 Al alloy had reached a greater level of dimensional stability.
The mechanical properties of various types of aluminum alloys under SCT have been examined in earlier studies.Less emphasis has been made on studies investigating the effects of DCT on the mechanical behavior of AA7075-T6 alloys.Also no work was observed identifying the ballistic performance characteristics of the DCT process.The prime objective of this paper is to study the mechanical properties of AA7075 T6 alloy under DCT.In addition,the ballistic performance was analyzed on the DCT samples by studying the failure mechanisms,DOP and post ballistic fractography.
2.Materials and methods
The commercial rolled AA7075-T6 alloy material used in this study is obtained in the form of a thick rectangular plate as size of 120 mm × 120 mm × 50 mm.Fig.1 provides a schematic representation of the experimental methodology used in the current study.To examine the effect of cryogenic treatment on rolled AA7075-T6 plates are subjected to DCT at temperature-196°C for 72 h in a liquid nitrogen container.The samples are then taken out and left to reach room temperature.For better perception,the specimens are provided with a specific designation,as given in Table 1.Metallographic studies are conducted on BM and DCT specimens,and their mechanical properties,including tensile strength,impact,and microhardness,are measured.The samples for the above experiments are extracted and the details are provided in the subsequent sections.Finally,ballistic experiments are conducted on both BM and DCT samples to evaluate the ballistic behavior.The ASTM E3-11 standard is adopted in the sample preparation process for the metallographic examinations.The BM and DCT samples are molded with Bakelite and polished with emery sheets ranging from grit size 220-1500;then polishing with 1 μm and 0.5 μm diamond paste using a velvet cloth.Then,the polished samples are etched using Keller's reagent (HCl 3 mL,HF 1 mL,HNO35 mL and H2O 191 mL) for 30 s to reveal the microstructural features.The tensile tests are performed as per ASTM E08-19a standard [12] at ambient temperature.The BM and DCT samples are extracted by wire EDM and the test was carried out on a universal testing machine[Make:Aimil,Model:AIM-653-1] at a crosshead speed of 1.0 mm/min.According to ASTM E23 standard [13],Charpy impact tests are performed on the Instron CEAST-9350 impact testing machine.The hardness of BM and DCT specimens are evaluated by performing a microhardness test using a Vickers hardness testing machine [Make: Fine testing instruments,Model: BMVH-1000 M].The test is done according to the ASTM E384-11 standard[14].When measuring microhardness,a load of 10 N is put on the surface for 10 s.The BM and DCT targets are tested for their ballistic performances.The details of the ballistic testing machine,ammunition,testing standard and procedure are explained below.The ballistic testing machine consists of a gun barrel of 250 mm length (manufactured by Prototypa,Czech Republic).Fig.2 is a schematic drawing of the ballistic test rig.An infrared light-emitting diode is placed between the gun barrel and the target to calculate the projectile's initial velocity.Ballistic experiments are conducted using 7.62 × 39 AK47 rifle rounds as shown in Fig.3 The projectile is made of full metal jacketed with copper jacket and hardened steel core and mass of 8.0 g.The requirements outlined in National Institute of Justice 0108.01 -standard for ballistic resistant protective material [4,5]are followed when conducting ballistic experiments.The target is mounted on the target holding fixture.The firing distance is maintained as 15 m per the standard procedure.The ballistic experiments are conducted for a total of 6 targets(3 BM target and 3 DCT target) at an initial velocity of 750 ± 10 m/s and the average results are calculated.After successfully conducting the ballistic experiments,the target is removed from the ballistic testing machine.It is noticed that all the projectiles have entered and struck very strongly into the target plates.The target plates are carefully parted along the projectile penetration path to analyze the failure mechanism,DOP,and post-ballistic results.
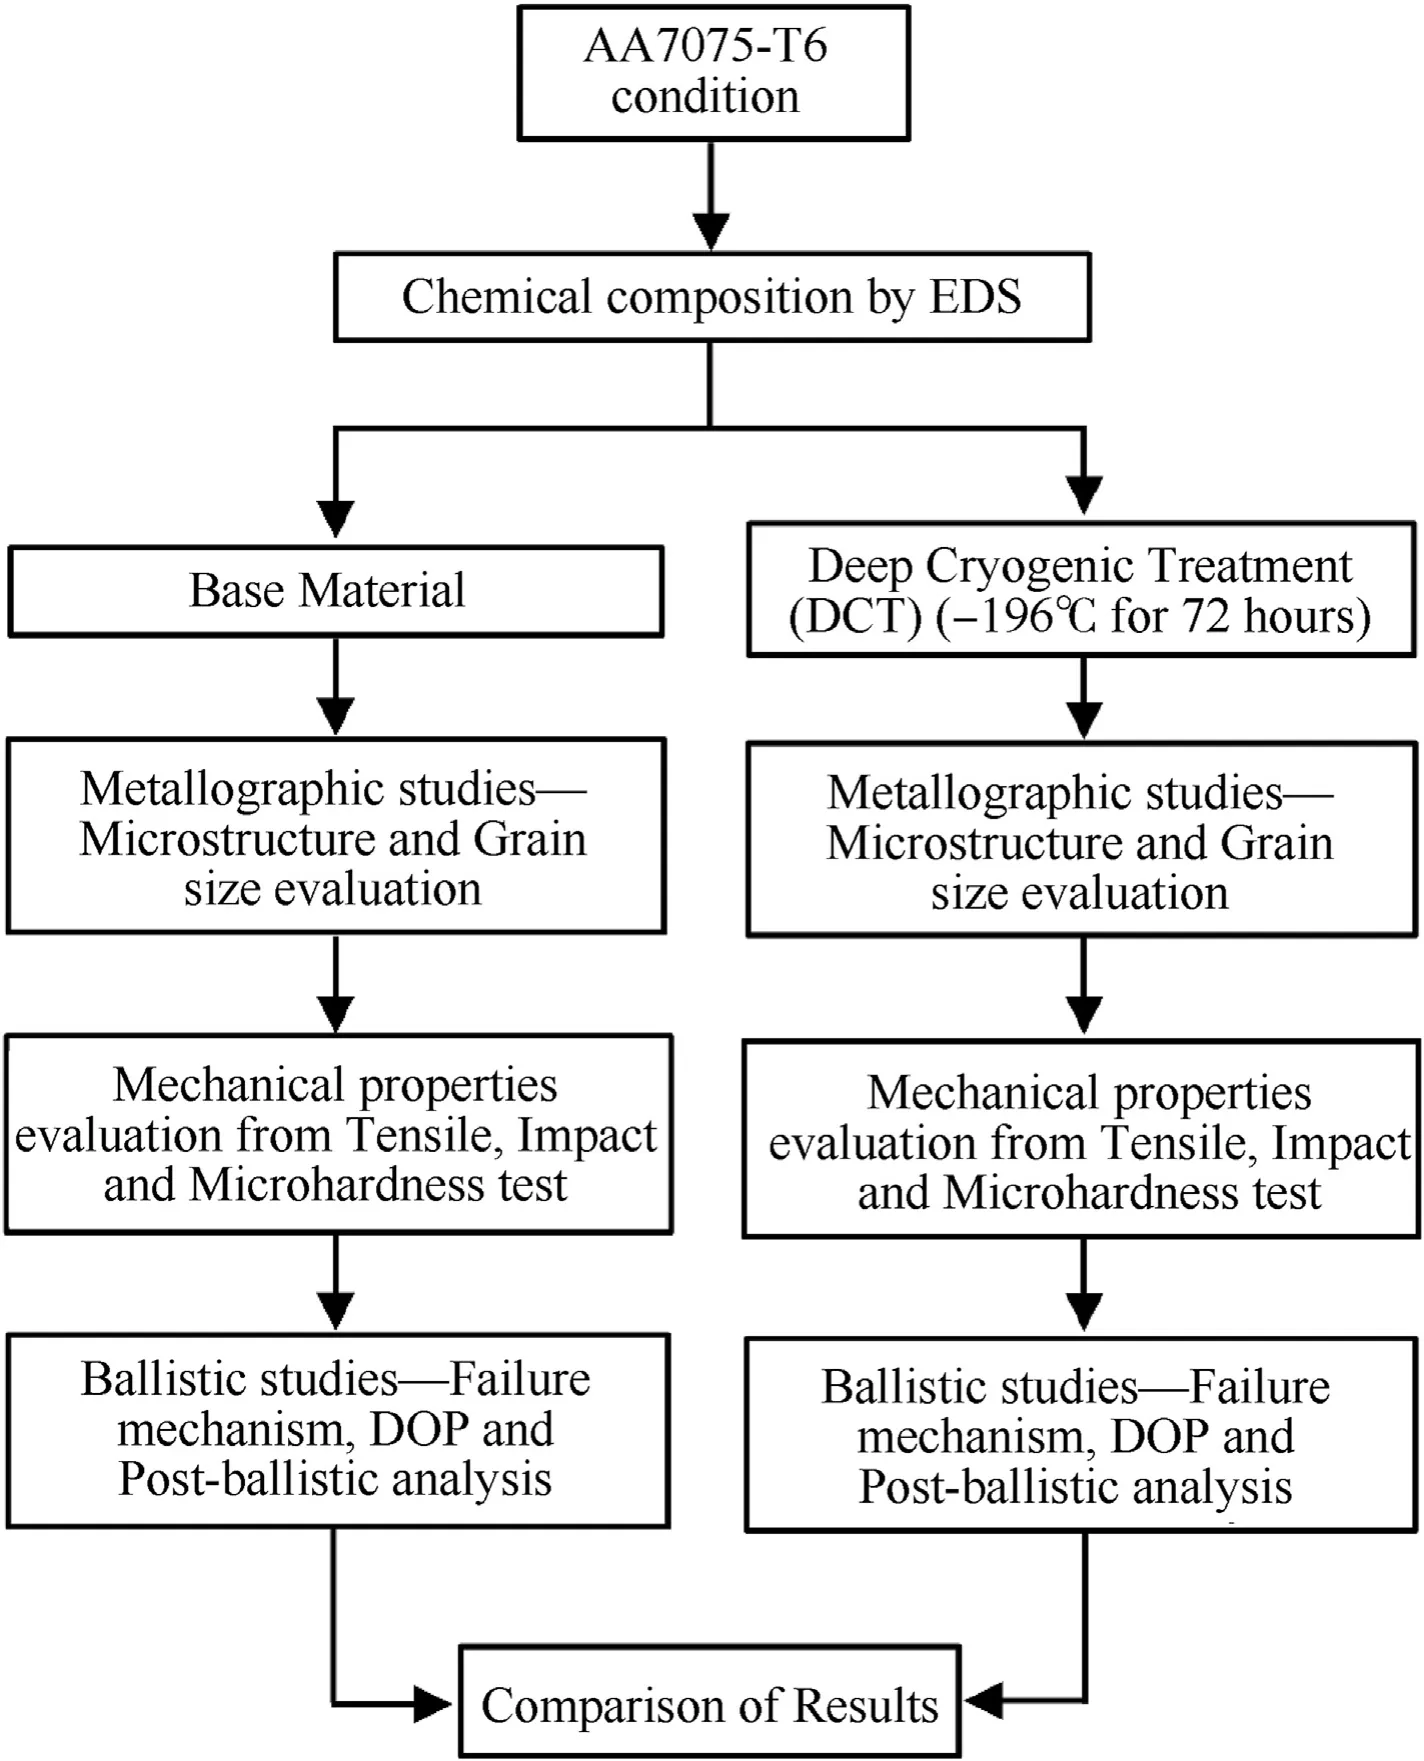
Fig.1.Experimental procedure of the present work.
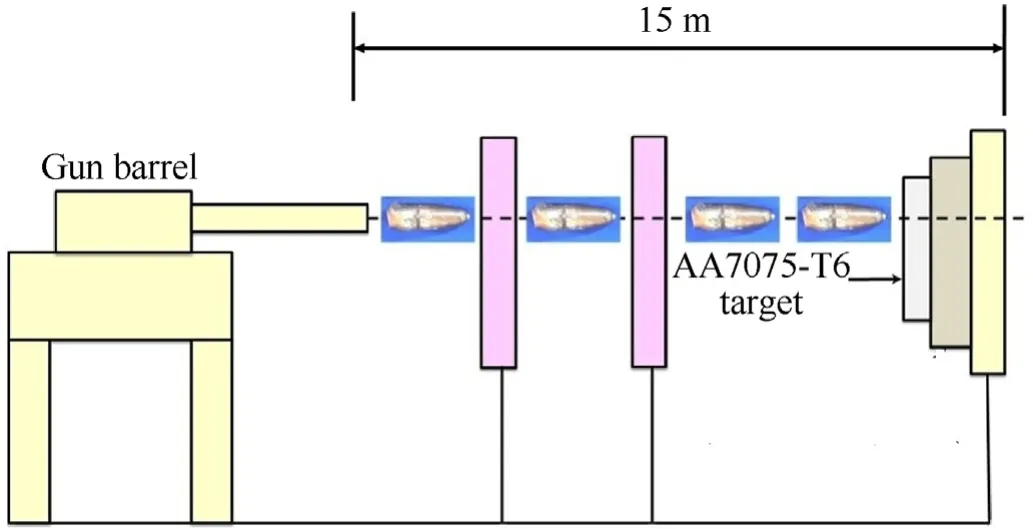
Fig.2.Schematic image of ballistic testing setup.
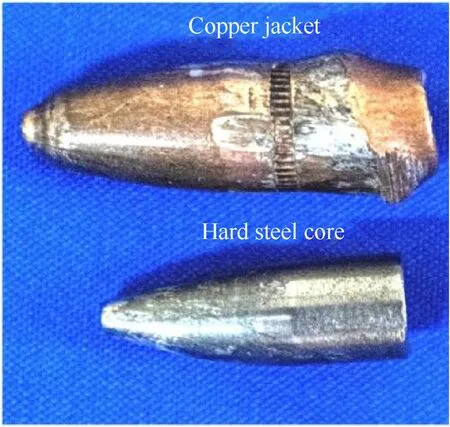
Fig.3.7.62 mm armour-piercing projectile.
3.Results and discussion
3.1.Microstructural characterization
After the DCT treatment,the microstructure of both BM and DCT samples are observed using an optical microscopy as shown in Fig.4 (a) and (b).The microstructures of the BM and DCT samples have β-phase (matrix) with aluminum rich grains.Also,the secondary phase MgZn2are observed in both the samples.
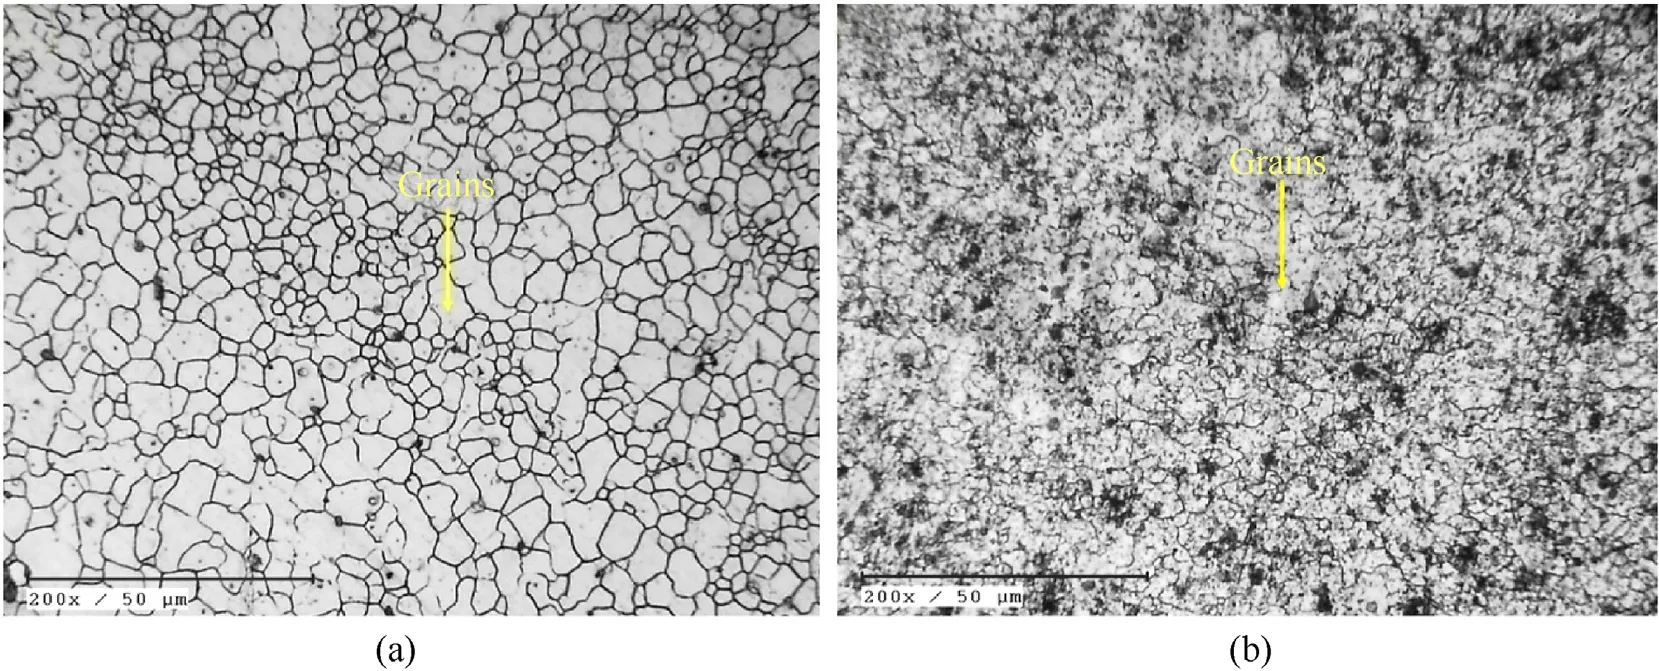
Fig.4.Microstructure: (a) Bm and (b) DCT.
The grain size has been measured using image analyzer software,following the ASTME-1382 standard.The microstructure of BM and DCT exhibited the grains with an average grains size of 27.99 μm and 23.22 μm.The Al matrix grain refinement happens because of the dislocation movements that happen during the cryogenic treatment.More amount of secondary phase intermetallic particles with uniform distribution are observed in the DCT alloy.This is due to the accelerated precipitation at very low temperatures.Also,very fine precipitates can be seen inside the grains and on the edges of the grains.Compared to BM,the DCT has increased the dispersion of the secondary phase in the matrix alloy.Mohan et al.[6] found a similar kind of microstructure in the SCT treated AA7075 alloy.DCT restricted the recovery of the phases and increased the dislocation density.The increase in dislocation density enhanced the mechanical properties of polycrystalline metallic materials[15].XRD results of BM and DCT AA7075 alloys are shown in Fig.5 Two different peaks were noticed in the XRD results.The major peak indicates an Al solid solution,and the minor peak specifies second-phase particles MgZn2in the BM.
The crystalline size (D) and dislocation density (δ) for BM and DCT were calculated from the intensities by measuring the full width at half maximum (FWHM).The Scherrer Eq.(1) is used for determining the crystalline size,whereKis the Scherrer constant,λ is the wavelength,β is FWHM of the sharp peaks and θ measured angle.The calculated dislocation density of BM and DCT is shown in Table 2.It was found from the calculated result that the dislocation density of the DCT alloy was higher than the BM.In addition to this,the DCT treatment has refined the grain size also.
The dislocation density δ was calculated by using Eq.(2).
3.2.Tensile test
The samples after the tensile test are shown in Fig.6.The mechanical properties of DCT samples are different from BM due to variations in the microstructure.Tensile properties of the AA7075-T6 alloy obtained before and after CT are shown in Fig.7.It is evident that CT has enhanced the tensile strength and ductility of the AA7075 alloy.Once soaking in liquid nitrogen for 72 h,the DCT samples showed superior tensile strength,improving by 7.41%from 332.67 MPa to 357.33 MPa.Also,the graph shows that the yield strength of the DCT samples has increased from 275 MPa to 310 MPa.However,the improvement is 12.73%higher than the BM samples.
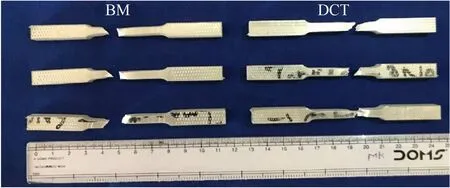
Fig.6.Tensile test samples of BM and DCT.
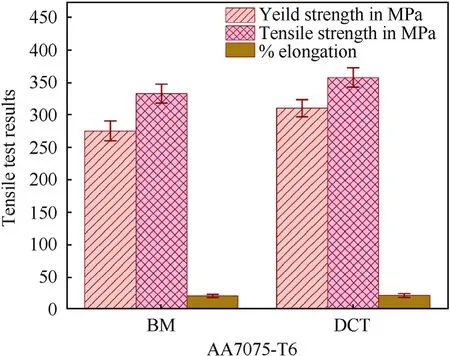
Fig.7.Tensile properties of BM and DCT samples.
The total elongation can be also considered similar,as the difference was only 0.83% in favor of the sample with cryogenic treatment.It was observed from the previous work of Kucerova et al.[7]and Lulay et al.[9]that the change in ductility obtained in DCT AA7075 was only 1.17%and 1%only.It was found from previous section 4.1,that the dislocation density of BM and DCT were found to be 10.86×10⁻⁴and 15.97×10⁻⁴.Hence this improvement can make the dislocation movement in the DCT alloy difficult to move from one slip plane to another.Similar results were observed from the studies of Mohan et al.[6].
3.3.Impact test
Charpy impact test samples and results of BM and DCT alloys are shown in Fig.8 (a) and (b).The absorbed energy of the BM specimen was 48 J,whereas the DCT specimen's absorbed energy was around 50 J,which is not a significant improvement compared to the tensile and hardness properties.

Fig.8.Impact test: (a) samples and (b) results.
3.4.Microhardness
The microhardness was measured for BM and DCT using Vickers hardness testing machine.In our investigation,microhardness measurements are taken from the specimen's top surface.Fig.9 shows the microhardness results of both the samples.The DCT samples exhibit a considerable increase in microhardness compared to the BM samples.

Fig.9.Microhardness results.
The sample of BM has an average microhardness of 154.53 HV,while the sample of DCT has an average microhardness of 171.1 HV.This is 9.68% higher than the microhardness of the BM.The improved hardness values are due to the formation of intergranular precipitates alongside refined grains.The reduction of grain size is one of the reasons for an increase in hardness value.DCT treatment helps to increase the dislocation density[11].The fine grains result in a larger number of grain boundaries,which enhances the hardness value.Recrystallized grains act as a barrier for dislocation motion [10].The precipitates and restriction of dislocation movement are the reason for higher hardness in DCT samples.
3.5.Ballistic behavior of BM and DCT targets
Fig.10 (a) and (b) depict the front faces of the BM and DCT targets following after ballistic test.The results clearly show that no cracks are developing around the crater area.Hence,no radial fracture has occurred in the targets.

Fig.10.Failure mechanisms in front side of AA7075 targets: (a) BM and (b) DCT.
However,failure mechanisms like petaling,ductile hole enlargement and few fragmentations can be noticed in the front faces of both the BM and DCT targets.It is observed that irrespective of the type of target,front petaling failure is visible in the front faces of both targets[1].Both the targets have failed by petaling because of the high radial and circumferential stresses caused during projectile penetration.Also due to the ductile behavior of aluminum,ductile hole enlargement failure has occurred in both targets [17].
Fig.11(a) and (b) shows the photographs of the penetration channel of the BM and DCT targets after sectioning.The penetration channel of the BM target is illustrated in Fig.11(a)as material flow lines along the path of impact.This phenomenon is not observed in the DCT target.A uniform conical-shaped spall formation is observed at the entry region along the penetration channel of BM 7075 target.However,along the penetration channel of the DCT target,the spall formation was found to be irregular.

Fig.11.Failure mechanisms along the penetration channel of AA7075 targets: (a) BM and (b) DCT.
This implies that the behavior of the top surface of the DCT target is hard and brittle.The entry region of both the DCT targets displayed more cracks that are propagated because of the ballistic impact.This can be attributed to the presence of more microhardness due to the DCT process which makes the DCT target's surface hard and brittle.
3.6.Depth of penetration
The ballistic resistances of BM and DCT targets are measured by the DOP.The target plates are carefully sectioned by band hacksaw to measure DOP accurately.The DOP values are measured using a profile projector with a minimum count of 0.01 mm.Fig.12 shows the sectioned views of the targets for DOP measurement.The Figure clearly demonstrates that the projectiles have penetrated each target at different depths.

Fig.12.DOP of BM and DCT targets.
The average DOP of the BM target is found to be 23.2 mm,whereas the DOP of the DCT target is found to be 19.3 mm.The decrease in DOP of the DCT targets indicates their enhanced ballistic resistance compared to BM.The grain size refinement and dislocation density enhancement are the reasons for enhanced ballistic strength of DCT target.It has been observed that the hardness of the target material is a key factor in determining the DOP when a high-speed projectile hits it [1,4,5,13,14].The projectile's kinetic energy is dissipated across the target surface due to variation in microhardness of target.Likewise,the increase in microhardness of the target increases its resistance towards the plastic flow during the projectile impact.
It improved the dissipation of the projectile's kinetic energy and reduced the DOP of the projectile.Ballistic resistance in the DCT target is 20.2%higher than in the BM.As discussed earlier in section 4.4,the enhancement in ballistic resistance can be correlated with the higher microhardness of DCT target compared to with the BM.Also,due to the increase in microhardness of the DCT target,the core of the projectile moves with difficulty.Therefore,the projectile cannot penetrate more into the target.Hence it is concluded from the above analysis that the DCT target has exhibited higher ballistic performance in compared to the BM target.It was observed from previous literature that the dynamic plastic flow of the material has a direct effect on the ballistic performance of AA7075 [8,24,25].Hence,the increased tensile strength and hardness of the target enhanced the penetrating resistance resulting in lower DOP [25].
3.7.Effect of DCT on tensile fracture
Fig.13(a)and(b)depict SEM images of BM and DCT alloy tensile fracture surfaces.The fracture surfaces of both samples are mainly characterized by the cleavage facets,micro voids and dimples.
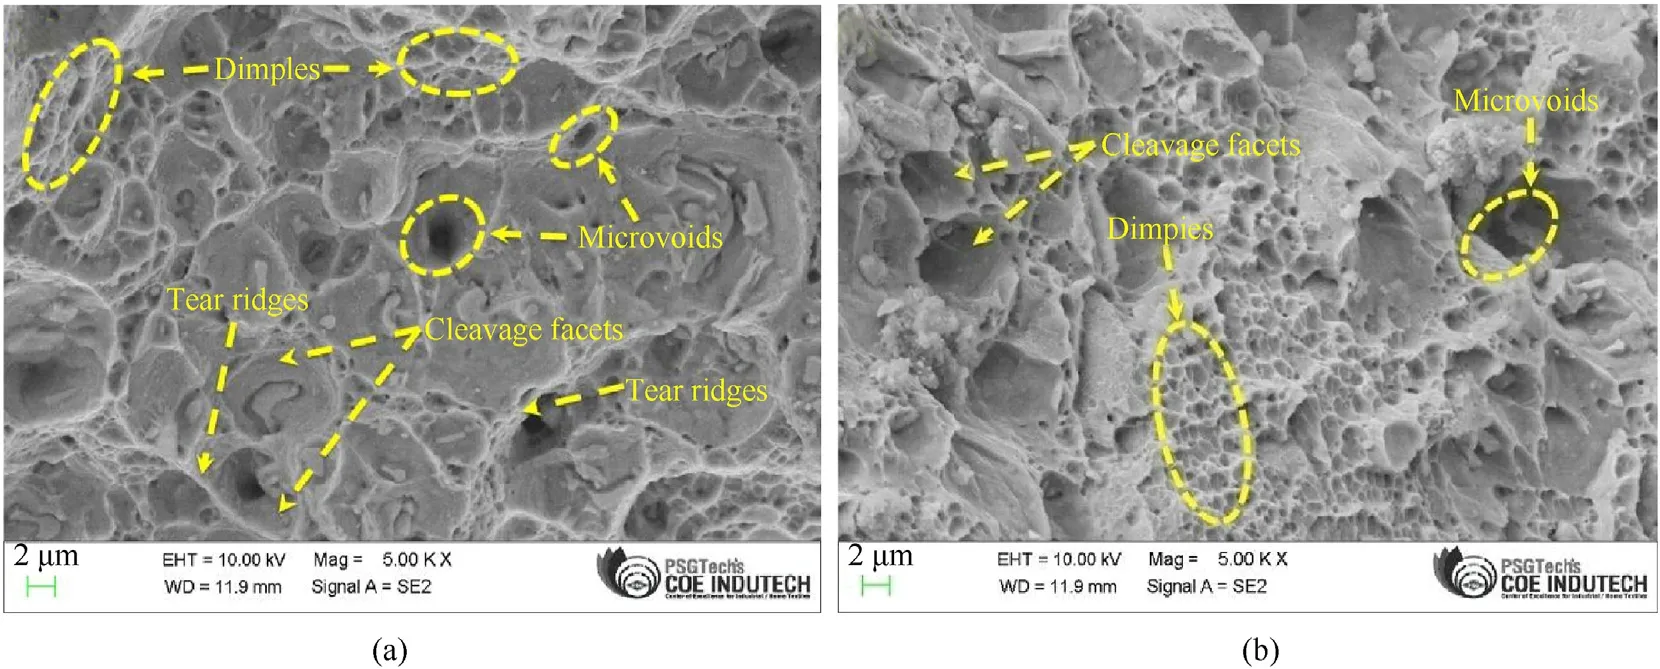
Fig.13.Tensile fracture surfaces: (a) BM and (b) DCT.
Ordinarily,Engineering materials are polycrystalline and contain the dislocations,grain boundaries,and other faults that inhibit the cleavage fracture so that true,featureless cleavage faces are rarely observed[18].It was one of the reasons for the formation of cleavage facets in both samples.However,more cleavage facets and fewer dimples were observed in the BM Fig.13(a) compared with the DCT Fig.13(b).Therefore,the ductility of the BM is slightly less than the DCT sample.It was observed from the previous work that the change in ductility obtained in DCT AA7075 was only 1.17%and 1% only [7,9].The ductility change of DCT was slightly higher than the BM.The presence of more dimples in the SEM fractography of DCT treated alloys confirms this.The fractures in the DCT are mainly ductile mode with a higher percentage of dimples to cleavage facets.BM fracture surfaces,tear ridges and micro-voids indicate that the samples failed to plastic deformation before fracture and that the failure was mixed mode type.The size of the dimples in the DCT sample was small,whereas size of dimples in the BM sample was larger and the local region was elongated.Hence,the load carrying capacity of the DCT sample was improved as compared to the BM sample.Similar observation was made by Kumar et al.[19] and found that the DCT heat treatment reduced the size of the dimples and increased the tensile strength compared to untreated samples.
3.8.Post-ballistic microstructures of BM and DCT targets
The ballistic behavior of the target material is determined by the amount of kinetic energy it absorbs.Figs.14 and 15 depict the optical microstructure images of the penetration channels of AA7075-T6 BM and DCT targets,respectively.Fig.14(b)-(d)shows the microstructure images of BM targets at three different regions.The grain disorientation and plastic deformation are seen in the top region Fig.14(b),and adiabatic shear bands (ASBs) are noticed in the top and middle regions Fig.14(c).Similar kind of observation was noticed in AA7075-T651 targets [20].The formation of ASBs was due to a large amount of projectile impact energy being transferred to a smaller region of the target in a very short period of time[21].Under higher strain rate conditions,ASBs formation may initiate the voids and cracks,which causes material failure.ASBs are formed due to strain localization and differences in deformation[25,26].Fig.14(d)depicts very minimum amounts of ASBs lines as compared to entry and middle regions.
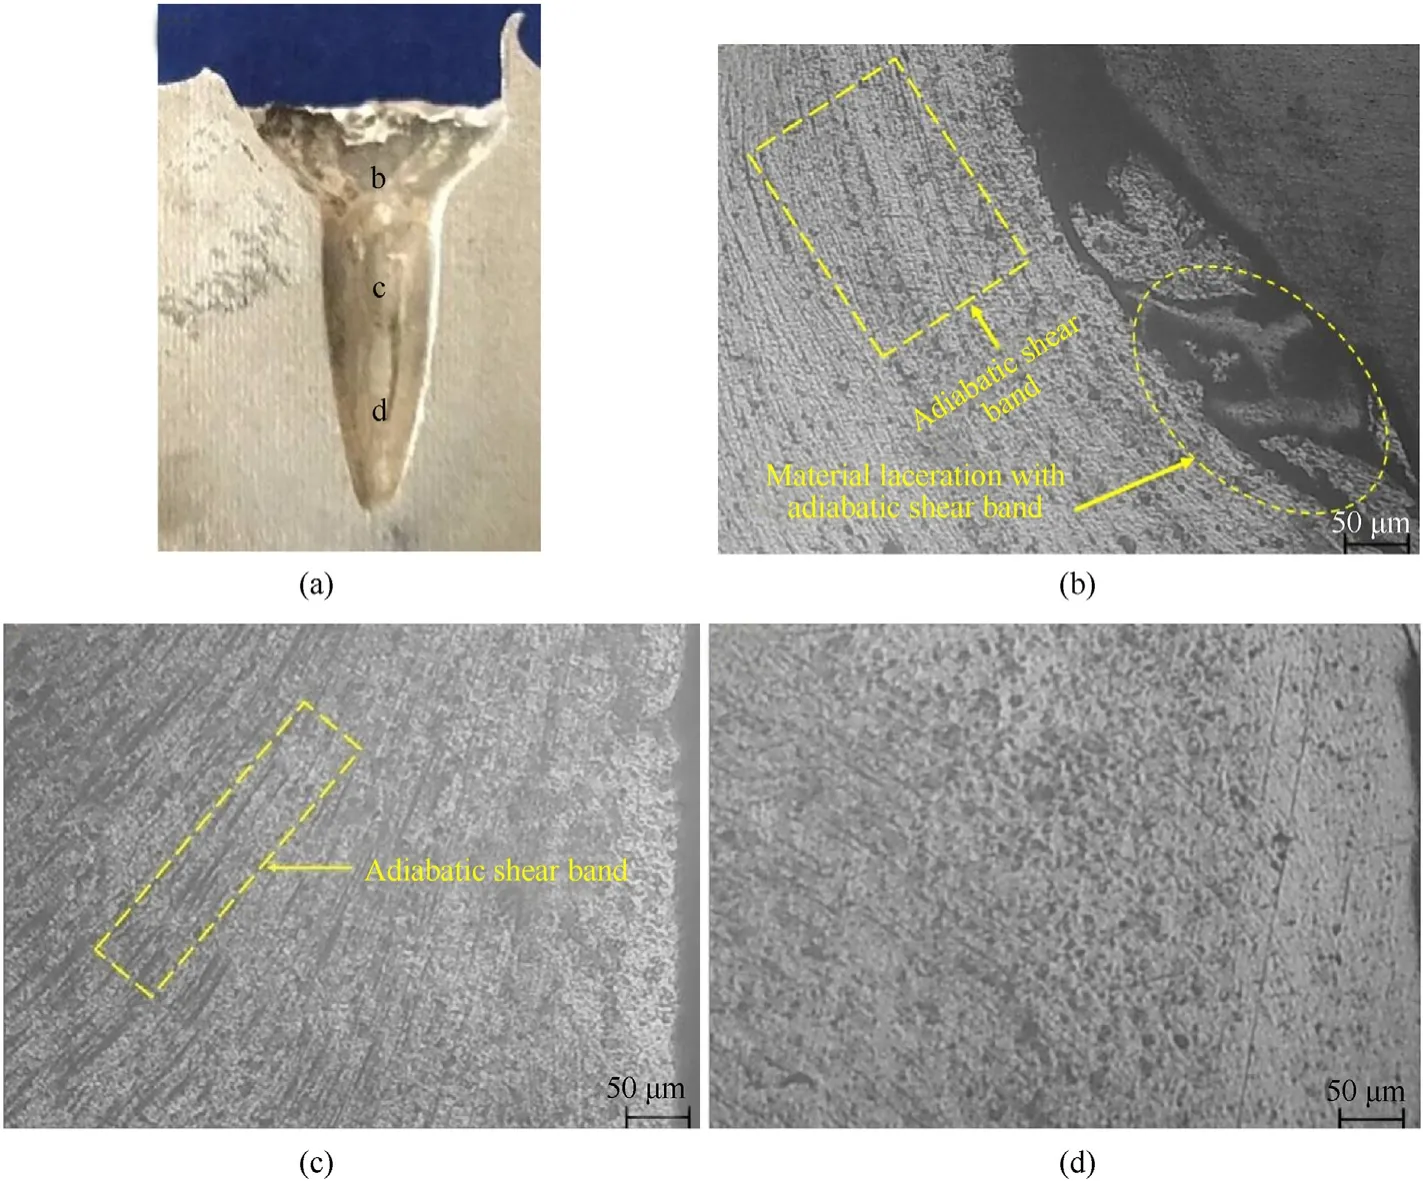
Fig.14.BM: (a) sectioned;(b) top;(c) middle;(d) bottom.
The amount of kinetic energy absorbed by the target in the bottom region was less compared to the middle and top regions.Hence,it was confirmed by the presence of a minimum number of ASB lines in the exit region.Fig.15 (b)-(d) shows the microstructure images of the top,middle,and bottom regions of the DCT targets.
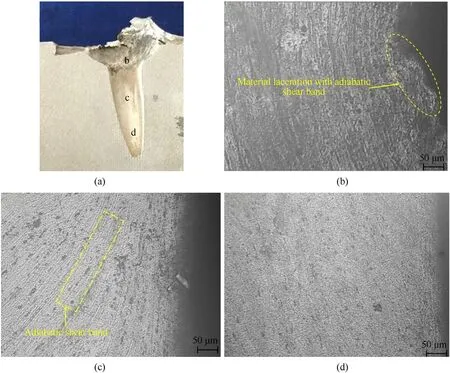
Fig.15.DCT: (a) cross sectioned;(b) top;(c) middle;(d) end.
Similar to BM,grain disorientation,plastic deformation,and ASB are noticed in the top and middle regions.The material laceration with ASB is less in the DCT top region as compared to the BM.The grain refinement and strengthening mechanisms were the primary reason for less ASB.Curved grains are clearly noticed in Fig.15(c),which confirms that the failure of the middle regions was caused by plastic deformation material rather than brittle failure.Even though the formation is ASB,no crack is observed in the entire penetration channel.The amount of material flowing toward the bottom region of the plate gradually drops.No ASB is noticed at the rear face (bottom region).It means most of the projectile's kinetic energy was observed in the front face (top region) and middle region.The absorption of more kinetic energy in the top and middle regions reduces further projectile penetration into the target.It was the primary major reason for the drop in DOP in the DCT target.Similar observations were made in the heat-treated AA7017 alloy[4].
4.Conclusions
The present work studied the effect of DCT on the mechanical and ballistic properties of AA7075-T6 alloy,and the detailed fracture analysis was made using an optical microscope and a scanning electron microscope.Based on the present study,the following conclusions have been drawn.
(1) The DCT alloy has shown fine grains along with the strengthening precipitates as compared to the BM alloy as evident from optical and X-ray powder diffraction (XRD)micrographs.
(2) Mechanical properties of DCT alloy have shown an enhancement of 7.41%in tensile strength,9.68%in hardness,and 4% in impact strength.
(3) SEM tensile fracture analysis shows the formation of cleavage facets,micro voids and dimples in both samples.The size of dimples in the DCT sample was small compared to BM and the failure completely dominated by ductile mode.
(4) The improvement in ballistic strength of DCT target is due to high dislocation density and refined grains,which restrict crack formation.
(5) The material laceration with ASB is less in the DCT top region than in the BM.ASBs was found to be higher in BM as compared to the DCT.
Declaration of competing interest
The authors declare that they have no known competing financial interests or personal relationships that could have appeared to influence the work reported in this paper.
Acknowledgement
The authors would like to thank the Centre for machining and materials testing at the KPR Institute of Engineering and Technology in Coimbatore for providing optical micrographs and Vickers hardness facilities.
- Defence Technology的其它文章
- Interaction of water droplets with pyrolyzing coal particles and tablets
- Multifunctional characteristics of 3D printed polymer nanocomposites under monotonic and cyclic compression
- The concept of sUAS/DL-based system for detecting and classifying abandoned small firearms
- Modelling and predicting the dynamic response of an axially graded viscoelastic core sandwich beam
- Development of bimetallic spinel catalysts for low-temperature decomposition of ammonium dinitramide monopropellants
- Thrust characteristics of nano-carbon/Al/oxygenated salt nanothermites for micro-energetic applications

