A review and a statistical analysis of porosity in metals additively manufactured by laser powder bed fusion
Dawei Wang, Huili Han, Bo Sa, Kelin Li, Jujie Yan, Jiazhen Zhang,Jianguang Liu, Zhengdi He, Ning Wang* and Ming Yan*
Keywords: additive manufacturing; laser powder bed fusion; selective laser melting; porosity; defects; mechanical performance; metallic materials; perspectives
Introduction
Overview of additive manufacturing of metals
Additive manufacturing (AM), or 3D printing, is a rising star in the field of manufacturing technology. AM technologies are renowned for lifting the geometric constraints of design and fabricating products directly from digital models1-3. Materials are “added” up during AM processing, making it the distinguishing feature that opposed to traditional subtractive and formative manufacturing. According to the literatures4-8and the classifications proposed by the American Society for Testing and Materials (ASTM)9, plentiful materials including metals,intermetallics, polymers10, ceramics, and composites, can be additively manufactured. The application of AM significantly reduces the time consumption and economic cost of prototyping and mold making11,12. Scientific researches and technological developments can be substantially facilitated through utilizing the AM technologies wisely.
The AM of metals has been attracting intense research and industrial interest recently13-15. As-printed metal components have been vastly used in healthcare,aerospace, automotive, and marine industries16,17. Most commercially-available AM technologies use metal powders or wires as the feedstock11. Feedstock materials are melted by heat sources, such as laser/electron beams and electric arc, then deposited to the products14. The motions of heat sources are numerically guided on the basis of sliced digital models. Thus, the products are constructed layer-by-layer to their final form. The powderbed-based AM technologies are well adopted at present to fabricate metallic products with high accuracy and good quality18-20. A powder bed is paved on the building substrate and subsequently scanned by the heat source. A layer is therefore “printed” through the selective melting or sintering. The metals fabricated by powder-bed-based AM are able to archive excellent mechanical performance and high relative density (up to 99.9%)8.
This review focuses on the laser powder bed fusion(LPBF) technology (also known as selective laser melting,SLM) that uses laser beam as the heat source. As a mainstream technology for the AM of metals21,22, LPBF is chosen for its capability of shaping plentiful metals and its universality in both research and industrial applications23. The products are “printed” through a fully melting of feedstock powder and the subsequent solidification. A schematic illustration of LPBF processing is presented in Fig. 1.

Fig. 1 | Schematic illustration of LPBF processing.
Overview of LPBF processing and defects
The feedstock powder’s morphology and granulometry can exert certain influences on the LPBF processing24-26,whereas, the quality of as-printed metal products are generally controlled, even dictated by the processing parameters8,27-31. The laser power, scanning velocity,hatch spacing (spacing between scanning tracks), layer thickness, and scanning patterns are major parameters that can be adjusted to pursue a stable and defect-free melting-to-solidification process16,23,32.
Appropriate laser parameters are required to maintain a stable molten pool, and to fuse the powder completely without activating detrimental instabilities19,28.However, the whole LPBF processing is a complicated operation. Melting at the beginnings, ends, and turns of scanning tracks is extremely difficult to stabilize due to the distinctive heating behaviors at those points28. The shadowing and related effects brought by laser spatter,vapor plume, and plasma are chaotic yet hard to measure33-36. Besides, the layer-by-layer deposition behavior of LPBF results in a cyclic heat history37. The accumulated impacts of heating/cooling cycles are difficult to evaluate. In summary, the instabilities and formation of defects in LPBF processing probably will not be entirely eliminated in the near future.
Defects are formed when printing deviates from its optimized range. Porosity, lack of fusion (LOF), unfavorable inclusion (e.g. unmelted particles), and cracks are common defects that observed in LPBF printed metal products22,38,39. Study of the defects and correlated mechanical effects is essential for the qualification and application of LPBF printed metal products16,31.
Scope of this review
As-printed products containing fatal defects, such as large LOFs and cracks, are generally not acceptable for heavy loads or longtime services40,41. However, as a less detrimental but near-inevitable defect, porosity exists in almost every LPBF printed metal component. This review focuses on this most universal and difficult-toeliminate defect. A thorough illustration of porosity formation and evaluation is presented at first, followed by a collective analysis of its effects on mechanical performance. Ti-6Al-4V alloy, 316L stainless steel (SS), Inconel 718 superalloy, and AlSi10Mg alloy are selected as representative metals in the further analysis. Their uniaxial tensile properties are compiled with an in-depth discussion on the correlation between porosity and tensile properties. Furthermore, the controlling strategies of porosity as well as the current challenges and opportunities for LPBF applications have been summarized in the last part.
Formation mechanisms of the porosity in LPBF printed metals
Porosity existed in LPBF printed metals are classified into two main categories: the gas porosity and the LOF porosity31,42,43. Criteria of this classification is the morphological differences since gas porosity is generally spherical, whereas, LOF porosity is irregular and commonly has unmelted particles in it30,44. Representative observations of the two types of porosity are presented in Fig. 2. Both types of porosity are filled with inert shielding gas after LPBF processing. The entrapped gas prevents the total closure of pores even after hot isostatic pressing (HIP)45,46. What’s worse, the porosity can even grow after heat treatments (HTs) due to the thermal expansion of entrapped gas47,48.
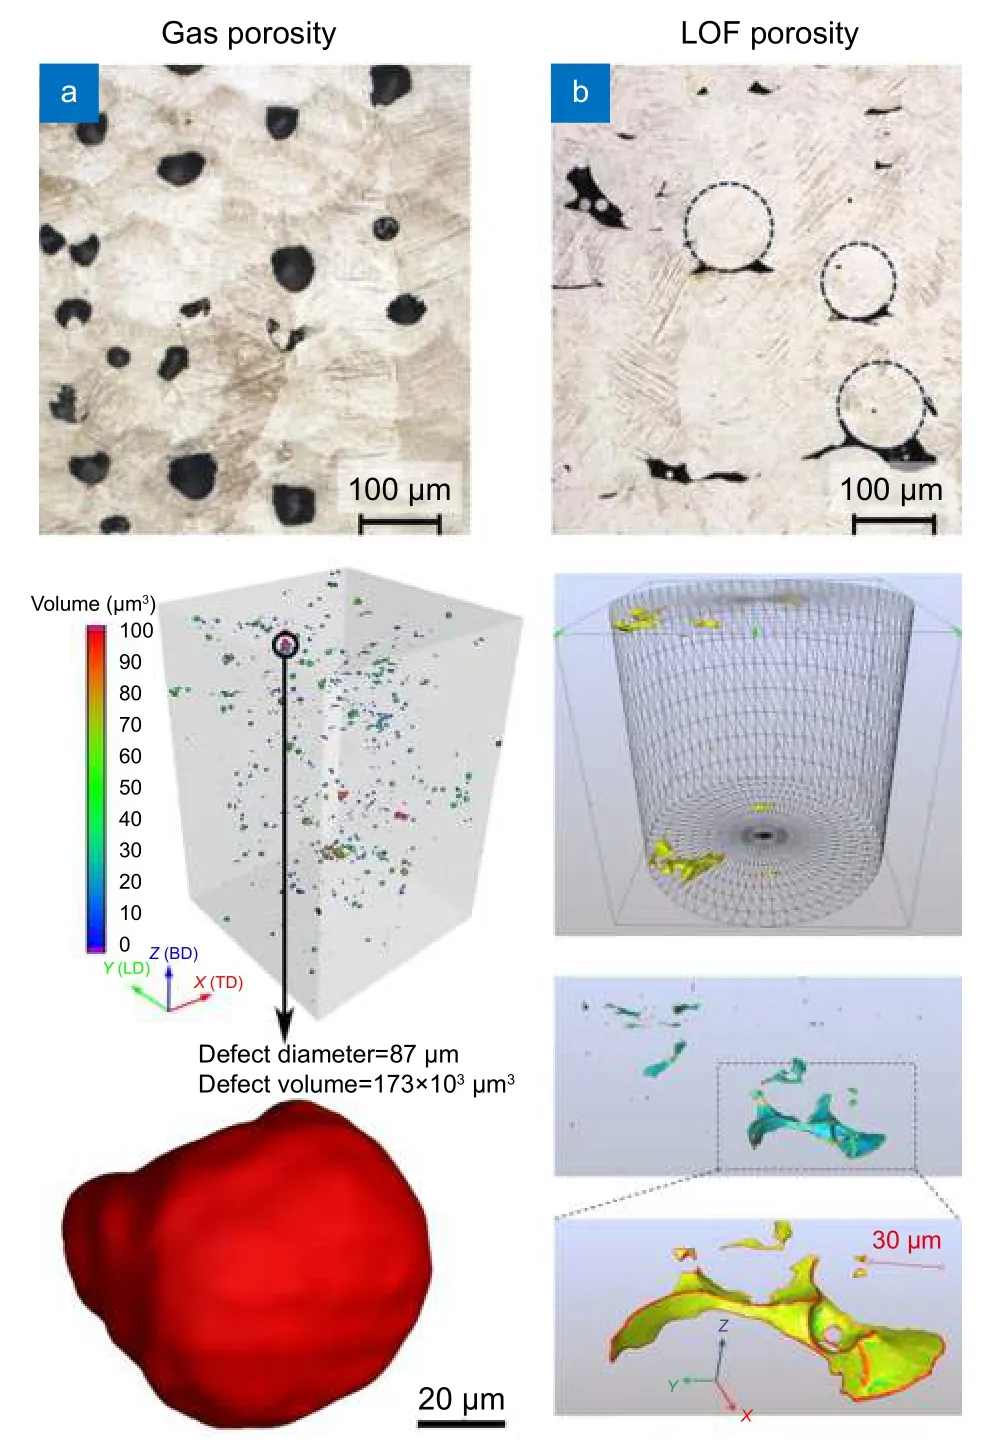
Fig. 2 | Representative cross-sections and 3D reconstructions of (a)gas porosity and (b) LOF porosity detected in LPBF printed metals.The dashed circles in (b) indicate unmelted feedstock powder. Figure reproduced with permission from (a) ref.37,43, Elsevier; (b) ref.43,Elsevier, under a Creative Commons Attribution-NonCommercial-No-Derivatives 4.0 International License.
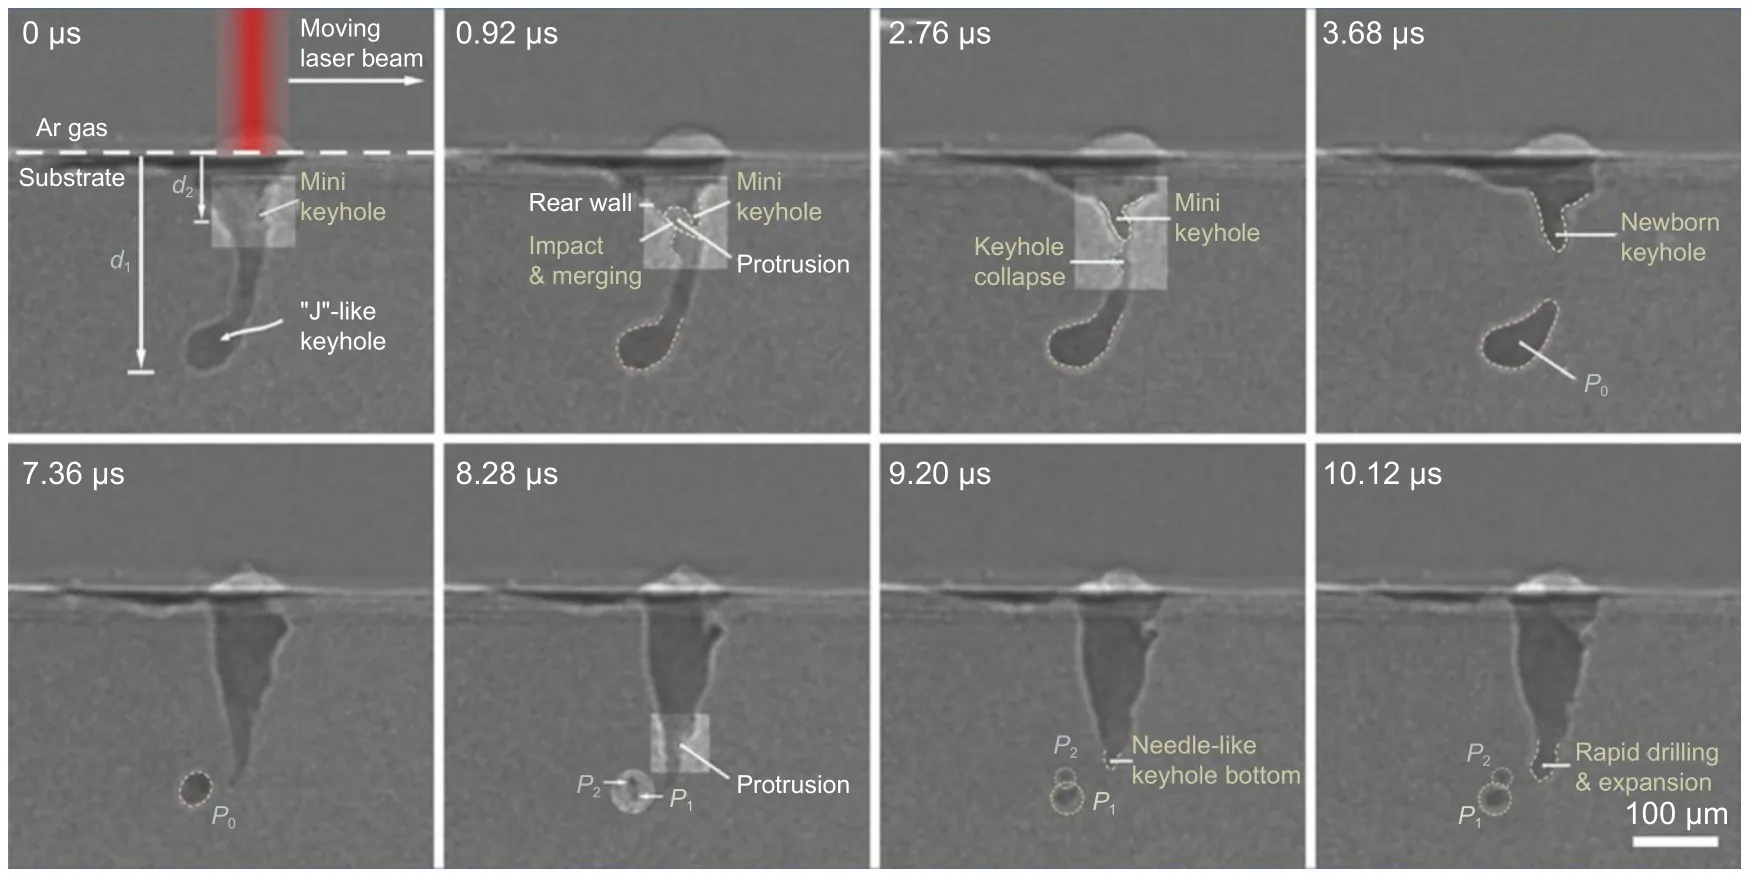
Fig. 3 | Synchrotron X-ray images of pores generated from keyholes. The time marks represent the delays of each graph after the first shot.Figure reproduced with permisson from ref.29, The American Association for the Advancement of Science.
Formation mechanisms of gas porosity
The gas porosity is induced by the entrapment of gas in the molten pool31. Both the melting depression and the cavities in feedstock powder can bring entrapped gas to the molten pool during LPBF processing19,27,49,50. The entrapped gas aggregates in the molten pool and forms spherical bubbles due to surface tension51. Bubbles that cannot escape before solidification become gas porosity in the as-printed products.
The vapor recoil pressure, surface tension, and Marangoni force (thermo-capillary force) are the three major forces that control the flow behavior in a molten pool27,52,53. On the basis of numerical simulations and experimental observations, recent studies28,29revealed that a stable molten pool can prevent the formation of porosity. On the contrary, if the balance of forces breaks, the resulted instabilities such as turbulence and keyholes have been observed to be responsible for the residual pores54. “Keyhole” is a description for the deep and narrow depression in the molten pool. Figure 3 displays the formation of pores through the collapse of keyhole tips.A high laser energy density boosts the recoil pressure thus increases the depth of depression55. Gas is therefore apt to be trapped in the deep keyholes. Furthermore,acoustic waves generated near the keyhole tips also facilitate the separation of tips56, increasing the risk of forming gas porosity50. In summary, the keyhole melting mode is unfavorable from the perspective of porosity control when compared to the shallow and semicircular conduction melting mode.
The selective vaporization of volatile compounds and elements can provide additional recoil pressure and contribute to the chaos in molten pool57-59. This mechanism is capable of inducing massive porosity in as-printed metals and should be avoided57,58. However, such compounds and elements can be employed intentionally as foaming agents, to fabricate foam materials such as low-modulus implants and breathable mold steels59. In addition, the feedstock powders of LPBF, commonly prepared by gas atomization and plasma rotating electrode process, have intrinsic porosity60-62. The powder-entrapped porosity can be inherited if the feedstock powder was not completely melted27,44. Otherwise, the powderentrapped gas releases during melting, which also increases the bubbles in molten pool and the risk of forming gas porosity63. Several studies reported the inherited porosity from powder in as-printed metals64-66. Wu et al.64confirmed a strong positive correlation between the porosity in feedstock powder and that in as-printed samples recently, through a comparative study using feedstock powders with different porosity fractions.
Formation mechanisms of LOF porosity
The LOF porosity is a result of local LOFs. When the laser energy is not enough to melt and fuse the material completely, separated surfaces will be generated and the voids among those surfaces become LOF porosity31,43.
Origin of the LOF porosity can be divided into two categories: the incomplete melt of feedstock powder and the incomplete fusion of melting tracks. The first category of porosity can be eliminated through processing optimization32, although it is still challenging if the feedstock powder contains refractory particles such as Mo and ceramics67,68. As mentioned before, the processing of LPBF is full of uncertainty. It is presently impractical to maintain the heat input stable for the whole scanning track28. Inhomogeneities in powder bed such as large voids and agglomeration, are still ubiquitous24. The spatter caused by unstable heat input and the powder agglomerations can produce significant shadowing effect,consuming the laser power and creating LOF voids in asprinted tracks28,54. Those large voids require longer time and more fluid to fill, making them may not be fully fused under regular processing parameters69. Even though the LOF porosity can be enclosed by the remelting when printing the layer above it50, it is still a common defect in the as-printed refractory metals and metals that printed using irregular feedstock powders68,70-72.
Measurement and evaluation of the porosity in LPBF printed metals
Measurement of the quantity, size, morphology, and spatial distribution of porosity is an initial step for evaluating LPBF printed metals. Measurement and evaluation methods presented in this review are divided into two classical categories: the destructive evaluation (DE) and the nondestructive evaluation (NDE). NDE methods do not permanently alter the inspected sample, making them feasible in both research and industrial applications73,74. On the other hand, DE methods also hold unique advantages such as the precise inspection of nearsurface porosity75. Key descriptors and four mainstream methods of porosity evaluation are presented and analyzed briefly in the subsequent contents.
Descriptors of porosity
Measurement and statistical analysis of key characteristics are crucial for the study of porosity. The characteristics of porosity in LPBF printed metals can be divided into four categories: quantity, size, morphology, and location38,76-78. The quantity of porosity is the most universal characteristic that appears in almost every piece of AM research works. Both volume-based (Archimedes,CT, etc.) and area-based (cross-sectional imaging, surface imaging, etc.) methods are able to provide the quantity data of porosity despite a variation in accuracy76. Meanwhile, the other three categories of key characteristics are dependent specifically on the imaging of porosity.
The size of porosity has been reported to have a strong effect on the void growth in plastic deformation79,80. The irregularity of porosity also increases with elevating size according to phenomenological statistics37,81,82. The square root of projected porosity area on a plane perpendicular to the maximum principal stress,, is broadly adopted to evaluate the scale effect of porosity75,83-85. According to the literatures on fracture mechanics, the largest pore holds the highest risk of inducing tensile and fatigue failures41,86,87. Statistical tools such as the extreme value statistics (EVS) have been employed to statistically estimate the size distribution of porosity, particularly the largest, to compensate the limited data sampling88. EVS method at 3D scale has shown success with the assistance of micro-CT in estimating the porosity size and fatigue life for LPBF printed AlSi10Mg alloy81,85.
Porosity morphology is also critical for the evaluation since it is closely related to the stress concentration89. To avoid the exhausting calculation of curvatures at porosity interfaces, aspect ratio (AR) and sphericity (ψ) are used as two common descriptors in the studies of porosity morphology84,90. AR is used to measure the elongation of a pore, defined by84:

whereLminorandLmajorare lengths of minor and major axes, respectively. Sphericity is used to describe the geometric deviation of a pore from a sphere, defined by90:

whereVandAare volume and surface area of the pore,respectively. A visualized comparison of pores with different AR and sphericity is presented in Fig. 4. The two morphological descriptors can be easily calculated using data processing software then implemented in statistical analyses. Furthermore, 2D descriptors such as circularity and convexity are also valuable candidates for rating the porosity in LPBF printed metals77.
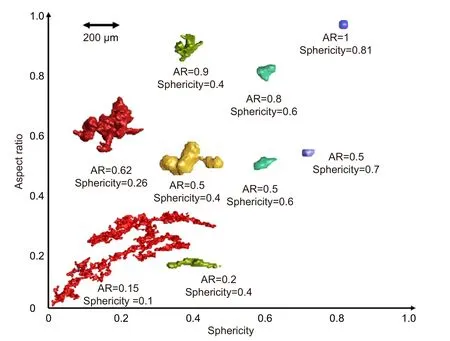
Fig. 4 | Porosity detected in LPBF printed Ti-6Al-4V alloy, with respective AR and sphericity values. Figure reproduced with permission from ref.84, under a Creative Commons Attribution-NonCommercial-NoDerivatives 4.0 International License.
The study on porosity clusters and spatial distribution of porosity in LPBF printed metals is currently at an early stage. Most quantitative researches are based on the artificial porosity that far dissimilar to the real situations91-94. It is promising to combine the actuallydetected porosity with spatial statistics in the future analytical investigations, since a successful example has been established by Becker80for predicting the performance of powder metallurgy (PM) products.
The Archimedes method
The Archimedes method may be the oldest NDE approach to measure the density of solid samples with arbitrary shapes95. Samples are immersed in a liquid medium, such as water, to determine the margin of weight when weighed in air and in the liquid medium. Therefore, if the densities of liquid medium (ρm) and air (ρa)are known, the relative density of a sample is yielded as:

whereρrelis relative density,Mais mass weighed in air,Mmis mass weighed in the liquid medium, andρrefis reference density of fully-dense material78,96. Although the Archimedes method only measures the whole quantity of porosity, it is still a practical and broadly-adopted method for evaluating the porosity in LPBF printed products38,78,97,98. A commercial Archimedes density meter usually uses small samples78,99, but this approach can be smoothly expanded to large and heavy products through utilizing proper weighing instruments. The Archimedes method counts the contribution of all the internal voids, resulting in a higher detectivity of total porosity quantity compared to other imaging-dependent methods37,97. The Archimedes method has been extensively employed in the AM community to achieve a rapid overall evaluation of the as-printed products74.
X-ray computed tomography
X-ray computed tomography (CT) is an advanced NDE technology that combines the X-ray imaging with the computed 3D reconstruction100,101. The intensity of X-ray attenuates after it transmitted a medium. The rate of attenuation varies among different mediums, e.g. the porosity and the dense metal. Therefore, the intensity of transmitted X-ray contains the inner structural information of the irradiated sample100. During CT inspection,the tested sample is exposed to X-ray radiation and a 2D slice is generated through collecting the X-ray intensity data from multiple angles with subsequent graphical reconstruction39,78. Those 2D slices are stacked and finally reconstructed into a 3D model with visible inner structure100. X-ray CT provides abundant information of the porosity in LPBF printed metals, including spatial distribution, morphology, dimensions and volumes, and other quantitative data102. Figure 5 demonstrates representative views of porosity distribution and a pore detected by CT.
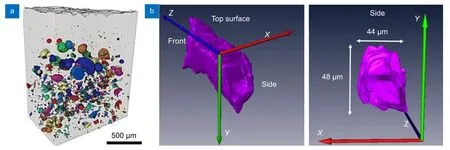
Fig. 5 | Representative 3D reconstructions of (a) the distribution of porosity in a Ti-6Al-4V sample and (b) views of a specific pore. Figure reproduced with permission from: (a) ref.101, Springer Nature. (b) ref.44, Elsevier.
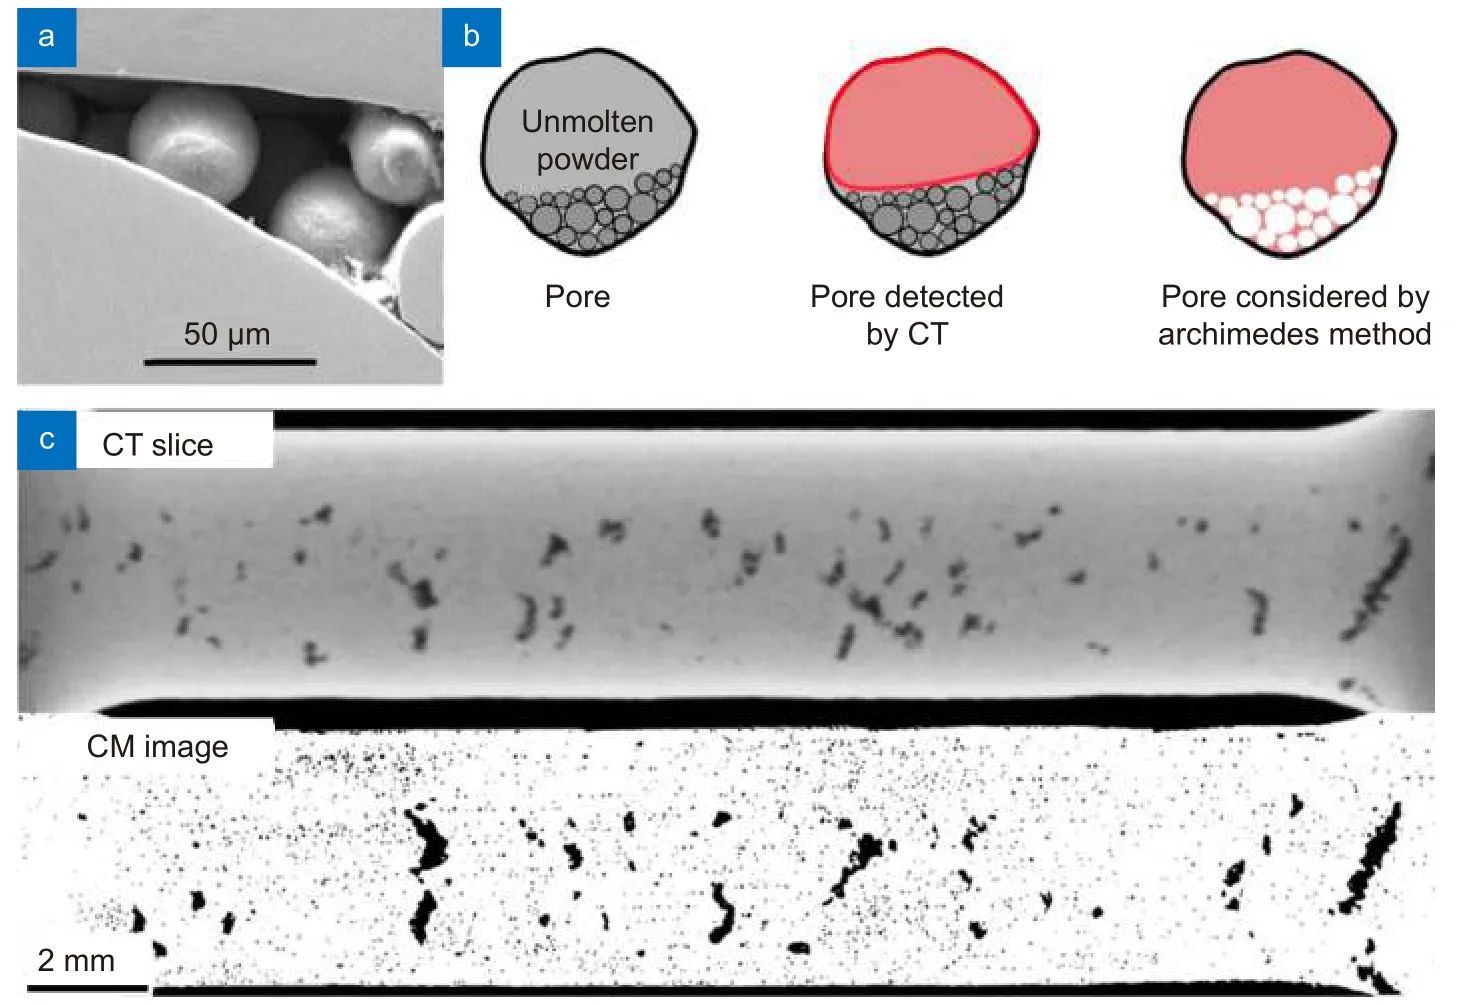
Fig. 6 | Comparative illustration of the limitations of X-ray CT. (a) Microscopic image of a LOF pore; (b) comparison of pores detected using X-ray CT and the Archimedes method; and (c) comparison of the same cross-section in a 316L sample detected by CT and by confocal microscopy (CM). Figure reproduced with permission from: (a, b) ref.76, Elsevier; (c) ref.104, under a Creative Commons Attribution-NonCommercial-No-Derivatives 4.0 International License.
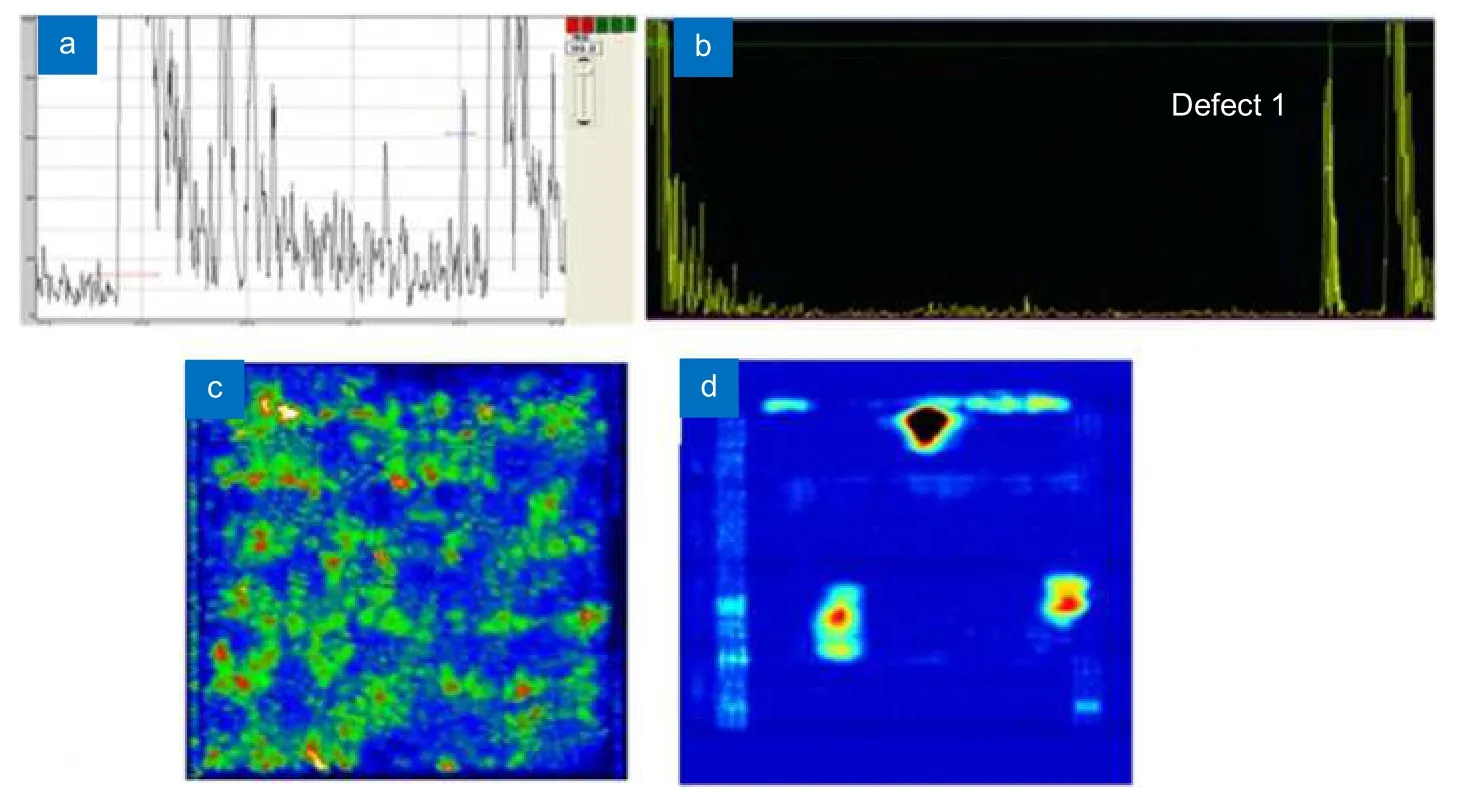
Fig. 7 | 1D ultrasonic A-scan diagrams of (a) conventional UT and (b) phased array UT; and 2D ultrasonic C-scan images of (c) conventional UT and (d) phased array UT. Figure reproduced from ref.117, under a Creative Commons Attribution 4.0 International License.
2D imaging method
The 2D imaging method is a DE method on the basis of cross-section imaging. Samples are cut along specific planes, then polished and examined using microscopic instruments such as optical and scanning electron microscopes (SEM)105. This method provides the spatial distribution, morphology, and other characteristics of porosity similar to the CT method, but only in a 2D form. Several cross-sections will be prepared and examined to generate statistically-reliable results for a common sample105,106. Although the 2D imaging method destructs the sample and only provides 2D information, it is still favored because of the outstanding accessibility and detectivity43,83,107,108. A modern SEM is capable of producing graphs with nanometer-scale resolution5. The micro features of porosity can be captured clearly on the whole cross-section, which is evidently beneficial for the statistical study of geometric descriptors83,105.
Ultrasonic method
Ultrasonic testing (UT) holds enormous applications in detecting defects in metal components109-111. This method is favored primarily for its excellent penetration depth in metals (can be as deep as several meters) and portability73. The inner defects are detected and evaluated through their interactions with the emitted ultrasonic waves110. Ultrasonic method has raised research interest in the community of AM recently112-115. Advanced ultrasonic technologies, such as laser ultrasonics and phased array ultrasonics, have been applied to pioneer the potential of UT in detecting porosity inside AM products114,116. Porosity-related time domain diagrams and 2D/3D images can be generated through probing the wave speed and energy distribution73. Figure 7 presents the representative 1D and 2D UT results of a TC18 alloy sample117. Employment of the phased array ultrasonic instead of conventional ultrasonic has significantly improved the signal-to-noise ratio. The ultrasonic method is an emerging NDE approach for detecting the defects inside LPBF printed metals, particularly for the examination of large and complex components due to its excellent portability and high penetration depth. On the other hand, although UT can provide precise location information of pores, it is currently limited by its inadequate quantitative ability73,117. Post-processing of data and other evaluation methods should be implemented as complements to improve the detectivity of UT.
General effects of porosity on the mechanical performance of LPBF printed metals
The existence of porosity can exert substantial influences on the mechanical performance of metal products89. Numerous studies have reported the degradation of mechanical performance that attributed to porosity18,30,83,118-120. Whereas, porosity can also be intentionally induced to realize specific functions. For instance,the porous biomedical implants with extra-low elastic modulus121,122. Porosity in metals can induce the nucleation of cracks due to the stress concentration under mechanical loads41,87. Therefore, the deterioration of ductility and dynamic mechanical performance of LPBF printed metals is often ascribed to the presence of porosity38,71,123,124. Meanwhile, the influence and acceptance level of porosity vary from different types of mechanical loads41,87. The effects and critical indicators of porosity in different loading situations will be discussed individually in the following subsections.
Tensile properties
Porosity causes reductions in tensile strength and ductility is a general consensus in the studies of cast metals125,126. Although LPBF prints products through a way differentiated from the traditional casting, the mechanical effects of porosity do share many similarities among LPBF printed and cast metals40,126. As illustrated in Fig. 8(a), the uniform stress field is altered in the adjacent region of an ellipsoidal pore and stress level is elevated near the tip. For an ideal ellipsoidal pore in an isotropic material, the maximum stress,σmax, is determined by the tip radius,ρ, and the length of semi-major axis,b,as127:

whereSis the remote stress. Stress concentration caused by porosity can deteriorate the mechanical performance of as-printed metals. A representative fractographic image in Fig. 8(b) demonstrates the presence of LOF pores in a LPBF printed Ti-6Al-4V sample with poor strength and ductility.
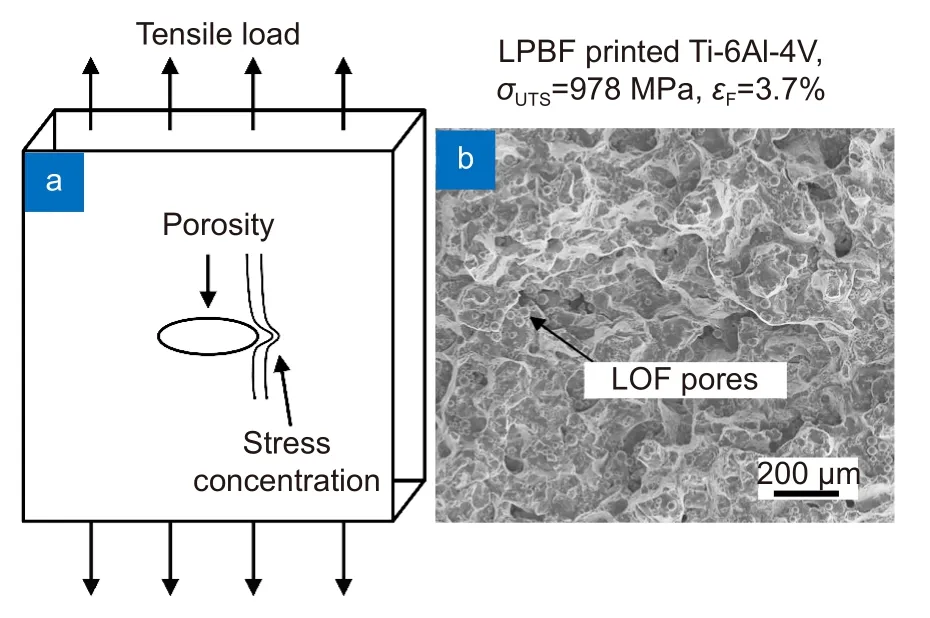
Fig. 8 | Detriments of porosity to the mechanical performance.(a) Schematic illustration of uniaxial tensile load applied to a sample with inner porosity. (b) Fractographic image of a LPBF printed Ti-6Al-4V tensile sample. Figure reproduced with permission from(b) ref.123, Elsevier.
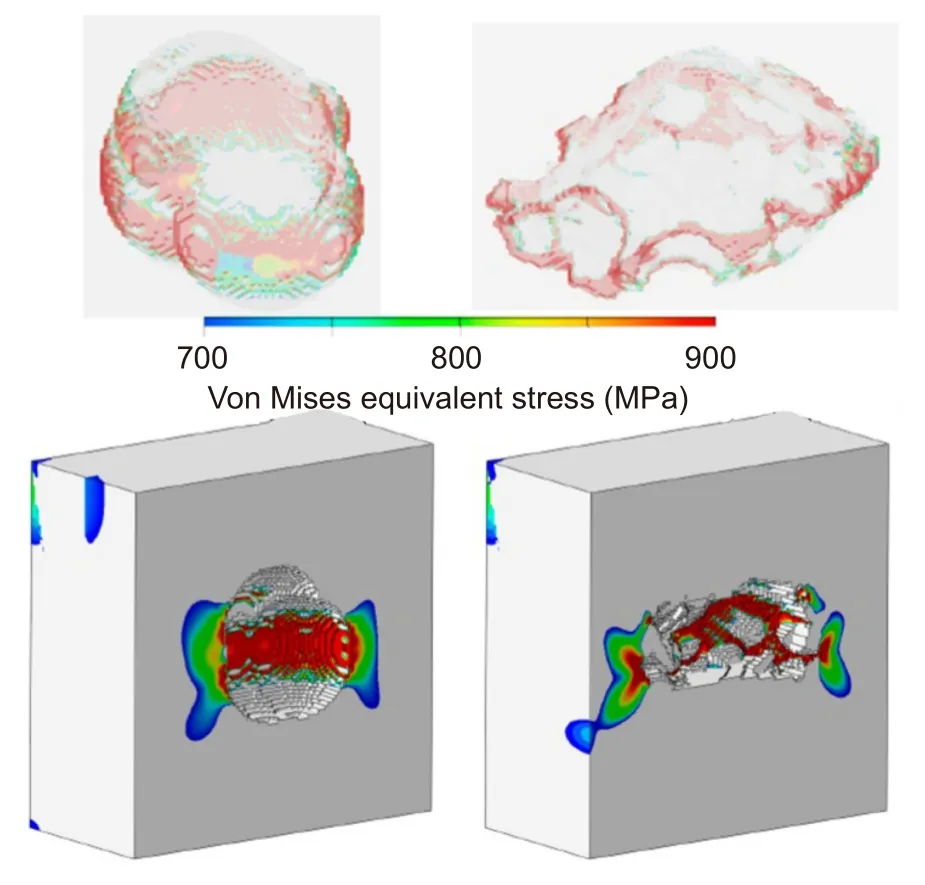
Fig. 9 | Simulated stress distribution profile of two pores in a LPBF printed Ti-6Al-4V sample under identical uniaxial tensile load. Figure reproduced from ref.90, under a Creative Commons Attribution 4.0 International License.
Uniaxial tensile test is one of the most basic and universal mechanical tests for engineering materials8,89. Important mechanical properties, such as yield strength(YS,σY), ultimate tensile strength (UTS,σUTS), strain at fracture (εF), reduction of area (RA), and elastic modulus (E), can be determined through applying a simple uniaxial tensile force to the sample until it breaks.
Porosity reduces the volume of material that can interact with the applied force. The elastic moduli of porositycontaining materials can be estimated by several empirical models. Bert128suggested a model with morphological considerations of porosity based on Rossi’s129study as:

whereE0is elastic modulus of fully-dense material,Vpis volume fraction of porosity,Vp,maxis geometrically-possible maximum fraction of porosity, andK0is stress concentration factor dependent on the morphology of porosity. Previous studies126,128,130have validated the feasibility of Eq. 5 to predict the effect of porosity on elastic modulus using both finite element method (FEM) and experiments. The influence of porosity on YS is similar to that on elastic modulus due to similar theoretical analyses at the elastic deformation stage131,132. YS decreases with rising porosity fraction owing to the reduction of material as well as the crack initiation at pores. Empirical studies131,133,134have also established relationships between porosity fraction and YS of LPBF printed metals that similar to Eq. 5.
1. 对象:选择2009年6月至2015年12月有临床表现,且MRI诊断为半月板损伤的海军舰艇官兵980例为研究对象,且全部为单膝单侧半月板,均为男性,年龄18~34岁,平均22.5岁,就诊时间1 h~3月,平均1.5周,左侧505例,右侧475例,内侧368例,外侧612例。均有外伤史:足篮球运动伤452例,舰艇战位训练伤245例,长跑伤143例,折返跑伤72例,其他68例。
Porosity’s influence at the plastic deformation stage is much more complicated compared to that at the elastic stage because ductile fracture is inherently anisotropic41.Eq. 4 suggests a smaller tip radius causes a higher stress concentration, indicating that the sharpness, or curvature of the tip, plays a dominant role in determining the local stress. Kabir and Richter90studied the stress distribution of an LPBF printed Ti-6Al-4V sample with pores in it. Figure 9 presents the FEM simulated stress profile that clearly illustrates the intensified stress nearby pores’ sharp tips. During tensile loading, a plastic zone will be generated surrounding a pore’s tip before the nominal stress reaches the yield point. The tips of pores can expand and propagate in the corresponding plastic zones, resulting in local plastic deformation and may initiate cracks41,127.
The ductile fracture behavior of polycrystalline metals is presently explained by the void nucleation, growth,and coalescence mechanism94,135,136. A set of microscopic images of void growth-coalescence under uniaxial tensile stress in an Al-Cu-Mg alloy are presented in Fig.10. The porosity in LPBF printed metals are natural void sites as discussed above. Those pores grow and facilitate the void nucleation in their neighborhood during plastic deformation. When two voids become close enough, an internal necking happens at the inter-void ligament and leads to the coalescence of voids94,137. Other coalescence mechanisms, such as internal shearing of inter-void ligament and “necklace” coalescence, can also contribute to the void coalescence depending on the strain and distribution of porosity41,135. In addition, clustered and periodically-arranged porosity are prone to coalescence owing to the smaller distances between pores and stronger stress triaxiality41. Thus, the spatial distribution of porosity can as well influence the mechanical performance significantly. For instance, Yadroitsev et al.138reported an apparent correlation between tensile necking and clustered inner pores in an LPBF printed Ti-6Al-4V.

Fig. 10 | Void growth and coalescence under tensile load. (a-f) High-resolution transmission electron microscopic images presenting the void growth and coalescence during in-situ tensile loading of an Al-Cu-Mg sample, with (g) corresponding schematic illustration. Figure reproduced with permission from ref.136, Elsevier.
It has been well established that the strain hardening phenomenon dictates the UTS of metals41,89,139. Therefore, the elongation at the onset of necking (macroscopic localized strain), a property that closely connected to the porosity80,94,135, is crucial in determining the engineering UTS of LPBF printed metals. Susmel et al.140reported the theory of critical distances (TCD) held a good accuracy in predicting the strength of notched tensile samples, which indicates the detriment increases exponentially against the rising length of pores. Voisin et al.141further noted that an LPBF printed Ti-6Al-4V sample with large, clustered subsurface porosity exhibited approximately the same UTS and ductility compared to a sample with porosity fraction two times higher than it.Those findings suggest that the periodically-arranged artificial porosity used in functional porous products may cause more harm to the tensile properties than the randomly-arranged porosity. In conclusion, large, sharp,and clustered pores are the most influential types of porosity at the plastic deformation stage.
Along with the increasing strain, the damage accumulates through the interactions of voids till a crack initiates/propagates, or the plastic instability begins142. This leads to the localization of strain (“necking”) and the decrease of engineering strength89. Constitutive yield functions have been proposed by Gurson143, Tvergaard144, and Needleman145, the porosity-related Gurson-Tvergaard-Needleman (GTN) yield functionΦis expressed as146:

whereΣis the von Mise stress,Σmis hydrostatic stress,q1,q2, andq3are material constants, andVp★is a function ofVp. On the basis of yield functions and experimental data, several numerical models have been proposed to predict the correlation between porosity fraction and deformation behaviors94,135,137,146. Hao and Brocks146incorporated the effects of strain rate and temperature into the GTN model and successfully verified their model using FEM and a 22NiMoCr37 steel sample as presented in Fig. 11.
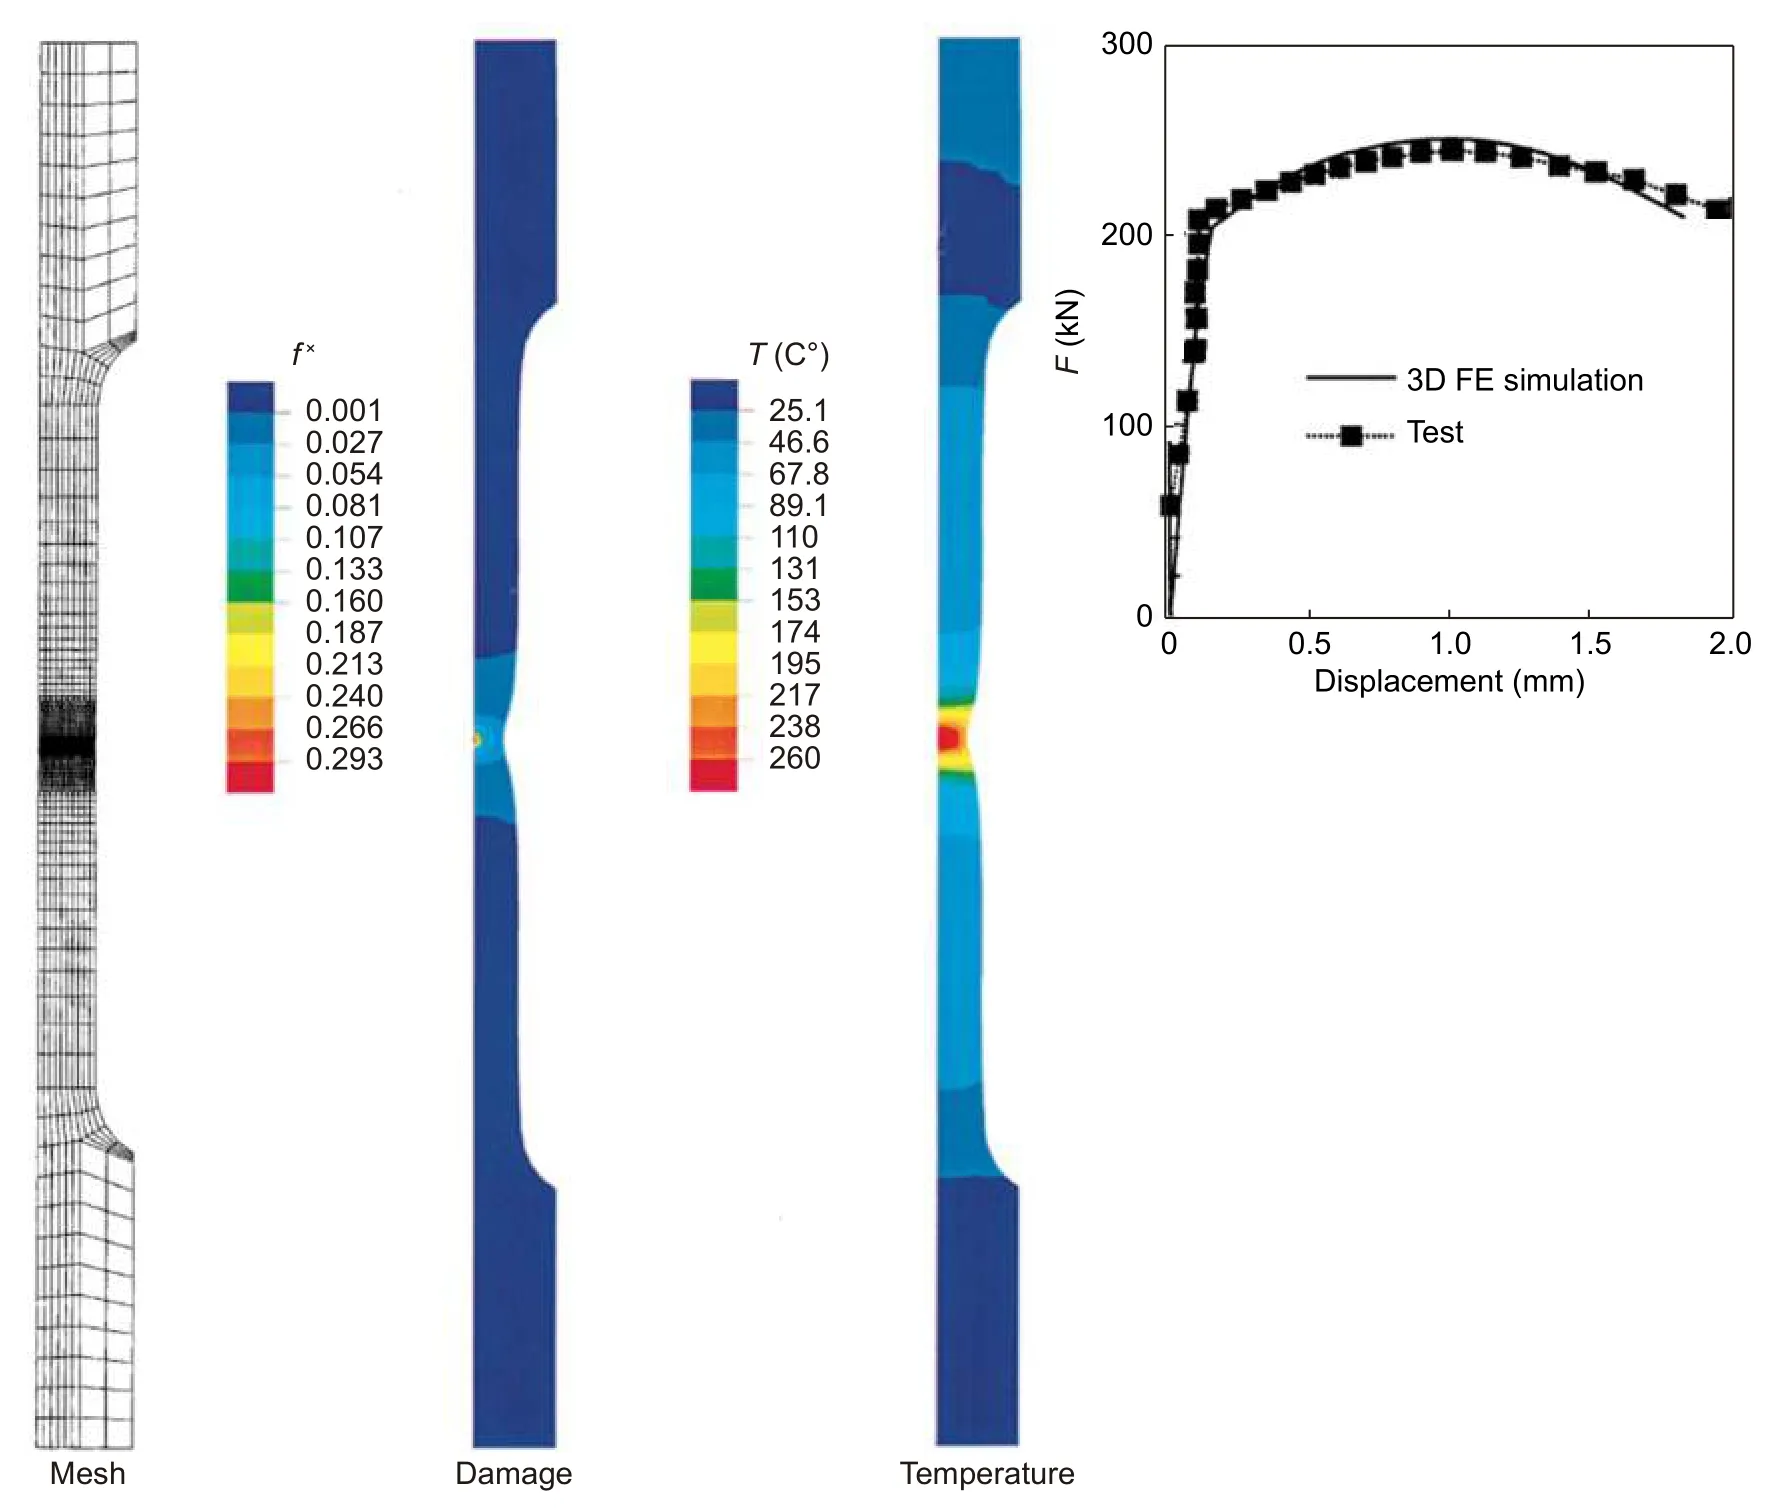
Fig. 11 | FEM simulation of uniaxial tensile tests and corresponding comparison between experimental and predicted data of a 22NiMo-Cr37 steel sample; the mesh is installed with cylindrical voids. Figure reproduced with permission from ref.146, Springer Nature.
Haynes147developed an simplified empirical model that illustrates the reduction in ductility caused by porosity in sintered metals as:

whereCis a material constant, andεF0is strain at fracture of fully-dense material. This model is applicable for preliminary fast estimations.
Fatigue performance
Fatigue failure of metals is caused by the initiation and propagation of fatigue cracks that similar to the last stage of tensile failure after plastic instability occurs87,148.Meanwhile, the fatigue cracks are induced by cyclic loadings instead of a simple tension. Two systematic reviews38,148have been published recently, focusing on the effects of defects on the fatigue performance of additively manufactured metals. Porosity is one of the most critical roles in determining the fatigue performance of LPBF printed metals because it can serve as fatigue crack initiation sites148,149. As depicted in Fig.12, Tammas-Williams et al.150illustrated the propagation of porosity-induced fatigue cracks in as-printed Ti-6Al-4V samples.

Fig. 12 | Fatigue crack propagation detected by CT in three LPBF printed Ti-6Al-4V samples. The red regions indicate the pores as the initiation sites of fatigue cracks. Figure reproduced with permission from ref.150, under a Creative Commons Attribution 4.0 International License.
The size, morphology, and spatial distribution of porosity have received the most research interest since the status of stress concentration generally dominants the fatigue performance of metals75,87,150-153. Considering the fact that morphological descriptors of all the pores in a sample are difficult to measure, studies on the effects of porosity on fatigue performance are mainly focused on the size of pores75,85,86,150,151,154,155. The maximum pore size has been broadly suggested as the most critical indicator.Statistical tools have been extensively used to estimate the size distribution of porosity75,85,156-158. Murakami159proposed an empirical model to describe the relationship between stress intensity factor, ΔKI, and the size of spherical pores as:

where Δσis stress amplitude. Eq. 8 is for internal pores and Eq. 9 is for surface pores. The stress concentration elevates with increasing projected area of pores, indicating a positive scale effect.
The TCD concept has been suggested by Taylor154as an effective tool to establish the linkage between porosity and fatigue performance. The material characteristic length,L, is used in TCD models to evaluate the risk of drastic reduction in fatigue limit as:

whereKcis fracture toughness of material, andσ0is characteristic strength of material, which is closely-related toσUTSand determined experimentally. Defects with length longer thanLcan exert significantly higher impacts on the fatigue performance as displayed in Fig.13154,160. Taylor161further noted a small sample size can lead to a smallerL, indicating the hazard of porosity may aggravate in LPBF printed metals with complex and small structural features. In addition, Caton et al.162developed a phenomenological model to correlate the initial pore size and the fatigue life as:
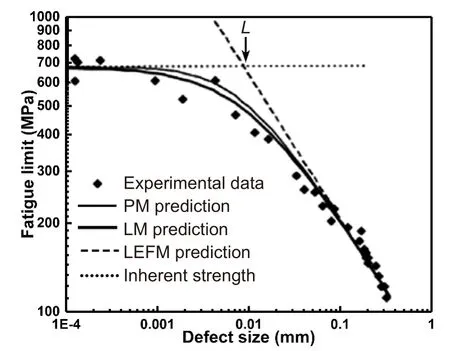
Fig. 13 | Experimental and predicted fatigue limits of silicon carbide samples against defect size. PM, LM, and LEFM are acronyms of point method, line method, and linear elastic fracture mechanics, respectively. Figure reproduced with permission from ref.154, Elsevier.

whereais crack length with the initial value of corresponding pore size,Nis number of loading cycles,Ca,s,andtare material constants,εmaxis the maximum strain,andσais alternating stress magnitude. The aforementioned findings suggest a promising methodology for estimating fatigue performance directly from porosity descriptors.
LPBF printed metal products are reported to have significantly lower fatigue performance, particularly the high cycle fatigue strength, compared to their wrought counterparts38,148. This difference is currently attributed to the defects, the high residual stress, and the non-equilibrium microstructures38,75,148,163,164, etc. However, two most vital descriptors, namely the irregularity and the largest size of pores, generally increase with rising porosity fraction based on the experimental results77,81,82,84,165.The findings above have revealed a potential that a higher porosity fraction may indicate higher probability of fatigue crack initiation and propagation. Therefore, it is possible to develop a constitutive model that correlates porosity fraction with fatigue limit in the future, which will be of great value for quick engineering estimations.
Correlation between porosity fraction and tensile properties of representative LPBF printed metals
Mechanical performance is crucial for most engineering metals. Excellent tensile properties are desired in services under heavy/dynamic loads46,166. Ti alloys, steels,nickel superalloys, and Al alloys are four major categories of LPBF printed engineering metals at present8,23,167.Four most extensively studied materials, namely Ti-6Al-4V, 316L, Inconel 718, and AlSi10Mg, are selected as the representatives of the aforementioned four categories. Their tensile properties at room temperature are discussed along with the influence of porosity. The finish conditions and the methods of density measurement are noted in the tables below to specify the collected data.Cartesian coordinates are employed to represent the orientations of mechanical tests as shown in Fig. 14.Zdesignates the deposition (building) direction,Xdesignates the longitudinal direction perpendicular toZ, andYdesignates the transverse direction perpendicular to bothXandZ.
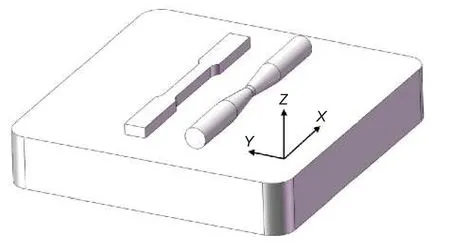
Fig. 14 | Designation of the testing directions.
With the aim of finding general trends and providing a more accessible way to predict the tensile properties,the correlation between tensile properties and porosity volume fraction is fitted using a simple phenomenological model as:

whereyis a specific tensile property (E,σY,σUTS, andεF),y0is fittedyvalue of fully-dense material, andCpis a fitted constant that indicates the sensitivity to porosity fraction. The differences in processing parameters, strain rates, and other factors are neglected in this review.
Ti-6Al-4V alloy
Ti-6Al-4V alloy is the most popular Ti alloy (accounts for more than 50% of total Ti usage) that has been vastly used in aerospace, marine, and biomedical industries since the 1950s168,169. It is anα+βdual-phase alloy with excellent specific strength, good corrosion resistance,and biocompatibility170. The LPBF of Ti-6Al-4V alloy has attracted extensive interest due to the challenges in its subtractive machining170-172. With the advances in processing optimization, as-printed Ti-6Al-4V components are capable of achieving an excellent combination of strength and ductility without any post treatments97,123,173.
Tensile properties of the Ti-6Al-4V alloy printed via LPBF are summarized in Table 1. The as-printed Ti-6Al-4V normally contains a high fraction of fine martensitic grains (α'-Ti) that grants high strength to the material174. Conventional HTs for LPBF printed Ti-6Al-4V are stress-relief annealing and solutiontreated and aging (STA)97,175. HTs above the effective martensite decomposition temperature (~780 °C) can transform martensitic phase into more stableα+βphases, enhancing the ductility simultaneously169.However, the HT-induced decomposition of fine martensites usually decreases the strength of Ti-6Al-4V as presented in Table 1. HIP treatments are capable of eliminating porosity to near-zero, whereas, the simultaneous reduction in strength is ascribed to the high temperature heating (> 1000 °C ) during HIP processing45,97.Meanwhile, several studies176,177reported moderate orientation effects on the tensile properties. The variation of tensile properties for samples built along different directions have been attributed to the inhomogeneity of defects and microstructures. Figure 15 displays the tensile properties against porosity fraction of as-printed Ti-6Al-4V. Phenomenological models are developed as:
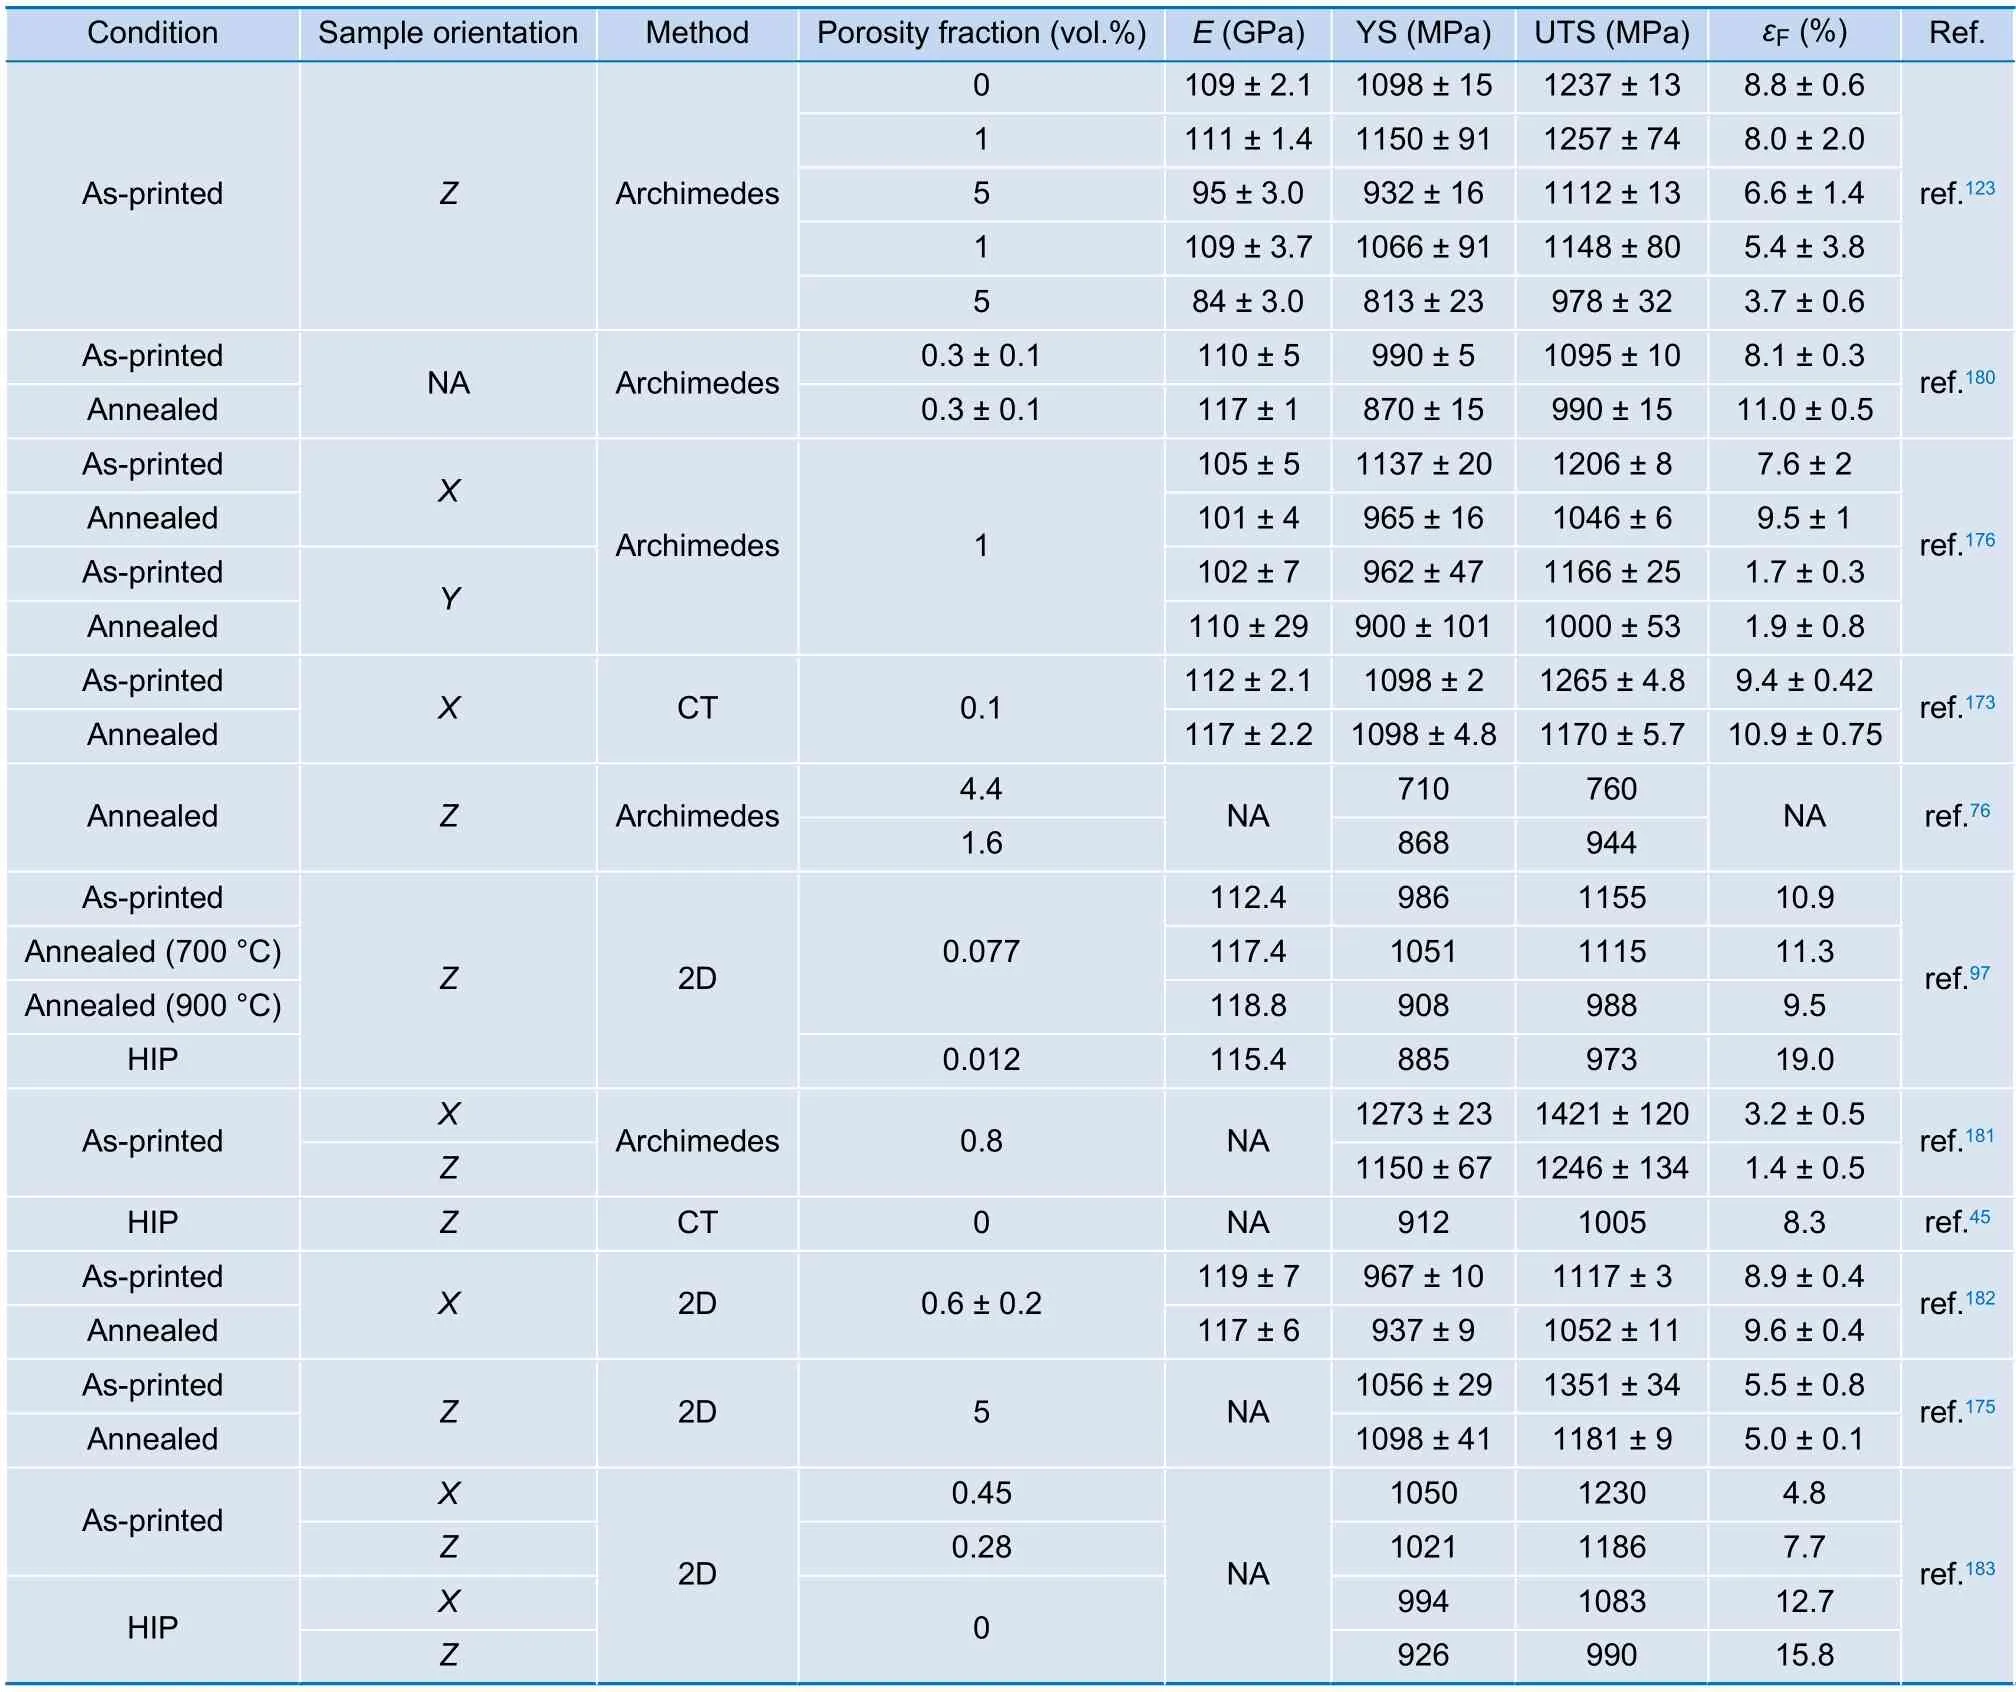
Table 1 | Summarized tensile properties of LPBF printed Ti-6Al-4V samples. Data not available is marked as NA.
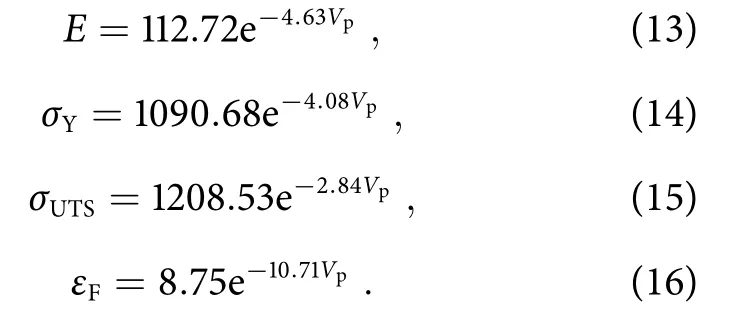
The mean squared errors (E2) of fittings are presented in Fig. 15 along with the fitted curves. The tensile properties maintain good when the porosity fraction is suppressed to below 1%. However, ductility of as-printed Ti-6Al-4V appears to be sensitive to both interstitial solutes and porosity fraction. Suppressing the porosity fraction to below 0.5% is necessary for achieving ductile and reliable Ti-6Al-4V products. The YS, UTS, and ductility data spreads significantly, which is probably caused by the variations in interstitial solutes (O, N, C,etc.). Addition of interstitial solutes brings a remarkable hardening effect to Ti-6Al-4V, whereas, the ductility drops significantly once the content of interstitial solutes exceeds a certain critical limit178,179.

Fig. 15 | Summarized tensile properties of LPBF printed Ti-6Al-4V versus porosity fraction, with corresponding phenomenological models. The red data spots are outliers that excluded from fitting.
316L stainless steel
316L SS is the second-most used austenitic SS after 304 SS184. The primary alloying elements of 316L SS are Cr(16-18 wt.%), Ni (10-12 wt.%), and Mo (2-3 wt.%).316L exhibits excellent ductility and weldability under multiple finish conditions184-186. It has been extensively used in chemical, food processing, marine, and biomedical industries due to its reasonable cost, fine formability,and good resistance to corrosion/oxidation185-187. A major drawback of conventionally-formed 316L is the lowYS (~250-300 MPa) since it cannot be hardened through quenching186,188. However, hierarchical, heterogeneous microstructures have been discovered in the LPBF printed 316L, granting an encouraging high YS to the material186,187. The scope of this classical engineering metal is expanding with the assistance of LPBF.
Tensile properties of the 316L SS printed via LPBF are summarized in Table 2. The hierarchical cellular microstructure generated through LPBF printing is critical to realize high strength, thus, the conventional HT is a simple stress-relief/solution annealing to maintain most of the as-printed microstructural features189. Similar to the Ti-6Al-4V alloy, 316L SS printed using proper parameters exhibits excellent tensile properties without any post treatments. Mechanical anisotropy has been noted in samples printed along different directions190-192. These variations have been ascribed to the anisotropic microstructure, textures, and defects190,191. A general trend of strength-ductility trade-off appears in those high-density 316L SS samples. High laser energies as well as hightemperature HTs can improve the ductility, whereas, it may reduce the density of dislocations and thus the YS187,193. Therefore, HIP becomes a less-favorable post treatment due to its possible damage to the YS. Figure 16 displays the tensile properties against porosity fraction of as-printed 316L SS. Phenomenological models are developed as:
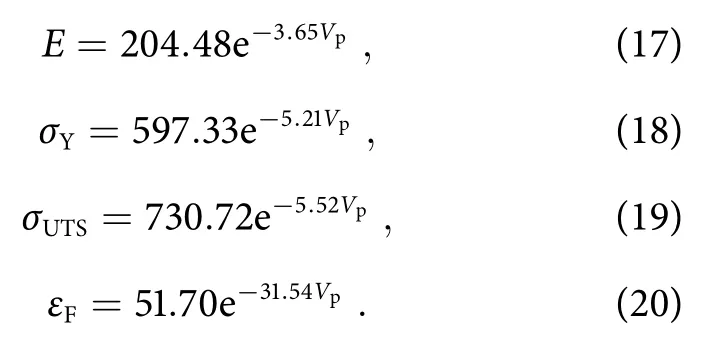
The mean squared errors of fittings are presented in Fig. 16 along with the fitted curves. As depicted by Eq.20, the ductility of as-printed 316L is highly-sensitive to porosity fraction. A nearly 40% reduction in ductility has been observed in the samples with ~1% porosity fraction compared to the fully-dense samples. To achieve excellent ductility and UTS, the porosity fraction should be suppressed to below 1% for as-printed 316L SS. The spreads of data in low-porosity-fraction areas are mainly caused by the microstructural anisotropy191,194,195. The columnar grains that grow along the deposition direction may decrease the strength of 316L samples printed alongZdirection due to a lower density of grain boundaries.
Inconel 718 superalloy
Inconel 718 superalloy is a Ni-Fe-Cr based superalloy with a nominal chemical composition of Fe-51Ni-19Cr-5Nb-3Mo-1Co-1Ti-xAl (in wt.%)200,201.It maintains outstanding strength, fatigue life, and resistance to oxidation/corrosion up to 700 °C, making this material an excellent choice for high-temperature applications201,202. Inconel 718 is particularly favored in fabricating gas turbines, combustors, and high pressure vessels200,202,203. As reported by Paulonis and Schirra204, the alloy can make up over half the total weight of a modern aircraft turbofan engine. On the other hand, the high strength at elevated temperatures as well as the low thermal conductivity of Inconel 718 hinders its forging and cold machining201. AM technologies including LPBF have been therefore vastly employed in the fabrication of complex Inconel 718 components202,205-208. Theγ'(Ni3(Al, Ti)) andγ''(Ni3Nb) precipitates are dominating roles in determining the mechanical performance of Inconel 718 products209. Proper HTs are essential for LPBF printed Inconel 718 to achieve ideal properties203,207,209.
Tensile properties of Inconel 718 printed via LPBF are summarized in Table 3. The STA treatment, for instance,that recommended by AMS 5662210, has long been used as a standard HT for Inconel 718 products203-205. This HT also works well with LPBF printed Inconel 718, generating a significant precipitation hardening effect while suppressing the detrimental Laves phase211. Anisotropic microstructure and mechanical performance have been observed. Notable fluctuations in elastic modulus and YShave been detected for both as-printed and STA-treated samples212-215, indicating the elastic modulus of as-printed Inconel 718 is highly-sensitive to processing parameters (sample orientations, laser energy density, etc.).Considering the STA treatment is essential for the hardening of Inconel 718, Fig. 17 displays the tensile properties against porosity fraction of STA-treated Inconel 718 superalloy. Phenomenological models are developed as:
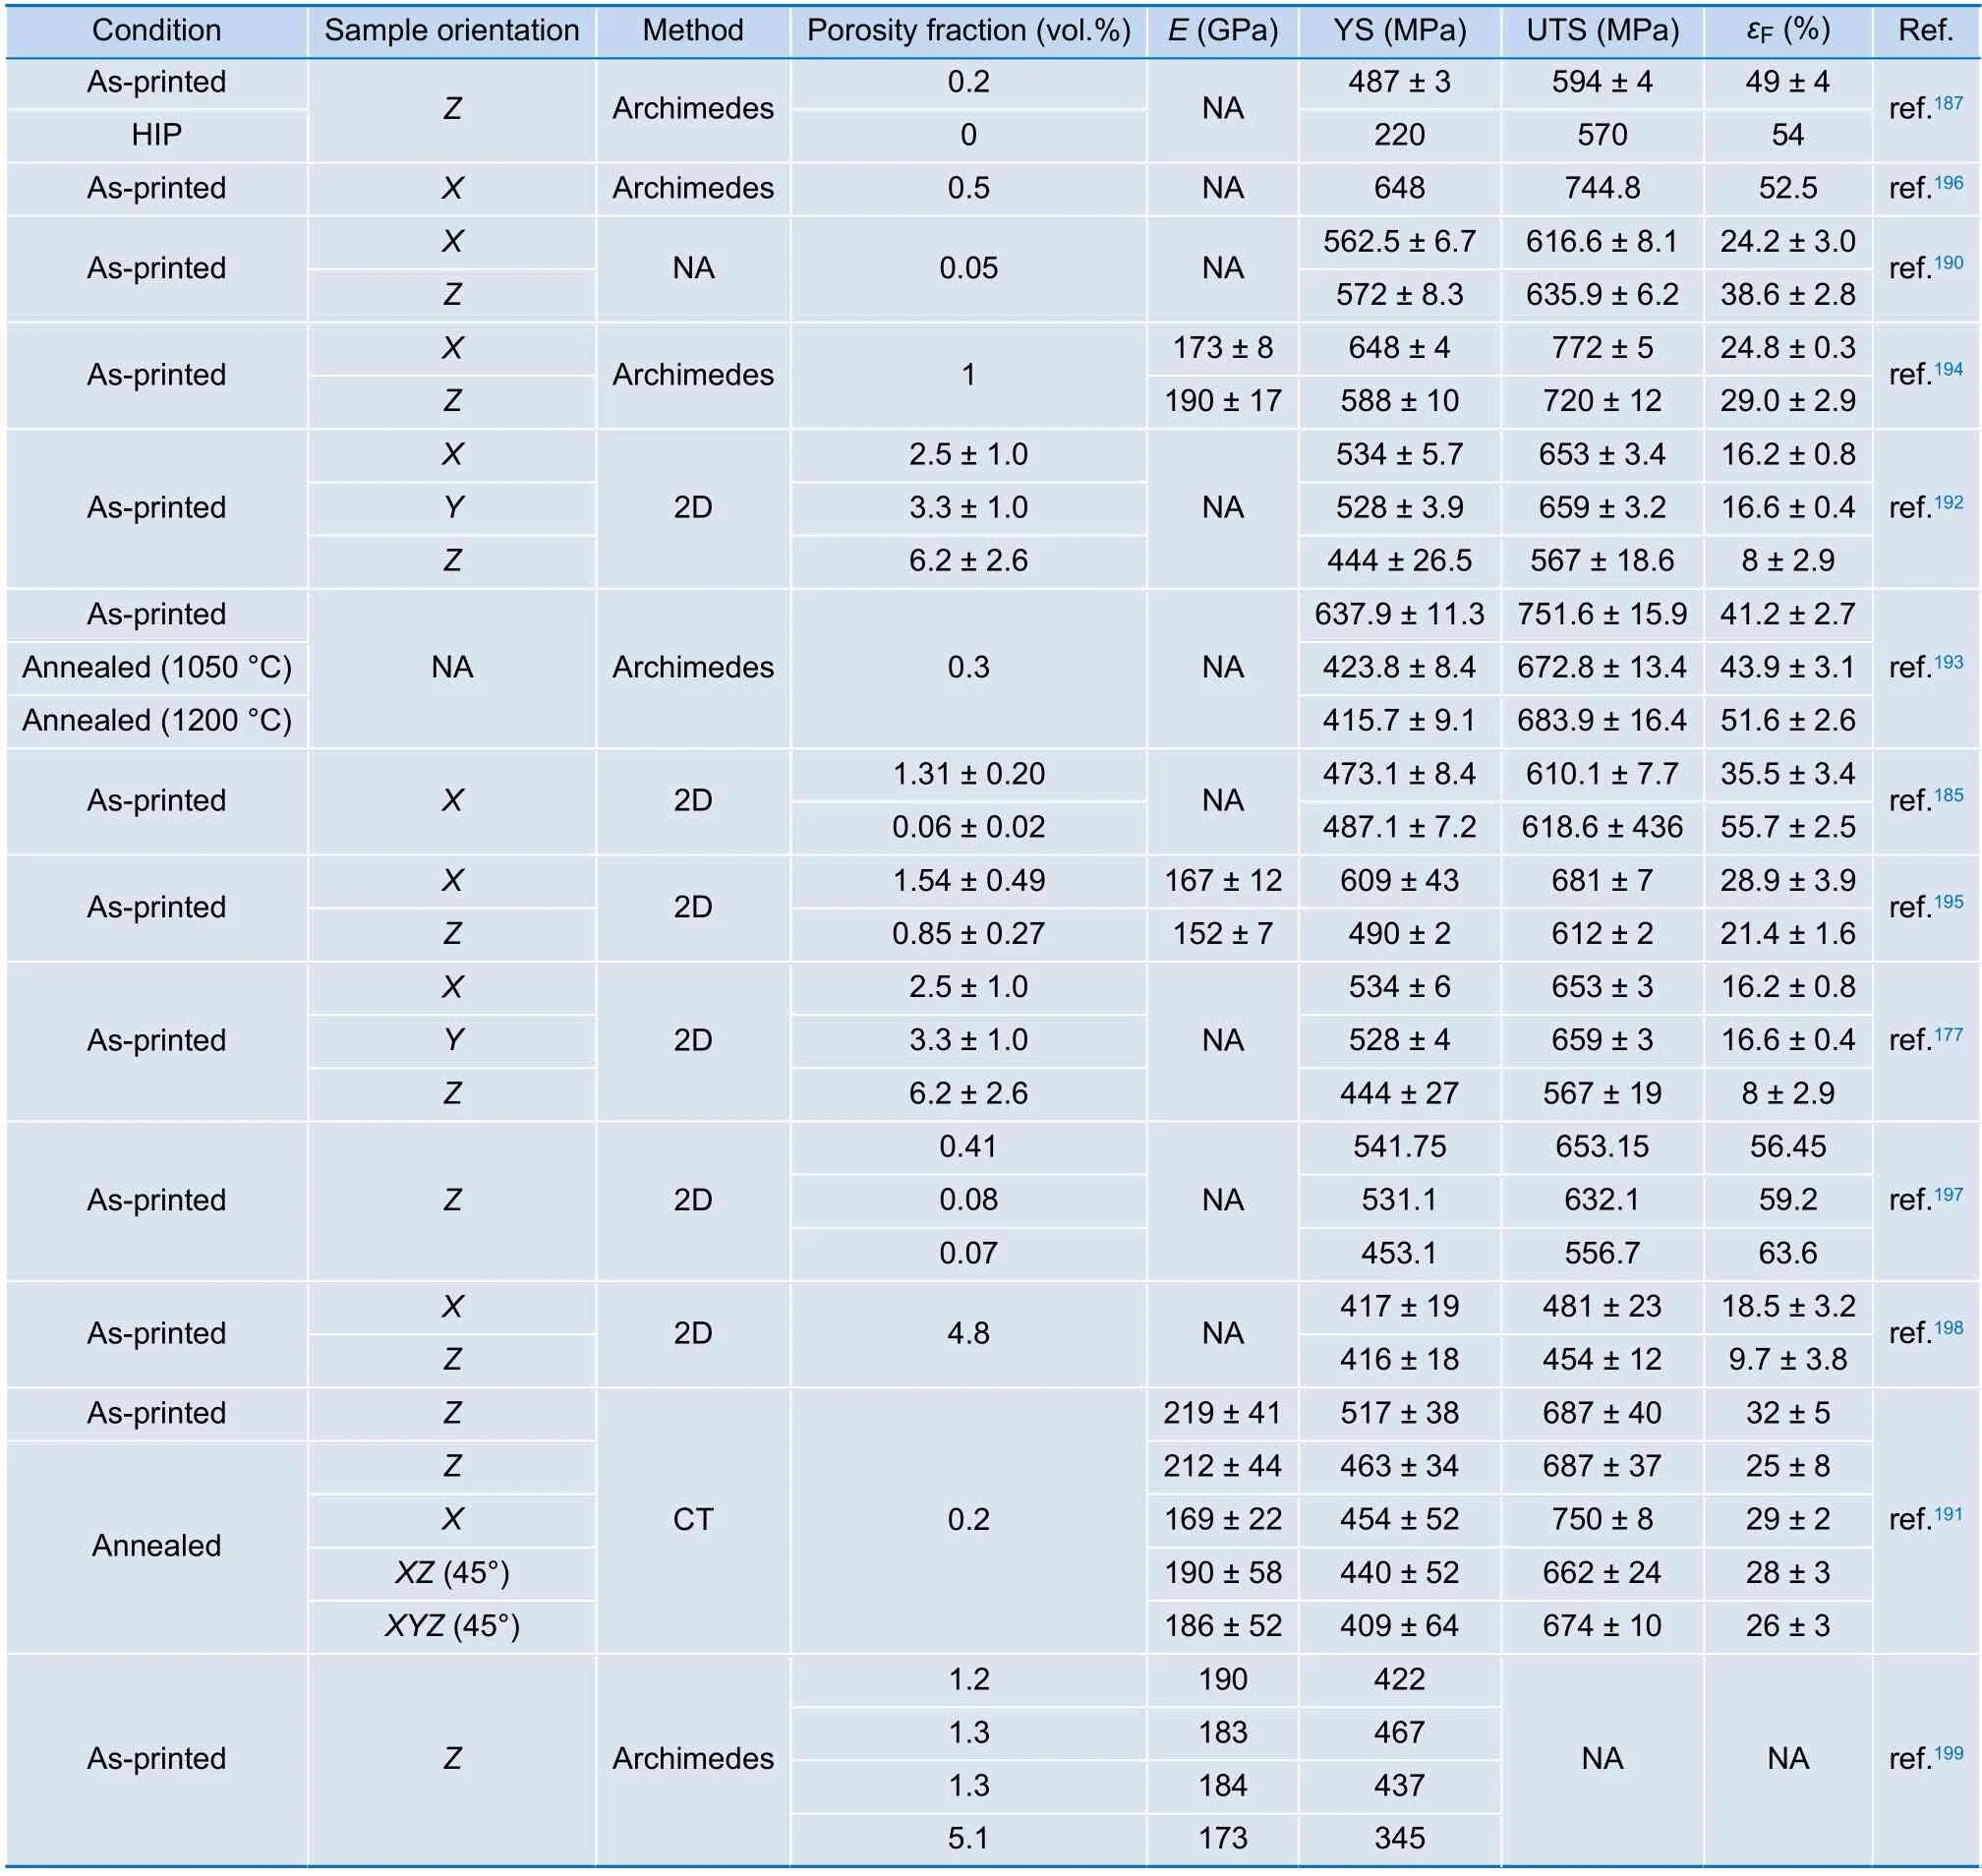
Table 2 | Summarized tensile properties of LPBF printed 316L SS samples. Data not available is marked as NA.
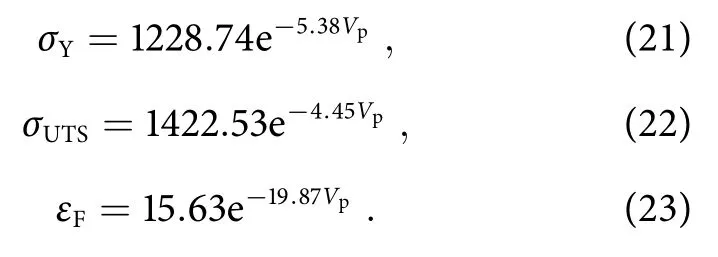
The mean squared errors of fittings are presented in Fig. 17 along with the fitted curves. The number of elastic modulus data spots is not enough for a reasonable fitting, thus the model ofEis omitted for Inconel 718. A porosity fraction below 0.5% is possibly suitable for LPBF printed Inconel 718 to realize excellent tensile properties. The trend of tensile properties are similar to that of 316L. The YS and UTS drop near-proportionally against elevating porosity fraction. The ductility of STAtreated Inconel 718 is less sensitive to the porosity fraction compared to that of as-printed 316L. In addition,the spreads of elastic modulus and ductility data are high in the low-porosity-fraction areas. Therefore, the microstructural factors are probably the dominating roles in determining the mechanical performance of Inconel 718 when the porosity fraction is below 1%.
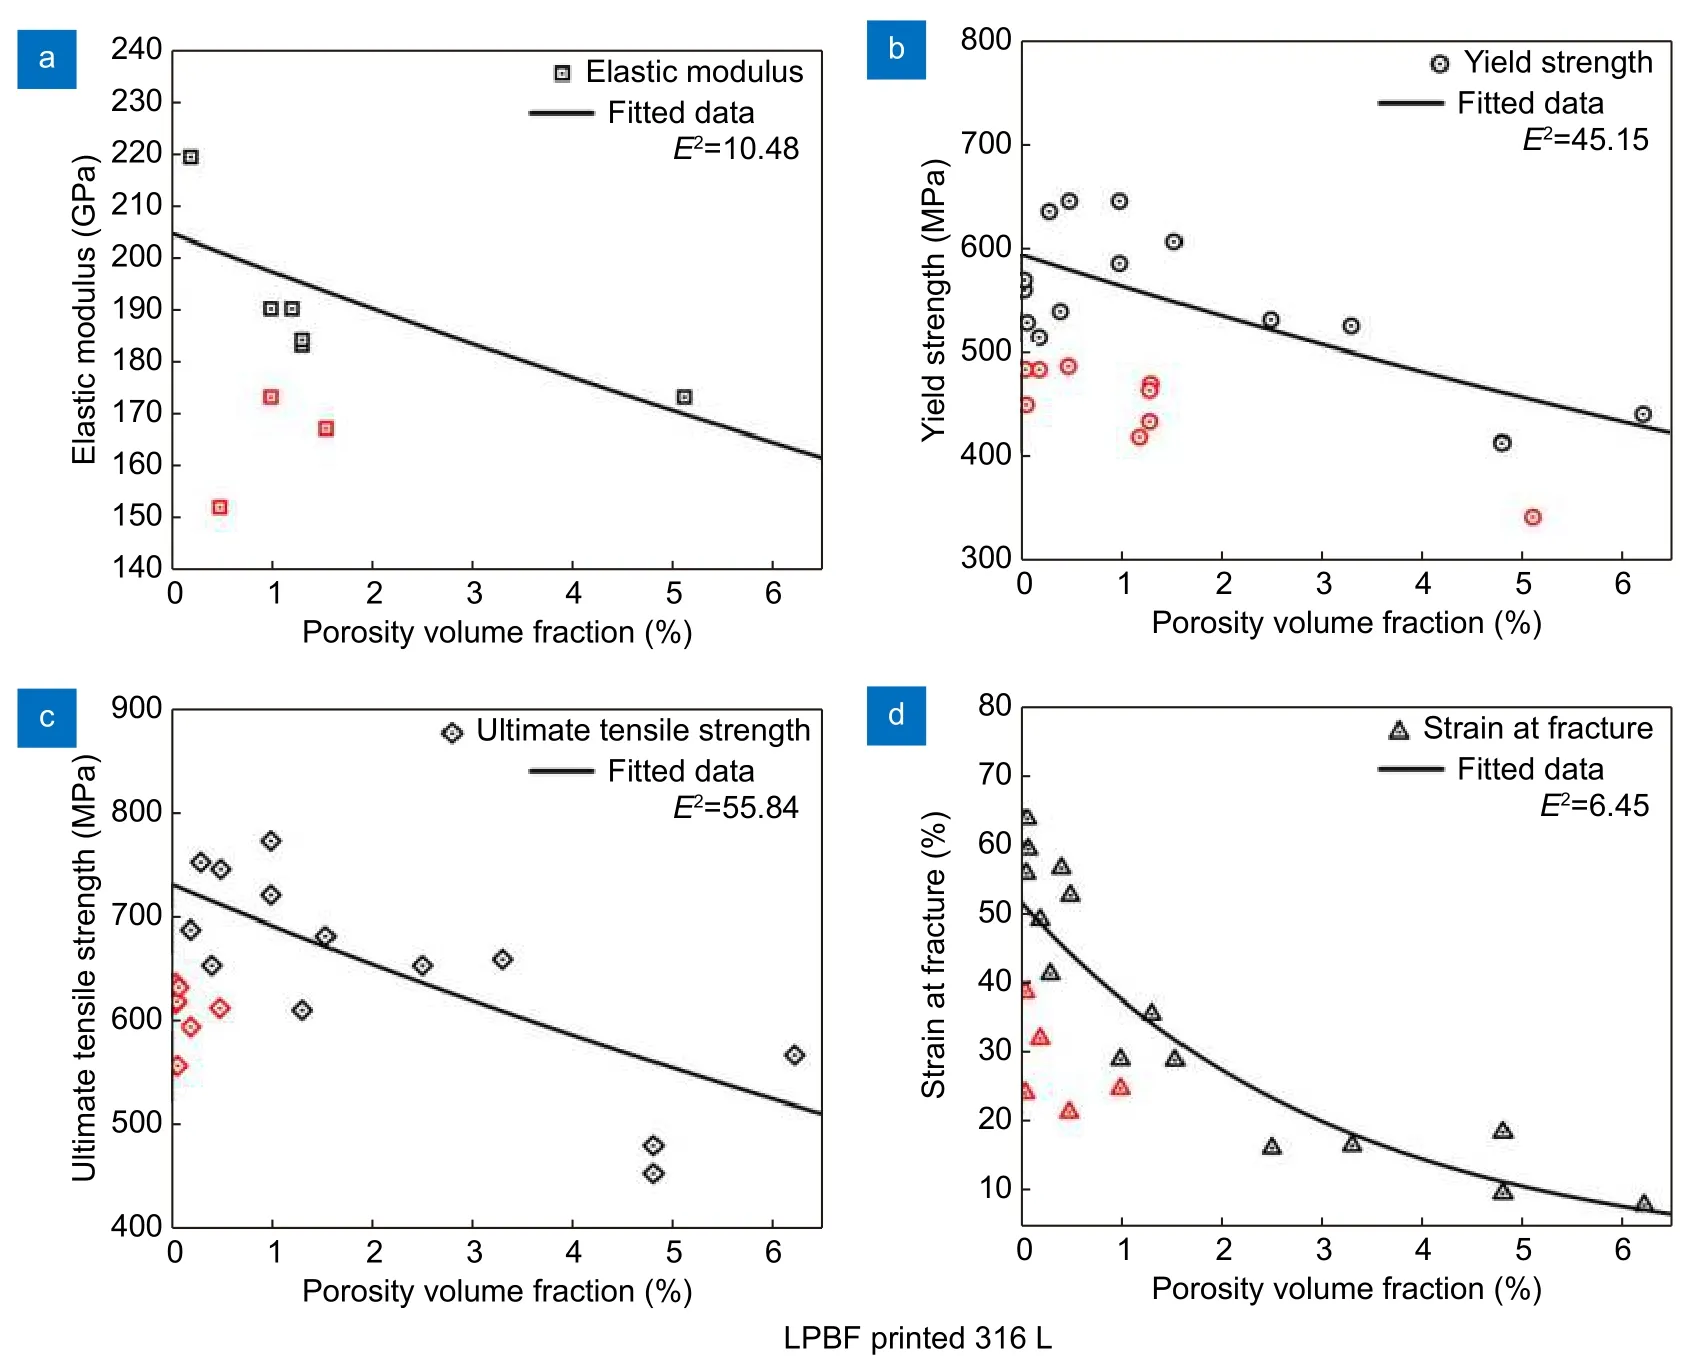
Fig. 16 | Summarized tensile properties of LPBF printed 316L SS versus porosity fraction, with corresponding phenomenological models. The red data spots are outliers that excluded from fitting.
AlSi10Mg alloy
Al alloys are renowned as light-weight engineering metals221. AlSi10Mg alloy is traditionally a cast Al alloy that can be hardened through HTs221-223. It has been extensively employed to fabricate light-weight components in the automobile and aerospace industries, owing to its good strength, weldability, and limited thermal expansion48,222-224. With the development of LPBF technology,crack-free AlSi10Mg products have been successfully printed without adding nucleants, implying a further extension of its application223-225.
Tensile properties of AlSi10Mg alloy printed via LPBF are summarized in Table 4. Solution + peak aging HT(STA, T6) is commonly applied to cast AlSi10Mg to induce Mg2Si precipitates48. However, this hardening method has not shown significant effect on LPBF printed AlSi10Mg samples48,222,226. The strength-ductility trade-off is a common trend in heat-treated AlSi10Mg samples227. Chen et al.228ascribed the high strength of asprinted AlSi10Mg to the hierarchical microstructure that induced by LPBF processing, which is similar to the LPBF printed 316L SS186. Girelli48reported a notable increase in the porosity fraction after 510-540 °C HT. The growth of pores is probably caused by the thermal expansion of entrapped gas since the reduction in density elevates with increasing peak temperature and heating time. In addition, several works57,229-231suggested that the mechanical anisotropy of as-printed AlSi10Mg can be effectively eliminated by HTs at 300 °C or above. Figure 18 displays the tensile properties against porosity fraction of as-printed AlSi10Mg alloy. Phenomenological models are developed as:
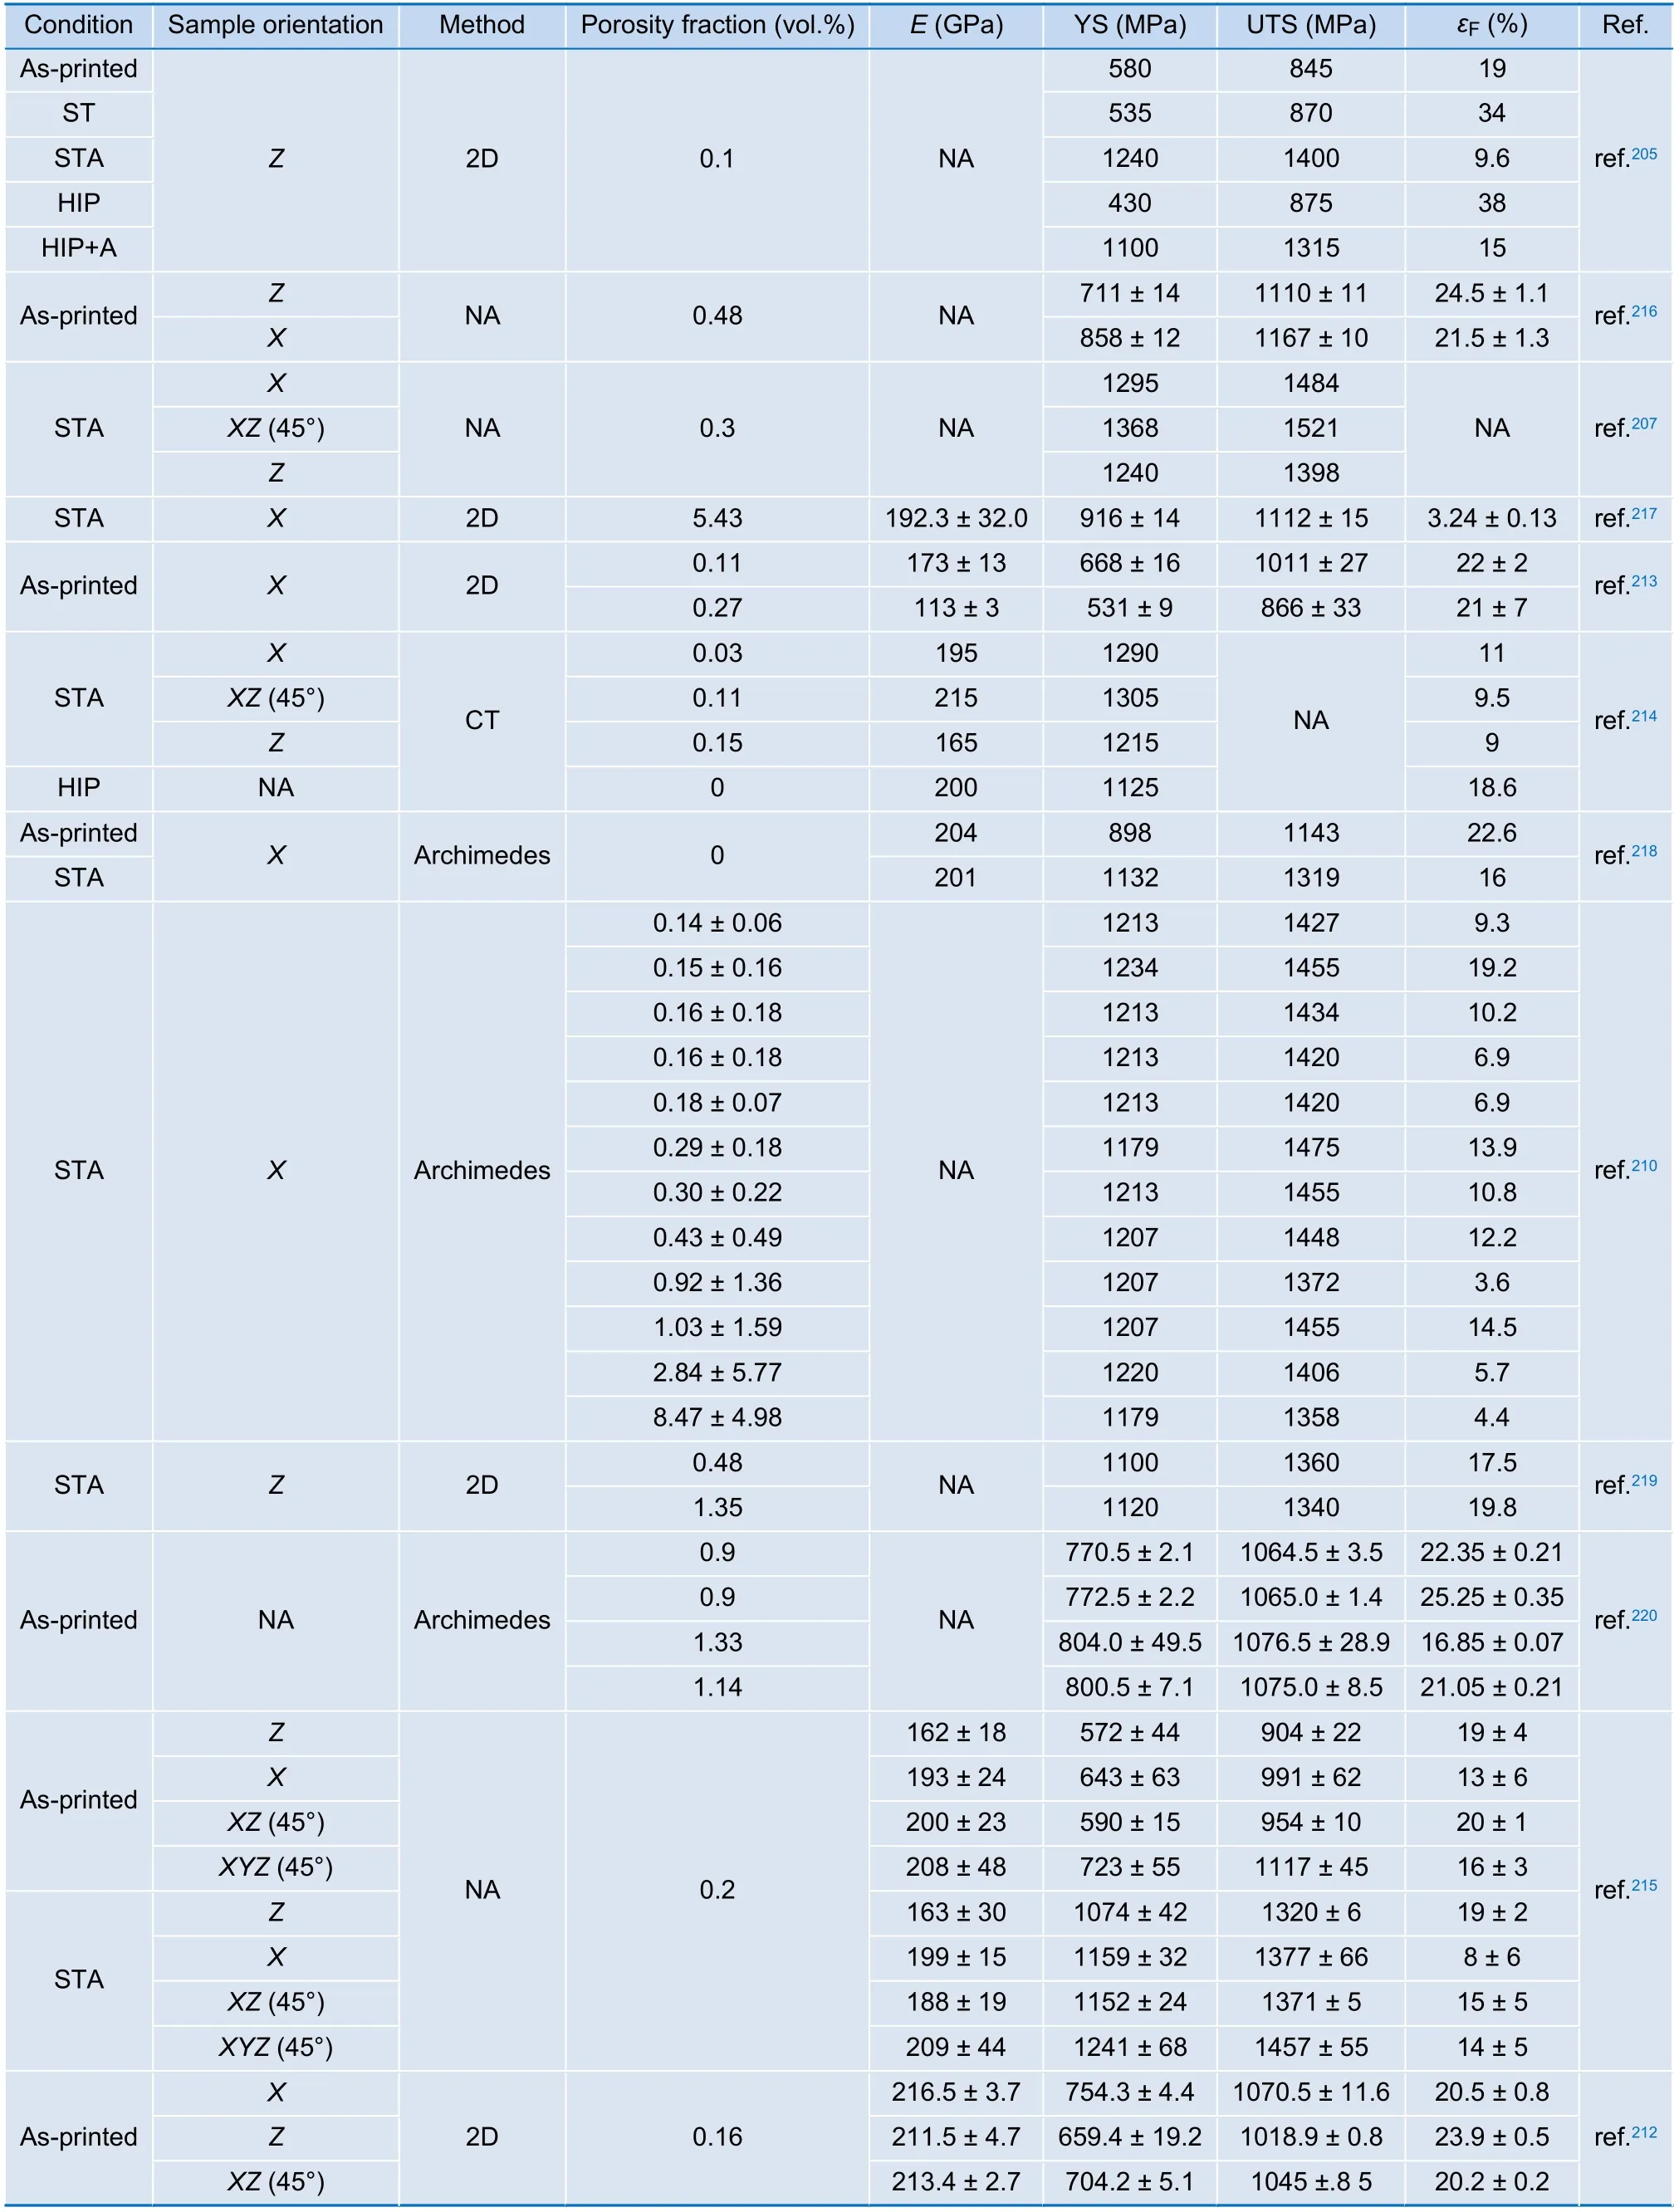
Table 3 | Summarized tensile properties of LPBF printed lnconel 718 samples. Data not available is marked as NA.

Table 3 (Continued)

The mean squared errors of fittings are presented in Fig. 18 along with the fitted curves. As depicted by Eq.27, AlSi10Mg is a relatively-brittle material in comparison to Ti-6Al-4V, 316L, and Inconel 718. The ductility ofas-printed AlSi10Mg is extremely sensitive to the porosity fraction. Fatal cracks may initiate from the pores at an early stage of tensile deformation, resulting in high spreads of ductility and UTS data. To conclude, the elimination of porosity is vital for less-ductile metals such as LPBF printed AlSi10Mg41,229,232. The porosity fraction of as-printed AlSi10Mg should be as low as possible(< 0.1%) to reduce the risk of crack initiation.
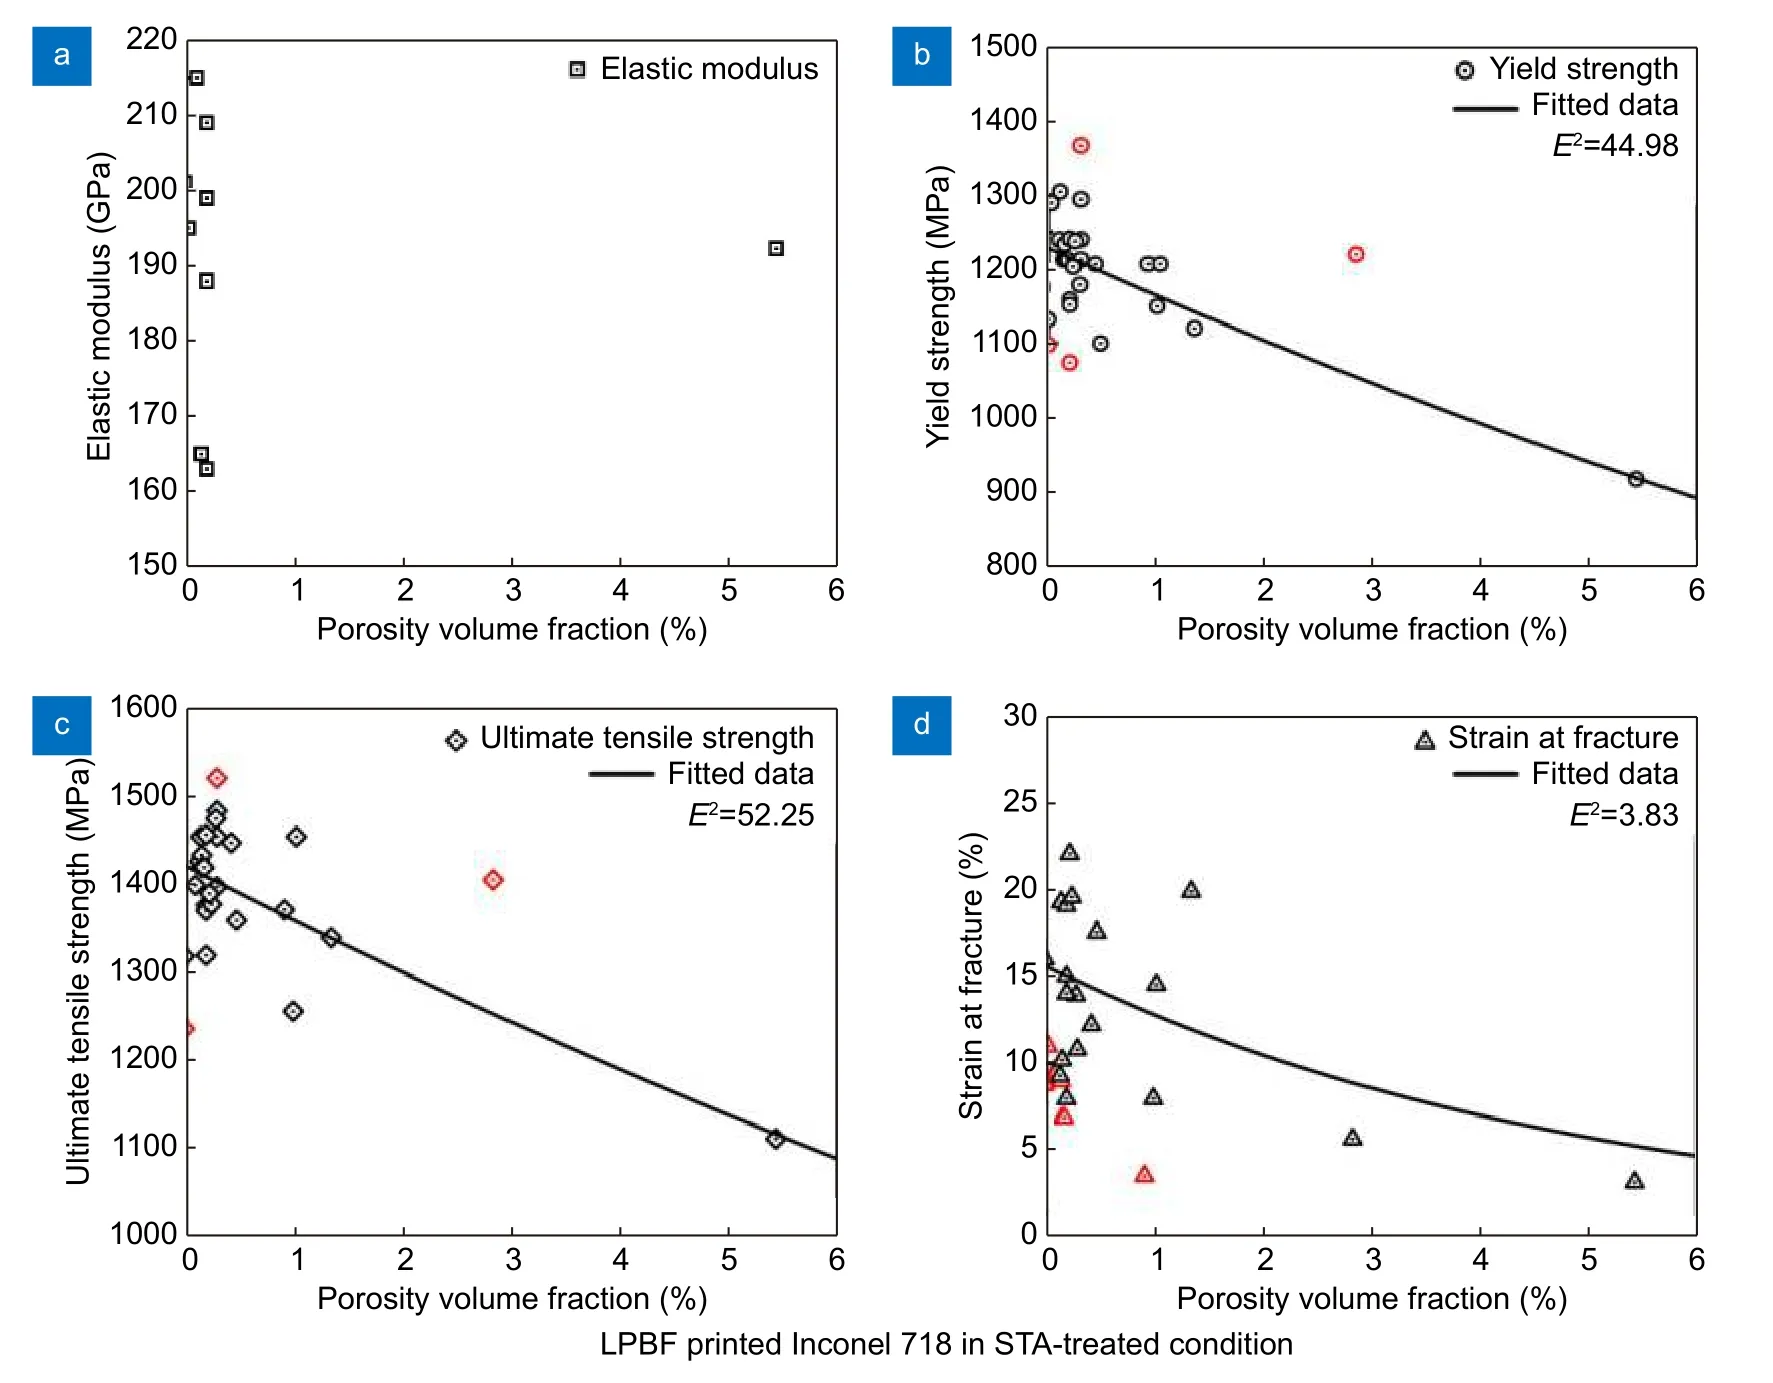
Fig. 17 | Summarized tensile properties of LPBF printed lnconel 718 versus porosity fraction, with corresponding phenomenological models. The red data spots are outliers that excluded from fitting.

Fig. 18 | Summarized tensile properties of LPBF printed AlSi10Mg versus porosity fraction, with corresponding phenomenological models. The red data spots are outliers that excluded from fitting.
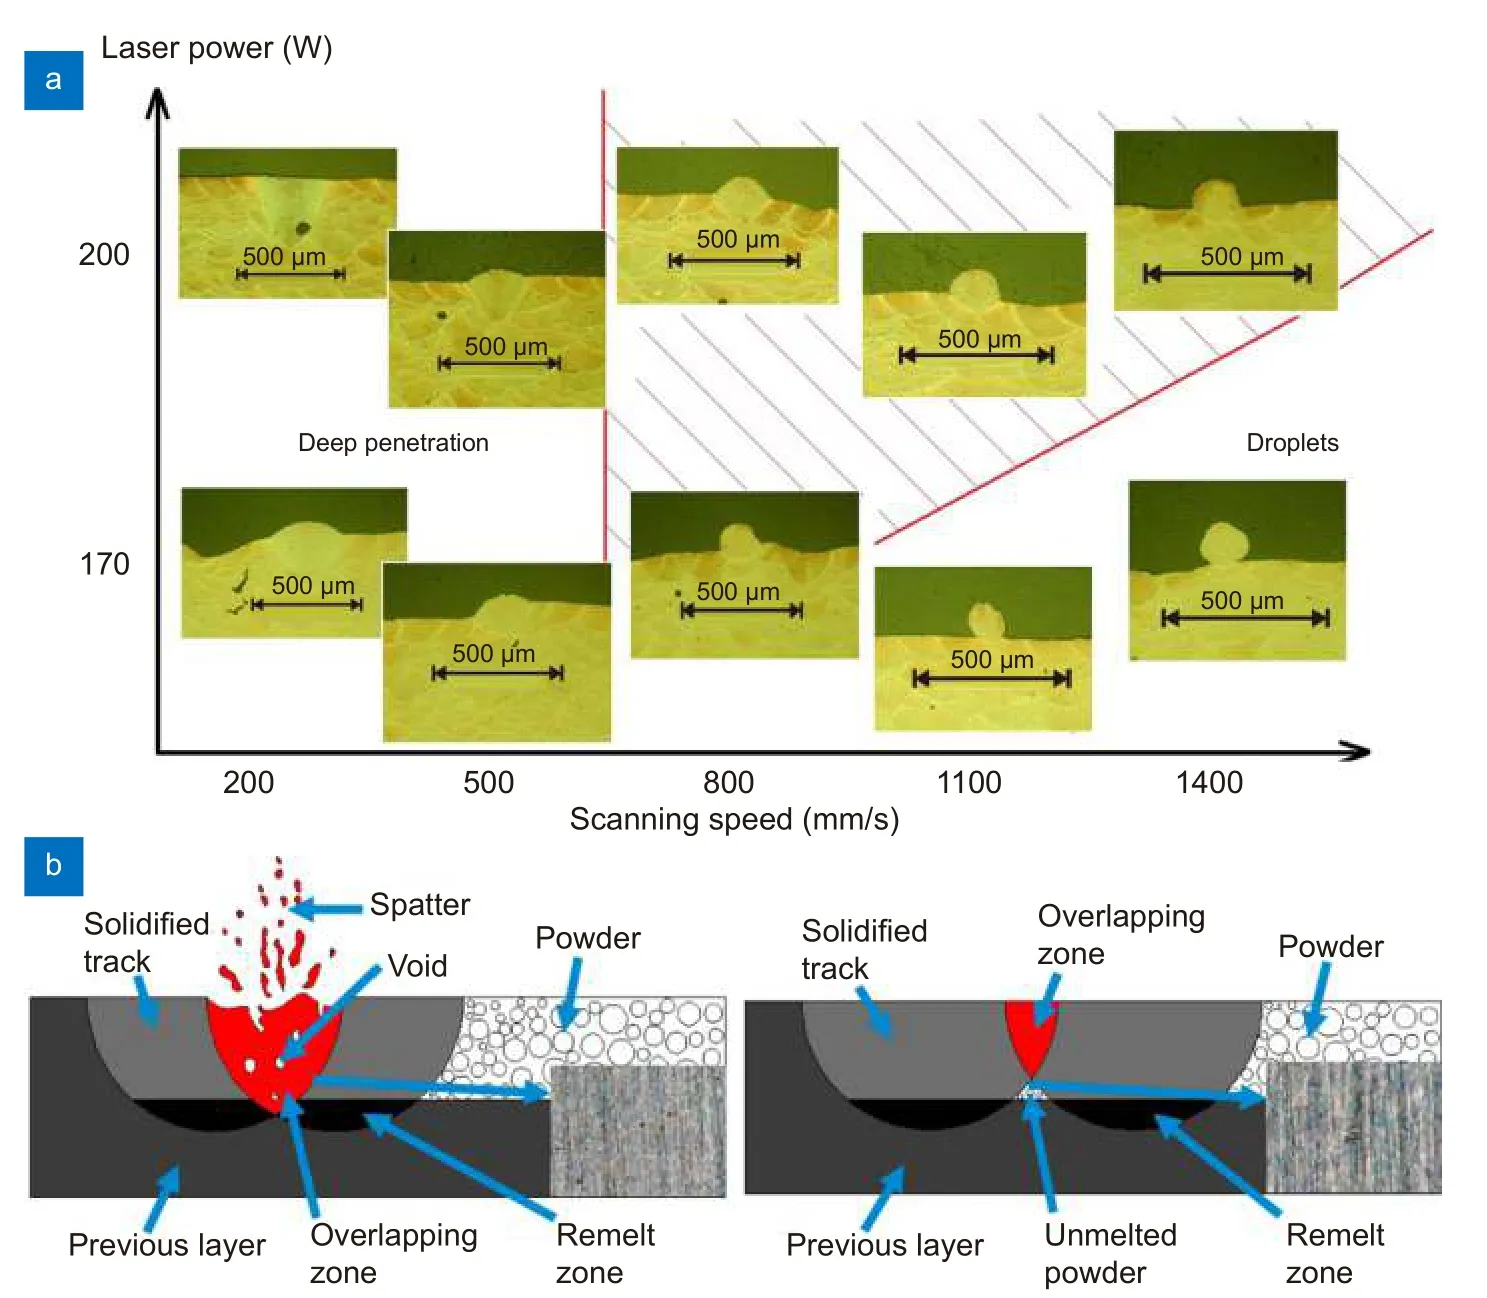
Fig. 19 | The influence of LPBF processing parameters. (a) Cross-sections of single scan tracks of LPBF printed AlSi10Mg. (b) Schematic illustration of the porosity formation due to inappropriate overlap rates. Figure reproduced with permission from: (a) ref.232, Taylor & Francis; (b)ref.244, Elsevier.
Comparison of tensile properties between LPBF printed metals and their traditionally-fabricated,porosity-free counterparts
The optimal tensile properties of the four aforementioned LPBF printed metals are summarized in Table 5,along with those of their porosity-free wrought/cast counterparts. Ti-6Al-4V, 316L, and Inconel 718 printed under optimized processes exhibit apparently superior YS and UTS than their wrought counterparts. The asprinted AlSi10Mg lacks Mg2Si precipitates, leading to a slightly lower YS compared to that of STA-T6-treated cast AlSi10Mg. The ductility of as-printed Ti-6Al-4V and Inconel 718 has reduced simultaneously as expenses for hardening. Nevertheless, the ductility of as-printed 316L and AlSi10Mg has been enhanced owing to the unique hierarchical microstructures generated by LPBF processing. All four LPBF printed metals hold elastic moduli that comparable to their wrought/cast counterparts when the porosity fraction has been suppressed to near-zero. However, the anisotropic elastic modulidiscovered in as-printed 316L and Inconel 718 demand extra attention in applications191,194,195,212-215. In summary,the tensile properties of LPBF printed metals can be comparable to, even superior to those of the traditionally-fabricated, porosity-free counterparts. Suppressing the porosity fraction to certain acceptance levels is essential for achieving excellent mechanical performance. On the other hand, metals with high porosity fractions may be intentionally printed to pursue lower moduli.
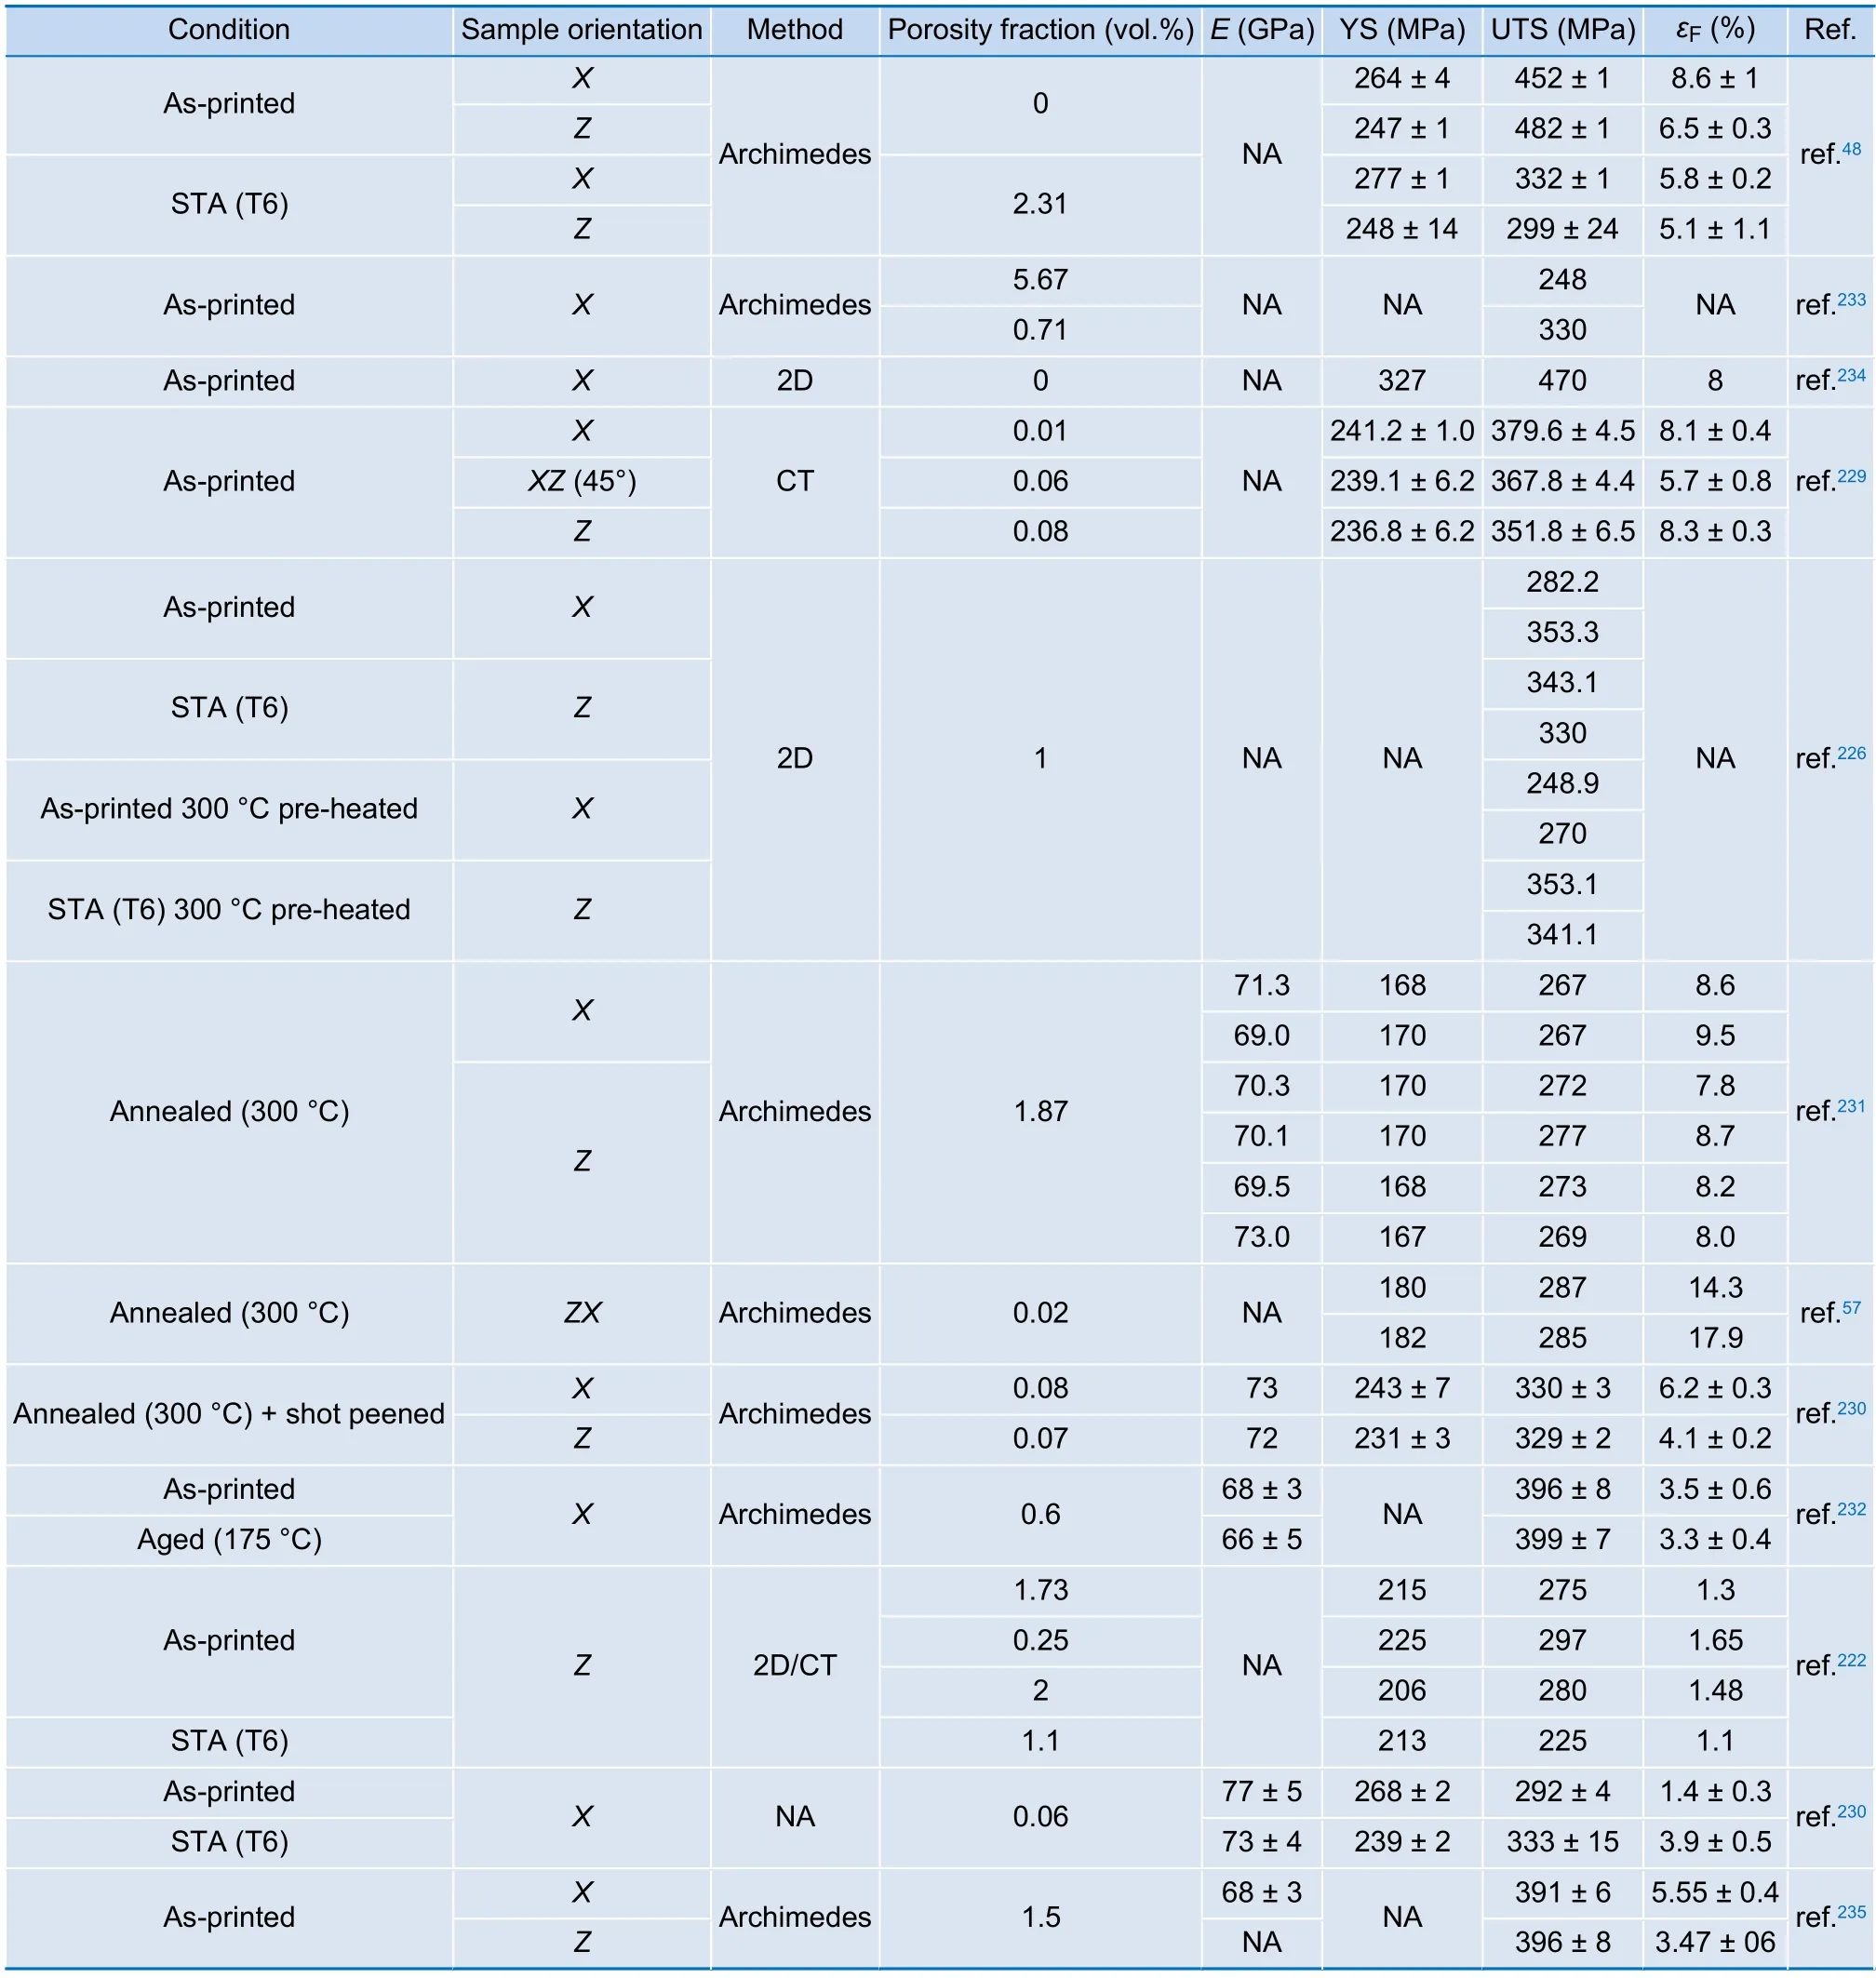
Table 4 | Summarized tensile properties of LPBF printed AlSi10Mg samples. Data not available is marked as NA.
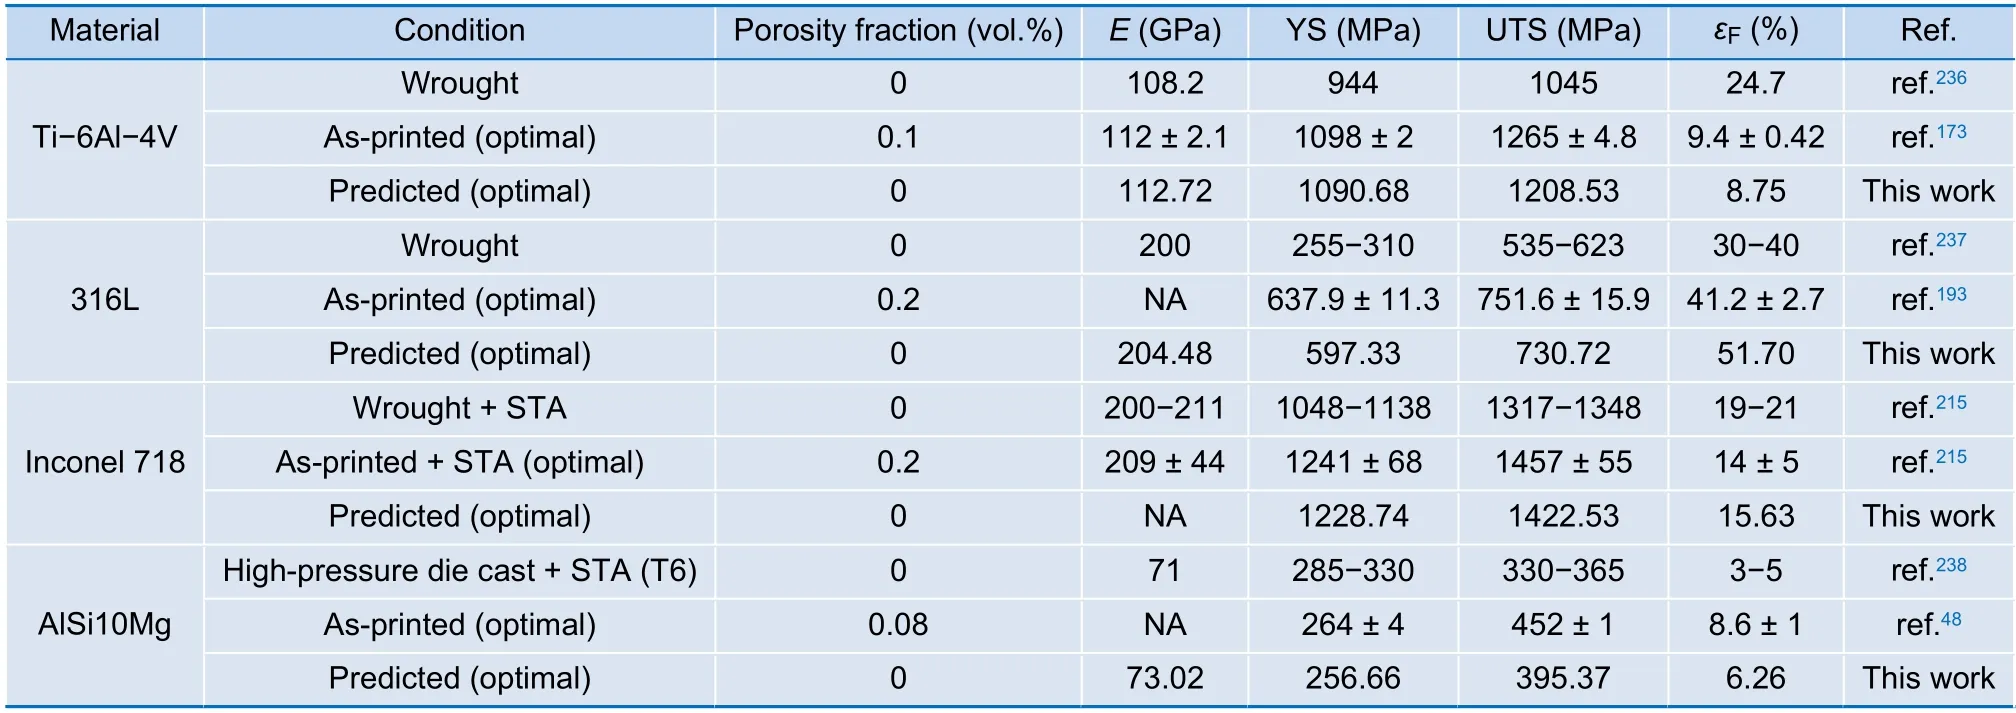
Table 5 | Summarized optimal tensile properties of LPBF printed Ti-6Al-4V, 316L, lnconel 718, and AlSi10Mg samples, as well as their porosity-free counterparts. Data not available is marked as NA.
Controlling the porosity in LPBF printed metals
The relative density of LPBF printed metal products has always been a primary metric to evaluate their usability.As displayed in the sections above, the presence of high porosity fraction or large-scale porosity exhibits substantial detriment to the mechanical performance. Products with minimum fraction of porosity are generally preferred for their better performance and reliability.Samples printed using matured materials, such as Ti-6Al-4V and AlSi10Mg, are capable of achieving near-full density and excellent performance. Whereas,challenges still exist in the LPBF processing of refractory,brittle metals, and metal matrix composites67,239. To suppress the porosity in as-printed metals is crucial yet beneficial for the repeatable fabrication of high-quality products. The porosity controlling methods can be divided into three primary categories at present: the processing optimization, the post treatments, and the online monitoring.
Processing optimization
Processing optimization is the most accessible approach to suppress porosity formation166,240. This optimization is frequently performed as an initial step of studies on LPBF.
Yadroitsev et al.240suggested three major categories of processing variables: the feedstock powder, the laser parameters, and the strategy of manufacturing. The granulometry and morphology of feedstock powder are predominant roles in determining the properties of aspaved powder bed241,242. Using feedstock powder with good flowability and proper size distribution can pave a denser and more homogeneous powder bed, resulting in less porosity after printing31.
Most commercially-available LPBF machines allow certain customization/adjustments to the processing parameters. Laser power, scanning velocity, hatch spacing, and layer thickness are parameters that have been mostly adjusted224,232,243. Figure 19 illustrates the significant variation in molten pools that generated through adjusting the aforementioned parameters. The optimization of laser parameters can contribute considerably to the stabilization of molten pool19,29. Hence, ideal melting tracks combined with proper overlap rates are essential for eliminating the processing-induced porosity244. Numerical methods, particularly the FEM simulations, have shown great potential in guiding the processing optimization28,245,246. Khairallah et al.28performed multiphysics,high-fidelity LPBF simulations on Ti-6Al-V and 316L,using an advanced full-laser-ray-tracing heat source. An optimized laser power map to reduce spatter and porosity has been proposed based on their simulations.However, such high-fidelity simulations demand enormous computing power and extremely-complicated modeling. Current high-fidelity simulations are mostly limited to a single track or a single layer247. Substantial improvements in processing parameters demand for practical multi-track and multi-layer simulations, which are presently at an initial yet promising stage248,249.
Other parameters of manufacturing, such as the preheating temperatures, the scanning patterns, the orientations to place components, and the speed/blowing direction of shielding gas, can be further utilized to suppress the porosity. Adjusting these minor parameters lead to varied thermal behaviors, which may influence the melting177,233,250,251. Anwar and Pham233reported notable differences in the amount of laser spatter for samples printed along different directions. Extra attention should be paid to these minor processing parameters when printing materials that are prone to forming porosity.
Post treatments
HTs and machining after LPBF printing are capable of reducing the porosity fraction. Owing to the entrapped gas in pores, pressure-less HTs are generally not feasible for the elimination of porosity45-47. Thermal expansion of entrapped gas may even induce porosity growth in lessstiff materials47,48. HIP treatment has been employed in casting and PM for over 60 years to reduce the inner voids31. This treatment applies high isostatic pressure to the products via the surrounding medium (usually inert gases) at elevated temperatures252. Heating and pressing facilitate the closure of void-type defects thorough lowering the YS while raising the diffusivity253. Proper HIP treatments can significantly increase the ductility of LPBF printed metals183,187,205,254. The strength, in particular UTS, may also increase after HIP due to the densification and elongated strain-hardening stage76. Substantial improvements in fatigue performance have been reported for LPBF printed less-ductile metals after HIP45,255-257.However, the benefit on fatigue performance disappears for the dense and ductile LPBF printed 316L SS256. This phenomenon is probably caused by the microstructural evolution and corresponding loss in strength after HIP.The heating of HIP can induce grain growth, decomposition of nonequilibrium phases, and reduction in dislocation density253. Therefore, the parameters of HIP request elaborate optimization to achieve positive influences.
Surface and near-surface defects can be removed by post subtractive machining. Samples with polished surfaces always exhibit better fatigue performance than those with rough surfaces since the surface defects hold the highest probability of crack initiation38,75,153. The hybrid additive manufacturing technology has emerged in recent years as a promising tool for in-situ defect elimination258,259. Products can be printed and then precisely machined within a hybrid machine, saving considerable time and labor cost. With the guidance of evaluation tools (e.g. CT), the subtractive methods can be more effective in eliminating porosity and other near-surface defects.
Online monitoring
The online (or in-situ) monitoring of LPBF processing has attracted intense research interest in recent years29,260-262. Optical sensors, pyrometers, thermocouples, and other sensors have been implemented for the real-time monitoring of processing262. The online monitoring technologies provide more information, particularly on the laser-matter interactions and the melting/solidification behaviors, than the traditional offline measurements263,264. The formation, dimensions, morphology, and locations of defects can be captured directly through online monitoring without any destruction to the products261,265. Such details can act as strong evidence for the subsequent processing optimization (see Fig. 20). Cunningham et al.19determined the critical threshold of laser parameters to avoid unfavorable keyholes on the basis of online synchrotron X-ray imaging.Through analyzing the temperature feedbacks of molten pool, a closed-loop system that equipped with adaptive laser control has been built by Renken et al.266. It reduces the risk of defect formation through stabilizing the melting process. Furthermore, multi-sensor monitoring should be capable of providing coupled information including image, temperature field, and acoustic data.Those data can provide more detailed insights into the LPBF processing, which will be of great value for both research and industrial applications.
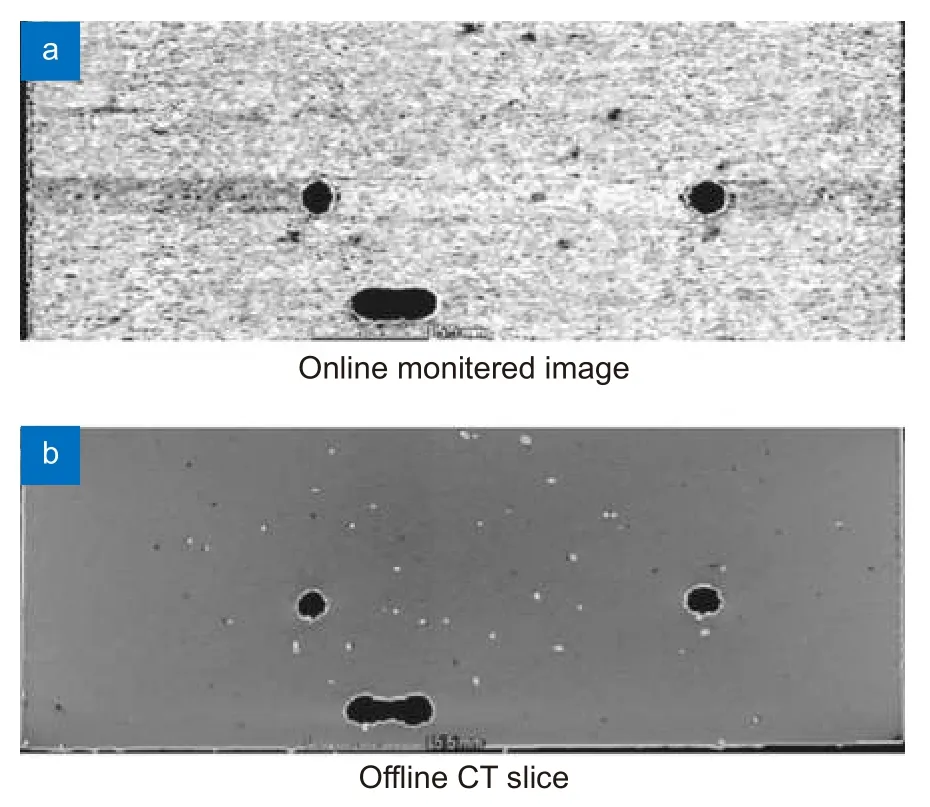
Fig. 20 | Comparison between online monitoring and offline CT images. (a) The image acquired through online optical monitoring and (b) the offline CT slice at the same layer of a LPBF printed AlSi10Mg sample. Figure reproduced with permission from ref.265,Springer Nature.
Challenges and potential opportunities
LPBF printed metals are now serving in diverse industries16. As a rapid-growing technology, LPBF has its fair share of scientific and technological challenges. The mechanical performance of LPBF printed metals can be significantly influenced by porosity. Challenges on the evaluation and suppression of porosity stem from the limitations in evaluation methods and the complex laser-matter interactions during LPBF processing. On the other hand, opportunities exist at where the obstacles located. Potential solutions that may be helpful are provided in the following contents. Key concepts of this section are summarized in Fig. 21.
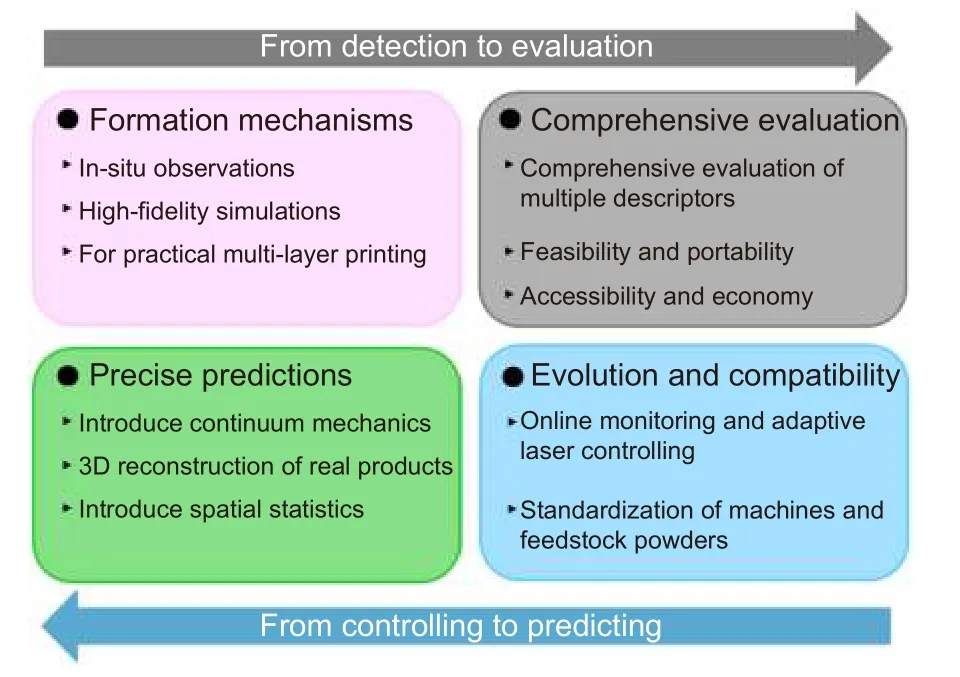
Fig. 21 | Challenges and potential opportunities for the study of porosity in LPBF printed metals.
Formation mechanisms of porosity in multi-layer printing
Great developments have been made in understanding the formation of porosity in single-track printing. A clear formation process of gas porosity has been revealed using in-situ synchrotron X-ray imaging29. High-fidelity FEM simulations of single melting track have been performed based on the synchrotron X-ray observations28.However, the track-by-track, layer-by-layer LPBF printing generates complicated thermal cycles, resulting in a thermal history that definitely differs from that of singletrack investigations. The formation mechanisms of porosity in practical multi-layer printing have not yet been well-studied. This challenge may be addressed in the future using evolved instruments and FEM codes/models. Establishing a database of LPBF-printable metals shall accelerate the research progress on this issue,since physical properties of materials are indispensable for numerical studies. The sensitivities to porosity of various metals can also be included in this database,which will be helpful to avoid the expensive trial-and-error testing in designing processing parameters.
Comprehensive and accessible evaluation of porosity
The merits and drawbacks of currently-available porosity evaluation methods are conspicuous as discussed in above sections. NDE methods lack the ability of precisely measuring the dimensions or the small-scale features of porosity, while DE methods are time-consuming, costly, and even unacceptable in industrial applications. The CT method has been widely used in academia since it can provide 3D reconstructions of porosity,whereas, the dimensions of samples have been strictly limited (generally in millimeter scale) by the flux of Xray as well as the samples’ density. Besides, the inferior portability of CT scanners is a major drawback for industrial applications. Therefore, a comprehensive evaluation method with 3D measuring ability, good accuracy,and reasonable portability can raise a revolution in the evaluation of porosity. The online monitoring appears to be a promising approach since it is capable of providing images of every layer, even every scanning track, without additional time-consumption or any destruction to the products. 3D reconstruction through stacking those online-captured images is technically feasible. Furthermore,a multi-sensor online monitoring system should be able to provide graphical information coupled with thermal data, which is valuable for the in-depth investigation of porosity formation.
Precise prediction of the mechanical performance of LPBF printed metals
As displayed in this review, the majority of predictive models on mechanical properties are staying at the phenomenological stage presently. However, the models based on continuum mechanics have shown ability of predicting the mechanical behaviors of isotropic materials with internal porosity146. This technique may be able to be extended to the LPBF printed metals. The actuallydetected porosity can be incorporated into the 3D-reconstructed models as the base of FEM meshes. Therefore,high-fidelity simulations of mechanical tests can be performed with the assistance of modern porosity evaluation tools (e.g. micro-CT). In addition, the spatial statistics should be introduced into the product qualification. The influences of porosity is closely-related to its spatial distribution. Clustered and near-surface porosity can be given “more weight” in a spatially-related risk model.
Evolution and compatibility of machines and feedstock powders
Monitoring and adaptive control of laser processes have been successfully implemented in laser cladding, direct energy deposition, and other manufacturing technologies263. On the basis of real-time feedbacks, laser parameters are adaptively controlled during processing to achieve better products. A closed-loop, in-process intervention system can eliminate the defects automatically during LPBF processing, improving the quality and repeatability of products. This technology seems promising to be implemented to LPBF since a simple laser remelting can remove most of the porosity within a layer267. LPBF machines equipped with a porosity controlling system will be favored by the materials that not suitable for HIP treatment (e.g. 316L and AlSi10Mg).Furthermore, standards for qualifying the as-printed products are developing rapidly owing to the efforts of many organizations such as the ASTM268. The development of standards for machines and feedstock powders,however, is relatively sluggish. Significant influences of feedstock powder on the quality of as-printed products have been well-established24. Moreover, useful porositycontrolling techniques, such as the “skywriting”, have been developed by the manufacturers of LPBF machines but not yet been standardized269. Establishment of machine and feedstock standards will be of profound significance to the compatibility and repeatability of LPBF printed metals.
Concluding remarks
The rapid-expanding applications of LPBF printed metals demand for high-performance yet reliable products. As the most universal defect in LPBF printed metals, porosity plays a critical role in determining the mechanical performance and reliability of printed products. A systematic review on the formation, evaluation, effects on mechanical performance, and controlling methods of porosity has been presented in this work. The achievements and challenges have been critically reviewed, with a statistical analysis on the correlation between porosity fraction and tensile properties of four representative metals. This review attempts to provide an overview of the studies focused on the porosity in LPBF printed metals along with potential opportunities for future researches.
Porosity generates primarily from the complicated laser-matter interactions during LPBF processing. The instabilities in molten pool can induce residual gas pores after solidification. The LOF induced by inappropriate processing parameters, spatter shadowing, and other mechanisms can also generate porosity in as-printed metals. The formation mechanisms of single-track printing have been well-established on the basis of in-situ imaging and advanced FEM simulations, whereas, the porosity generated during multi-layer printing has not yet been illustrated clearly.
NDE and DE methods have been extensively employed in the evaluation of porosity. Projected area, AR,and sphericity have been used as common descriptors to evaluate the porosity. NDE methods (e.g. the Archimedes method) can provide an accurate overall quantity of porosity. The resolution of NDE imaging,however, is highly-dependent on the dimensions of samples and the performance of instruments. DE methods hold an intrinsic advantage of providing precise details on the morphology and spatial distribution of porosity, although the applications of DE methods are hindered by their destructive nature. Statistical techniques (e.g. the EVS) have exhibited a good ability in enhancing the generality of limited measurements. Incorporating the spatial information of porosity into evaluation may be a substantial improvement for future studies.
The presence of porosity is detrimental to the mechanical performance of LPBF printed metals, particularly to the tensile properties and fatigue performance. Large and irregular pores are severe stress raisers that facilitate the initiation and propagation of cracks. Statistical analysis in this review shows ductility is most sensitive to porosity among several key tensile properties. The critical limit of porosity fraction before drastic performance degradation is also closely related to ductility. Ductile metals such as 316L SS can sustain apparently higher porosity fractions than the brittle metals such as AlSi10Mg.Thermal expansion of entrapped gas in porosity demands extra attention during post treatments. Hightemperature and long-time HTs may induce hazardous porosity growth in less-stiff materials.
Processing optimization is currently the most feasible way to control the porosity in LPBF printed metals. Post HTs with applied pressure are able to further minimize the porosity to a near-zero level. However, HTs are not omnipotent due to the microstructural changes and porosity growth that may happen at elevated temperatures. Online monitoring instruments have been implemented to assist the in-depth LPBF processing optimization. On the basis of online monitoring and adaptive laser control, automatic defect suppression through in-process intervention can emerge in the near future.
Further study on the formation mechanisms of porosity is requesting for advanced monitoring instruments and high-fidelity simulations. On the other hand, developing NDE methods with excellent detectivity and portability are crucial for the porosity evaluation in LPBF printed metal products. 3D reconstruction based on the online monitoring images may be a promising solution.Semi-empirical models incorporated with continuum mechanics and spatial statics should be of great value in predicting the mechanical performance of LPBF printed metal products. The standardization of machines and feedstocks can further improve the repeatability and reliability.
In summary, studies on the porosity in LPBF printed metals are essential for improving mechanical performance and reliability. Understanding the formation and effects of porosity is an important step to the complete understanding of process-structure-property relationship. Quantitative investigations are requested by the prediction and simulation of mechanical behaviors. With the development of physical theories and models, the formation of porosity can probably be controlled accurately using evolved equipment in the future. The porosity in LPBF printed metals may even be utilized deliberately to achieve specific functions.
Acknowledgements
The authors are grateful for the support of the National Key Research and Development Program of China [grant number 2018YFB1106301], Research and Development Program Project in Key Areas of Guangdong Province [grant number 2019B090907001 and 2019B010943001], Shenzhen Science and Technology Innovation Commission [grant number JCYJ20180504165824643], Natural Science Foundation of Guangdong Province [grant number 2020A1515011373], and the National Natural Science Foundation of China [grant number 51971108]. Dr. Ming Yan appreciates the support of the Humboldt Research Fellowship for Experienced Researchers.
Competing interests
The authors declare no competing financial interests.
 Opto-Electronic Advances2022年10期
- Opto-Electronic Advances的其它文章
- Multifunctional flexible optical waveguide sensor: on the bioinspiration for ultrasensitive sensors development
- Label-free trace detection of bio-molecules by liquid-interface assisted surface-enhanced Raman scattering using a microfluidic chip
- High performance integrated photonic circuit based on inverse design method
