Residual stress indentation model based on material equivalence
Xiokun LIU, Lixun CAI,*, Hui CHEN
a Applied Mechanics and Structure Safety Key Laboratory of Sichuan Province, School of Mechanics and Engineering,Southwest Jiaotong University, Chengdu 610031, China
b School of Civil Engineering, Changsha University of Science & Technology, Changsha 410114, China
KEYWORDS Conical indentation;Equivalent material;Finite element analysis;Residual stress;Theoretical model
Abstract A novel residual stress indentation model for conical indentation loading is proposed to describe the relationship between the residual stress,material constitutive parameters,load,and displacement for materials with a uniaxial constitutive relationship that obeys Hollomon’s power law(H-law).The novel model was established based on the principle that the equivalent material without residual stress corresponds to the original material with residual stress,conical indentation theoretical model based on energy density equivalence, and an assumed power-law relationship between the dimensionless residual stress and relative difference of the yield stresses of the equivalent material and original material. Sixty imaginary H-law materials with ten equibiaxial and ten uniaxial residual stresses were investigated by Finite Element Analysis(FEA).The residual stresses predicted by the novel model from the indentation load-displacement curves simulated for the imaginary materials are in close agreement with those applied by the FEA.Finally,indentation tests for Cr12MoV steel, 45 steel, and 6061-T6511 aluminum alloy were carried out on their specimens without residual stress and their bending specimens with equibiaxial and uniaxial residual stresses.The residual stresses predicted by the novel model according to the indentation load-displacement test curves are in good agreement with those applied by the tests.
1. Introduction
The residual stress commonly present in various components has both adverse effects and advantages on structural safety.It is essential to measure the residual stress of the components for safety evaluation and structural optimization of nuclear power, aerospace, and other key engineering.Residual stress tests include destructive methods, such as hole drilling,contour, ring-core and slot milling, and non-destructive methods, such as X-ray diffraction, neutron diffraction,Raman spectroscopy, and indentation.
The indentation method is a minimally invasive approach that can be conveniently used to determine the residual stress of structural materials in service. However, due to the significant analytical obstacles in solving elastoplastic contact problems, empirical equations with limited applicability have generally been used. Previous studieshave shown that material residual stress has different effects on the indentation load-displacement curves and the actual contact area of conical indenter. Compared with zero residual stress state, the compressive residual stress of a material increases the load response and contact area at the same indentation displacement, while tensile residual stress decreases the load response and contact area. In 1996, Bolshakov et al.and Tsui et al.investigated the influence of residual stress on the hardness and elastic modulus of 8009 aluminum alloy using conical indentation tests and Finite Element Analysis (FEA), respectively.Their works demonstrated that the hardness and elastic modulus were related to residual stress when the nominal contact area was directly used if the effects of pile-up and sink-in were ignored. In 1998, Suresh and Giannakopoulosdefined the equibiaxial residual stress tensor as the sum of nominal hydrostatic pressure tensor and the nominal deviator stress tensor,and assumed that the deviator stress(equal to the residual stress σ) was equivalent to the average indentation stress(P-P)/A, where Pand Pare the indentation loads with and without residual stress under the same indentation displacement, respectively, and Ais the actual contact area.Because no zero residual stress state exists for a material in service or a welding material, the load Pcannot be obtained by the indentation test; therefore, the residual stress cannot be determined by the Suresh method.
In 2003, Lee and Kwondefined the equibiaxial residual stress tensor as the sum of true hydrostatic pressure tensor and deviatoric stress tensor, which differs from the Suresh model.They expressed the contact area as a function of load,and thus the resulting residual stress model is related only to the load. However, the maximum indentation displacement used in Lee modelis an artificially fixed value. Whether stable predictions can be made using different fixed indentation displacements has not been further investigated. In 2005,Xu and Lifound that A/Aand h/hhave a linear relationship with σ/σby FEA of a variety of materials,where Ais the nominal contact area, his the elastic unloading displacement, his the maximum indentation displacement, and σis the yield stress. However, an explicit equation to solve for the residual stress was not recommended.In 2006, Chen et al.established three equations describing the numerical relationships of dimensionless hardness, dimensionless unloading stiffness, and dimensionless indentation work with residual stress, yield stress, and elastic modulus using dimensional theory and FEA. The residual stress, yield stress, and elastic modulus were obtained by single conical indentation and the three dimensionless equations. The method is suitable for ideal elastoplastic materials, and the three equations contains 60 parameters.Zhao et al.replaced the dimensionless hardness and dimensionless unload stiffness in Chen’s methodwith dimensionless unloading work and dimensionless residual indentation depth. They proposed a method that includes 56 parameters to calculate the residual stress, yield stress, and elastic modulus. These equations with many regression parameters are complex and usually sensitive to indentation test errors. Additionally, they only describe ideal elastic-plastic materials and are difficult to broadly apply in engineering testing.
Previous studies have generally used pyramid indenters with conical,triangular(Berkovich),and rectangular(Vickers)tips.The indentation load-displacement curves of these indenters obey Kick’s lawP = Ch, where P is the indentation load, h is the indentation displacement, and C is the loading coefficient.In 2010,Lee et al.proposed a fitting model based on dimensional analysis to describe the relationship between equibiaxial residual stress,the difference in loading coefficients with and without residual stress, yield strain, and the strain hardening index.However,the model did not consider the theoretical relationship between the loading coefficient and residual stress and involved up to 60 parameters.In 2018, Akahori et al.established two equations for residual stress and yield stress based on indentation work under two different indentation displacements using dimensional analysis,where the residual stress and yield stress were determined by combining the two equations.In 2018 and 2019,Wang et al.derived iterative equations using dimensional analysis to determine the residual stress and elastic-plastic properties of materials based on elastic-plastic indentation work and load under specific indentation displacement.However,these equations contained dozens or even hundreds of fitting parameters. Most of these residual stress models based on equivalent deviator stress,energy, or dimensional analysis contain many fitting parameters,and are inevitably sensitive to experimental errors,leading to problems such as solution uniqueness and difficulties in application.
Based on the equivalent material assumption, conical indentation model, and assumption that there is a power-law relationship between the dimensionless residual stress and the relative difference of the yield stresses of the equivalent material and original material, a novel residual stress indentation model is herein proposed. The model characterizes the relationship between the equibiaxial or uniaxial residual stress,parameters of Hollomon’s power law (H-law), load, and displacement. The accuracy and universality of the novel model are verified by FEA and experiments for a series of H-law materials with various residual stresses.
2. Theoretical model and parameter determination
2.1. Residual stress indentation model based on equivalent materials


For a Material A with residual stress, the conical indentation load-displacement curve is given by P-h, where his indentation displacement with residual stress. Assuming that there is a Material B with a conical indentation load-displacement curve P-h without residual stress that is consistent with P-h, then the Material B is equivalent material of Material A.The stress-strain relationship of Material B is then given as
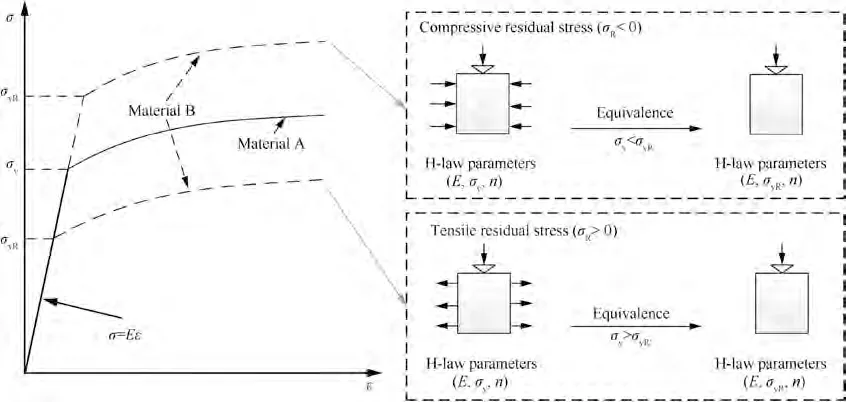
Fig. 1 Stress-strain relationship of equivalent materials.
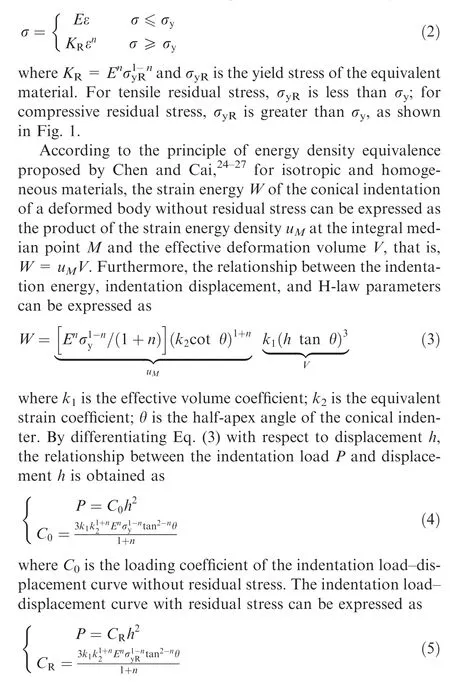
where Cis the loading coefficient of the indentation load-displacement curve with residual stress.From Eqs.(4)and(5),we can derive
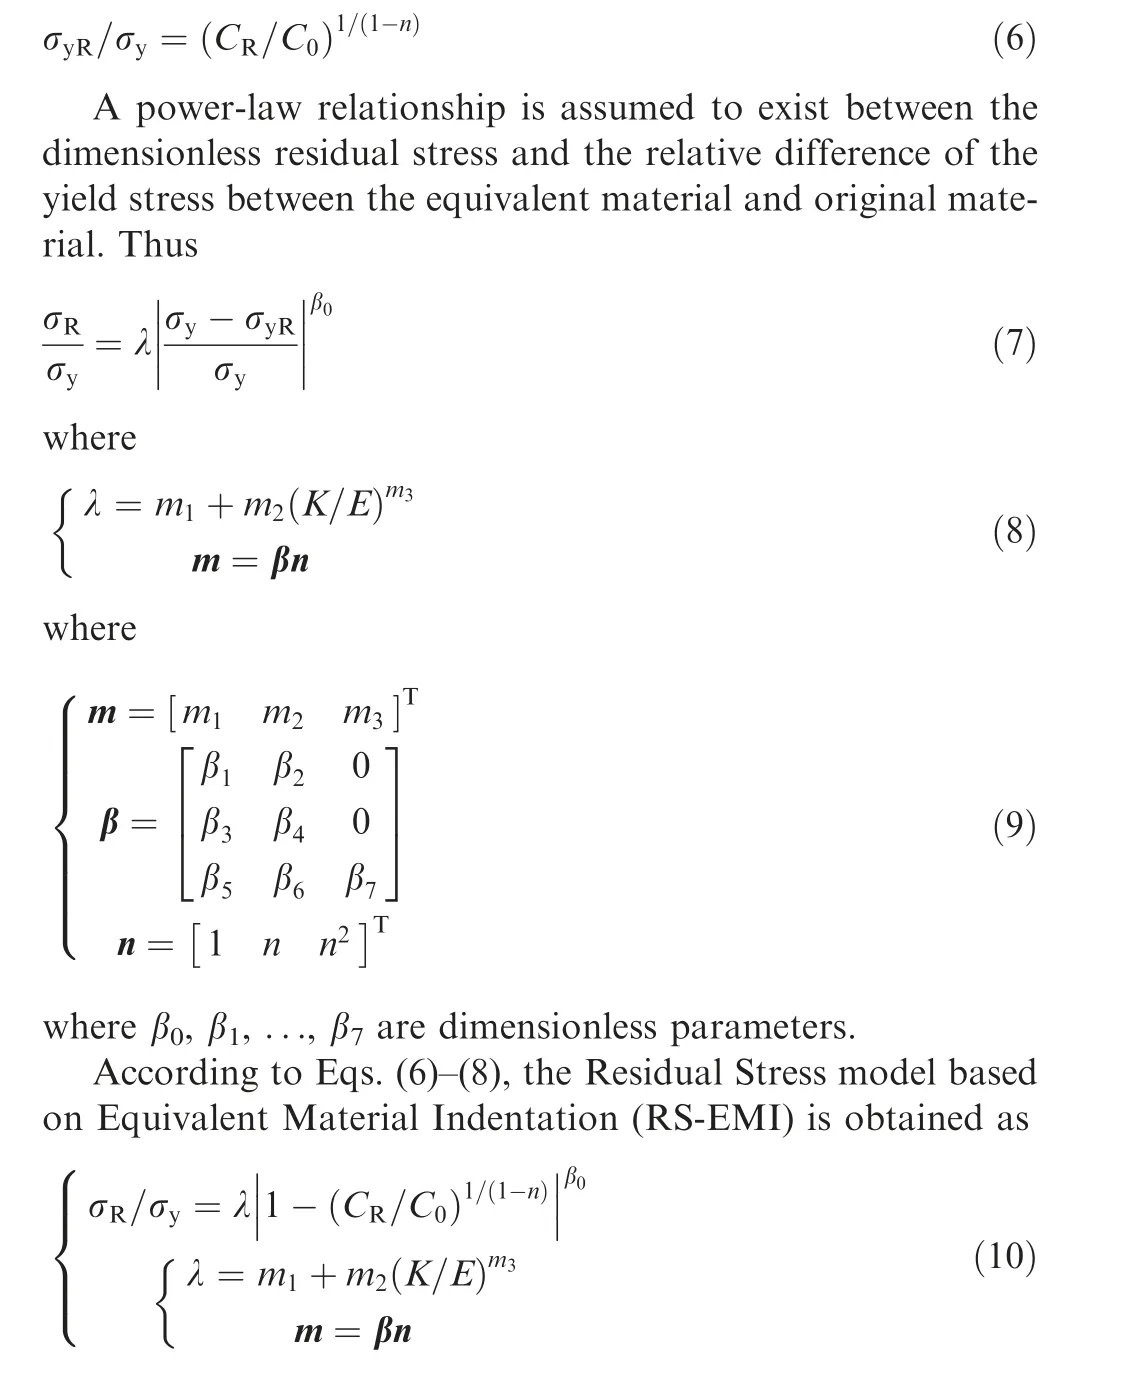
2.2. Determination of model parameters
A diamond conical indenter with a half-apex angle of 70.3°was used for the residual stress indentation test. An axisymmetric two-dimensional (2D) mesh model and quarter threedimensional (3D) mesh model were established according to the geometries and boundary conditions of the material indentation zone for equibiaxial and uniaxial residual stresses,respectively, as shown in Fig. 2.
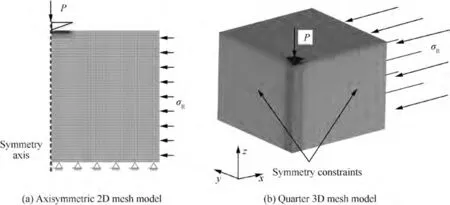
Fig. 2 Axisymmetric 2D and quarter 3D mesh models.
For equibiaxial residual stress,the PLANE182 element was used as the mesh element outside the contact zone of the axisymmetric 2D mesh model, with a total of 7727 elements;TARGE169 and CONTA172 were used as the mesh elements inside the contact zone. For uniaxial residual stress, the SOLID185 element was used as the mesh element outside the contact zone of the quarter 3D mesh model, with a total of 26000 elements; TARGE170 and CONTA173 were used as the mesh elements inside the contact zone. As a small effect,a typical friction coefficient of 0.2 is set for 2D and 3D mesh models.The FEA process was divided into two steps.Firstly,pressure was applied to the right side of the mesh to simulate residual stress. Secondly, displacement control was used to conduct conical indentation tests with an indentation displacement of 80 μm.
Equibiaxial and uniaxial residual stresses were assessed in typical light alloys (E = 70 GPa) and steel (E = 200 GPa).For both types of materials, yield stresses σof 200 and 800 MPa, strain hardening indices n of 0.1, 0.3, and 0.5, compressive residual stresses σof -5σ/6, -σ/2, and -σ/6, and tensile residual stresses σof σ/6, σ/2, and 5σ/6 were used.The influence of compressive and tensile residual stresses on the load-displacement curve was different; thus, the parameters in Eq. (10) were different. The loading coefficient Cand Care determined by fitting the conical indentation load-displacement curves with different H-law parameters using Kick’s law: P = Chwith residual stress and P = Chwithout residual stress, respectively. For the four conditions of light alloy and steel combined with tensile and compressive residual stresses, the parameters E, σ, n, σ,C, and Cin Eq. (10) were regarded as known parameters,and the dimensionless parameters β-βwere regarded as variables,which were then obtained by nonlinear least squares fitting using Gauss-Newton iteration. Tables 1 and 2 list the parameters of the equibiaxial and uniaxial residual stresses,respectively, employed in the RS-EMI model.
3. Numerical verification of RS-EMI model
Load-displacement curves with different residual stresses were obtained by FEA, the loading coefficients Cand Cwere determined using Kick’s law,and the dimensionless equivalent yield stress was calculated using Eq. (6).The predicted dimensionless equivalent yield stress was obtained by substituting the given residual stress, RS-EMI model parameters, and H-law parameters into Eq. (7). The four conditions were verified under equibiaxial residual stress with an elastic modulus E of 200 GPa,as shown in Fig.3.The predicted results are in good agreement with the FEA results.
For equibiaxial residual stress,light alloys with elastic moduli of 50,70,and 90 GPa and steels with elastic moduli of 180,200, and 220 GPa were selected. The σ, n, and σ/σvalues are listed in Table 3. FEA of a wide range of H-law materials and different residual stresses was used to determine the loading coefficients Cand Cby fitting the load-displacement curves according to Kick’s law. Furthermore, the dimensionless residual stress σ/σpredicted by the RS-EMI modelwas found to be in good agreement with that applied by the FEA (Fig. 4, where σis the residual stress applied by the FEA or the jig).

Table 1 Equibiaxial residual stress parameters β0-β7.

Table 2 Uniaxial residual stress parameters β0-β7.
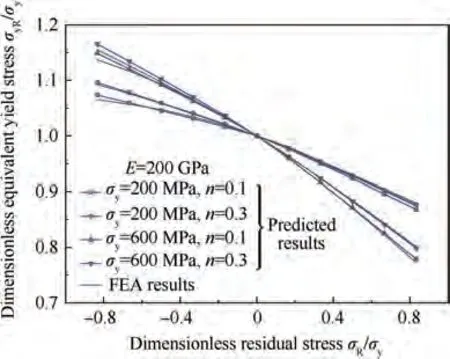
Fig. 3 Relationship between dimensionless equivalent yield stress and dimensionless residual stress.

Table 3 Preset H-law and residual stress conditions for FEA.
For uniaxial residual stress, a light alloy with an elastic modulus of 70 GPa and steel with an elastic modulus of 200 GPa were selected. The σ, n, and σ/σvalues are listed in Table 3. The loading coefficients Cand Cwere obtained in the same manner as for the equibiaxial residual stress. The dimensionless residual stress σ/σpredicted by the RSEMI model was in good agreement with that applied by the FEA (Fig. 5).
4. RS-EMI model application
The H-law parameters obtained by regressing the uniaxial tensile true stress-strain test curves of the three metal materials(6061-T6511 aluminum alloy, Cr12MoV steel and 45 steel)are listed in Table 4.To verify the homogeneity of the materials,a 15 mm×15 mm×15 mm cube was used for indentation tests in x,y,and z directions.Fig.6(a)and(b)show the indentation specimen and universal jig, respectively, used in these tests. The surface roughness Rwas controlled to less than 0.8 μm by sequential grinding using metallographic sandpaper with different grain sizes. Each direction was tested three times, and the results are shown in Fig. 7. The results show that the indentation load-displacement curves of the same material almost coincide in the three directions,which demonstrates that the materials are homogeneous.
Cross-beam and single-beam specimens with dimensions of 160 mm×20 mm×15 mm(Fig.8(a))were used for the equibiaxial and uniaxial residual stress tests,respectively.The center of the specimen surface was set as the indentation zone, and the surface roughness Rwas controlled to less than 0.8 μm.Fig.8(b)shows the equipment used to simulate residual stress.Equibiaxial and uniaxial stresses were applied by bolts in the equipment and measured using strain gauges.The relationship between strain in the x- and y-directions and stress conforms to Hooke’s law:

where σand σare stresses in the x- and y-directions,respectively; εand εare the strains measured by the strain gauges in the x- and y-directions, respectively; μ is the Poisson’s ratio of the material, which was set as 0.3 for all three materials.
Fig.9 shows the multifunctional high-precision indentation instrument used for the residual stress indentation tests. The distance between the adjacent test points was more than 2 mm. Displacement control was adopted for indentation using a loading rate of 2 μm/s and a maximum indentation displacement of 80 μm.
The flowchart for solving the residual stress using the RSEMI model is shown in Fig. 10. A load-displacement curve was measured via conical indentation in the stress-free zone,and Cwas obtained by fitting the results according to Kick’s law or by using Eq. (4) with the known H-law parameters.Another load-displacement curve was measured via conical indentation in the zone with residual stress, and Cwas obtained using Kick’s law. The values of β-βfor the equibiaxial and uniaxial residual stresses are given in Tables 1 and 2, respectively, and the dimensionless residual stress was obtained using Eq. (10).
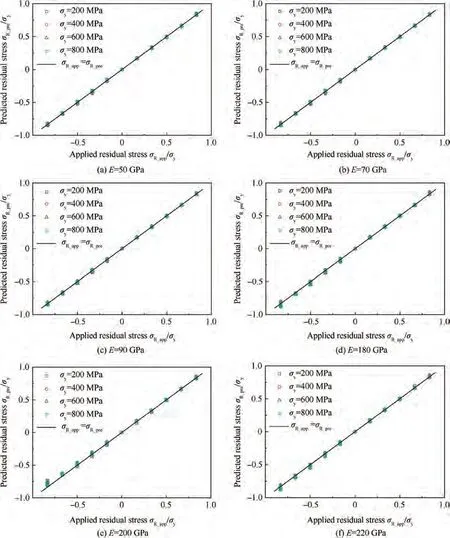
Fig. 4 Numerical verification of RS-EMI model with equibiaxial residual stress (n = 0.1, 0.2, ..., 0.5).
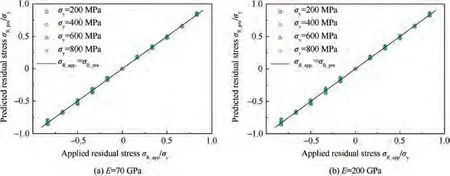
Fig. 5 Numerical verification of RS-EMI model with uniaxial residual stress (n = 0.1, 0.2, ..., 0.5).

Table 4 Uniaxial tensile properties of materials.
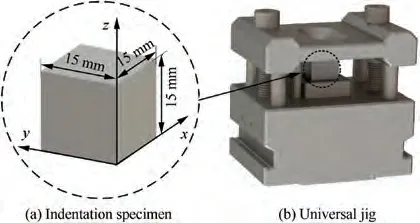
Fig. 6 Indentation specimen and universal jig for testing homogeneity of materials.
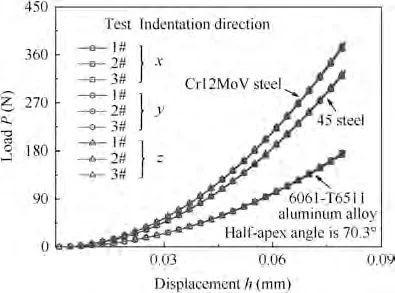
Fig. 7 Indentation load-displacement curves of three materials in three directions.
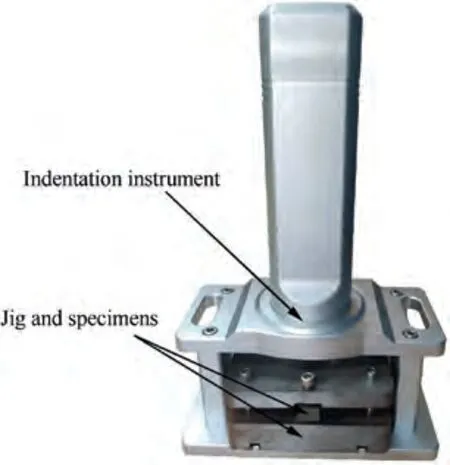
Fig. 9 Indentation instrument.
Equibiaxial and uniaxial stresses were applied to 6061-T6511 aluminum alloy, Cr12MoV steel and 45 steel and using the equipment shown in Fig.8(b).The tensile and compressive residual stresses were tested in triplicate for each material,while a stress-free indentation experiment was conducted once for each material. The indentation load-displacement curves are shown in Fig. 11(a)-(c) and 12(a)-(c). The load-displacement curves with equibiaxial residual stress, uniaxial residual stress, and no residual stress were fitted according to Kick’s law to obtain the loading coefficients Cand C.The residual stresses were then calculated by the RS-EMI model and compared with the applied residual stresses,as shown in Fig.11(d)and 12(d).The results show that the residual stresses predicted by the RS-EMI model are in good agreement with those applied by the tests.

Fig. 8 Uniaxial residual stress specimen and stress application jig.
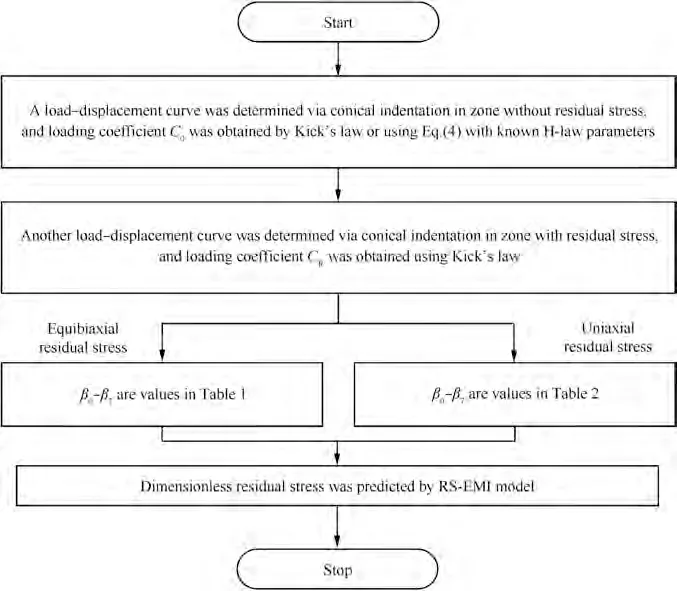
Fig. 10 Flowchart of RSIM application.
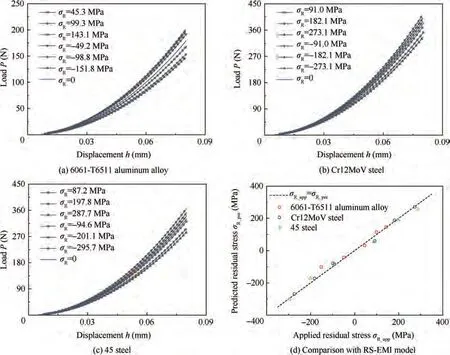
Fig. 11 Indentation load-displacement curves with equibiaxial residual stress and RS-EMI model predicted results (half-apex angle of 70.3°).
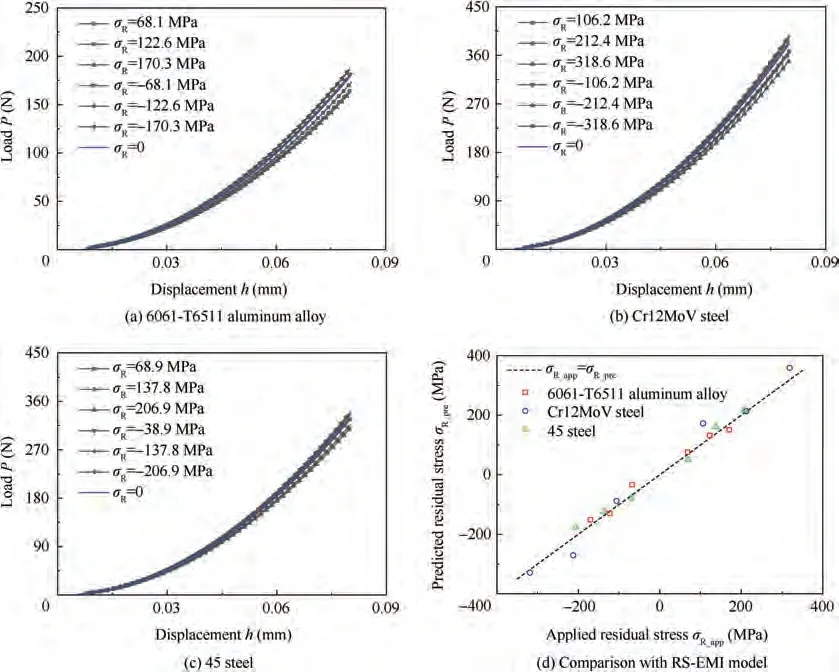
Fig. 12 Indentation load-displacement curves with uniaxial residual stress and RS-EMI model predicted results (half-apex angle of 70.3°).
To validate the proposed model, three homogeneous metal materials are used. When the materials are inhomogeneous,the situation will be more complicated and difficult. In particular, the small zone near the plastic deformation zone can be regarded as approximately homogeneous for inhomogeneous materials such as welded and functionally graded materials.
5. Conclusions
(1) For H-law hardening materials and uniform residual stress field, the equivalent material assumption states that the indentation load-displacement curve of a material with residual stress coincides with that of the equivalent material without residual stress. Furthermore, a power-law relationship is assumed to exist between the dimensionless residual stress σ/σand the relative difference (σ-σ)/σof the yield stress between the equivalent material and original material. We propose the RS-EMI model for obtaining equibiaxial and uniaxial residual stresses based on the conical indentation model and energy density equivalence.
(2) Indentation load-displacement curves were obtained by FEA for a variety of imaginary H-law materials and equibiaxial or uniaxial surface residual stresses. The residual stresses predicted by the RS-EMI model are in good agreement with those applied by the FEA.
(3) Cr12MoV steel, 45 steel, and 6061-T6511 aluminum alloy cross-beam and single-beam bending specimens with various residual stresses were subjected to conical indentation tests. The residual stresses predicted by the RS-EMI model according to the indentation load-displacement test curves are in good agreement with those applied by the tests.
The authors declare that they have no known competing financial interests or personal relationships that could have appeared to influence the work reported in this paper.
This study was co-supported by the National Natural Science Foundation of China (Nos. 11872320 and 12072294).
