Influence of alumina abrasive tool wear on ground surface characteristics and corrosion properties of K444 nickel-based superalloy
Min LI, Jingfei YIN, Linbo CHE, Wenfeng DING, Jiuhua XU
National Key Laboratory of Science and Technology on Helicopter Transmission, Nanjing University of Aeronautics and Astronautics, Nanjing 210016, China
KEYWORDS Abrasive wheel wear;Corrosion resistance;Grinding;K444 nickel-based superalloy;Microcrystalline alumina
Abstract K444 nickel-based superalloy is an important material to manufacture the gas turbine due to its excellent mechanical properties at high temperatures and corrosion resistance.Currently,grinding is the mostly used method for the surface finish of the K444 alloy components. However,few studies worked on the effects of the abrasive tool wear on the ground surface characteristics and corrosion properties of K444 alloy. This study uses two different-type alumina abrasive tools, i.e.,white alumina(WA)and microcrystalline alumina(MA)wheels,to grind the K444 alloy.The influence of the alumina abrasive tool wear on ground surface characteristics and corrosion resistance performance are investigated. It is discovered that the MA wheel presents a slighter wheel wear and higher self-sharpening than the WA wheel.Compared to the WA wheel,the MA wheel has less material adhesion,which leads to a better surface finish.In the corrosion testing,the maximum corrosion depth is 80 μm in the surface ground by the MA wheel but 100 μm in the surface ground by the WA wheel,which demonstrates that the MA wheel grinding benefits the surface corrosion resistance of K444 alloy.Therefore,this study could provide a guide to selecting the abrasive tools and optimizing the grinding process of the K444 alloy.
1. Introduction
Nickel-based superalloys are the important components of turbine blades of gas turbines because of their excellent hightemperature strength, antioxidation and corrosion resistant properties, and microstructure stability.Hot-corrosion resistant nickel-based superalloy K444 is a cast superalloy which has a large content of Al and Ti elements, forming the ordered γphase with the volume fraction of about 45%,and amounts of solid solution strengthening elements, such as Cr, W and Mo. These lead to the good mechanical properties at high temperatures. Its excellent corrosion resistance is owing to the high concentrations of Cr and Co elements and high Ti/Al ratio.K444 is developed by Institute of Metal Research, Chinese Academy of Sciences, which is designed to be used as turbine blade in marine environment of warship or ship and has been applied successively to some gas turbines blades.Inconel 718 has been widely utilized in aero-engine industry due to its excellent high-temperature strength, thermal stability,and fatigue strength. For Inconel 625, the major features of excellent corrosion behavior creep resistance make widely used in heavy water plants. But it has been observed that precipitation of intermetallic phases and carbides occur on subjecting the alloy to aging treatment in the range 550-750 °C, which leads to some decline in the plasticity of the alloy.
Grinding with abrasive wheels is the most important mechanical method to machine the K444 turbine blade. As well known, grinding is a process of high strain and stress,which will lead to the microstructure variation of the ground surface, therefore it will influence the service characteristics.The gas turbine blade is designed to serve in a harsh environment with a lifetime more than 10,000 hours.In an ocean environment, seawater may be sucked into the gas turbine. NaCl deposition easily happens on the surfaces, which causes the surface corrosion. The surface corrosion destroys the surface integrity, which is detrimental to the lifetime of the blades.When aggressive ions,such as Cl,are in the solution environment,this equilibrium of surface is disrupted and soluble metal ions are formed. In addition, the corrosion properties of the machined surface should be taken into accounts, owing to the marine working condition of K444. NaCl is the principal salt compositions in sea water,with an approximately constant content of about 3.5%, thus 3.5% NaCl solution is usually used to simulate the sea water under the lab condition.Previous studies found that the surface corrosion was highly dependent on the surface quality after machining.Therefore,it is important to ensure the surface quality after machining to maintain the surface corrosion resistance.Nowadays,grinding is mostly used to machining the material. However, to our knowledge,there are few reports on the surface corrosion resistance of K444 after grinding.
The strengthening phase in nickel-based alloys can significantly improves the high temperature lasting strength, shear resistance, and abrasion resistance of the materials, which makes nickel-based superalloys a typical refractory material.However, Ti, Al and other oxyphilic elements are easily oxidized.At high temperatures, it is easy to have chemical reaction with the abrasive and the bonding material of the wheel,resulting in serious adhesion and blockage.When the abrasive particles contact the oxide on the surface of the workpiece, it is easy to cause the abrasive particles adhering to the workpiece material.
In addition,the corrosion performance of machined surface characteristics was studied in the previous research.Lee et al.investigated the influence of surface roughness on corrosion resistance of 21Cr ferritic stainless steel. Results showed that the corrosion behavior was correlated well with the surface scratching depth which was strongly influenced by the grinding parameters and coolant liquid types.Wang et al.investigated the influence of surface roughness on breakdown behavior of shear plastic deformation of Al-Zn-Mg-Cu alloy introduced by manual abrasion with abrasive paper. With increasing grit number, more ηprecipitates were dissolved and more subgrains with the segregation of solute atoms at the subboundaries formed within the altered surface layer.The breakdown behavior of both samples did not change with surface roughness with peak-aged T6 and over-aged T73 alloys. The altered surface layer attack occurred for the T77 sample prepared with the rough surfaces, but was absent for the sample prepared with a smooth surface. Ardila et al.revealed the relationship between stainless steel specimen morphology and micro-abrasive-corrosion.Grooves parallel to the rotation of the sphere increased wear rates under micro-abrasion- corrosion conditions when compared with grooves oriented perpendicular to the contact. While due to more abrasives into the contact area,parallel grooves resulted in higher passivation currents than perpendicular grooves.
Many researches have been carried out the machining properties and tool wear behaviors of nickel-based superalloys. Xu et al.explored the wheel-workpiece contact zone,the results showed that due to the high grinding temperatures, strong adhesion appeared between the abrasives and casting superalloy K417 workpieces. As with the increasing of grinding temperature, the surface roughness of the workpiece increased significantly. Liu et al.used ordinary abrasive (AlO) wheel and super abrasive(CBN and diamond)wheel to grind nickelbased single crystal alloy CMSX4 respectively. When the cutting depth was 0.05 mm,the grinding force of AlOwheel(up to 5 N/mm) was higher than that of superhard wheel (up to 2.5 N/mm). However, when the cutting depth was 2 mm, it was lower than that of the superhard wheel. This was mainly because the alumina wheel showed obvious self-sharpening effect during the coarse grinding stage (a= 2 mm), while the abrasive wear of the CBN wheel was more serious under this large grinding load. The report from Ding et al.revealed that when use brown alumina and microcrystalline alumina wheels to machine GH4169 and DZ408 alloys,strong adhesion wear and attrition wear were the main wear type.However, severe wheel clogging was the primary wear feature for DD6 alloy in the same grinding conditions. The above researches showed that, the contact between wheel grains and superalloy workpiece was under extreme conditions during the nickel-based superalloys grinding process. Thus the wear behaviors were not ignorable.
The influence of the abrasive tool wear to the corrosion performance of ground surface caused by grinding process remains unclear, especially for grinding K444 alloy. In this paper, the abrasive tool wear and its influence on the ground surface characteristics and corrosion resistance properties of K444 superalloy are investigated, which is of great practical significance to prevent accidental damage to gas turbine blades. The study on the grinding performance of nickelbased superalloy K444 will provide theoretical and technical support for industrial production.
2. Experimental procedures
2.1. Workpiece materials
As mentioned above, K444 nickel-based superalloy was the research material in this paper. The alloy melted in an industrial scale vacuum induction furnace and then cast into thecuboid. After that, the workpiece was processed into a 35 mm×8 mm×5 mm cuboid for clamping and testing conveniently. The chemical compositions and heat treatment of K444 used in this investigation were listed in Tables 1 and 2. On the basis of K444 superalloy, the chemical etching method in a reagent containing 20 g CuSO, 50 ml HCl and 100 ml HO was used to reveal the γ,carbides,grain boundary structure and minor, as shown in Fig. 1.

Table 1 Chemical composition of nickel-based superalloy K444 (wt%).4,5

Table 2 Standard heat treatment condition.4,5
2.2. Grinding setup
The grinding experiment was conducted on a precision grinder(Blohm Profimat MT 408). The white alumina wheel (WA)and microcrystal alumina wheel (MA) were used as shown in the Fig. 2, the shape code of the wheel was 1A1 400 mm×20 mm×127 mm,the average size of abrasive grain was #80 US mesh size, and the wheel hardness was F. The single-grit diamond dresser of 0.15 mm tip radius was used in the dressing process. K444 superalloy workpiece was mounted on the worktable of grinder as shown in the Fig. 3.The grinding parameters were listed in Table 3. Moreover,the dressing parameter in this investigation was dressing wheel speed v= 20 m/s, dressing feed speed f= 200 mm/min,depth of dressing cut a= 0.01 mm.
2.3. Tool wear and ground surface observation
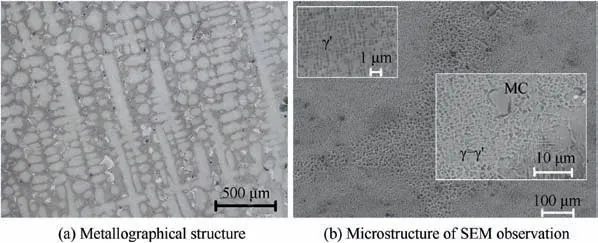
Fig. 1 Material structure morphology of K444 superalloy.
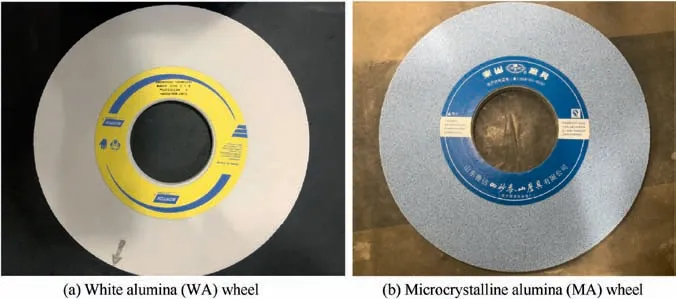
Fig. 2 Morphology of WA and MA abrasive wheel.
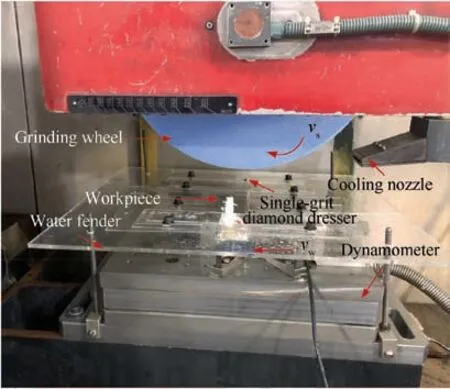
Fig. 3 Grinding experimental setup.
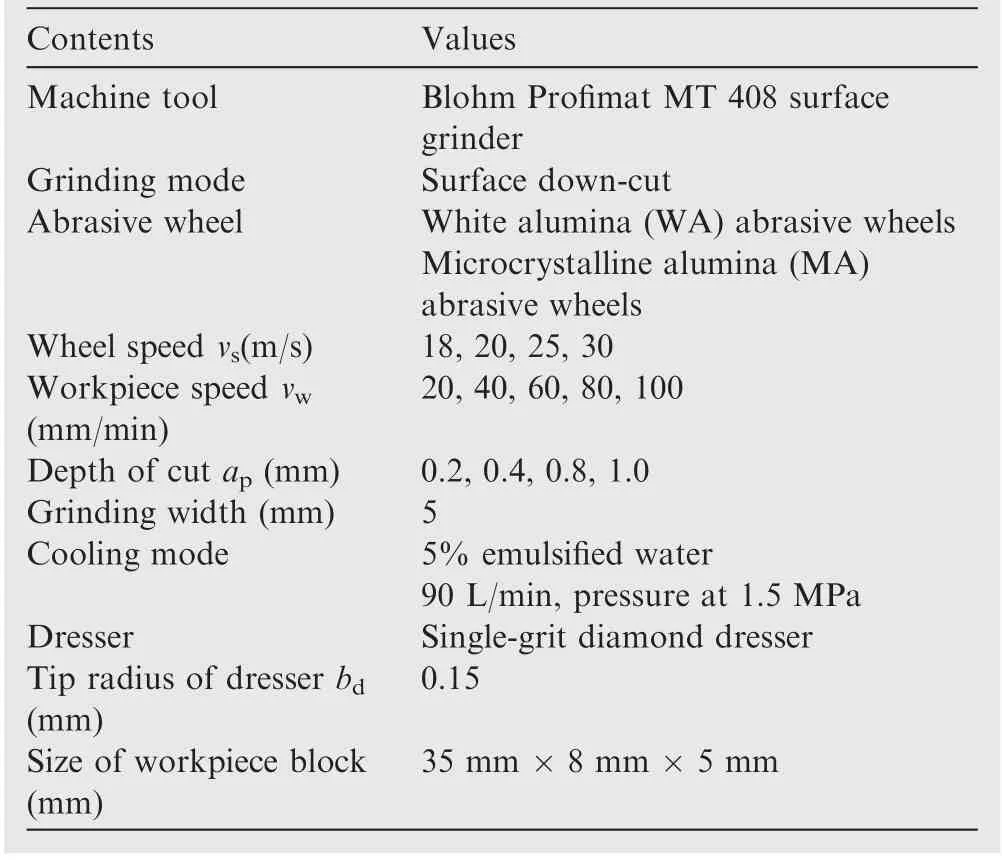
Table 3 Grinding experiment conditions.
The tool wear of WA and MA wheels were obtained by measuring the grinding surface on graphite using the wheel after grinding the K444 alloy, owing to that the width of K444 superalloy workpiece was narrow than the abrasive wheel width. The wear depth was detected by the step height of the ground graphite.The wear morphology,adhesion characteristics of the wheel,as well as the ground surface morphology were collected by Hirox KH-7700 3D optical microscopy(OM) and TM 3000 scanning electron microscope (SEM).The ground surface roughness Ra was measured by roughmeter MAHR Perthometer M2 and was undertaken triple times to get reliable data. The ground surface characteristics were also observed under SEM. The microhardness values of ground workpiece (the cross section perpendicular to the grinding direction) were detected by HXS-1000A hardness testing machine. The average value of three repeat measurements were considered as an acceptable result. The ground workpiece metallurgical graphs were obtained by Leica DMC 4500 optical microscope.
2.4. Corrosion testing
This study conducted electrochemical corrosion testing to reveal the corrosion resistance of the ground sur-faces. The electrochemical corrosion testing was conducted on the workstation (ZAHNER ENNIUM), as shown in Fig. 4. A 3.5wt%NaCl solution was selected to simulate the marine environment in which the gas turbines made of K444 superalloy generally work. Before the corrosion testing, the epoxy resin was used for insulation, as shown in the lower left of Fig. 4,then the workpieces were successively cleaned with acetone and deionized water. The saturated calomel electrode (SCE)and Pt counter electrode were used. The tests were carried under a constant temperature of 25 °C by thermostatic water bath. Samples were immersed at the open-circuit potential(OCP)and then anodic polarized from OCP at a scanning rate of 0.167 mV/s. The polarization curve and electrochemical impedance spectroscopy of the ground workpieces were measured to de-scribe the corrosion properties and corrosion characteristics. By applying the electric current and voltage, the polarization curve and electrochemical impedance spectroscopy (EIS) could be obtained. In order to ensure the accuracy of the test, each workpiece under the same grinding condition were repeated 3 times.
The micromorphology and element analysis of the surfaces after electrochemical corrosion testing were observed by scanning electron microscope. The corrosion morphology,element distribution, and depth of corrosion pitting after detection of polarization curves were investigated. Concretely, the depth information was obtained by Sensofar S neox 3D confocal profilometer.
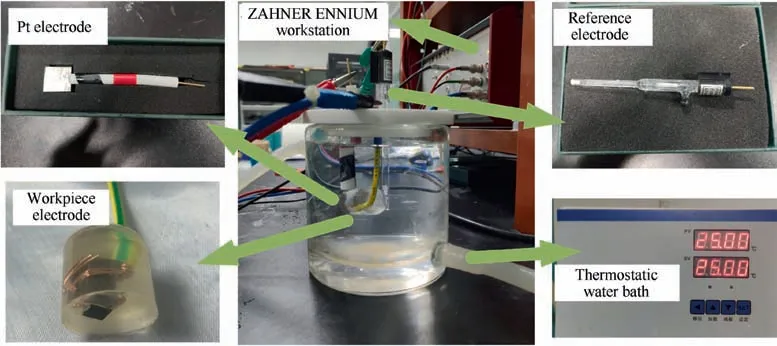
Fig. 4 Electrochemical measurement system.
3. Results and discussion
3.1. Tool wear characteristics

The radial wear of the WA wheel is generally larger than that of the MA wheel in the same grinding parameters,as shown in Fig. 5. With increase of aand v, the wheel wear increases.This is attributed to the change of the maximum undeformed chip thickness a. The maximum undeformed chip thickness acan be calculated according to Eq. (1).
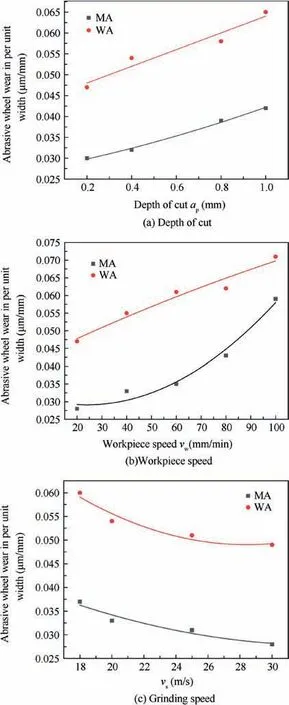
Fig.5 Effects of grinding parameters on wheel wear in grinding process.
where C is the coefficient related to the cutting edges angle,and Nis the active cutting edges density on the wheel surface(N=7.1 mmin the current study).It can be concluded that when increasing the workpiece feed speed vor decreasing grinding speed v, the awill increase, resulting in a larger load on abrasive grains and severer wheel wear.
The wheel wear morphologies are shown in Fig.6.The WA and MA wheel show different wheel wear behaviors. On the WA wheel surface, wear flat and workpiece material adhesion phenomenon are observed, as shown in Fig. 6(a). While the MA wheel surface shows little adhesion but some micro fracture and micro-cracks, as shown in Fig. 6(b), which is due to the self-sharpening characteristic of the MA wheel. Microedge cutting grains combined in the grinding process will reduce the grinding temperature and attrition condition has a good effect on the material removal of workpiece, and lead to the larger grinding ratio than WA wheel.
More specifically, to better visually obtain the workpiece material adhesion condition of the two kinds of wheel. The second electronic diffraction mode of SEM observation are conducted to distinguish the workpiece material adhesion from the wheel materials. Owing to the atomic weight are significantly different, the brightness varies significantly, as shown in Fig. 7(c) and (d), the workpiece and wheel material are distinct. Large pieces of workpiece material adhere to the WA wheel surface, while little workpiece material adhesion on the MA wheel surface. Subsequently, the EDS detection on the marked area in Fig.7(c) and(d)are carried out.The elements content analysis verifies that the brightness materials are K444 workpiece. The element contents of C, O, Al, Ti, Cr, Co, Ni and W are 34.39%, 13.06%, 7.09%, 2.8%, 8.2%, 5.12%,28.47% and 0.87% in WA wheel surface. While due to little adhesion and self-sharpness of MA grits, the Al, Ti, Cr, Co,Ni and W elements contents drop to 5.19%, 1.76%, 4.93%,2.97%, 17.7% and 0.52%. The ground surface of WA wheel shows harsh contact condition and results in strong adhesion.Nevertheless, the MA wheel surface displays the slight wear and adhesion phenomenon, which benefits from the selfsharpness feature of MA grits. The micro-crack in the wheel surface as shown in Fig. 7(d) will contribute to the selfsharpness condition and decrease the workpiece adhesion.
3.2. Morphologies and microhardness of the ground surfaces
Grinding process can lead to some microstructure transformation of workpiece. Therefore, the ground surface roughness,morphology of ground surface and micro hardness distribution below the ground surface under different wheels are obtained. The ground surface roughness is also an important index of the grinding performance, since the corrosion resistance of a part strongly depends on surface roughness. The surface roughness of K444 superalloy ground by the WA and MA wheel are shown in Fig. 8. In general, the MA wheel shows a better surface finish in grinding K444 superalloy than the WA wheel. Accordingly, when the depth of cut rises, the surface roughness of K444 ground by the WA wheel increases rapidly from 0.264 to 1.16 μm, while 0.289 to 0.66 μm for the MA wheel ground surface. The surface roughness of K444 decreases slightly and stays stable around 0.3 μm with increasing grinding speed from 18 to 30 m/s. When the workpiece speed increases from 20 to 100 mm/min,the surface roughness of increases from 0.243 to 0.74 μm to the WA wheel ground surface and 0.236 to 0.57 μm to the MA wheel ground surface.The wheel surface of the WA shows more adhesion of the workpiece teared after grinding and thus result in the worse surface roughness.
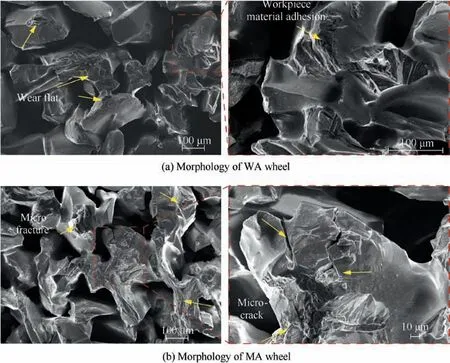
Fig. 6 Wheel wear topographies after grinding K444.
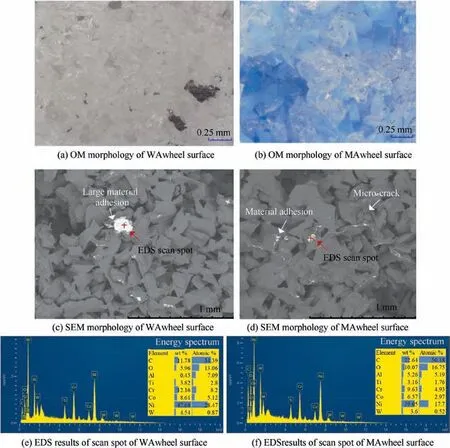
Fig. 7 Adhesion and elements distribution of wheel surface.
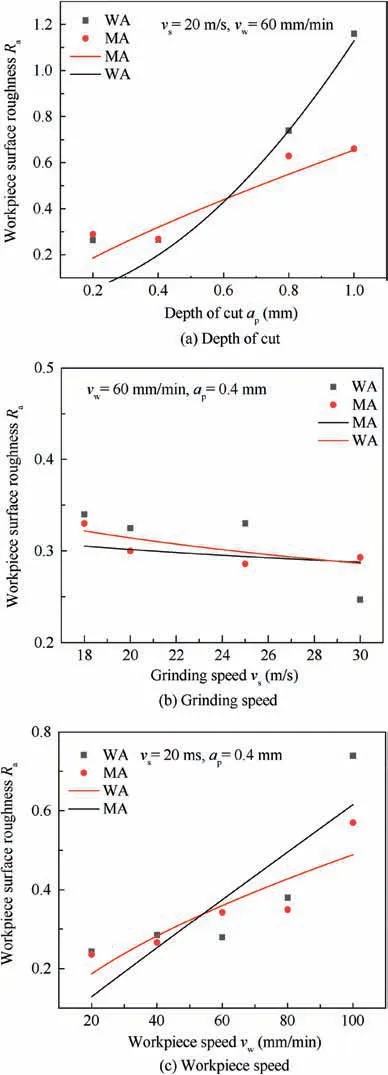
Fig. 8 Effects of grinding parameters on surface roughness of K444 workpiece.
By comprehensively considering the grinding efficiency,tool wear condition and surface roughness, the grinding parameters can be optimized as v= 20 m/s, v= 60 mm/min, a= 0.4 mm. The investigation about microtopography of tool wear characteristics,microhardness distribution,metallographical structure and ground surface morphologies after grinding under this specific parameter were obtained separately. The ground surface morphologies of K444 superalloy demonstrate the MA wheel grinding can achieve better surface quality than the WA wheel grinding, as shown in Fig. 9. The surface ground by the WA wheel shows teared cracks and surface smearing in Fig. 9(a). This is corresponding to the WA wheel wear characteristic of large material adhesion and the severely wear behavior during grinding process.On the surface ground by MA wheel, some grinding tracks and micro-cracks are observed. Moreover, few workpiece tear appears (Fig. 9(b)). The differences of surface ground by two types of wheel are related to the material removal capacity, the MA wheel shows a better wear resistance according to the Fig. 5, the self-sharpness of microcrystalline alumina abrasive also contributes to the workpiece material removal process.Therefore,little adhesion,better wear resistance,and little workpiece tear phenomenon will generate better surface quality. In addition,the ground surface generated by the WA and MA wheels show consistency with the wheel surface wear feature.
The microhardness distribution of the workpiece ground by two wheels show a same trend, which are represented in Fig. 10. The bulk material hardness value is around 430 HV at about 320 μm beneath the ground surface, and the ground surface hardening decreases with the increase of distance from ground surface. The surface hardness after the WA and MA abrasive wheel grinding process are about 17.2% and 11.7%higher than bulk material, respectively. Generally, WA wheel grinding process leads to higher degree work hardening compared with MA grinding wheel under the same grinding parameter, on account of the severer tool wear condition and rapid cooling process.
The ground workpiece metallurgical graphs of the cross section after the chemical etching, which are shown in Fig. 11. The corrosion depth of workpiece ground by WA abrasive wheel shows deeper and severer corrosion in the direction perpendicular to grinding process,compared with the surface generated by MA abrasive wheel.The specific information of the corrosion depth distributions is analyzed by Sensofar S neox 3D confocal profilometer in Section 3.3.
3.3. Corrosion resistance of the ground surface of K444
Pitting potential can be obtained by the polarization curves.The pitting potential indicates the corrosion resistance, which can reflect the lowest potential that can cause pitting corrosion on a passivated metal surface. The pitting corrosion extends from the surface of the metal to the interior, forming holes.The hydrolysis of these metal ions caused by aggressive ions,such as Clwill cause the decline of pH of the solution, so the pitting formation process is actually a process of autocatalytic acidification.The pitting process includes metastable pitting nucleation, repassivation and further development into stable pitting. The polarization curves of workpiece of K444 ground by different wheels are shown in Fig. 12. In the enlarged part of Fig. 12, the pitting potential Ep of the MA wheel ground surface is 3.6 V, which is higher than the WA of 3.3 V, indicating that pitting corrosion are inclined to take place on the WA wheel ground surface.As for the self-electric potential, it is obvious that the self-corrosion potential of the MA wheel ground surface Ecorr is -0.39 V higher than the WA wheel of -0.46 V, which indicate that the MA wheel ground surface is not easy to be oxidation and corrosion tendency is decreasing in the NaCl solution under the same grinding parameter compared with that of WA.
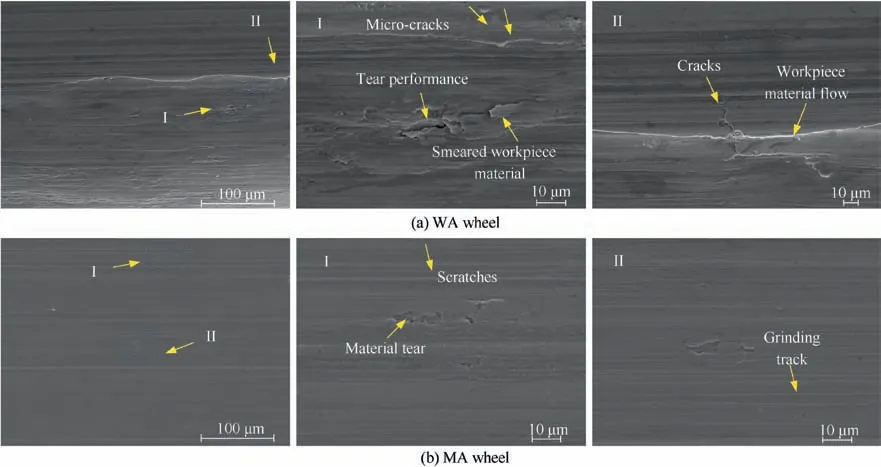
Fig. 9 Morphology of workpiece surface ground with WA and MA wheel.
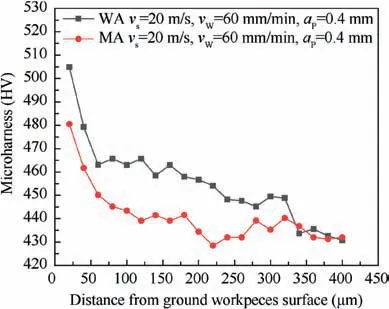
Fig. 10 Microhardness of WA and MA abrasive wheel ground surface.
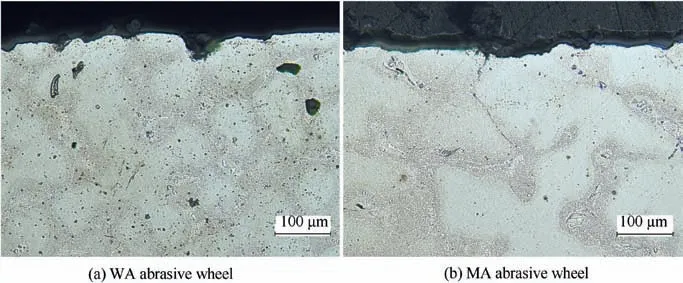
Fig. 11 Metallographical structure of workpiece ground by WA and MA abrasive wheel.
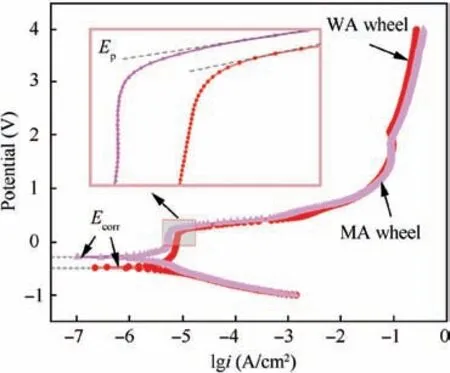
Fig. 12 Polarization curves of the K444 workpiece ground by the wheels.
Electrochemical impedance spectroscopy (EIS) of K444 superalloy ground surface is shown in Fig. 13. The Nyquist spectra of two samples are similar in shape, as shown in Fig. 13(a), the similar curve characteristic suggests that the corrosion mechanism of samples is the same. In the figure,there are only capacitive reactance arcs within the scanning frequency range, but no inductive reactance arcs, which is related to the diffusion transmission process. In general, the larger arc radius in the Nyquist plots indicates the better corrosion resistance of the material in the solution. Accordingly,the corrosion resistance of the K444 ground surface by the MA wheel is superior to the WA wheel,in the 3.5 wt.%NaCl solution.
In the Bode spectra as shown in Fig. 13(b), on the basis of the slope of the curve in the middle and high frequency band,the corrosion resistance of the material can be predicted that the higher the slope of the curve,the better the corrosion resistance. Theoretically, the slope of this part of the curve should be -1 but the result in the figure is less than -1, which indicates that there is a certain dispersion effect occurs in the surface of workpiece electrode. The parabolic curve in the Bode diagram shows the phase frequency characteristics. When the frequency decreases, the phase angle gradually increases and then decreases, and the maximum phase angle appears in the middle. The maximum phase angle of corrosion surface produced by MA wheel is larger than WA wheel, which shows a better the better corrosion resistance.
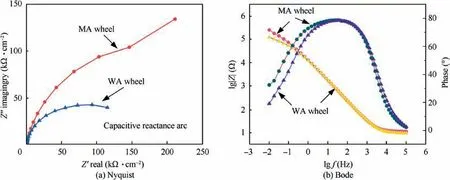
Fig. 13 Electrochemical impedance spectra of ground K444 workpiece.

Fig. 14 Corrosion morphology of the ground surface by WA wheel.

Fig. 15 Corrosion morphology of the ground surface by MA wheel.
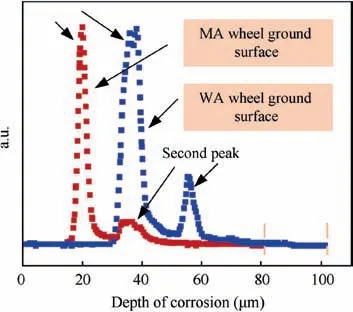
Fig. 16 Corrosion depth distribution of the ground surface.
3.4. Corrosion morphology and mechanism analysis
The corrosion morphology of the ground surfaces by the two wheels are shown in Figs. 14 and 15. The corrosion occurs around MC and γphase. The layer by layer corrosion can be seen in the surface, which indicates the corrosion tendency,as demonstrated in Fig. 14. While on the ground surface corrosion of MA, the corrosion occurs around the MC phase,while the γphase shows more complete, as shown in Fig. 15. In the K444 superalloy, γphase is the main strengthening phase. Therefore, it is not easy to arise damage if the grinding condition is relatively more temperate by using the MA wheel, during the stress-strain grinding process. While the forming of MC phase procedure demines the microcracks are easily derived, resulting in the higher corrosion trend in both WA and MA wheel ground surface.
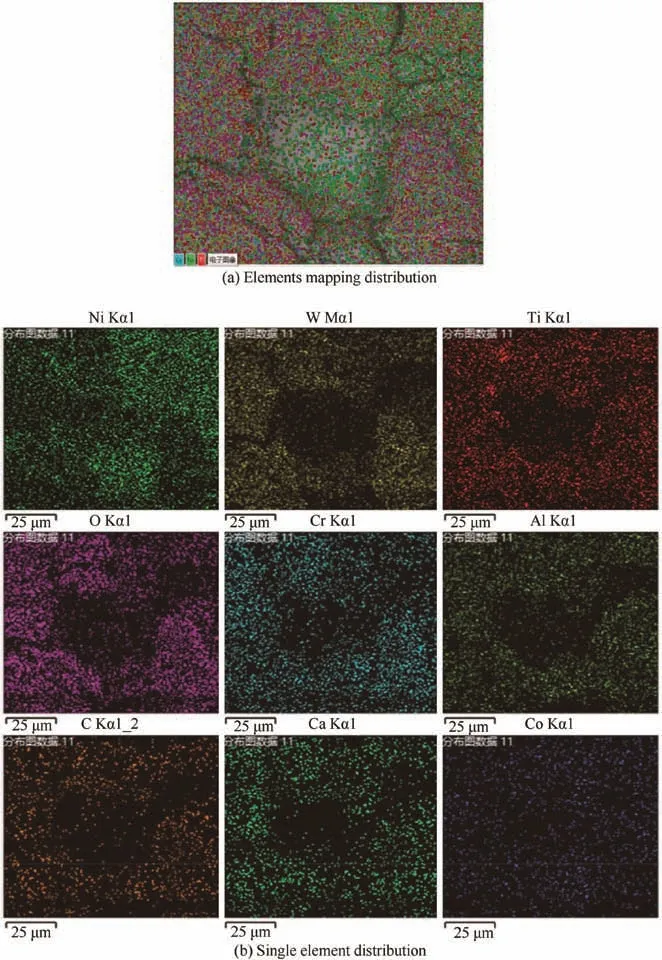
Fig. 17 Elements map scanning of corrosion surface of WA wheel ground workpiece.
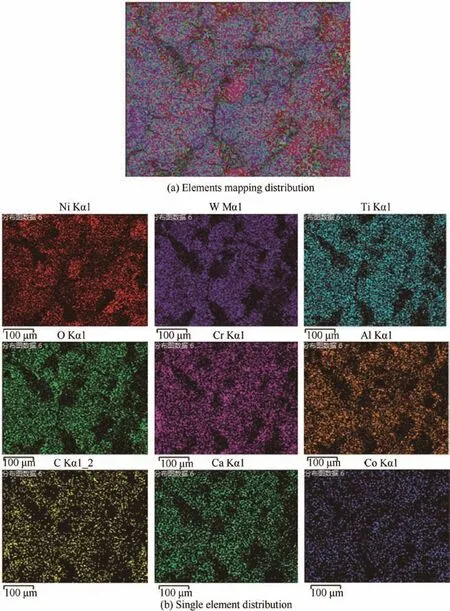
Fig. 18 Elements map scanning of the corrosion surface of the MA wheel ground workpiece.
As shown in the Fig.16,it can be seen from the surface corrosion depth information of WA wheel that, the corrosion depth is mainly distributed between in two depth ranges of 30-40 μm and 50-60 μm (the depth coordinate of strong peak and second peak shown in the figure),then the maximum corrosion depth is around 100 μm. While as for MA wheel, the corrosion depth is mainly between 15-25 μm and 33-37 μm,the maximum corrosion depth is around 80 μm.The depth distribution of corrosion surface indicates that there are two types of deep pits in the region. The feature of WA ground surface shows layer-by-layer corrosion morphology of SEM as shown in Fig.14.Therefore,compared with the ground surface corrosion depth and morphology of the WA and MA wheel, in the Figs. 14 and 15, the surface ground by the MA wheel has a stronger corrosion resistance.
According to the above analysis of both the wear characteristics and surface morphology of the ground surface,that MA wheel grinding condition is better than WA wheel.So that during the grinding process,elastic deformation and grinding heat are less prone to occur than WA grinding condition.The material tear defects in WA grinding surface will destroy the surface integrity, which significantly reduces the corrosion resistance of the grinding surface. Meanwhile, the equilibrium of surface will be destroyed by Cl, that the soluble metal ions of Clin turn causes the drop of pH of the solution in the pitting pit. More material defects will cause more early corrosion stages of pitting, which can be illustrated in Fig. 9. The depth of corrosion seriously affects the service performance of the workpiece.
The grinding condition have a significant influence to the grinding surface quality and thereby influence the corrosion characteristics and morphology. The self-sharpness of MA wheel is beneficial to reducing the defects of grinding surface as well as improving the performance of the corrosion resistance.
Further analysis of the corrosion of the ground surface is carried out by the EDS map scanning, as shown in Fig. 17 and Fig. 18. The element distribution of the corrosion surface show different colors to distinguish various elements. In general, the elements of the corrosion morphology of workpiece surface distribution can be concluded that the elements distribution various in different phase, γphase is mainly composed of Ti and Ni elements. Whereas the MC phase is comprised with M (Ti, Mo, W et al) and C element. Compared with the shallow area, deeper depth corrosion areas are lack of O, C and Cr elements but enrich of Ti and Ni elements. Combined with the corrosion depth distribution in Fig. 16, the depth distribution of corrosion surface indicates that there are two types of deep pits in the region, which are γphase and MC phase corrosion. It can be illustrated that MC phase makes deeper corrosion, and then flaking from the ground surface. Therefore, the corrosion of MC phase generates more surface defects than γphase, and the deeper corrosion depth will perniciously influence its service performance. The surface ground by MA abrasive wheel shows a better corrosion resistance and less surface defects than WA wheel.
4. Conclusion
The tool wear of WA and MA wheel,ground surface morphology, as well as corrosion behavior and microstructure of the ground surface are studied. The study indicates the process match of the grinding wheel to the workpiece material. Therefore, it could provide a guide to the process optimization in grinding the K444 alloy. In addition, the influence of surface microstructure to the corrosion resistance in grinding with different wheels is to be further studied in future. The main conclusions in the paper are:
(1) Compared with the WA wheel, the MA wheel shows superiorities in self-sharpness and wear resistance, the surface ground by the MA wheel appears little teared material and a better surface finish in grinding K444 superalloy.
(2) The surface ground by MA wheel has a higher corrosion resistance than that ground by the WA wheel. The MA wheel grinding could reduce the maximum corrosion depth by 20% in the ground K444 surface than the WA wheel grinding.
(3) In corrosion, MC phase is vulnerable to be corroded,forming a deep corrosion pit. γphase is less damaged in the grinding with the MA wheel. Therefore, the surface ground by the MA wheel shows shallower and less defects in corrosion.
The authors declare that they have no known competing financial interests or personal relationships that could have appeared to influence the work reported in this paper.
This work was financially supported by the National Natural Science Foundation of China (Nos. 51921003 and 51775275),Major Special Projects of Aero-engine and Gas Turbine (No.2017-VII-0002-0095), National Key Laboratory of Science and Technology on Helicopter Transmission(Nanjing University of Aeronautics and Astronautics) (No. HTL-A-20G01),Interdisciplinary Innovation Fundation for Graduates, (Nanjing University of Aeronautics and Astronautics, No.KXKCXJJ202006)and the Project Funded by China Postdoctoral Science Foundation (No. 2020TQ0149).
