The microscopic mechanical performance for nonuniform welded joint of nickel-based alloy with nanoindentation
Li Xiaoquan , Hao Benxing , Chen Yixin , Yun Yeling , Yang Zonghui
李晓泉,郝本行,陈一鑫,云叶菱,杨宗辉
1.School of Materials Science and Engineering,Nanjing Institute of Technology,Nanjing 211167,China;
2.Jiangsu Key Laboratory of Advanced Structural Materials and Application Technology,Nanjing 211167,China
Abstract To quantify the nonuniform micromechanical performance of welded joint,the load-displacement curves by nanoindentation test were introduced to examine different zones including base metal,coarse grained heat affected zone,partially melted zone,weld metal near the fusion boundary and weld metal center.The results showed that the strengthening effect of weld metal was more obvious than that of heat affected zone for nickel based welded joint and especially in coarse grained heat affected zone,the hardening resulted from overheating was not apparent.Nickel based weld metal with high content of alloying elements which were often segregated at interdendritic regions or precipitated in grain interior under nonequilibrium solidification contributed to the characteristics that differ from conventional low alloy steel welded joint.
Key words microscopic mechanical performance,nanoindentation,nickel based alloy,welded joint
0 Introduction
At present,nickel-based alloys with excellent corrosion resistance and lower temperature toughness have been widely used for fabrication of liquid natural gas equipment.Welding is an essential process to assemble the individual pieces of nickel-based corrosion alloys or take a bead on plate as corrosion layers.For nickel-based alloys which have face-centered cubic and/or austenitic microstructure,the good corrosion resistance comes about as a result of the high contents of chromium,molybdenum and niobium etc.However,during nonequilibrium welding thermal cycle the high alloyed elements will seriously affect structure transformation and make a nonuniform welded joint.This brings about the great difficulty to assess the safety and describe mechanical performances in application.Numerous studies have been showing that these high-chromium nickel-based alloys were susceptible to hot cracking during welding.The reheated weld and heat affected zone of nickel-based alloys are highly susceptible to intergranular hot cracking,called ductility dip cracking (DDC) which is related to grain size and intergranular carbide precipitation[1-6].The development of welding consumables for high nickel alloys has attracted attention that demonstrates abilities to mitigate ductility dip cracking and hot cracking[7-10].Now there yet has not been an extensive investigation of microscopic mechanical analysis for nonuniform welded joint.
The overall goal of this investigation is to quantify the microscopic mechanical performance with the help of nanoindentation for nonuniform welded joint of nickel based alloy.Now nanoindentation test has been utilized to obtain load-displacement curves of nanoindentation for various microscopic regions,then relation curves between displacement,hardness or modulus of elasticity with indentation depth could be obtained[11-14].Therefore this information could be further conducted to provide insight into microscopic mechanical performance for nonuniform welded joint.The possible mechanism will also be discussed according to analysis of microstructure in welded joint with scanning electron microscopy (SEM) and energy dispersive spectroscopy (EDS).The work was expected to reveal stress-strain characteristics in different microscopic regions of nickel based welded joint and to be helpful for design of welding technology of nickel-based alloys.
1 Experimental
Commercially available 6 mm thick nickel based plates of alloy 625 which has a composition of approximately Ni-22Cr-8Mo-0.06C were machined with 150 mm wide by grooves with 30-deg beveled edges on opposite sides of the plates to be welded and a pair of welding plates with 60 degree V groove were used for experiment.The nickel-based alloy covered electrode of 4.0 mm diameter,AWS A5.11 ENiCrMo-3,was received in the form of multiple-pass weld which was used to join two base plates.Welding current of 110-120 A and arc voltage of 24-28 V were employed with travel speed of 18 cm/min.Three layers of weld metal were required to completely fill the grooves.Once welding was completed,transverse sections of the welded joint were cut out.To compare mechanical performance of microscopic regions in welded joint,nanoindentation instrument (type of Agilent G200) was used to examine different regions which included base metal,coarse grained heat affected zone,partially melted zone,weld metal near the fusion boundary and weld metal center.The samples were examined by optical metallography and scanning electron microscopy equipped with analytical capabilities for microchemical analysis.As seen in Fig.1,with the help of nanoindentation test in addition to information of microscopic relationship about strainstress,the morphology of indentation which is about size of 5 μm in welded joint could be obtained and further SEM observation or EDS microchemical analysis could also be carried out.
2 Results and discussion
2.1 Nonuniform stress-strain characteristics
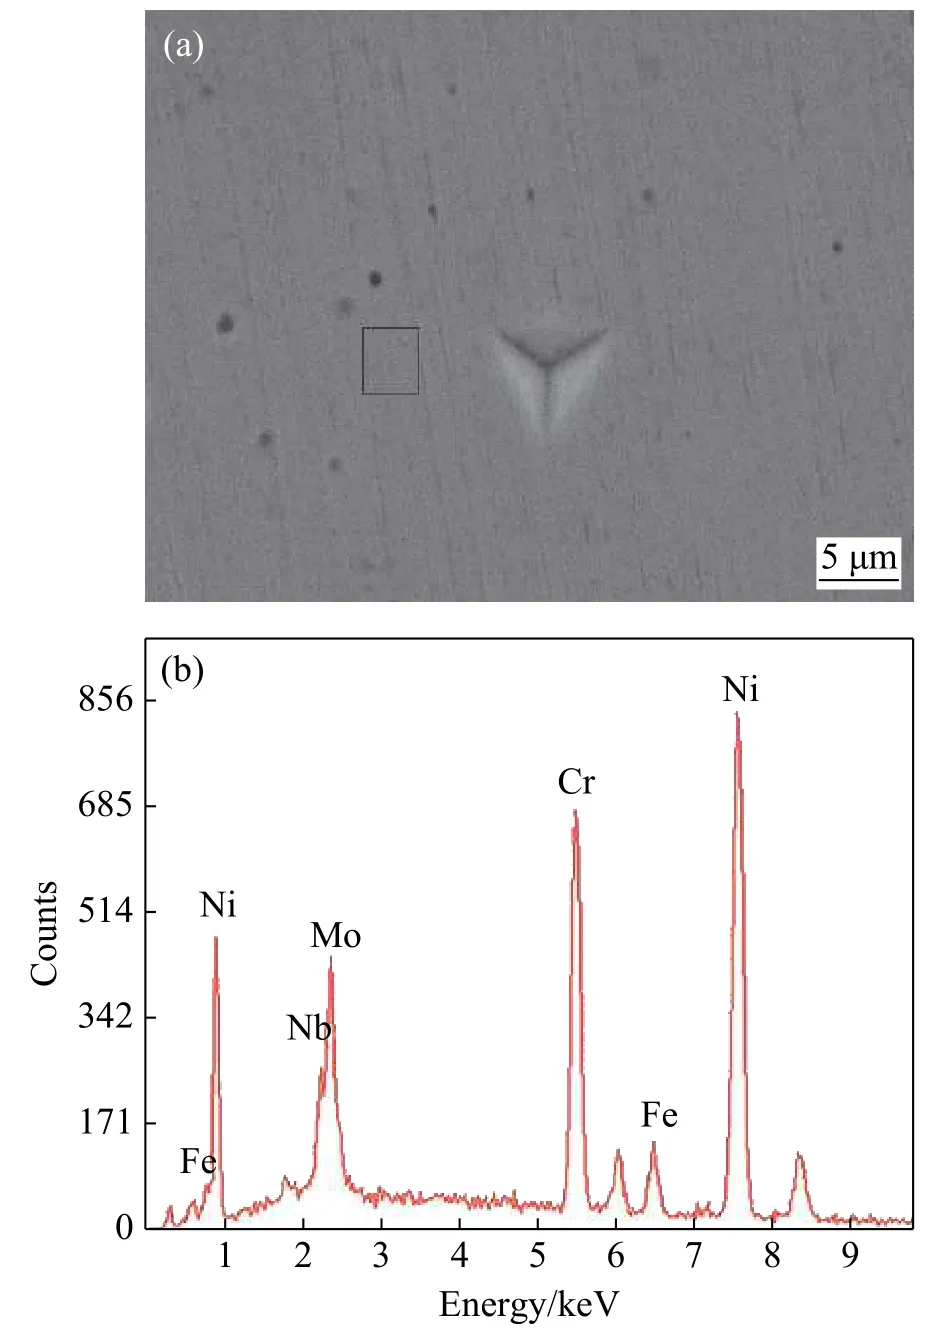
Fig.1 Micrograph of nanoindentation and EDS results of microscopic region near indentation (a) Micrograph of nanoindentation (b) EDS analysis results
Fig.2a illustrates the relation curves of indentation depth with the loading under the same load of 30 mN in different regions of welded joint,which lie typically in base metal (point 1 to point 3),coarse grained heat affected zone(point 4 to point 7),partially melted zone (point 8 to point 11),weld metal near the fusion boundary (point 12 to point 15) and weld metal center (point 16 to point 19).The common characteristics of the curves showed that the indentation depths increase rapidly with the increasing load at the initial period,and then drop down.This can be explained easily that elastic deformation was prior to plastic deformation.With the increase of loading,the rate of increasing depth drops which shows that the depth of indentation is largely depended on plastic deformation which is affected by work hardening.It could be noted that the plastic flow occurred during holding load of 30 mN for time of 10 s until releasing load.A small recovery of indentation depth can be seen due to elastic deformation disappeared immediately and then some ageing effects for stress relaxation.According to Fig.2b which shows experimentally creep depth as a function of time during holding load,and creep occurs mainly within around 1.5 s after holding load and increase slightly soon afterwards.But the difference of initial creep depth is obvious for various regions.The initial creep depths occurred in heat affected zone are significantly higher than in weld metal which indicating that the more displacement occurred in heat affected zone than in weld metal before creep under the same load.
As a result of high peak temperatures during welding,grain growth is evident near the fusion boundary as shown in Fig.3,however,the coarse grained heat affected zone was of particular interest because it was exhibited no difference with other regions of base metal or heat affected zone.Since in general,such grain coarsening could cause strengthening significantly for welding of conventional low alloy high strength steels.

Fig.2 Results by nanoindentation tests with nickel based welded joint (a) Load-displacement curves (b) Dynamic creep depth curves (1 2 3-base metal,4 5 6 7-coarse grained heat affected zone,8 9 10 11-partially melted zone,12 13 14 15-weld metal near the fusion boundary,16 17 18 19-weld metal center)
On a microscopic scale,the above curves would appear some difference due to nonuniform mechanical performance for welded joint.Fig.2a shows the curves of indentation in different zones of welded joint tend to appear some regularity.From base metal,coarse grained heat affected zone,partially melted zone,weld metal near the fusion zone to weld metal center,the curves of indentation shift left gradually.It implies that the high strength in weld metal center was obtained,while conventional hardening resulted of overheating in coarse grained heat affected zone was not obvious.
2.2 The distribution of modulus

Fig.3 Optical micrograph of coarse grained heat affected zone.
The modulus of elasticity and hardness measured in various regions are shown in Fig.4.As shown in Fig.4a,neither the variation of modulus of elasticity nor is the fluctuating regularity is very evident.The fluctuation range of modulus of elasticity is around ±20 GPa with only a relative variation of 8%.However,the distribution of hardness appears obvious regularity which shows a raising tendency from base metal to weld metal center with the hardness variation of 4.0 GPa to 5.0 GPa and the relative variation of 25%.It should be noted that the hardening in coarse grained heat affected zone which is emerged usually for low alloy high strength steel seemed to be not obvious.The explaination for above phenomena is that the hardness is a physical quantity related to microstructure closely.It is the nonuniform microstructure in welded joint that leads to the characteristics of hardness distribution,while the modulus of elasticity is little dependent of microstructure.
2.3 Microstructure
Fig.5 shows a low magnification and high magnification micrographs of weld metal by which one can observe the general primary solidification structure of austenite.It can be seen that the solidification mode was cellular dendritic and the high-angle grains boundaries outlined columnar grain.The direction of dendritic growth within the grain has good parallel orientation.
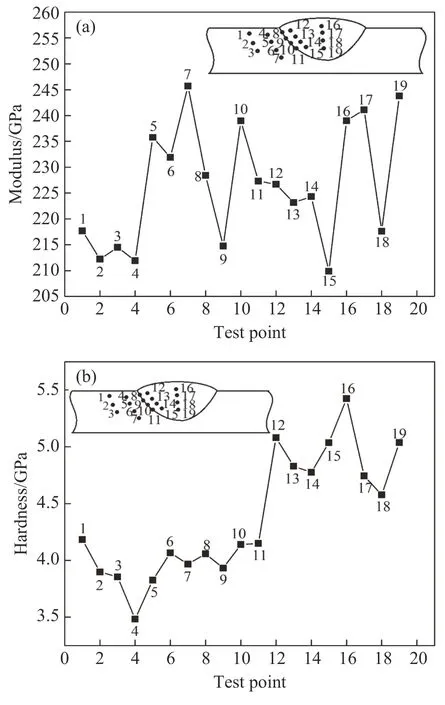
Fig.4 Modulus of elasticity and hardness for various tested points by nanoindentation tests (a) Modulus of elasticity (b) Hardness (1 2 3-base metal,4 5 6 7-coarse grained heat affected zone,8 9 10 11-partially melted zone,12 13 14 15-weld metal near the fusion boundary,16 17 18 19-weld seam center)
In order to obtain much more information about the details of microstructure,the scanning electron microscopy and energy dispersive X-ray spectroscopy were used for examination.It was found that the interdendritic regions or grain interior etched more darkly than the dendrite cores in which some precipitates appeared as shown in Fig.6 and Fig.7.The similar phenomena have been reported by earlier researchers[15-16].The results clearly showed that molybdenum was enriched in dark regions where the level of molybdenum was 17.26%,while the matrix contained only at 6.99% level.Owing to lower thermal conductivity in nickel based weld pool,the temperature gradient in front of advancing solid/liquid interface is usually gentle which causes to form cellular dendritic solidification mode.Meanwhile,the high viscosity pool and much higher cooling rate for pool also result of serious microsegregation of solutes occurs during the solidification of the weld.Hence,the core of the dendrite is very rich in nickel and rather poor in chromium and molybdenum which further promote precipitates to form.Therefore the effect of precipitation-hardening resulted by strengthening phase would be developed.According Ni-Cr,Ni-Mo binary diagrams[17-18],the maximum solid solution of chromium and molybdenum in nickel matrix are 47.01% and 17.26% respectively at 700 ℃ temperature.It is reasonable that the precipitates of Ni4Mo or Ni3Mo are precipitated prior to Ni2Cr which is in consistent with the experiment.While both Ni4Mo or Ni3Mo have been known as the brittle precipitates which strengthen the hardness but damage the toughness.In terms of microstructure,the largest difference between low alloy steel welded joint and nickel based alloy welded joint is that the former would occur post solidification phase transformations (austenite →ferrite) while the latter would lead to the final microstructure of austenite.In spite of grain growth in heat affected zone owning to overheating during welding,the harmful effect of austenite with face centered cubic structure on hardening would be more limited than ferrite with body cubic structure.Therefore the conventional hardening resulted from overheating in coarse grained heat affected zone was not obvious in nickel based alloy welded joint.However,because of much high contents of alloy elements for nickel based alloy,the effects of solution strengthening and precipitation hardening would be more displayed under nonequilibrium solidification,especially at the weld metal center which is solidified finally.Thus the characteristics of stressstrain for nickel based welded joint could be exhibited as in Fig.2.
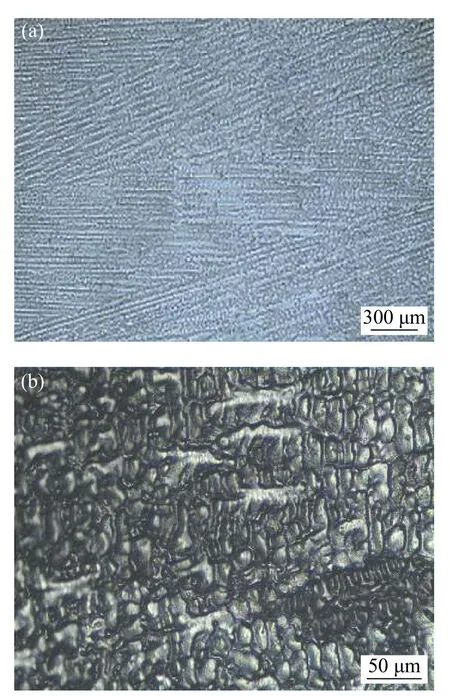
Fig.5 Optical micrograph of weld metal (a) Low magnification photograph (b) High magnification photograph
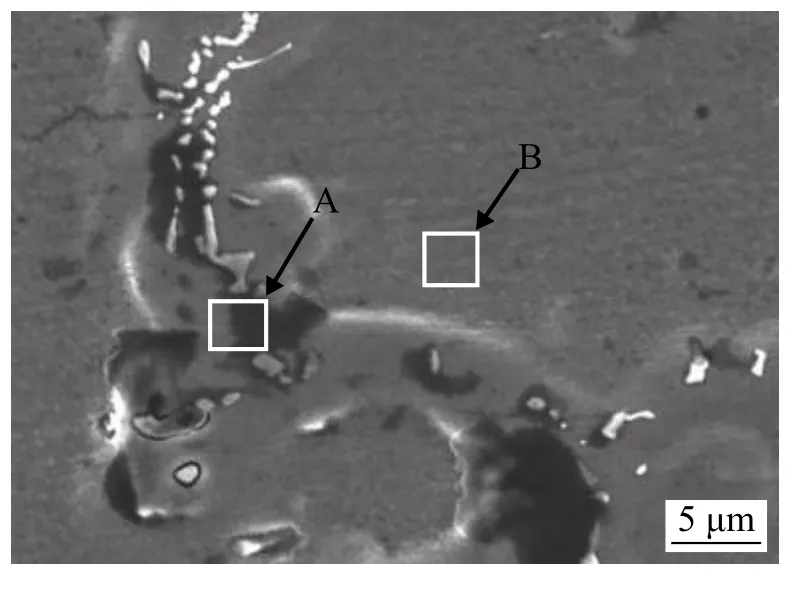
Fig.6 EDS measuring points of the weld metal

Fig.7 EDS results of the dissimilar weld zone in Fig.6 (a)EDS analysis result of region A (b) EDS analysis result of region B
3 Conclusions
(1) With the help of load-displacement curves of indentation,the microscopic mechanical performance for nonuniform welded joint could be well described.
(2) The indentation test indicated that the strengthen effect of weld metal is more obvious than that of heat affected zone for nickel based welded joint and especially in coarse grained heat affected zone the hardening resulted from overheating was not apparent.
(3) Nickel based weld metal with high content of alloying elements which were often segregated at interdendritic or precipitated in grain interior under nonequilibrium solidification contributed to the characteristics that differ from conventional low alloy steel welded joint.
- China Welding的其它文章
- A brief review of brazing diamond in cutting tools
- Principles and application of RES welding technology
- Interface microstructure and properties of submerged arc brazing tin-based babbit
- Welding deviation detection method based on weld pool image contour features
- Performance study of a complex thermal barrier functional coating with an electro-spark deposited burn-resistant layer
- Lap joining Al5052 to Ti6Al4V by GTAW with AlSi5 filler wire

